Cook Local, Eat Global
Adapted From 660 Curries: Methi Gosht–Lamb With Fenugreek Greens

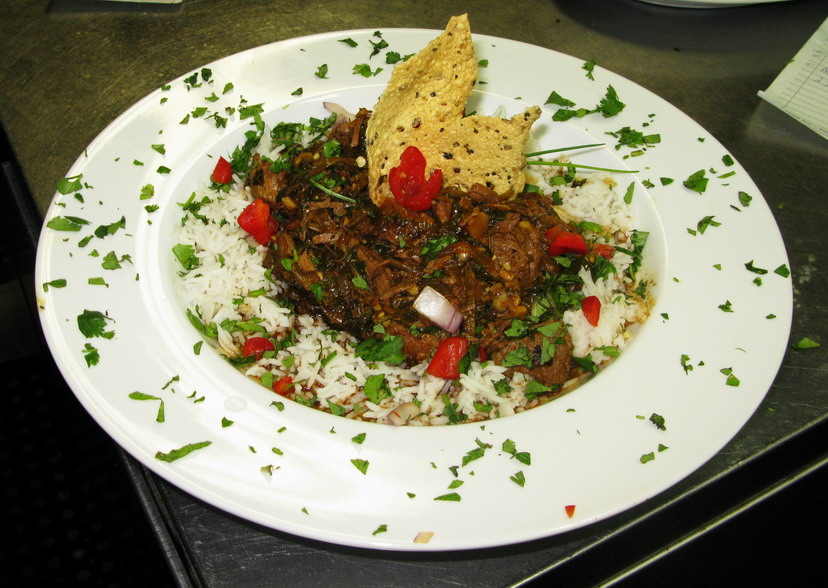
I absolutely love the flavor of methi greens. They are lightly bitter, but with the sweet fragrance of newly-mown hay which I find to be irresistible. It is a delectable combination, and I discovered when I made this recipe that methi greens make a perfect foil for the rich sweetness of braised cubes of lamb shoulder.
The recipe is adapted from Raghavan Iyer’s excellent cookbook 660 Curries; I changed a few of the particulars in order to make a prettier curry, especially for service at Salaam. Along with adding fragrant spices, I added paprika in order to give the meat an appealing reddish brown color. I also didn’t make the deep-fried onion garnish, as we don’t have the capability to do deep frying at the restaurant; instead, I used finely diced red onion and bell pepper to add color and fresh flavor to the dish.
To add height and texture to the plate, I placed pieces of shallow fried pappad–thin wafers made of lentil flour and spices that are easily found in Indian markets. When put into hot oil, these discs bubble, puff and spread out into thin, crisp cracker-like wafers. Broken into irregularly-shaped pieces, the pappad made very pretty garnishes for the curry, which perhaps made up for a lack of deep-fried onions. (And, they were fun to eat, too!)
This curry is not saucy–the meat is basically cooked in its own juices, and the fenugreek greens, which are added at the end so that they retain their dark green color–add their own liquid to the dish. I didn’t thicken the juices at all; I simply simmered them in order to concentrate their flavors. We served methi gosht with raita and cilantro chutney so that the dish wasn’t too dry, being as it was served on top of basmati rice, which is not exactly juicy.
Methi, also known as fenugreek greens, is available dried, in boxes labeled as quasoori methi or kasoori methi, frozen in resealable bags, and sometimes fresh at Indian markets. I like combining either the fresh or frozen greens with a bit of the dried greens; the fragrance in the dried methi is stronger and more concentrated, but the flavor, color and texture of the fresh or frozen greens are superior. If you use a bit of the dried greens along with the fresh or frozen, you get the best of both worlds.
I also like to add a bit of fenugreek seeds to any masala I grind for a dish that uses methi greens. Its vanilla/fresh-cut hay/musky aroma enhances the flavor and scent of the greens. This makes sense, as they are both from the same plant! In addition to fenugreek seeds, I ground up cumin, coriander, black cardamom and black pepper together to make the spice blend for this curry; my choices were a serious departure from the original recipe, but the results were very fragrant and enhanced the meaty flavor of the lamb perfectly.
I cooked my curry in the pressure cooker, which results in a very tender, moist texture with a great deal of flavor, but it can be cooked on the stovetop normally, too. Just note that it will take a good bit longer to cook without a pressure cooker, and plan your meal accordingly.
A good sauteed vegetable dish, like Broccoli with Panch Phoron, would go perfectly with this dish. A potato dish, like Tiny New Potatoes With Garlic Scapes and Panch Phoron would also go nicely here, as would Aloo Gobi.
Methi Gosht
Ingredients:
1 tablespoon cumin seeds
1 teaspoons black peppercorns
1 tablespoon coriander seeds
2 black cumin pods
1/2 teaspoon fenugreek seeds
2 tablespoons fresh ginger ground into a paste (measured after grinding)
2 tablespoons fresh garlic ground into a paste (measured after grinding)
1 1/2 teaspoons kosher salt
1 teaspoon ground cayenne pepper
1/2 teaspoon turmeric
2 tablespoons sweet paprika
2 pounds boneless leg of lamb, fat trimmed and cut into 1″ cubes
2 tablespoons ghee or canola oil
2 tablespoons dried methi greens
1 1/2 cups water
1 1/2 cups frozen or fresh methi greens, large stems removed
salt and garam masala to taste
Method:
Grind whole spices into a fine powder. Mix together with the ginger and garlic pastes, the salt, cayenne pepper, turmeric and paprika, and rub all over the lamb pieces. Cover and refrigerate for at least 1 hour.
Heat oil in the bottom of a pressure cooker or braising pot over medium high heat. Brown the meat cubes well, and allow meat juices to emerge. Add dried methi and water, lock down the lid to the pressure cooker and bring to full pressure. Turn heat down to low and cook on high pressure for fifteen minutes. Allow pressure to reduce naturally off the heat. When pressure is reduced, remove lid, add fresh or frozen methi, and cook at a fast simmer until meat is completely done, the greens are wilted and tender, and the liquid in the pot as reduced by 2/3.
Add salt and garam masala to taste and serve over steamed rice.
If you don’t have a pressure cooker, add only a little bit of water–about 1/2 to 1 cup and simmer, covered, over medium heat until the meat is mostly tender–about twenty-five to thirty-five minutes, then continue recipe as written.
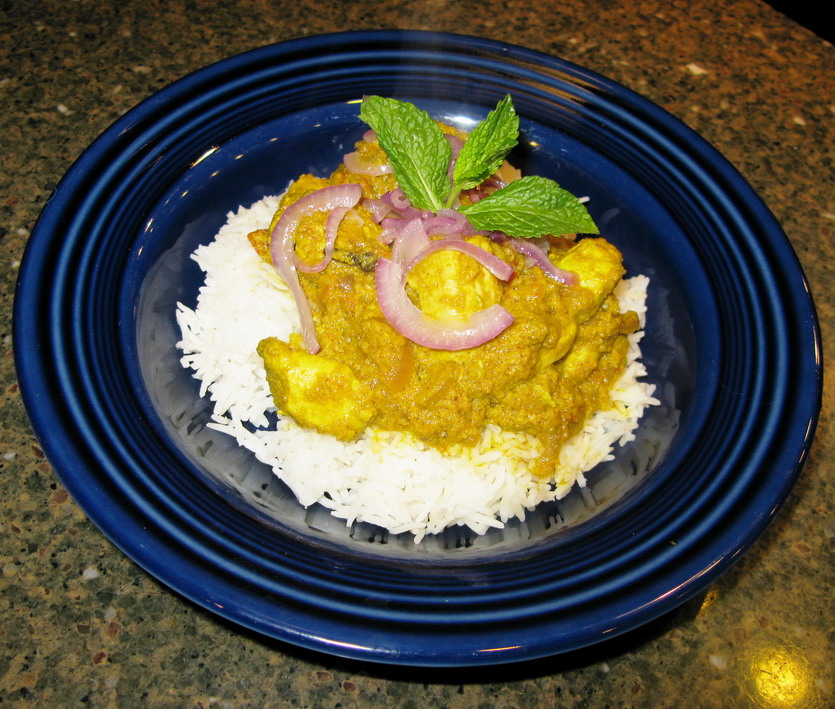
Worth Cracking a Coconut: Murghi Hara Masala (From 660 Curries)
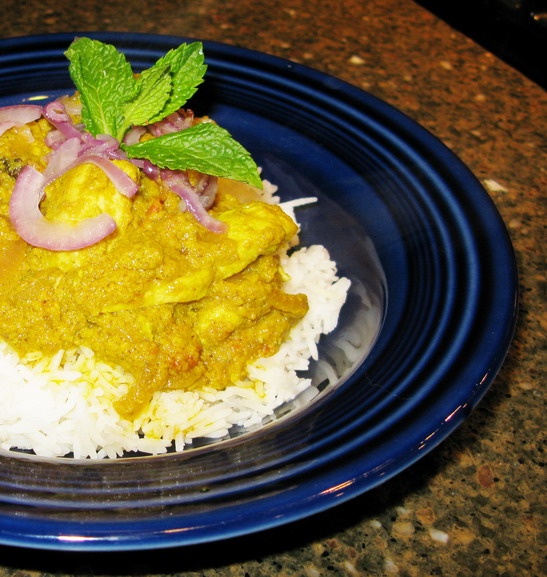
This recipe comes from Raghavan Iyer’s sister’s neighbor in Mumbai, and it is a fabulous combination of flavors and aromas. Imagine fresh mint and cilantro, fresh coconut, yogurt and garam masala cooked into a thick yellow-hued curry with sauce that clings to the strips of chicken breast. I did add some whole spices to the cooking oil–cardamom and cinnamon–because I love the way they scent the air when I am cooking.
Iyer says that you can substitute dehydrated (unsweetened) coconut flakes for the fresh coconut, but I thought that this recipe sounded so scrummy that I just had to buy a fresh coconut and take a crack at cracking it, prying the meat from the shell, and grating it.
I have to admit that most of the work of this recipe revolved around the coconut. And let me say right now that just because I was stubborn and went through the time, trouble and effort to play with the fresh coconut doesn’t mean you have to. You can take Iyer’s advice and use dehydrated coconut that has been soaked in water, instead of the freshly grated coconut meat.
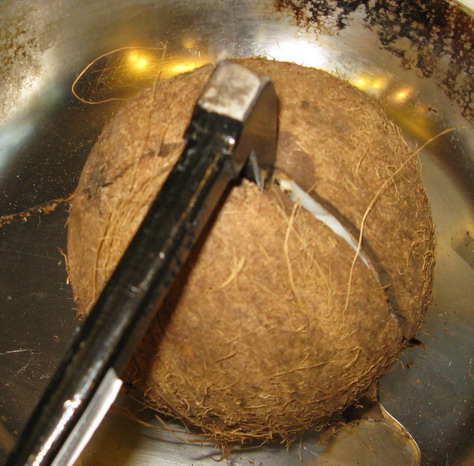
Now you are going to want to know how to go about cracking open a coconut. As you can see from the photograph, the process is somewhat violent in nature and definitely messy. Be prepared to get down and dirty with this process. Or, if not dirty, at least, a bit sticky and disheveled.
Also the sound that a coconut shell makes as it cracks is a little bit disturbing if you have a good imagination and have been reading about ancient weapons like war hammers and morning stars. I highly suggest not mixing the reading of the bloodier parts of European history with the work of cracking a coconut. You can do one, or the other, but probably not both.
At least, not without a moment to pause, reflect, and perhaps become a little queasy, especially if you are the squeamish sort.
A lot of folks use a hammer and nail to open a coconut by pounding the nail into the three “eyes” or black indentations on one end of the coconut and whapping at it with the hammer until it cracks. Then, the hard shell can be pried apart by using a screwdriver as a lever or chisel, with the ever present hammer as a means of thwapping, whapping and violent disresembling.
I didn’t do it that way. I couldn’t find a good nail, so I used my nail puller, which has a pointy, beak-like chiselish end made of steel that can stand up the force of a nice big hammer. It is also bigger than a nail, so I figured it would make a nice big crack in the shell. And it did–eventually. Not before I made a lot of a mess and noise, but the coconut eventually succumbed to my superior force and will, and fell apart. After the coconut was pried apart in pieces, then I used a table knife and a bit of swearing and sweating to prise the white meat from the hairy shell, and then–and then–I could finally cut the meat into bits and put it into the Sumeet to be ground finely.
It was a procedure that I would rather not repeat any time in the near future, but I have to say it made a damned fine curry.
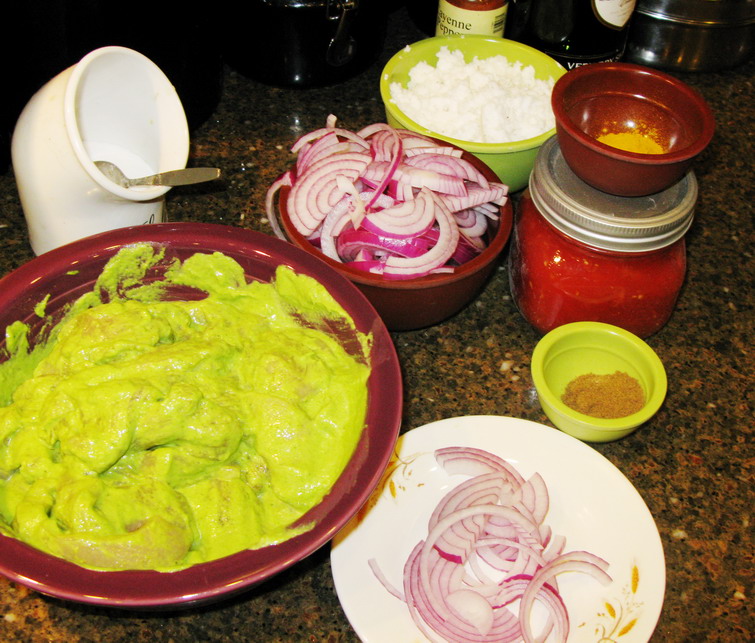
One thing about this recipe–in the book the ingredients list looks short, but that is because Iyer refers the cook back to a recipe for hara masala–a blend of cilantro, mint, garlic and ginger. It isn’t a hard recipe–here is how it goes: 1 cup firmly packed fresh cilantro leaves and stems, 1 cup firmly packed mint leaves, 8 medium sized garlic cloves and 1 1/2′ cube fresh ginger, peeled and cut into thin slices. Basically, you just chop this stuff up in a food processor until it makes a brilliant emerald colored, extremely fragrant paste. The chicken curry only requires 1/2 cup of this paste, so you can freeze the rest in an airtight freezer bag to be used later in another recipe.
In this recipe, the hara masala is mixed into well-beaten yogurt and is used as a marinade and also as the basis of the sauce. My one criticism of this curry is the color of the sauce can be a bit odd–the brilliant green yogurt marinade is eventually cooked with tomatoes and turmeric, which results in an odd somewhat greenish-brownish yellow shade that is a little weird. I found that adding just a bit more turmeric helps bring the color of the curry around to a prettier hue.

Really if the worst I can say about this delicious, fragrant curry of tender chicken in a thick, clingy sauce that is what the British would call “very moreish” , is that it has a somewhat funny color–well–then I guess it is pretty exemplary. It is the second recipe I have tried almost completely unaltered, from the book, 600 Curries, and I found that as much as I loved the lamb, I loved the Murghi Hara Masala even more.
I hope that some of you give this recipe a try and let me know what you think of it. And, again, if I were you, I’d take the alternative route and use the dehydrated unsweetened coconut flakes instead of wrestling a fresh coconut all over your kitchen, especially if you have not dealt with one before. The next time I make this curry–and there will be a next time–I will try the dehydrated coconut and see if it makes a curry as tasty as the fresh did.
Murghi Hara Masala
Ingredients:
1/2 cup hara masala–see body of the post above for recipe
1/4 cup plain yogurt whisked until smooth
1 1/2 teaspoons coarse kosher or sea salt
2 pounds boneless skinless chicken breasts, trimmed and cut into slices about 3/4″ wide
4 tablespoons canola oil or ghee
1 large red onion, thinly sliced
1 large tomato, peeled, seeded and chopped–I substituted 6 ounces of home-canned tomatoes here
2 teaspoons garam masala–I used my own house blend here that includes cinnamon, cloves, nutmeg, mace, cumin, coriander and a bit of fennel seed–or you could use Penzey’s Punjabi garam masala, or your own mixture or another pre made brand.
1/4 teaspoon ground turmeric–I ended up using half again as much to help make the color of the curry prettier
1/2 cup shredded fresh coconut or 1/4 cup dried unsweetened coconut flakes, rehydrated with 1/4 cup of boiling water–let it sit for fifteen minutes and drain.
Method:
Mix the hara masala, the yogurt and the salt together and whisk until it all is thoroughly combined into a lovely pale jade cream. Add the chicken strips to the marinade, and stir them up to make sure to coat every bit of chicken meat with the yogurt mixture. Cover and put in the fridge for at least 30 minutes, but no longer than an hour or two.
Heat two tablespoons of the oil in a large, heavy bottomed skillet and add half the onion, and cook until the slices wilt and turn a rich brown around the edges. Add the tomato, the garam masala and turmeric. (When you cook the onion, you can add a 1″ stick of cinnamon and about four cardamom pods to scent the oil beautifully.)
Cook, stirring now and again until the tomato releases some of its liquid and softens up–about five minutes.
Add the chicken and all of the marinade, scraping it out of the bowl if necessary. You don’t want to waste one little bit of this stuff, trust me. Cook, stirring as needed to keep the chicken from sticking until the chicken is very nearly cooked through–about seven minutes.
While the chicken simmers, heat another, small skillet over medium heat and add the remaining oil. Add the second half of the onion and cook, stirring until it wilts and turns golden brown on the edges. Add the shredded coconut and keep stirring until it has lightly browned–this should take between two and three minutes. add 1/2 cup of water and scrape the skillet to deglaze it, scraping up every little bit of browned onion and coconut you can. Transfer this mixture to a blender and puree into a pinkish paste, then add to the chicken. Give it a stir or two, let it simmer for the remaining minute or so it will take to finish cooking the chicken and serve with steamed basmati rice and a great selection of vegetable dishes.
This recipe makes enough for about six hungry adults, especially if you have lots of side dishes.
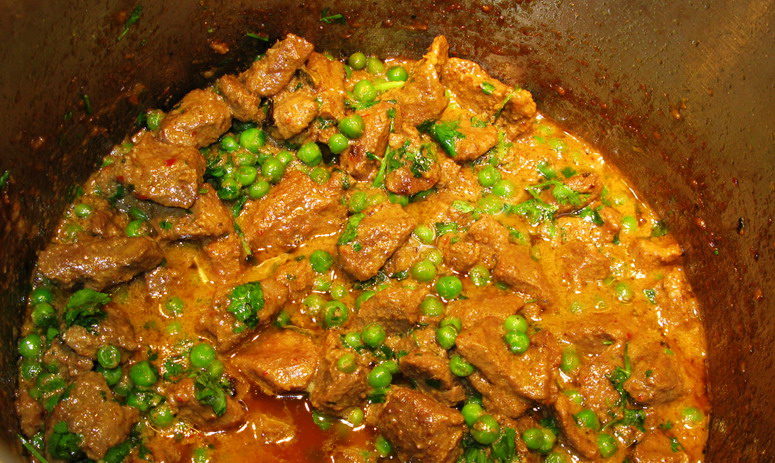
From 660 Curries: Khoya Muttar Gosht–Creamy Lamb Curry With Peas
When I was a kid, I used to hate peas.
It had to do with eating them from a can–they taste so utterly vile and wretched that way that I cannot blame my younger self for despising them.
And then, even when the peas were fresh or frozen, through most of my childhood, they were overcooked. To this day, I cannot even abide the smell of overcooked peas.
The only way I would eat them when I was a kid was raw, straight from the vine.
Now, of course, that I am an adult and can avoid canned peas and cook whatever wee green legume that comes my way as little as I want to, I adore them. They are sugary sweet and filled with the verdant breath of spring. They pop in your mouth when you bite them, unlike the sad olive drab little canned things that just lay there and squish against your teeth, extruding mushy innards in an unappetizing drizzle of goo.
So, now that I like them, I keep trying to find new ways to prepare them, new dishes to add them to and have found that I particularly love them in curries.
Which is why I chose this curry–Creamy Lamb Curry with Peas as the first recipe to test from 660 Curries.
This is an easy dish, where the lamb is marinated in yogurt mixed with ground chilies, turmeric and a paste made from fresh ginger and garlic for a period of time. Then, onions are cooked in oil, with whole spices, and the lamb is added, marinade and all, to cook until it releases its juices. Then, it braises in its own juice until it is nearly done. Then milk solids or cream are added, along with peas, and the dish is cooked to an intensely flavored, creamy, rich finish.

The original recipe specifies the use of khoya, which is milk solids. It is what you get when you boil milk, stirring the whole time, over medium heat, until all of the water boils away–only the solid fat, protein and sugar are left. Khoya is the basis for the northern Indian milk-fudge sweet called barfi or burfi. It is made from milk solids, sugar and usually ground up nuts and flavorings.
Making khoya is easy, but when I tested this recipe, I didn’t really have the time or inclination to spend a half hour simmering the water out of milk, so I used the author-suggested substitute–heavy cream. The next time I make this recipe, I will make the khoya, photograph the process and post about it, because as he says, khoya is a great way to enrich a creamy sauce without all of the fat of heavy cream.
The only other change made in the ingredients is I added about four cardamom pods, and used more peas–1/2 cup more to be precise. I also used a pressure cooker, because I am impatient. However, I will give the instructions as written by the author for those who do not have a pressure cooker.

One interesting thing I noted about this recipe is that Iyer specifies that the cook use red onions. He seems to specify the use only of red onions in his dishes–he says that in India, red onions are preferred, but I wonder if that is a regional preference on his part. The northern Indian and Pakistani cooks I learned from preferred yellow onions, saying that red onions were too juicy and sweet to cook with. They saved red onions for raw garnish, chutneys and the like, or used them barely cooked for their color, while yellow onions, well browned, contributed the flavor base to the dish.

Khoya Muttar Gosht
Ingredients:
2 tablespoons yogurt (I used strained Greek yogurt)
2 tablespoons fresh ginger ground into a paste
1 tablespoon fresh garlic ground into a paste
2 teaspoons ground Kashmiri chilies (or 1/2 teaspoon ground cayenne and 1 1/2 teaspoons Aleppo pepper flakes ground to a powder)
1/2 teaspoon ground turmeric
1 1/2 pounds lamb leg and shoulder meat, fat trimmed and cut into 1″ cubes
2 tablespoons canola oil
1 teaspoon whole cloves
3 3″ long cinnamon sticks
2 fresh or dried bay leaves
4 green cardamom pods
1 1/2 cups thinly sliced red onion
1/3 cup heavy whipping cream or khoya
1 1/2 teaspoons kosher or coarse sea salt
2 1/2 cups frozen green peas, unthawed
handful roughly chopped cilantro leaves for garnish (optional)
Method
Mix together the yogurt, ginger and garlic pastes, the chilies and turmeric in a medium sized bowl. Add the lamb and toss well to coat. Cover and refrigerate for at least thirty minutes to overnight in order to allow the flavors to perfume the meat. Do not leave longer than overnight as the yogurt will tenderize the meat and you do not want the meat overtenderized and mushy.
Heat the oil in a large, heavy-bottomed dutch oven or soup pot over medium high heat. Add the whole spices, and cook, stirring until they sizzle, crackle and release their fragrance–about thirty seconds. Add the onion and cook until it is softened, stirring constantly. Keep cooking until it lightly browns. Add the meat and the marinade, and cook, stirring, until the meat starts to release its juices. At this point, it is essentially braising in yogurt and its own juices. This will take ten to fifteen minutes. If you use the whole milk solids, add them with 1 cup of water. If you use cream, just pour in the cream and about 1/4 cup of water. Add the salt. Bring to a boil.
Turn heat down and simmer, covered until the lamb is tender–about twenty to twenty-five minutes.
Stir in the peas, cover the pan and turn off heat. Let pan sit covered off heat for five minutes to barely cook the peas–this way they retain their brilliant color.
Serve over rice with a garnish of cilantro leaves if you like.
Book Review: 660 Curries
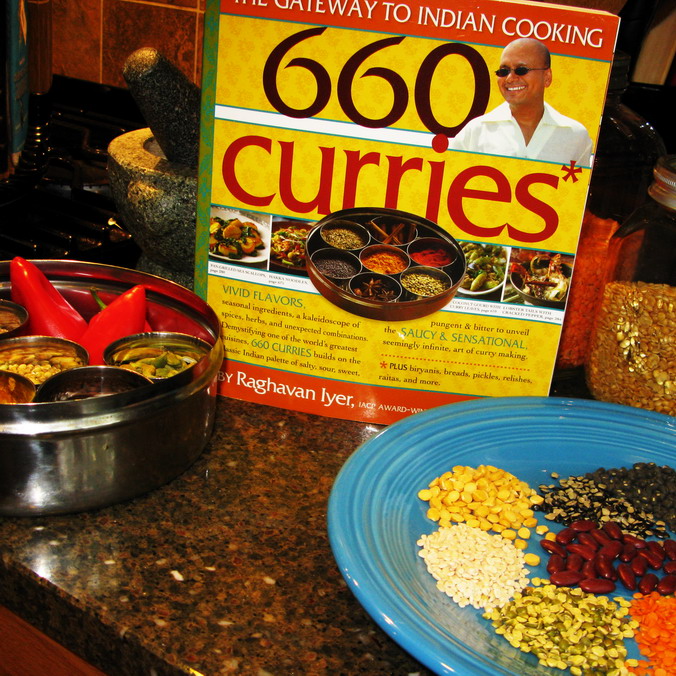
Why did I pick up 660 Curries, even though I have over thirty or so Indian cookbooks already, many of them outlining various regional cuisines?
I have to admit that I bought it because the author, Raghavan Iyer, a former chef, was named IACP (International Association Culinary Professionals) 2004 Teacher of the Year. IACP’s standards are high for their award recipients, so I was pretty certain that all of the recipes would not only be well-written and tested, there would likely be a wealth of information on ingredients, techniques and the culinary cultures of India.
I was not disappointed.
What I was not expecting was the fun-loving, expansive personality that Iyer’s prose depicted. While the book weighs in at 807 pages and very much looks like a textbook, this is no dry treatise on Indian food. Every chapter is opened with an essay introducing the topic at hand which sparkles with wit and charm. Reading this book provides a glimpse into exactly why Iyer won the honor of being 2004’s Teacher of the Year–classes taught by him must be fun affairs, filled with lots of information, encouragement and exciting new techniques, aromas and flavors, as Iyer channels his knowledge and love of all of the foods of India in a stream of clear instruction to his students.
Let me put it this way–not only was I informed in reading this cookbook, I laughed out loud more than once. Note for example, his introduction for the recipe on page 47 for dahi chaat–crispy shells stuffed with potatoes and chickpeas:
“Here’s the deal with this layered chaat: As soon as they are ready, grab one and pop it in your mouth in one fell swoop. Don’t look at it, don’t admire its beauty, don’t take a bite from it, don’t ponder what’s in it, don’t be afraid that it won’t fit in your dainty little mouth (open wide, and in it with go). Why? Because the moment the sauces start pooling at the bottom of the poori, (which is within seconds), they will soften it and the inner wall will cave in, making for a messy experience….”
Very few cookbooks make me giggle, much less laugh. They may be filled with great instructions, amazing recipes, and exciting narratives, but seldom do they hold any comedic value.
What are the recipes in this book like?
They are an incredibly varied lot–collected from every corner of India, reflecting every regional variation. Chapters are divided into main ingredients for the curries, including appetizer curries, poultry, game & egg curries, beef, lamb & pork curries, fish & seafood curries, paneer curries, legume curries, and vegetable curries, along with chapters on contemporary (or fusion) curries, biryani curries, and curry cohorts–or other dishes to go with the curries. There is also a chapter on spice blends and pastes, and information on the basic flavor components of curries, as well as conversion charts, a glossary of ingredients and mail order sources for spices and legumes.
Just leafing through the book right after it came in the mail, I was astounded at the number of recipes that I had never seen before, and I instantly started planning meals around several truly delicious sounding curries. Even though Iyer has both meat-based and vegetarian curries in his book–the meat recipes do not outweigh the vegetable-based ones, as is the case with many cookbooks that are written with the American or British audience in mind. There are just as many vegetarian curries here as meat curries, and they all sound delectable–I can’t wait to try a great many of them. (Zak quipped when he saw the book, “Oh, look–660 curries–and I bet we will be eating out of that book for the next three years!” Not that he minds–he could just tell by the way my nose sank into the book and refused to surface that I was going to be cooking a great many recipes from it.)
The way the book is put together is also physically attractive–it has 16 full-color pages of sumptuous photographs in the beginning of the book, including one for each chapter. I think that these would have been better if they had been sprinkled throughout the book, but I can also see the wisdom of grouping them together so they can be easily found. The rest of the book is set in three colors with the text in an easily read black font with titles, drop caps and sidebars in a nice-curry red orange. Each recipe title is presented in English surrounded with an orange box in a Hindi-styled English font, with a translation in Hindi beneath in smaller black letters in the same decorative, but still easily read font. Each page is edged on the outer edge with a delicate, lacy decorative border.
Look for recipes I tried out from this book and tested in the next few posts this week and next–this book is so delicious I really wanted to give my readers a taste of it right away.
Meatless Monday: Making The Richest Paneer Ever

So, I can be lazy.
That’s the only excuse I can possibly have for not making my own paneer regularly.
Paneer, for those who don’t know, is the only native cheese of India, and is made by heating milk to a boil and then adding an acid such as lemon juice or white vinegar, and stirring off the heat until the curds form.
Then you strain out the whey, rinse the curds, and squeeze out the moisture, then press as much moisture out of the cheese as possible with a heavy weight.
The active part of the cheesemaking takes about twenty minutes or so. No really. And then you let it get pressed for three to five hours, until it is a firm as you want it to be.
That’s it.
Now you see that I really have had no excuse whatsoever for not making paneer often.
Except for laziness.
And that’s no real excuse.
Especially once you -taste- homemade paneer. It is so superior to even the best commercial paneer in flavor and texture that they seem almost as if they are two different foods altogether. They really shouldn’t be compared. It just isn’t fair to the stuff you buy in the store.
And once you cook with it and taste it in say, muttar paneer–you will be spoiled forever. I mean it. For real. FOREVER.

So, I am guessing that I’ll be making paneer about every other week or so from now on.
Oh, darn.
I can hear Zak weeping over it from here. (He puts up with so much crap from me; I don’t even know how he does it.)
This first batch of paneer I made with Snowville Creamery Half & Half instead of whole or two percent milk. I had read about making paneer this way in Raghavan Iyer’s excellent 660 Curries and wanted to give it a try. He said he made paneer this way for a creamier mouthfeel, and I was curious about how it would go.

The cheese came together very easily–and the curds were a rich ivory color from the butterfat from the pastured cows, and silken smooth. I worried for a while that it would be too soft to fry up at all, even after pressing, but though it was more delicate than commercially made paneer, I could still fry it just fine.
There are a couple of tricks to it, though.
One, be sure your oil and pan are heated all the way before you put the cheese in. If you put the cheese in too soon it will start to melt before frying and make an UGLY MESS (tm, patent pending.) Not a good thing.
Two, be advised that this paneer will be more moist than commercial paneer–mainly because it is not being pressed in a big old machine to get all the whey out–so, when you fry it–it will sputter and pop sizzling hot oil even more than the stuff from the store. If you can believe it. Oy. Wear long sleeves and eye protection. No low-necked shirts, either. You know, now that I think on it, a balaclava wouldn’t have been a bad idea either.
Three–it browns faster than the commercial brands I’ve fried–and I’ve fried lots of them both at home and in a restaurant kitchen. AND, because it browns faster, I’d suggest putting fewer cubes of it in the pan so you have fewer bits to worry about at one time. You have to turn them quicker.
And then we come to four. This particular style of homemade paneer is fairly fragile, probably because of its lower protein content. Remember, protein is what holds cheese together, so keep in mind that if you make your paneer with half & half, you have to handle it gently when you fry it and turn it. I used a spatula in one hand and a table fork in the other and was as deft as humanly possible and even so I still broke a few pieces. So, be careful and treat this higher-fat paneer with kid gloves and kindness.
Or, you could be a sensible person and use whole milk instead of half & half! (Or do what I plan on doing next and use one quart of whole milk and one of half & half–that way you are still adding a bit more fat for a creamier texture, but not so much that the cheese is so finicky to fry.
Speaking of texture–the cheese is like firm cream cheese in texture. Very firm cream cheese. And it is similar in flavor–very rich, like the veritable essence of milk. When fried, the outside turns into a crisp lacy crust that gives way to an airy-light melting richness. It’s very hard to describe, but it is heavenly. In fact, I am convinced that if there are angels, that they eat food that is like this paneer–something that is crisp and light and rich and silky all at the same time.
Don’t you want to try to make something that angels would eat in your very own kitchen? Don’t you? Come on, you do, I know you do. And it is SO easy. It really is. Simple. Simple, simple.
Use this recipe and give it a shot–then turn it into any one of the paneer recipes I will list at the end for you. You won’t be sad that you did it. You won’t regret it. You will be happy, and you tastebuds will be happy and your family and friends will be happy.
You want to be happy, don’t you?
Then dance on into your kitchen and start makin’ yourself some cheese!

The Richest Paneer Ever
Ingredients:
2 quarts of half & half–the best you can get (or, use 1 quart of whole milk and 1 of half & half for a firmer, less rich cheese)
1/4 cup of distilled white vinegar
Method:
Wash out your sink really well. I mean it. Squeaky clean. Cleanliness is necessary when playing with dairy product. Then take out your colander and line it with several layers of clean cheesecloth. I used four.
Put half and half or the half and half and milk mixture in a heavy bottomed, deep pot. Cook, stirring often, over medium heat until the milk comes to a boil. Do now allow the milk to scorch.
When the milk has boiled, turn off the heat and add the vinegar all at once and stir gently. Immediately, you will see curds begin to form, and the milk will separate into creamy colored curds and a greenish, thin, watery whey.
When all of the curds have formed–which should take about three to five minutes of gentle, slow stirring off heat–pour the contents of the pot gently into your prepared colander. Run cold water over the curds in the colander until they cool just enough for you to touch them.
With very clean hands, rinse and work the curds through the water stream, rinsing assiduously in order to remove the vinegar and as much of the whey as is possible.
When the rinsing is done, and you will know if you poke your nose near your cheese–it should have no vinegar scent left to it at all. It should in fact smell just like fresh, delicious milk–gather up the edges of the cheesecloth and squeeze the ball of curds within it, twisting it up tightly in the cloth so that as much whey as you can get out is forced from the cheese into the sink.
When you have squeezed the cheese until you hands hurt (that sounds vaguely naughty), remove the colander from the sink and place it in a larger bowl that will hold it. Put the cheese, still wrapped up in the cloth, into the colander and flatten it out nicely. Then, put something or somethings heavy on top of it.
I used my granite Thai mortar and pestle, with an eight pound free weight plate set on top of it.

Leave the cheese alone to be pressed and drained–dairy products like a little privacy when they are being magically transmuted from one delicious form into another more delicious form. Leave it for three to five hours–for firmer paneer–press it longer.
(In retrospect, if I’d had the time, I think that my paneer might not have been so sputtery and spitty in the frying pan if I had enough time for a full five our press. But, I could only spare three and a half hours, so sometimes you takes what you can gets….)
When the pressing is finished, take the weights off the cheese, unwrap it from its mummification bandages and set it on a plate or cutting board and admire it.
Then, carefully cut it into cubes and pan fry it as described in my recipe for methi malai paneer
Use the fried paneer in any recipe you like, though I am partial to saag paneer. (Mattar paneer and Methi malai paneer are both excellent as well. Just not as good as saag paneer.)

Categories:
- Admin (rss) (55)
- Blogs and Blogging (rss) (81)
- Book Reviews: Cookbooks (rss) (43)
- Book Reviews: Non-Cookbook Food Books (rss) (38)
- Cats and Cat Blogging (rss) (47)
- Chinese Cooking Lessons (rss) (32)
- Culinary School Stories (rss) (18)
- Dairy Pruducts: Cultured and Barbaric (rss) (4)
- Documentary Filmmaking (rss) (1)
- Essays, Rants and Reflections (rss) (260)
- Fighting Hunger (rss) (12)
- Food and Kids (rss) (45)
- Food in the News (rss) (126)
- Food Media (rss) (98)
- Food Preservation (rss) (18)
- Food Safety (rss) (45)
- Gardening (rss) (30)
- Herbs and Herb Blogging (rss) (20)
- Holidays (rss) (50)
- Kat Blogging (rss) (22)
- Kitchen Science (rss) (36)
- Leftover Makeover (rss) (8)
- Life, the Universe and Everything (rss) (131)
- Local and Sustainable (rss) (227)
- Local Athens Food and Foodies (rss) (42)
- Meatless Mondays (rss) (32)
- Menu For Hope (rss) (5)
- Nutrition, Diet and Health (rss) (84)
- On The Farm (rss) (8)
- Recipes: Almost Vegetarian, Vegetarian and Vegan (rss) (294)
- Recipes: American Regional (rss) (37)
- Recipes: Appalachian Hillbilly (rss) (33)
- Recipes: Bread, Pasta, Grains (rss) (95)
- Recipes: Canning and Preserving (rss) (8)
- Recipes: Chinese (rss) (123)
- Recipes: Comfort Food (rss) (120)
- Recipes: Cookies (rss) (16)
- Recipes: Desserts (rss) (48)
- Recipes: French (rss) (25)
- Recipes: Fruits and Vegetables (rss) (302)
- Recipes: Greek, North African and Middle Eastern (rss) (31)
- Recipes: Indian (rss) (137)
- Recipes: Italian (rss) (42)
- Recipes: Japanese (rss) (7)
- Recipes: Jewish (rss) (4)
- Recipes: Korean (rss) (6)
- Recipes: Meat, Poultry and Fish (rss) (220)
- Recipes: Mexican/Native American/ Latin American/Caribb (rss) (27)
- Recipes: Original (rss) (108)
- Recipes: Thai (rss) (27)
- Recipes: Tofu (rss) (17)
- Recipes: US Regional (rss) (16)
- Recipes: Vietnamese (rss) (8)
- Restaurant Stories (rss) (28)
- Sewing, Quilting, Arts and Crafts (rss) (16)
- Simple Chinese Recipes (rss) (30)
- Slow Food and Heritage Foods (rss) (10)
- Spice Blogging (rss) (44)
- The Chinese Cookbook Project (rss) (14)
- The Chinese Pantry (rss) (39)
- The Documentary (rss) (2)
- The Kitchen Saga (rss) (17)
- The Locavore's Bookshelf (rss) (15)
- The Unsung Adventures of The Culinary Nerd (rss) (6)
- Tools and Toys (rss) (35)
- Uncategorized (rss) (10)
- With a Side of Politics (rss) (48)
Archives:
- August 2012 (9)
- July 2012 (12)
- September 2011 (3)
- August 2011 (7)
- July 2011 (8)
- June 2011 (16)
- May 2011 (17)
- April 2011 (11)
- December 2010 (9)
- November 2010 (5)
- February 2010 (1)
- December 2009 (5)
- November 2009 (7)
- October 2009 (10)
- September 2009 (16)
- August 2009 (14)
- July 2009 (14)
- June 2009 (7)
- May 2009 (17)
- April 2009 (10)
- March 2009 (25)
- February 2009 (13)
- January 2009 (10)
- December 2008 (5)
- November 2008 (5)
- October 2008 (6)
- September 2008 (13)
- August 2008 (8)
- July 2008 (11)
- June 2008 (18)
- May 2008 (13)
- April 2008 (14)
- March 2008 (16)
- February 2008 (17)
- January 2008 (19)
- December 2007 (25)
- November 2007 (18)
- October 2007 (24)
- September 2007 (16)
- August 2007 (15)
- July 2007 (15)
- June 2007 (10)
- May 2007 (14)
- April 2007 (16)
- March 2007 (17)
- February 2007 (20)
- January 2007 (13)
- November 2006 (1)
- October 2006 (8)
- September 2006 (14)
- August 2006 (25)
- July 2006 (30)
- June 2006 (28)
- May 2006 (34)
- April 2006 (29)
- March 2006 (24)
- February 2006 (30)
- January 2006 (38)
- December 2005 (40)
- November 2005 (37)
- October 2005 (32)
- September 2005 (25)
- August 2005 (30)
- July 2005 (28)
- June 2005 (21)
- May 2005 (8)
- April 2005 (22)
- March 2005 (17)
- February 2005 (29)
- January 2005 (10)
Search Site:
Links:
- Lily’s Wai Sek Hong
- 101 Cookbooks
- A cat in the kitchen
- A Veggie Venture
- Accidental Hedonist
- Cha Xiu Bao
- chez pim
- Chocolate & Zucchini
- Chopstick Cinema
- Chowhound.com
- Chubby Hubby
- Cook sister!
- Cooking with Amy
- da*xiang
- Eat Local Challenge
- Eating Liberally
- Ecocentric
- Eggbeater
- Epicurious
- Farmgirl Fare
- Fatfree Vegan
- Foodgoat
- ForkandBottle.com
- Green Olive Tree
- Hooked on Heat
- Jaden’s Steamy Kitchen
- Kalyn’s Kitchen
- Lucullian delights
- Mahanandi
- Matt Bites
- MeatHenge
- mmm-yoso!!!
- New York Times – Dining & Wine
- Pizza Goon
- Rasa Malaysia
- Ruhlman
- Sailu's Kitchen
- Serious Eats
- SF Gate: Food & Dining
- Simply Recipes
- Soul Fusion Kitchen
- Tastespotting
- The Amateur Gourmet
- The Cleaner Plate Club
- The Food Section
- The Grub Report
- thecookscottage
- U.S. Food Policy
- Wandering Chopsticks
- Washington Post Food and Dining
- Wasted Food
Meta:

Powered by WordPress. Graphics by Zak Kramer.
Design update by Daniel Trout.
Entries and comments feeds.