Site is Down for Maintenance
It’s acting wonky.
We hope to have it fixed shortly.
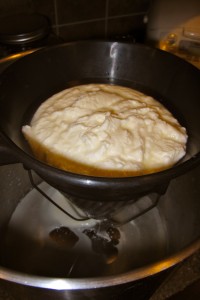
A Better Way to Drain Yogurt
So, I discovered something I really didn’t like about making my own Greek yogurt.
Straining it.
Sure, it’s easy–you use multiple layers of cheesecloth to either line a strainer, or you tie the yogurt up in a bag and hang it over a bowl to catch the whey.
And that is simplicity itself.
However.
When it comes to getting the yogurt out of the cheesecloth bag and into your container, this solution becomes downright messy and irritating.
The yogurt sticks to the cheesecloth–and you have to essentially peel it off. Also, depending on the type of cheesecloth you get–it can be really essentially useless with such an open weave that even when you use four layers of it, some of the yogurt will flow out of it along with the whey and you lose lots of your valuable protein and fat.
Also, some cheesecloth sheds threads. Yeah. Threads in my yogurt. Yum.
Not.
It also sheds fibers. Fibers in my yogurt–also “not yum.”
AND, washing out the cheesecloth is another messy proposition. After you try desperately to get all of the yogurt out of it–which you will fail at, mind you–you rinse out the cloth in your sink–whereupon you will likely curse as you see all that delicious yogurt washing on down the drain when you it could instead be heading down your gullet towards your stomach. You rinse it out in the sink and then wash it in your washing machine.
But there’s a problem.
In the washing machine, if you don’t wash it by itself, it will pick up stuff from your dirty clothes.
Like lint.
Fibers.
And, my favorite and I’m sure yours–cat hair.
EUWW.
So, I resolved to figure out something to drain the yogurt more efficiently.
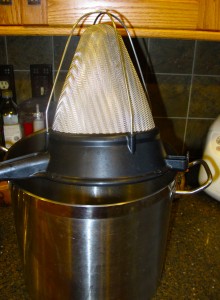
And I did. I use a boullion sieve.
Yes, it is an expensive piece of equipment. However, it is simple to clean (you put it in the dishwasher), it doesn’t impart hair, fibers or threads to your food and you can use it to strain anything you like. It’s actual purpose is to get every bit of particulate matter out of stock so you can make a rich, full-flavored but perfectly clear soup called boullion. So yes, you can use it for stocks.
You could use it to strain fruit and vegetable juice to get every bit of the pulp out. (Which is useful for making jelly.)
It is also an extremely sturdy piece of equipment that will likely last for decades of use, whereas most cheesecloth is doomed to fall apart after a few uses. (Unless you get the really good stuff from cheesemaking suppliers.
Before I went the route of the boullion strainer, I tried making a bag from fine muslin to drain the yogurt–but it held fibers and hair just as badly as the cheesecloth did. And picking that stuff out of yogurt is less than fun.
Edited to add: I wanted to mention the suggestions made by readers in the comments, as they are really good ideas, and are cheaper than my solution.
David T. mentioned that he uses jelly bag to strain his yogurt. The bag is made from a fine nylon mesh so there are not threads or fibers to get stuck in your yogurt. Also, you can wash it in the dishwasher.
Adam suggests that when he makes a small amount of yogurt, he strains his through a gold coffee filter. (I will say that the boullion strainer is basically like a giant gold filter–it is made of the same fine metal mesh, except in this case, it’s not gold–it’s steel.)
My main problem with either of these suggestions is that I make two quarts of yogurt at a time. The jelly bag might work for that much yogurt, but the coffee filter would require straining in several batches, and that could be frustrating.
More Fermented Fun: Cultured Butter
I promised more fermented goodies in the near future.
Specifically cultured butter.
What is cultured butter? Butter that went to finishing school and went on to get a MFA from the Chicago Art Institute?
No.
It’s butter made from cream that has either been allowed to ripen over several days without the addition of any bacterial culture, or real honest to God homemade Creme Fraiche, or cream that has been cultured with the addition of commercial cultured buttermilk.
Essentially, it’s butter made from tangy cream, not sweet cream.
In the United States, not a whole lot of folks know about cultured butter, nor do they tend to like it. It’s rather hard to find and when you can find it–its very expensive. The first time I tasted commercially available cultured butter, I popped my head up and said, “Oh, it tastes like butter at Gram’s house.”
And this is how we can tell that my Dad’s father’s family were from fairly recent European immigrant stock. It all has to do with the foods they liked to eat–many of which were unfamiliar to most American palates when Dad was growing up and when I was growing up as well.
Gram always left her butter out at room temperature. She stored it in a cupboard and in later years, the microwave, to keep bugs, dust and mischievous cats from getting into it, but it was pretty much left out to the open air. I always thought it was to keep it soft so it was spreadable, but it always had a different flavor than everyone else’s butter, and my Dad told me why.
“The Old Man,” he said, meaning his dad, my Pappa, “Liked his butter to be kind of tangy, almost rancid, just like his father and mother liked it.” Apparently, Pappa’s parents, had kitchen help who made the household’s butter by skimming cream from the milk delivery and then letting it ripen on the counter for up to three days before churning it in one of those hand-cranked glass butter churns that everyone had back in the day.
That was the way their parents, who were from Germany, made butter and to them, that was just how butter was supposed to taste.
Dad didn’t know what that was called, but it was cultured butter–which is not at all what most Americans like–we prefer “sweet cream” butter–which if you look at most any package of butter sold in grocery stores these days, they are all going to be labelled as such.
Dad said Gram’s butter tasted sort of like that, but he didn’t like any of it at all–he preferred sweet butter.
I like them both, I have to admit, with a preference leaning toward cultured butter, especially when it comes to a spread on toast or bread, or for use in sauces or on vegetables. Sweet butter is still my preferred butter for baking.
But cultured butter is SO DARNED EXPENSIVE! Usually at least twice as expensive as sweet cream butter and it’s harder to find, too.
So, do like I did and figure out how to make it on your own.
How to Make Cultured Butter
Step One: To make cultured butter, you need cultured cream, which you are not likely to find at your corner grocery. So you need to follow my directions on how to make what the French call creme fraiche which is a tastier version of sour cream. Please do not try to use commercial sour cream to make butter. It will not work. There are all kinds of stabilizers, thickeners and who knows what all in sour cream to make it artificially thick and then it is usually pasteurized nigh unto death, which is going to make it nearly impossible to use for butter making. So take the time to culture the cream your own self. Start out with the best cream you can afford–I used Snowville Creamery heavy cream that comes from pastured cows. If you live where you can get Snowville, I urge you to use it–the butter it makes is fantastic, but if you cannot get it, use the best cream you can find. (If you can get cream from a local farm or your own cow–all the better!)
Step Two:You need to churn that creme fraiche into butter.
In order to do this, you need a means by which to agitate your cream so the fat molecules bash up against each other and start clinging together into clumps that eventually become butter. (In a nutshell, that’s what happens when cream is turned into butter. Molecules bash together and stick and you get something creamy and delicious to eat on bread or cook with.)
There are lots of ways to churn butter, some of them low tech, some of them high tech and one of them no tech.
Being a frugal sort by nature, I started to use the no tech version which is to stick the creme fraiche into a glass jar so that it’s only half full, seal it up tightly, and shake the dickens out of it until you see lumps of butter separating and floating around in the thin, bluish buttermilk.
There’s a problem with this method. Two, actually. Well, there are probably more, but the reasons I gave up on it this morning are that the rough and ready agitation that is necessary for sufficiently shaking the cream such that it turns into butter makes my boobs jiggle annoyingly, and it takes forever, so my hands and wrists started to hurt.
(No, there is no video available of me shaking the jar on YouTube so do not ask.)
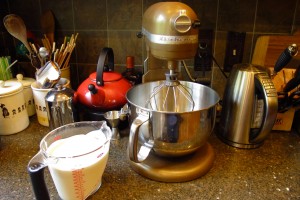
I refuse to wear a sports bra and wrist braces just to make butter so I put the jar down and switched to a high tech method: I used Conan, my big bronze and barbaric Kitchenaid mixer.
I skipped straight over the low tech methods, because I do not have any kind of butter churn. Nope, I do not have the Little House on the Prairie model that sits on the floor and has a churn dash attached to a pole that you plunge up and down for however long it takes to make butter sitting in the corner of my kitchen looking all pioneery and picturesque. Neither do I have one of those really neat old glass one from the early part of the 20th century that you turn a crank and a dash inside swirls around and makes butter. That’s the low tech kind I’d have, because that’s what my Grandma used to make butter when my Mom was a kid, but they are pretty expensive. Apparently people collect them and stick them on shelves in their kitchens to look all vintage and retro. I mean, I’d stick one on a shelf in my kitchen, but I’d also make butter with it too.
But I digress. Be that as it may, I used a high tech method. If you lack a Kitchenaid, you could use a hand-held mixer. Or, you could use a good heavy-duty blender. Or a really good food processor would do the trick, too. You just need something that has a part that can move very quickly through the cream and act as a churn dash, whirling and bashing and sloshing that cream together so the fat molecules start getting dizzy and grabbing onto each other for support.
If you have no low tech churn or no high tech electric device to churn your butter, I’m afraid you’ll have to deal with the boobs and wrists problem and just shake, shake, shake your jar until the butter comes. I guess you could put on a Carmen Miranda or Harry Belafonte album and dance and shake to the beat so that you get a good workout. Maybe it will burn some extra calories to make up for the butter you are making and presumably are going to eat.
Step Three: Pour your cream into your churning vessel–I used four cups of cultured cream–and start agitating. With Conan the Kitchenaid, I used the whisk attachment and started on low speed and gradually moved it up to high speed, taking great care to adjust the speed so that I didn’t slosh the cream over the lip of the bowl and all through the kitchen.
So, you agitate.
And agitate.
And agitate.
(Do you feel agitated yet? No? Well, your cream probably does.)
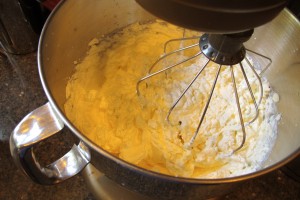
After a few minutes, your cream is going to come to the soft-peaks stage of whipped creamdom. That’s good, but you need to keep going. Soft peaks are when you stop the mixer and lower the bowl or lift the whisk and you end up with the cream forming a peak that goes up and then slumps over into a Dairy Queen kind of swoopdydoo.
A few minutes more, and the cream will come to the stiff peaks stage. That’s when you stop the whisk, lower the bowl or raise the whisk and your cream stands right up at attention, like a, well like something stiff. It makes a nice peak. This is where you would stop if you were making whipped cream.
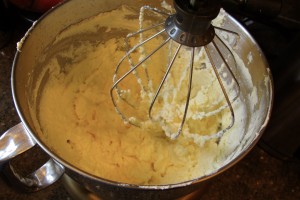
But, you’re not, you’re making butter. So keep going. Soon you will come to the stage where the cream stops looking creamy and glossy and all whipped and it turns all ugly, and lumpy and curdled looking. Like this picture right here.
Kind of unappetizing looking isn’t it? This is the stage where your whipped cream has broken, and if you were trying to make whipped cream, you’d cry, tear out your hair or gnash your teeth. (It can be rescued, by the way. Just add a bit more cold liquid cream and start whisking again, first on low speed and then on to medium until it goes smooth and starts acting like whipped cream again.)
But we’re not making whipped cream, we’re making butter, so no tears are necessary. Just keep going.
And going.
And going.
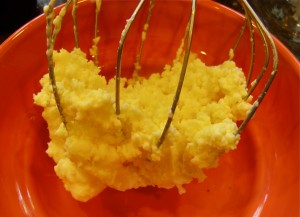
The cream stays at this stage for a long time. It seems like forever. But then, you will notice little odd clumps in your curdly looking yucky cream–little granules. They’ll look something like this:
Those are wee tiny granules of butter forming, so don’t stop now, but keep going.
It will seem as if it’s taken forever for those tiny butter granules to start forming clumps, but trust me, if you turn away for a few seconds (to comment on Facebook, for instance) you will find yourself being splashed in the face with buttermilk. (That is if you are using a mixer–something self-enclosed like a real butter churn or a food processor will save you from a buttermilk bath.)
Quickly, turn the speed down if you are using a mixer, so that you do not shower your entire kitchen with buttermilk. What you will see at first is small clumps of butter clinging together with pools of buttermilk in between and yellow, lumpy cream in the center, but within just a few seconds, all that will remain in the bowl will be butter that has for the most part adhered to itself and is entangled in the wires of your whisk, with a few smaller lumps floating in a small pool of buttermilk.
Stop your churn, mixer or other mechanical device, or your arms from shaking the jar, and lift out the butter.
Step Four: (I’ll bet you never thought we’d ever get to step four.) Pull your butter out and after letting as much buttermilk drain off of it as possible for a few seconds, set it in a bowl. Fish out any smaller lumps of butter from the buttermilk and set them in the bowl as well. Then, set a fine strainer over a jar and pour the buttermilk into the jar. Rescue any butter bits that end up in the strainer, and put them with their brethren in the bowl, tightly close the lid to the jar and put the buttermilk in your fridge. This can be used for baking, and I suspect for starting another batch of creme fraiche. Some people like to drink it–my Dad liked to when he was a kid, and so did my Mom.
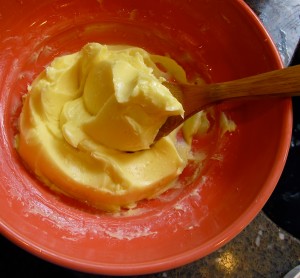
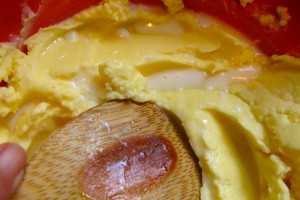
Step Five: Now, you must knead the butter to extract as much buttermilk as possible from it. Here’s where I went all Little House on the Prairie, and used a small wooden (well, mine was bamboo, but whatever) paddle, working the butter all around the bowl. Pushing and scooping and pushing again with the paddle, kneading releases tiny droplets of bluish white buttermilk which ooze from the mass of butter, and form puddles in the bowl. Drain these off carefully by tipping the bowl, while with one hand you keep the butter from falling into our sink.
You could do this with your hands, but your hands are warm and will begin to melt the butter. This could make your hands slippery, so when you try to tip the bowl without dropping it–well, you can imagine the tragedy that could strike. You can’t very well scrape butter out of your sink into which shards of bowl have embedded themselves and then eat that. It doesn’t have to be a paddle–it could be a wooden spoon, or I suspect a metal spoon for that matter, though a wooden one would be more comfortable to hold for the job.
Keep kneading until you can get no more buttermilk out. The more buttermilk you remove, the longer your butter will stay fresh. If you leave buttermilk inside it, your butter will go rancid, which is not the same thing as cultured, and it will smell and taste awful.
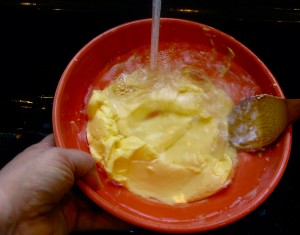
Step Six: Rinse the butter by running very cold water over it in the bowl, while kneading it with the paddle. You can run water into the bowl until it is half full, turn off the water, knead for a while, and when the water turns cloudy, dump the water out and start again with fresh cold water from the tap. Keep rinsing until the water comes out perfectly clear–as clear as it was coming from your tap. This is how you get rid of those last tiny, stubborn droplets of buttermilk. Drain the rest of the water out–which magically doesn’t carry your butter out with it because fat and cold water do not mix!
Step Seven: Next, if you want to, add a bit of salt to the butter by sprinkling very fine salt over your mass of butter and kneading it in with your paddle. Taste as you go. Salt not only helps bring out the fullness of the cultured butter’s flavor, it also acts as a preservative, helping it last longer.
Once you’ve put in as much salt as you want–go slowly and sparingly with the salt–you do not want to overdo it–you can pack the butter into a jar or roll it up into a cylinder in waxed paper and pop it into your fridge to chill and solidify.
And that, my friends, is it. That’s how you make cultured butter!
It really is simpler than this huge post would let on. I just tried to make the explanations as thorough and descriptive as possible and then put in a lot of photographs so you’d see each step of the process. This isn’t meant to make it look complicated–it’s to help build your confidence if you decide to try making your own cultured butter in your own kitchen.
You can use these instructions to make sweet cream butter–just leave out step one and start out with plain old heavy cream from the store–not ultra-pasteurized if you can manage it.
Taste your butter and enjoy it. You can use it just as you would use sweet cream butter–on bread or toast, or in cooking. It adds a wonderfully tangy, somewhat nutty flavor to any dish to which it is added and pastry made with it has a more complex flavor than that made with regular sweet cream butter.
I hope you do try making this–it’s fun to do–especially if you have kids helping–and you end up with a product that would cost you quite a bit if you bought it in the store. Four cups (one quart) of cream yields about one pound of butter, and around two cups of buttermilk. If you bought that in the store–it would be about ten dollars for the cultured butter and the buttermilk usually goes for three or four dollars a quart.
I spent about four dollars, maybe for that quart of cream, so look at how much money I saved–but the money isn’t the main point. The main point is the flavor of the butter is so much more intense, fresh and delicious than any cultured butter I’ve ever bought, and I have the satisfaction of making it in my own kitchen using ingredients I know and trust.
Fomenting Fermentation Fun: Purple Sauerkraut
Long ago, when I was a kid, my Grandma, Grandpa, Mom, Uncle John and I made at least a hundred pounds of sauerkraut.
And no, that wasn’t even the German side of my family. That would be my Dad’s family, but oddly, he and many of his siblings despise sauerkraut and apparently never developed a taste for it.
Nope, it’s the Cherokee/Anglo-Irish/Lapsed Amish side of the family who made and ate all of that kraut.
Weird, huh?
But yeah, I remember the five of us gathering in the cold basement of Grandma’s house on a cool day in October or early November, with bushel baskets of plain old green late-season cabbages piled high around our feet, making kraut. I washed the cabbages in the sink, bobbing the heads up and down in frigid water until all traces of dirt were removed from the outside, then dried them and handed them off to Grandpa or Grandma, who would take turns shredding them using the horribly sharp kraut cutter that Grandpa had built himself.
That kraut cutter was ominous: it looked like a combination of a regular kitchen mandolin with just a whiff of guillotine added. I figure it was the rustic wood and carbon steel slanted blade that gave it a certain murderous air. And it was scary sharp. Only Grandma, Grandpa or Mom were allowed to touch the thing. And as Grandma got older, she wasn’t allowed any more.
Anyway, one would shred and the other would sprinkle the shreds into the two huge twenty gallon crocks. It was also my job to scoop a teacup of kosher salt and sprinkle it over the cabbage when directed to, sprinkling it over each crock, half a teacup in one crock, half in the other.
Mom and Uncle John had the hardest job of all–pounding the cabbage with the big, heavy wooden kraut tampers that Grandpa had turned out of oak and walnut wood on his lathe. They had a good time with it, pounding and squashing the cabbage like mad, laughing and even though it was cold downstairs, working themselves into a sweat.
I remember asking Grandma once why we never made kraut out of red cabbage, and was answered with laughter.
“Who’d want to eat purple kraut?” Grandpa said. “It wouldn’t be appetizing.”
“But kraut, when it’s been cooked with sausages isn’t very appetizing looking anyway,” I said. “But it still tastes good.”
“But being purple isn’t going to make it any better looking,” he stated and went back to making shreds of cabbage fall like snow into the deep bowl with the cutter.
Well, that’s why most folks don’t make kraut from red cabbage. Because who would want to eat purple kraut, and it’s not appetizing looking and there’s no reason in the world to make something like that.
Well, Grandpa was wrong.
Because I personally want to eat purple kraut, and it is perfectly well pretty AND it turns out to be really good for you, too.
Anthocyanins are the chemical compounds in plants that give them a blue, purple, pink or red hue. These are what give red cabbage their lovely red-violet tint, and many scientists are discovering possible health benefits for those of us who eat (or drink in the form of grape juice or especially red wine) our anthocyanins on a daily basis.
It turns out that anthocyanins are anti-oxidants, and they have properties that lower the risk of heart attack or stroke, and some of them have been found to help prevent or slow tumor growth.
Sign me up for some of that! (Note that many anthocyanin compounds are driven off or destroyed by heat, so many of these vegetables and fruits are best eaten uncooked or maybe just fermented, since acids preserve anthocyanins.)
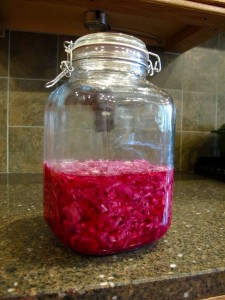
And plus–I don’t care what Grandpa said–purple kraut is pretty and looks plenty appetizing to me–you can see for yourself in the photograph above. Seems so silly for him to say that since he loved pickled beets, but I digress.
I made this small batch of kraut with both white and red cabbage…two small heads of red and three small ones of white.
And since there was so little cabbage, I didn’t bother with the evil looking kraut cutter which resides safely high up on top of a kitchen cabinet, looking just as scary as it ever did.
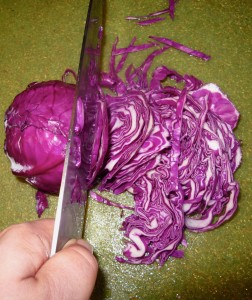
Instead, I shredded it with a knife, by hand. I just cored and cut the heads in half through the stem end to the top, and then laid the half heads flat on the cutting board and then carefully sliced them into dime-thin slices. It’s easy and once you get into the rhythm, it isn’t too bad at all. In fact, it’s pretty darned good.
And it’s certainly safer than getting near Madame Guillotine, which is what I call the Grandpa’s cutter.
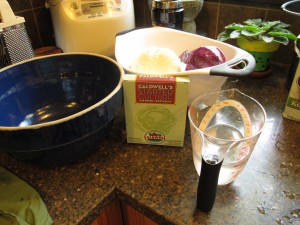
Since I’m the only one who eats kraut in the house now, and I was experimenting with using Caldwell’s Vegetable Fermentation Starter, I decided to not bother with dragging a crock out of the basement. I just used a glass jar with a locking gasket and lid. This wasn’t ideal, because the jar had a neck on it that is narrower at the top, just enough to make it difficult to weigh the cabbage down once it was put under the brine in the jar. I may end up finding a smaller crock and just using that.
Weighing the cabbage down once it’s in the jar is imperative, really. It keeps the kraut away from the air–air exposure is what allows molds to grow on the surface of the kraut–which, while it isn’t dangerous–can give a weird off-taste to the finished ferment. (You just scrape it off the top and toss it and eat the rest of the kraut.)
Also, kraut ferments faster in warmer weather. (That should elicit a big “duh” from the audience, but alas, it’s been a long time since I played with kraut. Though kimchi isn’t all that different and I just made a nice batch of that.)
AND, did I mention I was playing with a commercially available culture?
Yeah, I did, didn’t I?
And how did that turn out for me?
I’m still on the fence about it. I let the cabbage ferment for seven days, with the lid closed on it, but not sealed so there was still plenty of air circulation. There was no mold growing on the kraut, and there were little fermentation bubblings and fizzings here and there, but when I tasted it, it tasted saltier than I thought it should. It has a nice cabbagy flavor, but it doesn’t seem fermented enough to me.
I followed the directions on the package to the letter–and it included the use of a brine, which I had never done with kraut–instead we beat the hell out of the cabbage to make it release it’s own juices–and the flavor is okay, but saltier than I would like and not nearly as sour as I would want.
Hrm.
So, it’s back to the drawing board for me and my purple sauerkraut.
Next batch is going to be made old-school–the way Grandma did it, and if it works out, I’ll give the recipe.
Then, I’ll try this starter business once again and see if maybe this first batch was a fluke and I can get really tasty fermented cabbage from the little green box.
What’s next in my fermentation fun?
Stay tuned for cultured butter–coming soon from a kitchen near you.
Happy 100, My Beloved Kitchen Saint
Unless you’re on a media blackout, I suspect you know that today would have been Julia Child’s 100th birthday. She lived a long life–she died nine years ago at 91 years of age–and I have to admit to shedding a few tears for her even though I never knew her personally–because she is one of my greatest influences.
She found her path, and nothing deterred her once she began moving forward. She just kept forging her way, guided by passion and love, and in doing so, changed the way Americans view food, cooking and eating forever.
Without Julia, I doubt there would be locavores.
The Slow Food movement would undoubtedly have started in Italy, but would it have come to America if we hadn’t been schooled by Julia? Maybe not.
And I doubt that there would be as many women in professional kitchens today if we hadn’t all grown up seeing Julia cook her heart out on television before God and everybody.
God bless her–we need more like her. (And truly, I think we have many, many more like her, following in her footsteps each and every day. People learning to grow, cook, eat and preserve good food seem to be popping up everywhere like porcini mushrooms after a rainstorm.)
To celebrate, PBS put together a video–“Julia Remixed.”
Here it is, so we can all celebrate together.
And remember: “Life itself is the proper binge.”
Powered by WordPress. Graphics by Zak Kramer.
Design update by Daniel Trout.
Entries and comments feeds.

