Cook Local, Eat Global
The Whole Enchilada Part II: Filling and Fixin’s
 I like shredded meat fillings in enchiladas, which I will often mix with beans or strips of fire roasted poblano chiles. For vegetarian fillings, I will use the beans and poblano strips, mixed perhaps with roasted sweet bell pepper strips, and sauteed bitter greens like kale or collards.
No matter what filling I use, there is always cheese. I like to use a mixture of sharp cheddar cheese and queso blanco. Queso blanco is a white Mexican cheese that melts beautifully into a creamy, buttery-flavored mass. A decent substitute is montery jack cheese, but I like the nutty-buttery flavor of queso blanco better.
The wonderful thing about making a shredded meat filling is that the cooking liquid can eventually be used as the foundation of the Colorado sauce; if I don’t want to use it right away, I will cool it completely to room temperature, and then put it into a freezer container and freeze it to either reuse the next time I make shredded meat or for the basis of a sauce or a soup.
Any kind of meat can be shredded successfully: pork, beef, chicken, lamb and game all make very nice shredded meat fillings. The key is choosing the right cut of meat to braise and eventually shred.
For pork, I prefer the shoulder or the Boston butt. For beef, the chuck roast (either bone in or boned) has immense beefy flavor and a texture that shreds beautifully. To make shredded chicken, an older stewing chicken is a must. Lamb shanks make lovely shredded lamb; you can also use the shoulder roast or a leg roast, particularly if you can get one from an older animal. For shredded venison, the haunch is a great cut to braise.
Once you have the correct cut of meat, you need to decide how much time you have to spend on braising it. If you have all day, by all means stick it in a stewpot and simmer as long as you need to until the meat is tender and falling off the bones, and all of the fat and connective tissues have melted and dissolved into gelatin. Whatever you do–do not underestimate how much time you will need to bring the meat to the point where it is falling-apart tender; each cut of meat from each animal is individual and unique, and sometimes they just plain take longer to cook, and it is better to have a late dinner that is fantastic than a meal that is on time, with tough, dried out meat.
If you have any thought that you may not have time to braise your meat properly, I suggest you run right out and buy a pressure cooker. This instant. Go, go, go. It is quite simply, the best investment for a cook who lacks time to spend all day in the kitchen. A pressure cooker works simply–you seal up your food item in the cooker with an amount of boiling water. When the steam cannot escape, it creates pressure within the cooking chamber–usually up to 15 psi, which raises the temperature at which water boils, and has the effect of cooking foods faster.
Using a pressure cooker to braise meats is like having a fail-safe device to obtain fork-tender meat with a minimum of time and effort. There are just a few rules to be aware of: after you have cooked your meat the recommended amount of time, do not immediately release the pressure by pressing the “quick release” valve, especially if you are cooking beef. Instead, take the pressure cooker off the heat, and allow it to release the pressure slowly and naturally over a fifteen or twenty minute period. If you use the quick release method, the fast temperature and pressure inversion has the potential to take your very tender, succulent meat and turn it into a tough, chewy mess. For some reason, the tissues in beef will often firm back up when treated in this way.
 Making shredded meat fillings is so simple, I have never had a recipe for them, but for the blogosphere, I will write it down now. Instead of giving a specific recipe for a specific meat, I will write this as generally as possible, so that one can use it as a master recipe to be altered depending on what cut of meat one uses.
Shredded Meat Filling
Ingredients:
Piece of meat, about two and a half pounds, bone in or not
3 cloves garlic, sliced thinly
2-3 tablespoons olive oil or bacon grease
1 onion, sliced thinly
2 cloves garlic, minced
1 chipotle en adobo
1 teaspoon freshly ground cumin
1 tablespoon freshly ground coriander (The spices can be varied to taste–see suggestions below)
2 quarts broth or stock to match meat (For pork or lamb one can use commercial vegetable or chicken broth; for venison, one can use beef broth.)
1 bottle lager beer
1 bay leaf
1 pinch Mexican oregano, or regular oregano
1 pound fire roasted fresh tomatoes, seeded and peeled, then cut up (Or, use 1 can Muir Glen fire roasted diced tomatoes.)
1 ripe (not green) sweet pepper, fire roasted, peeled, seeded and diced
salt and black pepper to taste
Method:
Cut meat up into managable chunks. (If using a whole stewing chicken, cut as if you were going to fry it, except don’t separate thighs from legs and wings from breast, and leave back and neck in the pot so that all the flavor is extracted from them during cooking.) For a beef chuck roast of about two pounds or so, I usually cut it into four or six pieces depending on whether or not I have a bone in the roast. (Bones are good for adding flavor to the cooking liquid, so do not be afraid of using roasts with the bones.)
Cut slits into the meat with the tip of a sharp knife, and insert slices of garlic into slits. (With chicken, you can insert the garlic under the skin if you don’t want to pierce the meat.)
Heat up oil in the bottom of your stew pot or pressure cooker until it is quite hot and add onions. Cook, stirring constantly, until the onions turn a medium brown. Add garlic, chile and spices, and cook a few more seconds, until the whole is very fragrant. Add meat and brown on all sides.
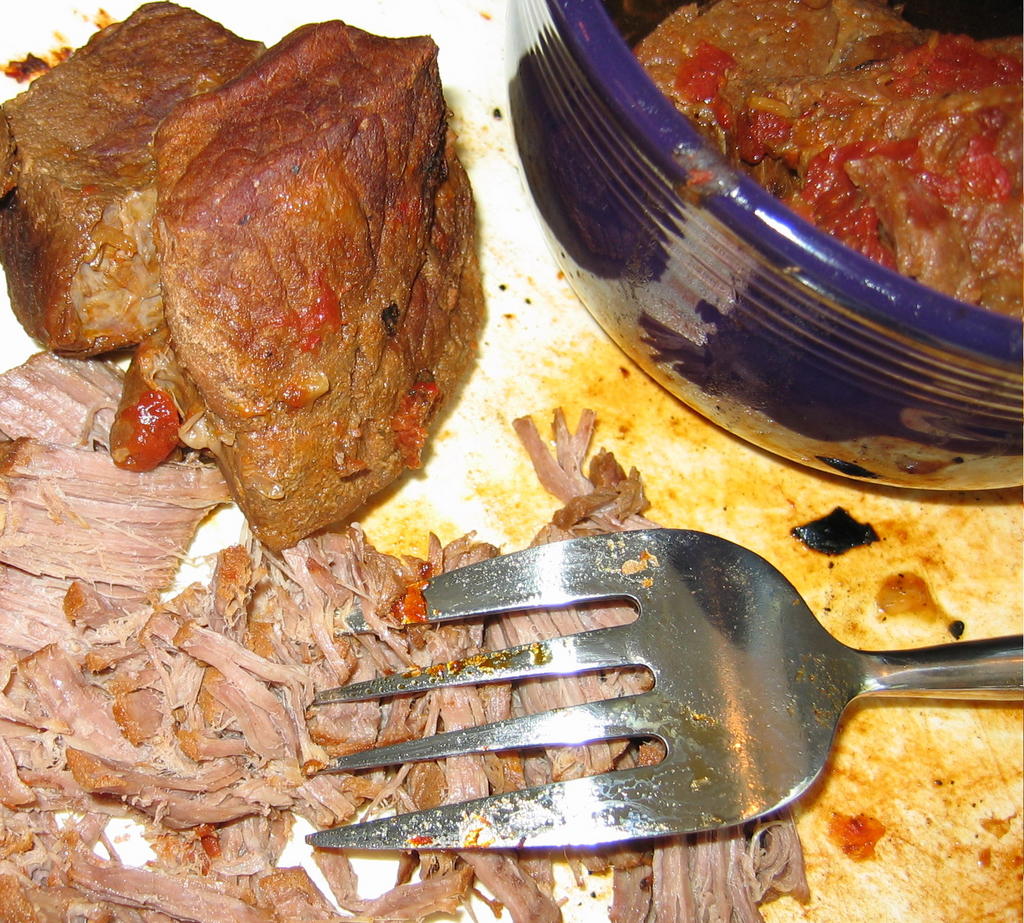
Add the rest of the ingredients and bring to a boil. If you are using the pressure cooker, cover with the lid, lock it down, and bring up to full pressure, then turn the heat down to low, and allow to cook for the manufacturer’s recommended time, and release pressure naturally as discussed above. If you are using a regular stew or stockpot, turn heat down, skim any scum off the top of the broth, cover and allow to simmer until the meat is so tender it falls off the bones, or when you stick a meat fork into it, it falls apart and the fork can be pulled out without the meat chunk sticking to it and coming out of the pot with it.
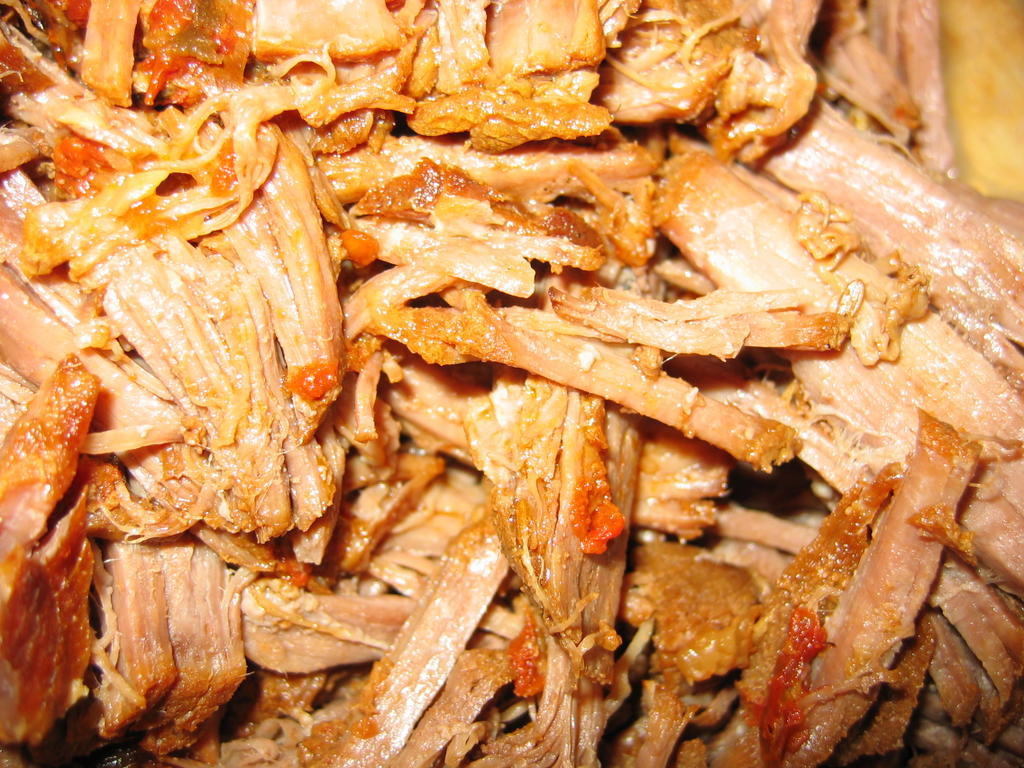
When meat is done, pull it out of the liquid, set it on a plate and allow to cool until you can easily handle it. Remove all hunks of skin, fat and connective tissue, and with a fork, gently shred the meat. Generally, I hold the fork tines down, as if I was holding a piece of meat to cut it, and hold the piece of meat steady with my other hand, and in a gentle up and down motion, attack the meat with the fork, tearing it into thin shreds.
Any accumulated juices on the plate should be poured over the meat. (You can also moisten the meat with some of the cooking liquid–this helps keep it from drying out while you wait to fill the enchiladas.)
Cover the meat until it is to be used as a filling.
Notes:
Spices can be varied according to what meat one is using. For beef, I use more cumin and less coriander, and a lot of black pepper and some dried or fresh thyme. For pork, I use more coriander than cumin, about a teaspoon of juniper berries, and a little bit of rosemary. For chicken, I use sage and rosemary, more coriander than cumin, and a pinch of allspice. For lamb, I use rosemary and thyme, more garlic and a lot of ground black or white pepper. For venison, I use lots of garlic and thyme, a teaspoon and a half of juniper berries and a lot of black pepper.
To use the cooking liquid, it is best if you remove as much fat as possible before using it to make a sauce; to do so, cool it completely and the fat will congeal at the top, making it simple to lift out by hand or with a spoon. I like to leave some fat, though–that is where the flavor is, and it will make a sauce with more body than a completely defatted broth will.
Shredded meat can be further seasoned, if you wish, with caramelized onions, roasted sweet or hot peppers or more spices. Ths is great to do if you are using it as taco meat, but if you are using it for enchiladas, which have a sauce, it is not necessary. For tamale filling, it is customary to mix the meat with a sauce before using it to fill the little masa packets, so extra seasoning is usually not necessary. Remember, you want people to be able to taste the meat, not just the sauces and spices.
 When I make enchiladas, I always make guacomole to serve on the side. With enchiladas Colorado, it provides a lovely contrast in color; with enchiladas verde, it provides a contrast in texture and especially in flavor.
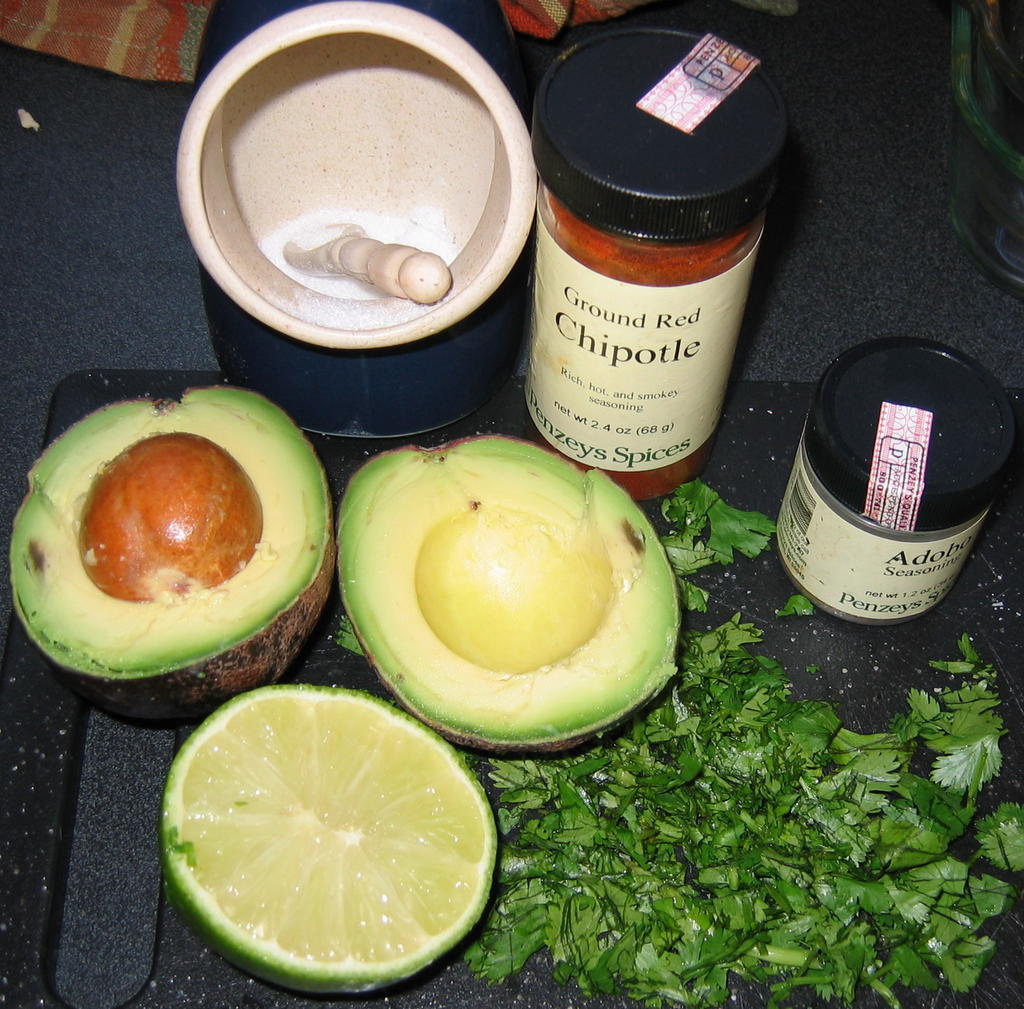
Quacamole is one of those recipes where less is more. The first homemade quacamole I had included either sour cream or Miracle Whip salad dressing, and while that was tasty, I have come to love a more traditional, minimalist’s version where the richness of the avocado is offset by the smoky warmth of ground chipotle, the bite of raw garlic and the sparkle or lime juice. I finish it off with salt, a tiny sprinkling of adobo seasoning or ground cumin (about a pinch’s worth) and freshly chopped cilantro. Anything else seems to muddle the flavors and cover the natural beauty of the avocado.
Oh, and I only use Haas avocados–those are the bumpy-skinned black ones about the size of my palm that make me really understand why avocados are sometimes called “alligator pears.” They have a fuller flavor and better texture than those big bright green waxy-skinned ones. I always choose ones that are fairly soft, as well, without being completely squishy–I like mine a little less ripe than other people do, apparently. But they should give to gentle pressure without threatening to burst and go “spoo” all over the place. The really mushy ones like that are either overly ripe or have been bruised and pummelled about and will make really ugly quacamole.
 Guacamole
Ingredients:
1 good sized, ripe Haas avocado
1 lime
1 small clove garlic, minced
1/4 cup freshly chopped cilantro
salt to taste
ground chipotle to taste
1 pinch ground cumin or adobo seasoning
Method:
Cut avocado in half, and remove pit. Squeeze pulp into a small bowl.
Squeeze the juice from half the lime over pulp, add minced garlic and cilantro. Mash avocado to a lumpy paste (smoothly pureed guacomole is yucky, in my opinion) and add salt, chipotle and cumin or adobo seasoning to taste.
If the avocado is particularly rich, you may need to add just a bit of the rest of the juice from the other half of the lime.
Notes:
How do you keep your guacamole from turning brown? Do not expose it to the air. I usually manage this by making it right before I serve it, but if you are making a bunch of it for a party, you can do this by doing as late as you can before your party, and then when it is done, covering the top completely with plastic wrap that is set down completely over the surface of the avocado pulp, sealing out the air. The myth about the pit stopping the browning is just that–a myth–Harold McGee debunked it in his book, “The Curious Cook” years ago.
3 Comments
RSS feed for comments on this post.
Sorry, the comment form is closed at this time.

Categories:
- Admin (rss) (55)
- Blogs and Blogging (rss) (81)
- Book Reviews: Cookbooks (rss) (43)
- Book Reviews: Non-Cookbook Food Books (rss) (38)
- Cats and Cat Blogging (rss) (47)
- Chinese Cooking Lessons (rss) (32)
- Culinary School Stories (rss) (18)
- Dairy Pruducts: Cultured and Barbaric (rss) (4)
- Documentary Filmmaking (rss) (1)
- Essays, Rants and Reflections (rss) (260)
- Fighting Hunger (rss) (12)
- Food and Kids (rss) (45)
- Food in the News (rss) (126)
- Food Media (rss) (98)
- Food Preservation (rss) (18)
- Food Safety (rss) (45)
- Gardening (rss) (30)
- Herbs and Herb Blogging (rss) (20)
- Holidays (rss) (50)
- Kat Blogging (rss) (22)
- Kitchen Science (rss) (36)
- Leftover Makeover (rss) (8)
- Life, the Universe and Everything (rss) (131)
- Local and Sustainable (rss) (227)
- Local Athens Food and Foodies (rss) (42)
- Meatless Mondays (rss) (32)
- Menu For Hope (rss) (5)
- Nutrition, Diet and Health (rss) (84)
- On The Farm (rss) (8)
- Recipes: Almost Vegetarian, Vegetarian and Vegan (rss) (294)
- Recipes: American Regional (rss) (37)
- Recipes: Appalachian Hillbilly (rss) (33)
- Recipes: Bread, Pasta, Grains (rss) (95)
- Recipes: Canning and Preserving (rss) (8)
- Recipes: Chinese (rss) (123)
- Recipes: Comfort Food (rss) (120)
- Recipes: Cookies (rss) (16)
- Recipes: Desserts (rss) (48)
- Recipes: French (rss) (25)
- Recipes: Fruits and Vegetables (rss) (302)
- Recipes: Greek, North African and Middle Eastern (rss) (31)
- Recipes: Indian (rss) (137)
- Recipes: Italian (rss) (42)
- Recipes: Japanese (rss) (7)
- Recipes: Jewish (rss) (4)
- Recipes: Korean (rss) (6)
- Recipes: Meat, Poultry and Fish (rss) (220)
- Recipes: Mexican/Native American/ Latin American/Caribb (rss) (27)
- Recipes: Original (rss) (108)
- Recipes: Thai (rss) (27)
- Recipes: Tofu (rss) (17)
- Recipes: US Regional (rss) (16)
- Recipes: Vietnamese (rss) (8)
- Restaurant Stories (rss) (28)
- Sewing, Quilting, Arts and Crafts (rss) (16)
- Simple Chinese Recipes (rss) (30)
- Slow Food and Heritage Foods (rss) (10)
- Spice Blogging (rss) (44)
- The Chinese Cookbook Project (rss) (14)
- The Chinese Pantry (rss) (39)
- The Documentary (rss) (2)
- The Kitchen Saga (rss) (17)
- The Locavore's Bookshelf (rss) (15)
- The Unsung Adventures of The Culinary Nerd (rss) (6)
- Tools and Toys (rss) (35)
- Uncategorized (rss) (10)
- With a Side of Politics (rss) (48)
Archives:
- August 2012 (9)
- July 2012 (12)
- September 2011 (3)
- August 2011 (7)
- July 2011 (8)
- June 2011 (16)
- May 2011 (17)
- April 2011 (11)
- December 2010 (9)
- November 2010 (5)
- February 2010 (1)
- December 2009 (5)
- November 2009 (7)
- October 2009 (10)
- September 2009 (16)
- August 2009 (14)
- July 2009 (14)
- June 2009 (7)
- May 2009 (17)
- April 2009 (10)
- March 2009 (25)
- February 2009 (13)
- January 2009 (10)
- December 2008 (5)
- November 2008 (5)
- October 2008 (6)
- September 2008 (13)
- August 2008 (8)
- July 2008 (11)
- June 2008 (18)
- May 2008 (13)
- April 2008 (14)
- March 2008 (16)
- February 2008 (17)
- January 2008 (19)
- December 2007 (25)
- November 2007 (18)
- October 2007 (24)
- September 2007 (16)
- August 2007 (15)
- July 2007 (15)
- June 2007 (10)
- May 2007 (14)
- April 2007 (16)
- March 2007 (17)
- February 2007 (20)
- January 2007 (13)
- November 2006 (1)
- October 2006 (8)
- September 2006 (14)
- August 2006 (25)
- July 2006 (30)
- June 2006 (28)
- May 2006 (34)
- April 2006 (29)
- March 2006 (24)
- February 2006 (30)
- January 2006 (38)
- December 2005 (40)
- November 2005 (37)
- October 2005 (32)
- September 2005 (25)
- August 2005 (30)
- July 2005 (28)
- June 2005 (21)
- May 2005 (8)
- April 2005 (22)
- March 2005 (17)
- February 2005 (29)
- January 2005 (10)
Search Site:
Links:
- Lily’s Wai Sek Hong
- 101 Cookbooks
- A cat in the kitchen
- A Veggie Venture
- Accidental Hedonist
- Cha Xiu Bao
- chez pim
- Chocolate & Zucchini
- Chopstick Cinema
- Chowhound.com
- Chubby Hubby
- Cook sister!
- Cooking with Amy
- da*xiang
- Eat Local Challenge
- Eating Liberally
- Ecocentric
- Eggbeater
- Epicurious
- Farmgirl Fare
- Fatfree Vegan
- Foodgoat
- ForkandBottle.com
- Green Olive Tree
- Hooked on Heat
- Jaden’s Steamy Kitchen
- Kalyn’s Kitchen
- Lucullian delights
- Mahanandi
- Matt Bites
- MeatHenge
- mmm-yoso!!!
- New York Times – Dining & Wine
- Pizza Goon
- Rasa Malaysia
- Ruhlman
- Sailu's Kitchen
- Serious Eats
- SF Gate: Food & Dining
- Simply Recipes
- Soul Fusion Kitchen
- Tastespotting
- The Amateur Gourmet
- The Cleaner Plate Club
- The Food Section
- The Grub Report
- thecookscottage
- U.S. Food Policy
- Wandering Chopsticks
- Washington Post Food and Dining
- Wasted Food
Meta:

Powered by WordPress. Graphics by Zak Kramer.
Design update by Daniel Trout.
Entries and comments feeds.
The reason quick release on the pressure cooker toughens the meat up is explosive decompression. The meat, due to the rapid and explosive nature of the pressure release compensates with the juices flowing out of the tissue. The result is tough dry meat. By letting the pressure out slowly the meat has time to balance itself at the new pressure and does not loose all the liquids. Think a diver surfacing too quickly. All the nitrogen gas boils out of their blood and into their blood stream.
Hmmm, I wonder if you were to reseal the meat, bring it back up to the pressure for a few minutes then slowly let it cool if it would recover?
It is kind of a beefy barometric chamber as it were.
Any more mysteries of the kitchen I can solve? That is much more manageable than the entire universe.
🙂
Comment by Bryian — August 29, 2005 #
Thank you Bry–you can tell I was thinking food, not living organism! Duh. And I have had lots of anatomy and physiology classes, too. Duh, duh!
But you are absolutely right–that is what it is.
And as for would it go back–uh, probably not. I wouldn’t want to risk a perfectly good piece of meat finding out.
Maybe with a hunk of icky meat, I’d give it a shot! But not on a day when I was intending to make enchiladas or tamales–no, no.
If you all are available next Saturday, maybe we could do that raincheck birthday feast for you?
Comment by Barbara Fisher — August 29, 2005 #
Thanks for the wed site.
Your methods are very helpful
I also needed the type of cheeses and beef that would be best for my enchiladas
Thanks again
Bea
Comment by Beatrice — May 1, 2008 #