Cook Local, Eat Global
Ginger Lemon Cookies
I read a lot of cooking magazines, but my favorite one is Fine Cooking Magazine.

It is the only one I currently subscribe to, mainly because it teaches cooking technique and in-depth recipes with a lot of photographs that perfectly illustrate tricky processes that are difficult to explain in words.
When you see a lot of my recipes on this blog illustrated not just with the finished dish–but instead with a full range of photographs showing the process of the dish being cooked–that is inspired by the photographers in Fine Cooking.
But what is weird–as much as I love it for being a real cooking magazine that is primarily about cooking and not about liftestyle, travel or food snobbery, I seldom actually cook from it.
I don’t know why, except I seldom ever cook directly from any one recipe. I have too much fun looking at a recipe, reading it over a few times, fixing it in my mind and then going forth to create my version of the dish to sit and fuss over a recipe and do it exactly like it appears in a magazine.
The exceptions to this rule are baking recipes–I don’t tend to mess with those too much, at least not the first time I try them.
And, in truth, I have done a few baked recipes from Fine Cooking.
One was a fruit tart with a shortbread crust that was a disaster, years ago. I ended up using Martha Stewart’s Pate Sucre recipe instead and then following the recipe for the filling–standard pastry cream lightened with whipped cream–and the topping–fresh fruit glazed with thinned warm apple jelly–from Fine Cooking. It turned out fine in the end, but the original crust that I tried to roll out was straight from hell. Sticky, unwieldy and gross, I ended up tossing it in the garbage.
I have also done galettes from the pages of Fine Cooking, and they turned out beautifully and were so successful, that they inspired me to learn to make pies for real.
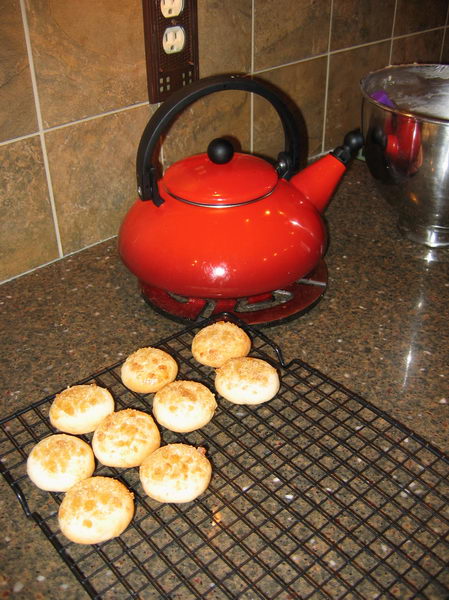
This time around, I saw a cookie recipe that looked good in the Fine Cooking Holidays special edition, and wanted to try it out. Ginger & Lemon cookies by Abigail Johnson Dodge, turned out not to look like the illustration in the magazine, but they did turn out pretty well, though, when I make them again, I will add more dried ginger, some cardamom and some lemon extract in addition to the lemon oil I already added.
I think it was a good recipe overall, but now that I have been writing recipes, I tend to notice the way other people write theirs.
The photograph of the cookies in the magazine show them as being very flat–almost as if they were cut out, but the directions specifically state to roll the dough into balls, then “slightly flatten” them before topping them with the minced crystallized ginger and sugar, and eggwhite.
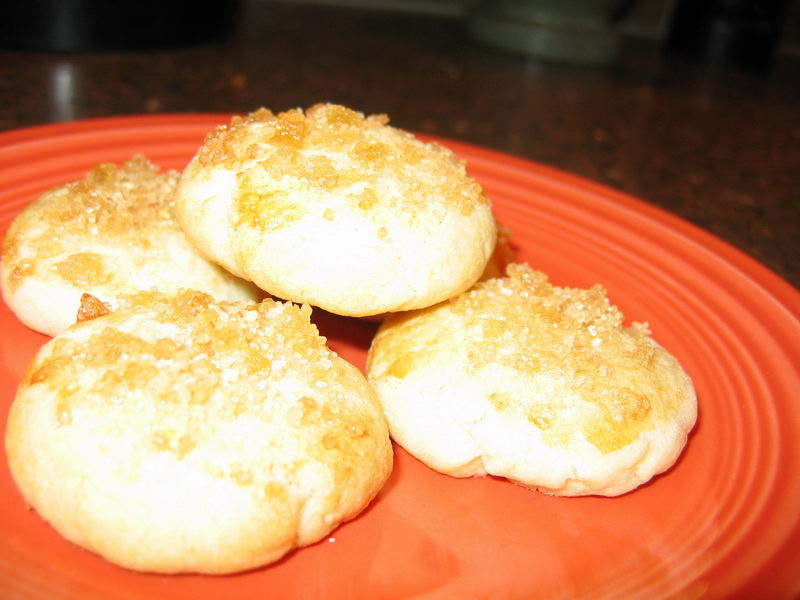
Well, as you can see from my photographs of the finished cookies, this created a rounded dome-shaped cookie instead of a flat one. In order to ameliorate this, I would either add a tiny bit of baking soda to help the dough spread in the oven, or flatten it more completely than stated.
Another flaw I noted was the amount of minced crystallized ginger called for in the recipe did not match the amount shown on the cookies in the photograph–the recipe calls for two tablespoons of sugar mixed with two tablespoons of minced crystallized ginger.
Yet, when I put as much of this topping on the cookies as illustrated, I ran out halfway through.
Also–I think that the cookie dough was short on ginger flavor. Even after I added dried ginger to the amount of grated fresh ginger the recipe directed, I still think a bit more ginger was called for. And, the lemon flavor was definately nonexistant with the small amount of lemon zest called for–one half teaspoon barely gave the dough any lemon tang at all. I added about five drops of lemon oil and that perked it up considerably.
But, all in all–this is definately a good idea for a recipe, and I will be making them again–just more my way next time. (Cardamom will deepen the lemon flavor and also strengthen the ginger while adding a whisper of its own complexity.) As it is–I make note of what I changed this time around in parenthesis, so readers can decide to try the recipe as originally written or my own redaction.
Ginger & Lemon Cookies
Makes around 30 cookies
Ingredients:
1/2 pound butter at room temperature
3/4 cup plus 2 tablespoons granulated sugar (For the 2 tablespoons, which was for the topping, I used 4 tablespoons raw sugar)
3 tablespoons grated fresh ginger
1/2 teaspoon finely grated lemon zest
(five drops lemon oil)
(1/4 teaspoon dried ground ginger)
1/4 teaspoon salt
2 large egg yolks
1/2 teaspoon vanilla extract
2 1/2 cups unbleached all purpose flour
2 tablespoons minced crystallized ginger (I used 4 tablespoons)
1 lightly beaten egg white
Method:
Position rack in center of the oven and preheat to 350 degrees F. Line three cookie sheets with nonstick liners or parchment. (I only used one pan, and I didn’t do the parchment paper or the nonstick liners, and I had no problem)
Beat together butter 3/4 cup sugar, ginger, lemon zest and salt. Cream together until light and fluffy–about 2-3 minutes. Scrape down the bowl, add the dried ginger, lemon oil, egg yolks and vanilla extract. Beat until combined. Add the flour and mix on low speed until well blended and dough just comes together.
Shape tablespoonsful of the dough into 1 inch balls, and set 1 1/2 inches apart on cookie sheets.
Mix together 2 tablespoons of sugar (4 tablespoons of raw sugar) and the crystallized ginger in a small bowl.
Press down on cookie until slightly flattened (Or until 1/4 inch thick) and brush with egg white then sprinkle with sugar’ginger mixture. Pat down with fingertip to get the ginger toping to stick.
Bake for about 11 minutes for dark cookie sheets, or 13 for silver ones, one sheet at a time. Remove fro oven, and let sheet cool on rack five minutes before removing cookies to cool completely on wire racks.
A Menu for Hope Update
Can I say this?
I have been keeping a close eye on Pim’s Menu for Hope charity drive for the victims of the Kashmir earthquake, and am thrilled to report that nearly $5,000 dollars have been donated to the cause. That is a great amount of generosity, and I am pleased to be a part of it, and to see love in action. Keep sending the love, people.
And speaking of love in action, I have to point my readers to a beautiful gift promised to the Menu for Hope by a fellow food blogger. Remember when I wrote about cast iron cookware last week, and people wrote in and talked about how attached they all were to their cast iron pots? This emotional attachment is pretty common across the board with cooks, because with cast iron, you have to invest a good bit of time and energy into nurturing it along until it is perfectly well seasoned, and even then, it requires a good bit more care than other pots that you can just toss in the dishwasher.
VK Narayanan, the blogger behind My Dhaba, offered a beloved cast iron kadai–or Indian style frying pan as a raffle gift, and blew me away with the generosity and love that such an offering symbolizes.
I take my hat off to VK–thank you for a heart offering in the cause of helping those in need.
And thank you to all the folks who have given to help the folks in Kashmir. Love is never wasted–it always returns to the giver, multiplied threefold, from the universe.
Stir Fried Bay Scallops with Greens
This was the first meal I made on the AGA.
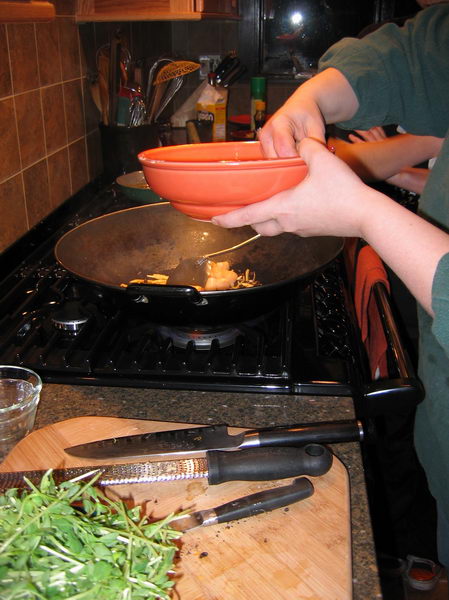
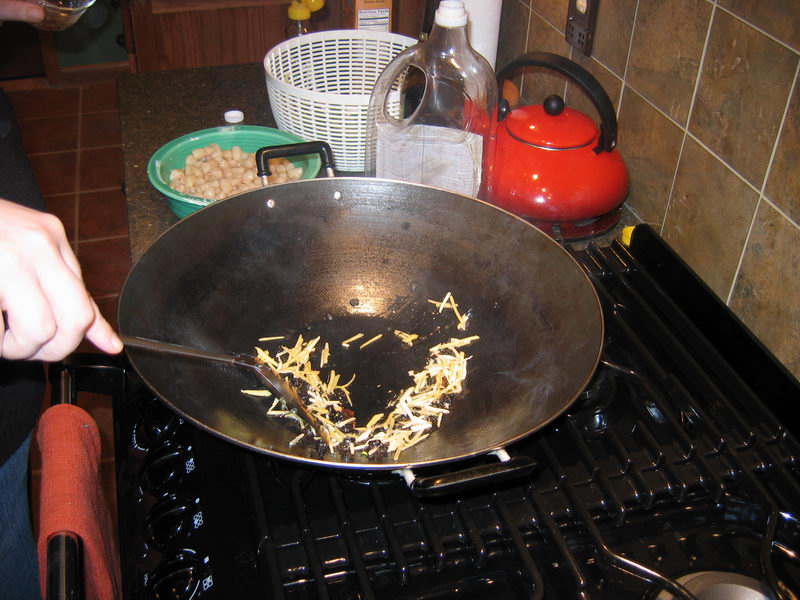
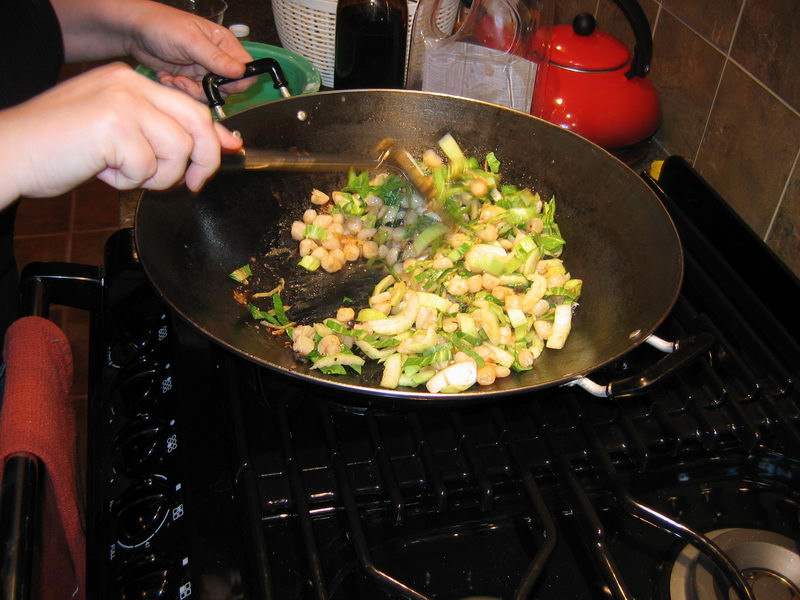
In the illustration to the right, you can see that I am cooking scallops, and in the lower left corner, you can see what I was cooking with them–snow pea tips. Those little sprouty-looking guys are the very tender tips to the snow pea shoots–that is the plant that bears snow peas. They are sweet and very crisp, but not quite as sugary tasting as the peapods themselves. They have a little bit of a beansprout savor to them that helps keep them from being overly sweet like snow peas can be.
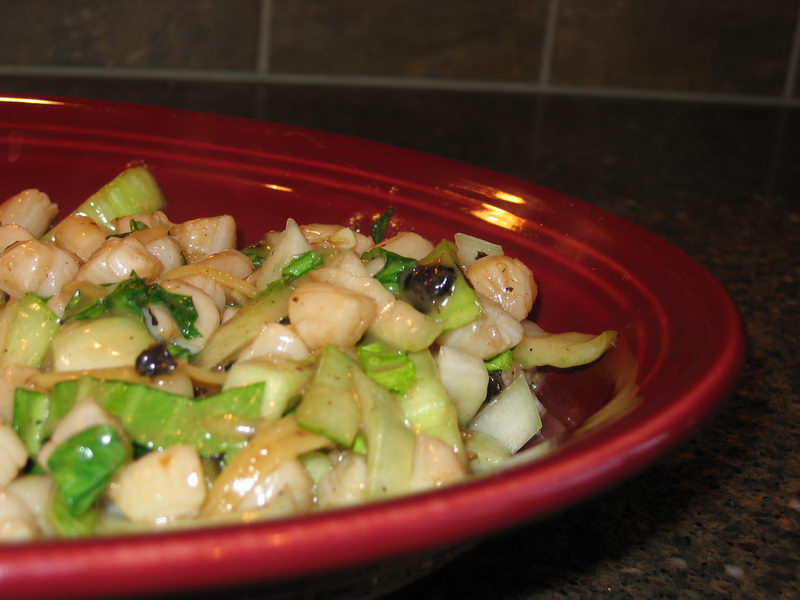
Anyway–those pea tips were fantastic cooked with the scallops, and they looked lovely–they formed a nice wreathlike nest of greenery for the tiny white bay scallops. Studded with the ebony fermented black beans and thin spikes of golden ginger and pale garlic, the dish was a treat to behold.
However, before we could post a picture of the finished dish, the rechargeable batteries for the camera died, so I never posted about this recipe.
This was tragic, because, as I said, the dish was a keeper, even if Morganna only ate the pea tips–apparently, unknown to me, she is afraid of most shellfish. (Don’t worry. I am working on helping her over this tragic phobia.)
But, a good dish will not leave my thoughts before it is recorded, and so, since Morganna stayed after school to prepare for her choir performance tonight, and it was just going to be Zak and I for supper, I recreated the dish, except no one has pea tips in Athens.
Instead, I used shredded Shanghai bok choi that Zak picked up at the New Market, our resident Asian/International Food market. (If I could have waited until the Farmer’s Market, I could have gotten sunflower or radish sprouts instead–I suspect those would be nearly as good as the pea tips.)
For those who are not familiar with it, Shanghai bok choi(mei qing choi) is similar to regular bok choi, but is harvested when it is younger and smaller, and instead of having white, very watery stalks, it has pale jade green stalks that are a little more flavorful. The leaves also tend to be a less dark green–more of a grass green than a pine green color. It is a very tender green, and it cooks very, very quickly. I like to use it instead of regular bok choi, but I still prefer choi sum or gai lan to it. (However, the stronger flavor of gai lan would overpower something as delicate as scallops.)
I shredded the bok choi finely across the width of the stalk–this simulated the long, slender shape of the pea tips, and made a contrast to the rounded shape of the scallops.
When it came to cooking the scallops themselves, I could have consulted one of my over 100 Chinese cookbooks, but I didn’t.
Instead, I remembered what I knew of Cantonese ways with seafood (with a touch of inspiration also from Sichuan) and improvised.
Ginger is nearly always used with seafood in Cantonese cookery, because of its purifying scent and its freshness. The Cantonese are fanatics for fresh seafood, but even so, they always want ginger with it to take away the fishiness in the cooking odor. It is also meant to be good for the digestion of rich foods, such as scallops. I remembered that fermented black beans are classically paired with steamed clams, I decided to use them as well, which meant that a bit of ginger was necessary, it being a perfect foil for the strong taste of the black beans.
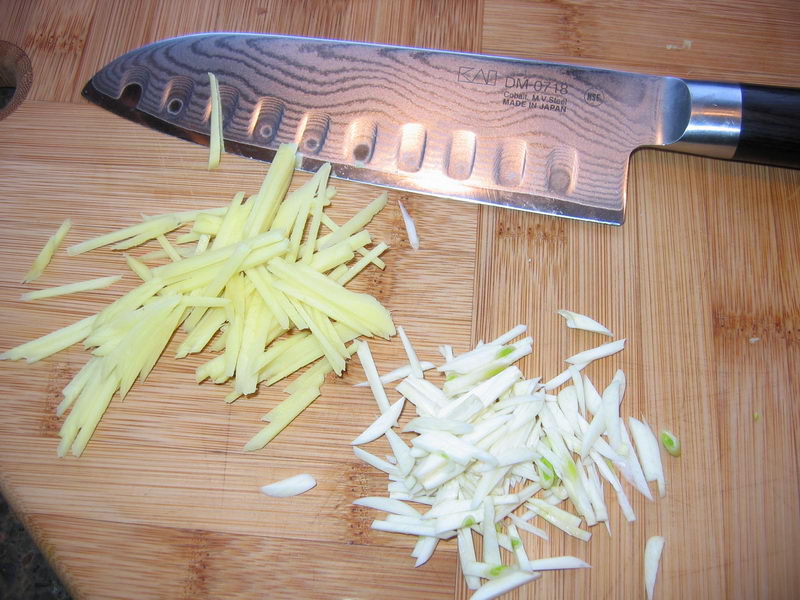
In order to have the ginger and garlic blend with the greens, I shredded them finely. This is accomplished after peeling the cloves and roots, by cutting thin slices, stacking the slices three or so high and then with careful strokes of the knife, slicing each stack into grass-fine shreds. When I am in practice, this technique is quickly accomplished, but if I go a few weeks without cooking Chinese or Asian foods, I will lose my touch and end up with clumsy looking matchsticks, instead of the whisper-thin shreds I seek.
The scallops had a fresh scent, so I decided on a very simple marinade. A splash of Shao Hsing wine, a bare teaspoon of thin soy sauce, so as to not color the dish overmuch–I wanted the pale perfection of the scallops to show through, and a few turns of the peppermill to give a pang of heat. From the Sichuan “fish fragrant” sauce–known in American Chinese restaurants as “garlic sauce,” I nabbed the idea of adding a tiny bit of Chianking vinegar–black rice vinegar. This vineger is fragrant and gently acidic, somewhat like balsamic vinegar, and the sour note helps counteract any tendency toward fishiness the seafood may have, while contrasting with the scallop’s natural sweetness, thus bringing into play the Chinese concept of the balance of opposing flavors in food.
To the marindade I added a pinch of raw sugar to boost the sweetness of the scallops, and about a tablespoon of cornstarch, to make the marinade coat the scallops and stick to them a bit.
I marinated the scallops for a mere ten minutes–just long enough to give fragrance to them without overpowering their natural flavor. I very much wanted only to enhance the essence of the shellfish, without adding extraneous flavors that might mask its simple beauty.
Cooking went very quickly–the first time, I was so surprised at how hot the burner got, I nearly scorched the ginger, garlic and black beans! However, this time, I was ready for it, and briskly set forth, and tossed and turned and cooked–the dish was done in a mere three minutes, without any fuss or trouble. The wok went on the fire, it heated up in record time, sending a thin ribbon of smoke skywards like a hungry ghost, and then in went the oil. A few seconds later, as soon as it shimmered, in went the aromatics. After a few seconds of tossing, in went the scallops, and then after a few turns, the greens followed.
A splash of wine, a drizzle of sesame oil, and I turned it out into a warmed platter, and it was ready for the table, fragrant with wok hay and glistening with wine and sesame oil.
I have to admit to preferring the pea tips to the bok choi, but truly–I would never turn this dish down. It is a truly fine and elegant repast, one that I suspect we will ejoy again and again.
Now, if only I could figure out that lovely dish Huy used to make with bean sprouts and shrimp….
Stir-Fried Bay Scallops with Greens
Ingredients:
1 pound tiny bay scallops
1 teaspoon thin soy sauce
2 tablespoons Shao Hsing wine or dry sherry
1 teaspoon Chiangking vinegar
freshly ground black pepper to taste
1 pinch raw sugar
1 1/2 tablespoons cornstarch
2 tablespoons peanut or canola oil
1″ chunk fresh young ginger, peeled and shredded
2 medium garlic cloves, peeled and shredded
2 teaspoons fermented black beans, mashed lightly
2 tablespoons Shao Hsing wine or dry sherry
2 heads Shanghai bok choi, washed, trimmed and shredded (or a double handful of snowpea tips)
1/4 teaspoon sesame oil
Method:
Toss scallops in next six ingredients until well combined, then marinate for ten minutes.
Heat wok until a thin wisp of smoke appears, then add peanut or canola oil. When it shimmers in the heat, add ginger, garlic and black beans all at once, and stir fry until well fragrant, about thirty seconds to one minute. Add scallops and marinade and stir very quickly, frying until nearly cooked through–around one and a half minutes. As soon as wok dries out and a bit of brown crust forms on sides and bottom from the marinade, add wine or sherry and deglaze while still tossing scallops. Immediately add bok choi (or even better, the pea tips) and cook, tossing for about thirty seconds to one minute more.
Add sesame oil and stir one more time, then scrape into heated serving platter.
Chambord Souffle Brownies
This brownie recipe has been over fifteen years in the making.
Which sounds rather dramatic, I suppose, but it is true. I have been playing with this recipe for around sixteen years, to the point where I am not even sure what cookbook the original came from.
All I know is that one year, I decided to make brownies that tasted like an Almond Joy bar, with almonds, a creamy coconut filling and dark chocolate batter that baked up moist and fudgy.
I used a moist chocolate brownie recipe, and then made a cheesecake batter for the filling, and added almonds, almond extract and flaked coconut to the cheese mixture. When it came time to melt the chocolate for the batter, I decided that, in the case of chocolate, if some was good, more was better.
So, I put in twice as much chocolate as the recipe called for, beat the living daylights out of the batter by hand, put half of it in the pan, poured the cheese and coconut mixture on top and spread the rest of the chocolate batter over it and baked it.
I discovered several things.
One–you can put a lot more chocolate into a brownie batter than is called for without adding more flour if you essentially overbeat the batter.
Two–if you want your brownies to be fairly light, you can add a bit more baking powder than is usually called for when it comes to dense, fudgy bars.
Three–no one liked the coconut filling except me.
So, the next year when Yule baking time came around, I ditched the coconut, and instead, added Carolan’s Irish Cream liquor to the cheese layer.
That was the ticket.
Those brownies, known variously as “Irish Cream Filled Brownies,” “Barbara’s Wonderful Brownies,” and “Ohmigod, The Wicked Brownies” for years, got me several marriage proposals–and as I mentioned a few posts back, one of which I accepted. These remained basically unchanged, except for adding a little more or less flour and changing chocolate brands, over the intervening fourteen or so years.
This year, I decided to do something different with the brownies, and come up with a variation, and thus was born this particular incarnation: Chambord Souffle Brownies.
Yes, I changed out the Irish Cream for Chambord, and added raspberry preserves in a thin layer marbled with the cream cheese.
Souffle is in the title this time around, because after all of these years making and tweaking with these brownies that taste more like confections than a baked item, I realized last night that they act more like a souffle than anything else.
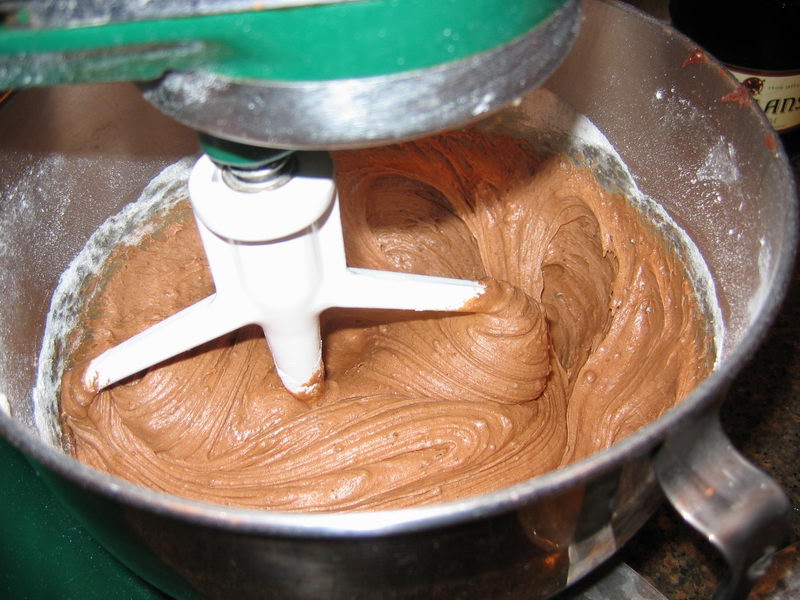
Which makes sense–they contain five eggs–four in the chocolate batter and one in the cheese. The eggs are well beaten with the sugar before adding the chocolate and beating well again. This process traps tiny air bubbles in the batter, which gives the incomparable light and airy mouthfeel that is characteristic of them. Then, beating well after the flour and baking powder is added continues the process of incorporating air.
As you can see from the photograph above, the finished chocolate batter looks like a thick, airy milk chocolate frosting. In fact, it uses semi-sweet chocolate, not milk–it is the air which causes the color to lighten considerably.
Once the brownies bake, they darken to their more natural color.
A few caveats about this recipe–calibrate your oven before baking them. They must bake at 350 degrees, no more and no less. Less than that, and you get a gloopy, gloppy godawful mess all over your oven, your pans and yourself. Over 350 degrees will get you a very baked outside (to the point of being way too crispy) and a severely underbaked center. If you have a convection oven, don’t use the fan (if you have a choice) the first time you bake these.
Bake them for only 45 to 50 minutes. Do not bake any longer. Yes, I know that they seem quite liquidy in the center–that is because there is very little flour in there to set up and hold everything together. Just take them out, and let them cool gradually on a wire rack on top of the stove. In fact, let them sit until morning. Walk away and forget about them until they are fully cooled. Then, come back and cut into them.
A crust forms on these, even if you follow my instructions. That is fine–it is supposed to do that. Some people who have baked these have cut the crust off and just eaten the soft, whipped interior portion. I say humbug to that–the textural differences are more appealing. What good is soft without a tiny bit of crisp to set it off? Just cut through it, and leave it in place on top of the brownies. It will crackle into a lovely crazed topping like old pottery.
Cut these into tiny squares. This is one of the few times you will ever hear me say, “Less is more.” These are unbelievably rich, so go easy on them.
Finally, understand that as these bake, they puff up like a souffle. (Hence the name, eh?) But, as they cool, like a souffle, they sink down in the middle. That is the nature of these brownies. That is what they do. It sometimes results in something that looks less than fabulous, but I promise you, if you use a very sharp knife, and cut into tiny squares, wiping the blade between each cut with a damp towel, then a dry one, and put the brownies on a plate, they will look fine. If you are worried about what people will think–don’t cut them in front of anyone, so they cannot see them in their natural state. Cut them in the kitchen, arrange them on a platter, have coffee or espresso sitting in front of your guests, garnish the platter with perhaps whole raspberries or some mint leaves or festoons of curly ribbon, and swan out to the dining room, set it down and wait for them to taste it.
Unless you are pox-ridden and endowed with the temperament and breath of a Komodo dragon, I can almost assure you that at least one guest will propose marriage, or at least something indecent, while the others moan incoherently with their eyes rolling up in their heads.
When these inevitable offers come–and they will–do as you will with them. I can counsel you no further; I give you the recipe, and you do the rest.
But, I can tell you this.
It has been twelve years, and I am still quite happily married.
Chambord Souffle Brownies
Filling Ingredients:
8 ounces cream cheese, softened
1 egg, lightly beaten
1/2 cup sugar
2 tablespoons Chambord liquor
Brownie Ingredients:
12 ounces good semi sweet chocolate, chopped finely
4 tablespoons butter
4 large eggs
2 1/2 teaspoons vanilla extract
1 1/2 cups sugar
2 tablespoons Chambord liquor
1 1/4 cups flour
1/2 tablespoon baking powder
1 1/2 tablespoons instant espresso powder
1/3 cup raspberry preserves (I used Bon Maman brand–it is very stiff and not squishy)
Method:
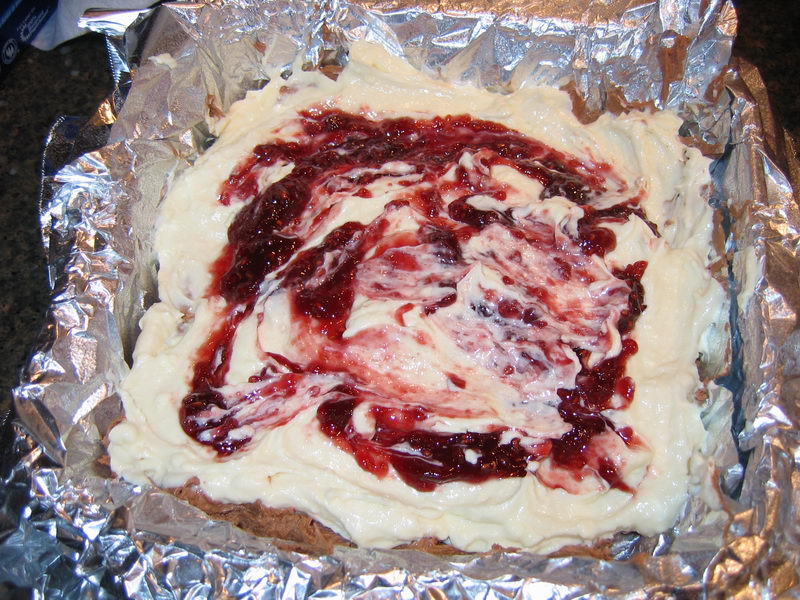
Set rack to the middle of the oven. Preheat oven to 350 degrees. Prepare a 9 x 9 inch glass baking pan by lining completely with foil, allowing about three inches overhang on all sides. (Use one sheet of foil going in one direction, and then another sheet going the other way.) Carefully press the foil so it follows the shape of the pan as well as possible. Leave the overhangs standing upright. Spray the pan well with Baker’s Joy.
Beat together filling ingredients until smooth. Set aside.
Melt chocolate together with butter over a hot water bath, or in microwave. (If you use the microwave, start on thirty seconds, and take out the chocolate and stir. If it still needs more time, go in five second increments–do not burn the chocolate!) Cool to just about body temperature.
Beat together eggs, vanilla, Chambord and sugar, until pale yellow and quite frothy. Add chocolate and beat on medium speed until fully incorporated. Put onto high speed and beat for one minute, or until stiffened slightly, and lightened in color.
Stir flour, baking powder and espresso powder together to combine well. Sprinkle over chocolate mixture and stir in slowly, scraping down side of bowl as needed. Beat on medium speed to incorporate air–beat until mixture lightens considerably and is quite stiff and fluffy–about one and a half to two minutes.
Spread half the brownie batter into the bottom of the pan in as even a layer as possible. It will be difficult to spread so pat it down as much as possible without compressing it overmuch. Spread the cream cheese mixture over it. Dot the raspberry preserves over the cream cheese, then draw a spatula or knife through, marbling it as shown in photograph above.
Take the remaining brownie batter, and divide into fourths. Dollup each forth into a quadrant of the pan on top of the cream cheese batter, then dabbing and pressing, coax the chocolate layer to cover the cream cheese layer as much as possible.This is tricky–the chocolate is stiff and hard to work with, but it eventually will work out if you keep at it.
Bake at 350 degrees for forty-five to fifty minutes. As described above, the brownie will puff up and seem quite liquid in the middle when it is done. That is fine–that is the way it is supposed to be. Take it out, set it on a wire rack on top of the stove,. turn off the oven and let it cool completely before lifting the brownies out of the pan by using the foil as handles.
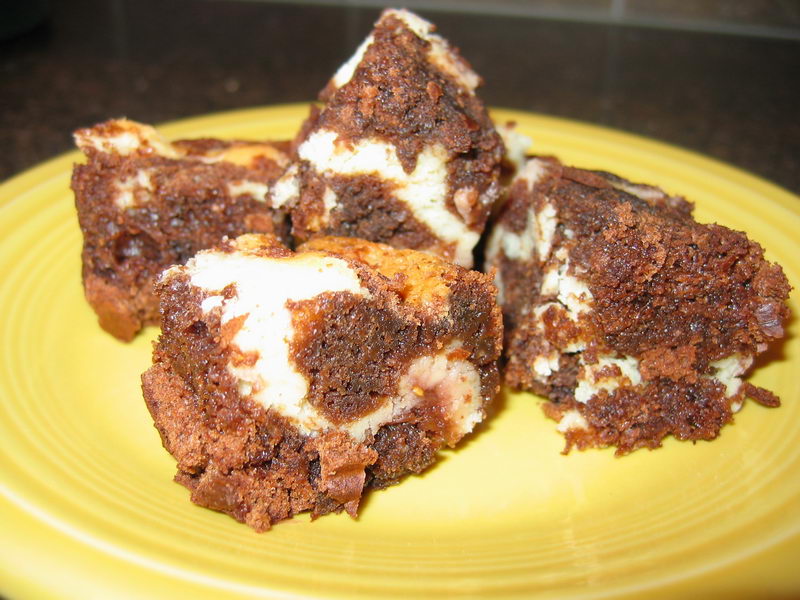
Cut into tiny pieces, keeping or discarding the thin crisp layer at the top as desired.
Serve with strong black coffee or espresso.
Cover and keep in a cool place–you can refrigerate it if you want, but most of the time, these don’t last too long around this house, so I don’t bother.
A brief (and hopefully final) non-food related post
At long last, Tigers & Strawberries is completely transferred over from Blogger — at least all the text is. Everything had transferred over safely except for the posts & comments from January through March. No matter what I did, Blogger refused to give them up.
Tonight, that changed.
Every single old T&S post is now in place. Barbara still has to categorize the posts I just successfully transferred, and I still have to update the older photos so they appear, but the hard & frustrating part is now over. Thank you all for your patience.
I know Barbara has lost a lot of folks as a result of the move, but, hopefully, that will turn around quickly. If you know of anyone who’s lost T&S, please show them in! And if they haven’t heard of the blog, well…you know what to do. 😉 (Barbara’s terrible at tooting her own horn. I’m good at tooting her horn. Erm. I mean. Uh. Nevermind.)
Now I will go away, hopefully never to be seen posting again, and I gratefully return you to your regularly scheduled food porn.

Categories:
- Admin (rss) (55)
- Blogs and Blogging (rss) (81)
- Book Reviews: Cookbooks (rss) (43)
- Book Reviews: Non-Cookbook Food Books (rss) (38)
- Cats and Cat Blogging (rss) (47)
- Chinese Cooking Lessons (rss) (32)
- Culinary School Stories (rss) (18)
- Dairy Pruducts: Cultured and Barbaric (rss) (4)
- Documentary Filmmaking (rss) (1)
- Essays, Rants and Reflections (rss) (260)
- Fighting Hunger (rss) (12)
- Food and Kids (rss) (45)
- Food in the News (rss) (126)
- Food Media (rss) (98)
- Food Preservation (rss) (18)
- Food Safety (rss) (45)
- Gardening (rss) (30)
- Herbs and Herb Blogging (rss) (20)
- Holidays (rss) (50)
- Kat Blogging (rss) (22)
- Kitchen Science (rss) (36)
- Leftover Makeover (rss) (8)
- Life, the Universe and Everything (rss) (131)
- Local and Sustainable (rss) (227)
- Local Athens Food and Foodies (rss) (42)
- Meatless Mondays (rss) (32)
- Menu For Hope (rss) (5)
- Nutrition, Diet and Health (rss) (84)
- On The Farm (rss) (8)
- Recipes: Almost Vegetarian, Vegetarian and Vegan (rss) (294)
- Recipes: American Regional (rss) (37)
- Recipes: Appalachian Hillbilly (rss) (33)
- Recipes: Bread, Pasta, Grains (rss) (95)
- Recipes: Canning and Preserving (rss) (8)
- Recipes: Chinese (rss) (123)
- Recipes: Comfort Food (rss) (120)
- Recipes: Cookies (rss) (16)
- Recipes: Desserts (rss) (48)
- Recipes: French (rss) (25)
- Recipes: Fruits and Vegetables (rss) (302)
- Recipes: Greek, North African and Middle Eastern (rss) (31)
- Recipes: Indian (rss) (137)
- Recipes: Italian (rss) (42)
- Recipes: Japanese (rss) (7)
- Recipes: Jewish (rss) (4)
- Recipes: Korean (rss) (6)
- Recipes: Meat, Poultry and Fish (rss) (220)
- Recipes: Mexican/Native American/ Latin American/Caribb (rss) (27)
- Recipes: Original (rss) (108)
- Recipes: Thai (rss) (27)
- Recipes: Tofu (rss) (17)
- Recipes: US Regional (rss) (16)
- Recipes: Vietnamese (rss) (8)
- Restaurant Stories (rss) (28)
- Sewing, Quilting, Arts and Crafts (rss) (16)
- Simple Chinese Recipes (rss) (30)
- Slow Food and Heritage Foods (rss) (10)
- Spice Blogging (rss) (44)
- The Chinese Cookbook Project (rss) (14)
- The Chinese Pantry (rss) (39)
- The Documentary (rss) (2)
- The Kitchen Saga (rss) (17)
- The Locavore's Bookshelf (rss) (15)
- The Unsung Adventures of The Culinary Nerd (rss) (6)
- Tools and Toys (rss) (35)
- Uncategorized (rss) (10)
- With a Side of Politics (rss) (48)
Archives:
- August 2012 (9)
- July 2012 (12)
- September 2011 (3)
- August 2011 (7)
- July 2011 (8)
- June 2011 (16)
- May 2011 (17)
- April 2011 (11)
- December 2010 (9)
- November 2010 (5)
- February 2010 (1)
- December 2009 (5)
- November 2009 (7)
- October 2009 (10)
- September 2009 (16)
- August 2009 (14)
- July 2009 (14)
- June 2009 (7)
- May 2009 (17)
- April 2009 (10)
- March 2009 (25)
- February 2009 (13)
- January 2009 (10)
- December 2008 (5)
- November 2008 (5)
- October 2008 (6)
- September 2008 (13)
- August 2008 (8)
- July 2008 (11)
- June 2008 (18)
- May 2008 (13)
- April 2008 (14)
- March 2008 (16)
- February 2008 (17)
- January 2008 (19)
- December 2007 (25)
- November 2007 (18)
- October 2007 (24)
- September 2007 (16)
- August 2007 (15)
- July 2007 (15)
- June 2007 (10)
- May 2007 (14)
- April 2007 (16)
- March 2007 (17)
- February 2007 (20)
- January 2007 (13)
- November 2006 (1)
- October 2006 (8)
- September 2006 (14)
- August 2006 (25)
- July 2006 (30)
- June 2006 (28)
- May 2006 (34)
- April 2006 (29)
- March 2006 (24)
- February 2006 (30)
- January 2006 (38)
- December 2005 (40)
- November 2005 (37)
- October 2005 (32)
- September 2005 (25)
- August 2005 (30)
- July 2005 (28)
- June 2005 (21)
- May 2005 (8)
- April 2005 (22)
- March 2005 (17)
- February 2005 (29)
- January 2005 (10)
Search Site:
Links:
- Lily’s Wai Sek Hong
- 101 Cookbooks
- A cat in the kitchen
- A Veggie Venture
- Accidental Hedonist
- Cha Xiu Bao
- chez pim
- Chocolate & Zucchini
- Chopstick Cinema
- Chowhound.com
- Chubby Hubby
- Cook sister!
- Cooking with Amy
- da*xiang
- Eat Local Challenge
- Eating Liberally
- Ecocentric
- Eggbeater
- Epicurious
- Farmgirl Fare
- Fatfree Vegan
- Foodgoat
- ForkandBottle.com
- Green Olive Tree
- Hooked on Heat
- Jaden’s Steamy Kitchen
- Kalyn’s Kitchen
- Lucullian delights
- Mahanandi
- Matt Bites
- MeatHenge
- mmm-yoso!!!
- New York Times – Dining & Wine
- Pizza Goon
- Rasa Malaysia
- Ruhlman
- Sailu's Kitchen
- Serious Eats
- SF Gate: Food & Dining
- Simply Recipes
- Soul Fusion Kitchen
- Tastespotting
- The Amateur Gourmet
- The Cleaner Plate Club
- The Food Section
- The Grub Report
- thecookscottage
- U.S. Food Policy
- Wandering Chopsticks
- Washington Post Food and Dining
- Wasted Food
Meta:

Powered by WordPress. Graphics by Zak Kramer.
Design update by Daniel Trout.
Entries and comments feeds.