Cook Local, Eat Global
Sewing And Craft Projects Part One: My First Rag Quilt

Since folks asked, I guess that I will post pictures and explanations of some of my recent sewing projects on Saturdays and leave Sundays for Weekend Kat Blogging, with the weekdays reserved for all things food and culinary. Since I get most of my foodie traffic on weekdays, this arrangement should satisfy just about everyone, including myself.
So, what is a rag quilt?
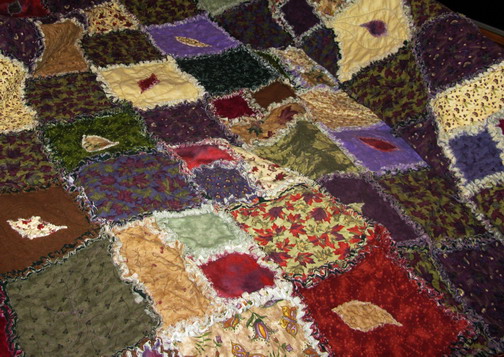
Well, it is a blanket or quilt made of easily frayed fabrics, often flannel or recycled (or as they say in the world of crafts these days, “upcylced”) denim, but plain cotton fabric is used as well. The quilt is put together completely differently than the traditional method of sewing a top out of patchwork or applique blocks, then layering it with batting and backing fabric, quilting it, then binding the edges. Instead of these usual techniques, rag quilts are constructed by sandwiching together front and back fabric with either flannel or batting in between block by block. After the blocks are layered, each one is individually quilted–most often with a simple “X” of stitches from corner to corner, then each block is sewn together, with the seams exposed on the TOP of the quilt. Instead of the usual 1/4″ seams used in traditional patchwork, these exposed seams are at least 1/3″ to 1″ wide, with most quilters using a 3/4″ seam.
After each row of blocks is assembled and stitched into a complete quilt, it can either be bound, or finished by sewing a line of stitching of the same depth as the seam allowance used in the rest of the quilt all the way around the edge. I chose the latter method, being as binding a quilt is my least favorite part of the exercise.
Then comes the tedious and somewhat tiring part: each seam is snipped through all three layers, to, but not through the stitches that hold them together, with each clip about 1/4″ apart. If you make a queen sized quilt like I did, this takes a while, and frankly, it is kind of hard to keep track of what has been snipped and what hasn’t. (Spring-loaded scissors help keep the hand fatigue at a minimum while executing this step in the process.)
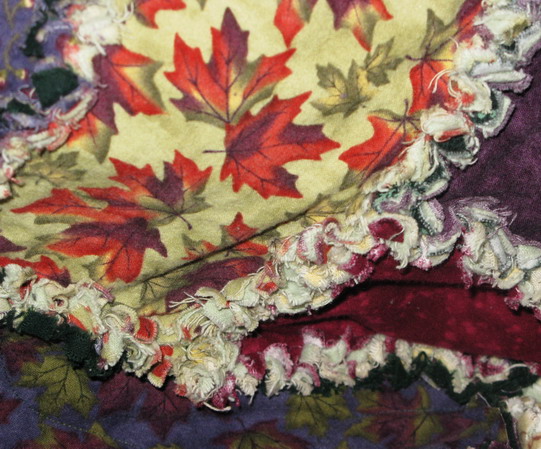
Then, you wash and dry the quilt, preferably at least twice, although three times is better. This allows the snipped seams to fray, and the colors of the fabric, particularly if you use flannels blend into a fuzzy, soft chenille that frames each block.
That is the simplest method of method of making a rag quilt although my explanation probably makes it sound harder to do than it actually is. Most of the difficulty in making this quilt, which features flannel fabric with leaf, flower and vine motifs, along with hand-dyes and solids, came about because of the weight and the size of the thing. Putting it together, row by row, after about five rows was nearly impossible. This one is constructed of ten rows with eight ten inch blocks per row, some of them with appliqued leaves on them, and others constructed of smaller squares and rectangles sewn together into a ten inch square.After stitching five rows together, the weight of the three layers of flannel makes stitching it nearly impossible, as gravity wants to drag the quilt down from the sewing table, pulling it from under the feed presser foot of the machine.
So, I put it together in two five-row chunks, and then sewed those together, with my friends Britanny and Heather holding the weight of the rest of the quilt up in the air to keep it from slithering out of the grasp of the sewing machine while I grappled to keep the seams relatively straight. Without their help, I would never have gotten the thing put together, and it would have ended up to be two oddly shaped and sized quilts instead of one magnificent one.
All of that said, I had a great time making this quilt. It took me only a week, which is pretty impressive considering that it is the largest quilt I have made to date, and it is my first attempt at complex free-motion quilting. Instead of just quilting an “X” through each block, I stitched leaf-shaped designs, vines, curving lines representing the wind and stylized flowers that matched the motifs on the fabrics. And, instead of just using plain square blocks, I added texture by piecing some of them, which had the added benefit of allowing me to use up nearly every bit of the fabric, which nearly cleaned out my stash of pretty flannels. (I had bought most of these fabrics right after Kat was born while we were staying in Columbus to be with her. There was a quilt shop a block from one of our hotels and I saw the gorgeous leaf fabric and bought some intending to make a baby quilt which never happened. So, instead, I combined these fabrics with other flannels I had bought years before just because it was pretty and ended up making this pretty thing.)
My favorite part about these quilts, aside from the ease of their construction and how quickly they come together, is the way the colors of the flannels blend together in the fuzzy seams. Especially the parts where the purples and greens blend together. I specifically used dark and pale green flannel–the only stuff I bought especially for this quilt–for the center layer, which only shows at the edges. I liked the way the two colors brought the different shades of plum, russet, green, purple, brown and cream together on the quilt.
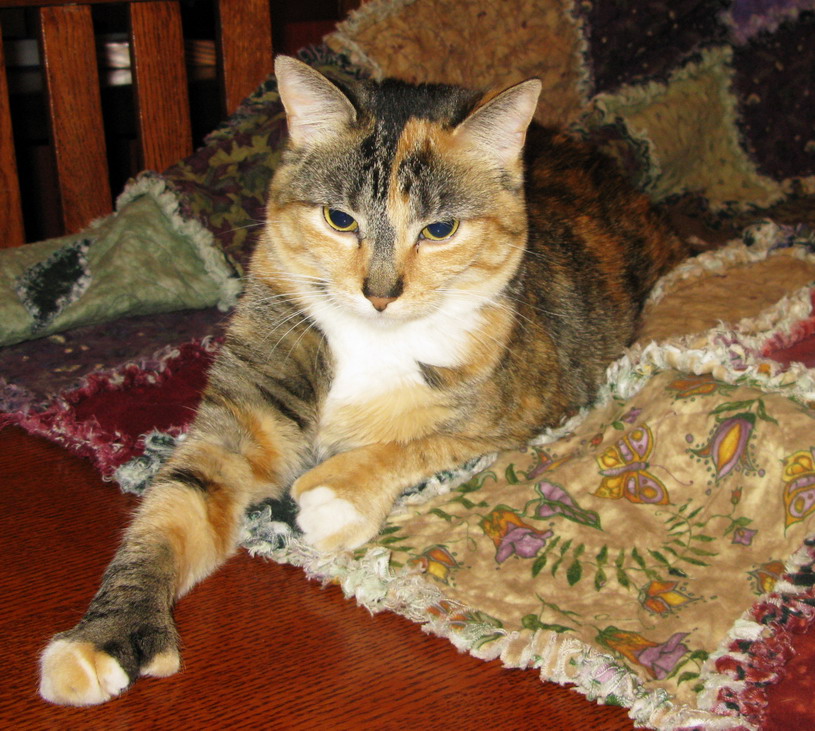
So, there you have it–a cuddly, soft and sweet queen sized quilt, ready to pack in a box and ship to its destination–it is a late Generic Winter Holiday gift for friends having a hard time. I think it will cheer them up–it will certainly warm them up. Wrapping up in it is like having a warm hug–which Cordelia agrees with as you can see.
When I brought the quilt back from the laundromat–I washed it in the big commercial machines so as to not overwhelm my washer with the weight–it was still damp, so I spread it out on the dining room table to let it finish drying before I folded it up and put it away.
The kitties took this opportunity to curl up on it, which was cute–except when I went to fold it up right before bed, I found that one of them had felt the need to anoint the quilt with a regurgitated offering of a hairball.
So, the next day, I was back at the laundromat, washing and drying it again.
Which is okay–because the more a quilt like this is washed and dried, the softer and fuzzier it gets, and the seams fluff out into really beautiful chenille. I took these photos before the third washing–the quilt is even prettier now. But, I have already wrapped it up with a matching lavender sachet and put it safely in a shipping box to go to UPS tomorrow, thus keeping it safe from feline intervention.
I can’t wait to make another one–I have a pile of old jeans from myself, Zak, Morganna and Kat to cut apart and combine with some really yummy hand-dyed orange flannel for a quilt for our guest room, which is done in blues and oranges and is decorated with a southwestern desert theme, and which features a bunch of paintings I did years ago. (Yes, I paint, too.) When it is done, I will feature it here, and maybe will take pictures of its construction while I am at it.
6 Comments
RSS feed for comments on this post.
Sorry, the comment form is closed at this time.

Categories:
- Admin (rss) (55)
- Blogs and Blogging (rss) (81)
- Book Reviews: Cookbooks (rss) (43)
- Book Reviews: Non-Cookbook Food Books (rss) (38)
- Cats and Cat Blogging (rss) (47)
- Chinese Cooking Lessons (rss) (32)
- Culinary School Stories (rss) (18)
- Dairy Pruducts: Cultured and Barbaric (rss) (4)
- Documentary Filmmaking (rss) (1)
- Essays, Rants and Reflections (rss) (260)
- Fighting Hunger (rss) (12)
- Food and Kids (rss) (45)
- Food in the News (rss) (126)
- Food Media (rss) (98)
- Food Preservation (rss) (18)
- Food Safety (rss) (45)
- Gardening (rss) (30)
- Herbs and Herb Blogging (rss) (20)
- Holidays (rss) (50)
- Kat Blogging (rss) (22)
- Kitchen Science (rss) (36)
- Leftover Makeover (rss) (8)
- Life, the Universe and Everything (rss) (131)
- Local and Sustainable (rss) (227)
- Local Athens Food and Foodies (rss) (42)
- Meatless Mondays (rss) (32)
- Menu For Hope (rss) (5)
- Nutrition, Diet and Health (rss) (84)
- On The Farm (rss) (8)
- Recipes: Almost Vegetarian, Vegetarian and Vegan (rss) (294)
- Recipes: American Regional (rss) (37)
- Recipes: Appalachian Hillbilly (rss) (33)
- Recipes: Bread, Pasta, Grains (rss) (95)
- Recipes: Canning and Preserving (rss) (8)
- Recipes: Chinese (rss) (123)
- Recipes: Comfort Food (rss) (120)
- Recipes: Cookies (rss) (16)
- Recipes: Desserts (rss) (48)
- Recipes: French (rss) (25)
- Recipes: Fruits and Vegetables (rss) (302)
- Recipes: Greek, North African and Middle Eastern (rss) (31)
- Recipes: Indian (rss) (137)
- Recipes: Italian (rss) (42)
- Recipes: Japanese (rss) (7)
- Recipes: Jewish (rss) (4)
- Recipes: Korean (rss) (6)
- Recipes: Meat, Poultry and Fish (rss) (220)
- Recipes: Mexican/Native American/ Latin American/Caribb (rss) (27)
- Recipes: Original (rss) (108)
- Recipes: Thai (rss) (27)
- Recipes: Tofu (rss) (17)
- Recipes: US Regional (rss) (16)
- Recipes: Vietnamese (rss) (8)
- Restaurant Stories (rss) (28)
- Sewing, Quilting, Arts and Crafts (rss) (16)
- Simple Chinese Recipes (rss) (30)
- Slow Food and Heritage Foods (rss) (10)
- Spice Blogging (rss) (44)
- The Chinese Cookbook Project (rss) (14)
- The Chinese Pantry (rss) (39)
- The Documentary (rss) (2)
- The Kitchen Saga (rss) (17)
- The Locavore's Bookshelf (rss) (15)
- The Unsung Adventures of The Culinary Nerd (rss) (6)
- Tools and Toys (rss) (35)
- Uncategorized (rss) (10)
- With a Side of Politics (rss) (48)
Archives:
- August 2012 (9)
- July 2012 (12)
- September 2011 (3)
- August 2011 (7)
- July 2011 (8)
- June 2011 (16)
- May 2011 (17)
- April 2011 (11)
- December 2010 (9)
- November 2010 (5)
- February 2010 (1)
- December 2009 (5)
- November 2009 (7)
- October 2009 (10)
- September 2009 (16)
- August 2009 (14)
- July 2009 (14)
- June 2009 (7)
- May 2009 (17)
- April 2009 (10)
- March 2009 (25)
- February 2009 (13)
- January 2009 (10)
- December 2008 (5)
- November 2008 (5)
- October 2008 (6)
- September 2008 (13)
- August 2008 (8)
- July 2008 (11)
- June 2008 (18)
- May 2008 (13)
- April 2008 (14)
- March 2008 (16)
- February 2008 (17)
- January 2008 (19)
- December 2007 (25)
- November 2007 (18)
- October 2007 (24)
- September 2007 (16)
- August 2007 (15)
- July 2007 (15)
- June 2007 (10)
- May 2007 (14)
- April 2007 (16)
- March 2007 (17)
- February 2007 (20)
- January 2007 (13)
- November 2006 (1)
- October 2006 (8)
- September 2006 (14)
- August 2006 (25)
- July 2006 (30)
- June 2006 (28)
- May 2006 (34)
- April 2006 (29)
- March 2006 (24)
- February 2006 (30)
- January 2006 (38)
- December 2005 (40)
- November 2005 (37)
- October 2005 (32)
- September 2005 (25)
- August 2005 (30)
- July 2005 (28)
- June 2005 (21)
- May 2005 (8)
- April 2005 (22)
- March 2005 (17)
- February 2005 (29)
- January 2005 (10)
Search Site:
Links:
- Lily’s Wai Sek Hong
- 101 Cookbooks
- A cat in the kitchen
- A Veggie Venture
- Accidental Hedonist
- Cha Xiu Bao
- chez pim
- Chocolate & Zucchini
- Chopstick Cinema
- Chowhound.com
- Chubby Hubby
- Cook sister!
- Cooking with Amy
- da*xiang
- Eat Local Challenge
- Eating Liberally
- Ecocentric
- Eggbeater
- Epicurious
- Farmgirl Fare
- Fatfree Vegan
- Foodgoat
- ForkandBottle.com
- Green Olive Tree
- Hooked on Heat
- Jaden’s Steamy Kitchen
- Kalyn’s Kitchen
- Lucullian delights
- Mahanandi
- Matt Bites
- MeatHenge
- mmm-yoso!!!
- New York Times – Dining & Wine
- Pizza Goon
- Rasa Malaysia
- Ruhlman
- Sailu's Kitchen
- Serious Eats
- SF Gate: Food & Dining
- Simply Recipes
- Soul Fusion Kitchen
- Tastespotting
- The Amateur Gourmet
- The Cleaner Plate Club
- The Food Section
- The Grub Report
- thecookscottage
- U.S. Food Policy
- Wandering Chopsticks
- Washington Post Food and Dining
- Wasted Food
Meta:

Powered by WordPress. Graphics by Zak Kramer.
Design update by Daniel Trout.
Entries and comments feeds.
So glad to read all is well…I had been worried. I love your quilt and I love your blog. Kat is precious.
Dolores
Comment by Dolores Jones — January 24, 2009 #
My mother often made these types of quilts when I was a kid, and I think it’s a great tradition to keep alive. Right now I wouldn’t have time to do anything like this, but “make a quilt” is on my list of things to do when I’m retired so it will be fun to read more about how you do it.
Comment by Kalyn — January 24, 2009 #
Kalyn, as of now, I have made a total of seven quilts–six of them traditionally done, with the seams hidden between the layers and binding, and then this rag quilt. I’ll be making at least two more rag quilts–one for the guest room and one for a friend. I also have another full-sized bed quilt planned for another friend that I have to design the pattern for–it will be figural–representative of an actual object.
I’ve also made a quilted flute case, and will be making more of those.
I will warn you that most of my quilt techniques are not “correct,” in that I do crazy-quilting totally against tradition, I will use the machine to guide quilting that looks very nearly like free-motion quilting–a big no-no.
I have found that while my methods are not traditional, the results are beautiful, and sturdy, so I have stopped worrying about how “correct” they are.
Comment by Barbara — January 24, 2009 #
That looks so lovely! Also love your cat – she seems to have made it her own:) She’s such a gorgeous, cuddly fur ball!
Comment by Mamlambo — January 24, 2009 #
Lovely quilt! I made a lap size rag quilt last year for my hubby and I didn’t have the nice spring loaded scissors. My bad. I’m still having problems with my hand that ended up with tendonitis from the stress. Wouldn’t have been so bad if I hadn’t spent 7 hours straight snipping. But the hubby loves his quilt 🙂
Glad you’re back. Have missed your posts and recipes. Will look forward to some new ones!
Comment by Kim — January 24, 2009 #
Good to see you back!
I’ve been into quilting lately too, though I do things the more traditional way, quilting by hand and such. Could you do a post on crazy quilting? I just finished a wall hanging but I don’t know if I did it the correct way. I know you say you don’t do it the right way either but I’d be interested in seeing your method.
Thanks!
Comment by Zoe Dawn — January 24, 2009 #