Cook Local, Eat Global
Meatless Monday: Falafel With Tahini Sauce
Nobody really knows where falafel originated. Many people say that these ground bean fritters came originally from India, probably brought to the Middle East region by spice traders. Considering that there are quite a few ground bean and lentil fritters traditional to various regions of India, and spice traders went back and forth from India to the Arab countries, this theory does hold water.
Others point to an origin in Egypt, where falafel is made exclusively from soaked, skinned and ground fava beans. Still others claim it is a traditional food of the Sephardic Jewish community.
Whatever the truth of the matter is, the fact remains that falafel is a much loved mezze, appetizer, street food and snack enjoyed in various forms all over the Middle Eastern region and now, throughout the world. It comes in many shapes and formulations–some are made with only fava beans, while others are made with only chickpeas, and still others contain a combination of the two. What is the same among all types of falafel is this–they are always made from beans which have not been cooked, but instead are soaked overnight in water, sometimes skinned and then are ground up with spices and aromatics and then fried.
This preparation method is fairly unique to falafel–most bean fritters are made from beans which have been cooked previously to being mashed or ground then shaped into fritters and fried. (South Indian idli, which are steamed cakes made from previously uncooked black lentils which have been left to ferment before being ground, are a similar idea–raw beans used to make a cake or fritter– but the preparation is steamed rather than fried and the fermentation makes the recipe completely different.)
I first came across falafel here in Athens, back when I transferred my credits from Marshall University to OU and came here to finish my degree. I tried them as the filling of a sandwich made by the Pakistani man who ran a street buggy called “Ali Baba’s.” He served his steaming hot chickpea falafel stuffed in a pita bread with onions, tomatoes, cucumbers, a garlicky yogurt sauce and, if you wanted, a hefty helping of his version of fattoush–bread and lettuce marinated in a tahini-lemon dressing.
I fell in love at first bite. I used to eat those sandwiches at least once a week–without fail. The only time I didn’t stop by for a falafel was when I was struck down with bronchitis for two and a half weeks, and I remember the nice man stopping Zak when he saw him walking by and asking about me. He knew something must be wrong if I hadn’t had falafel for two weeks!
After that, I took to eating falafel whenever and wherever I could get them–currently here in Athens, we eat falafel from Souvlaki’s–a hole-in-the-wall “fast food” Middle Eastern place that caters to the after-bar student crowd. Which is cool in that they make a good living that way, but uncool in that they make enough money during the school year that they can close up for the summer. Which is cool for them, but extremely uncool for me, because that means I have to procure my falafel by other means.
Which, this year, meant I felt the need to learn to make it myself.
And I found out that it wasn’t really so bad as all that.
The key to the making of falafel is two-fold. Be sure and soak your beans long enough–which means 24 hours. Yes, you have to plan ahead to make falafel. A whole day ahead. Don’t try using a pressure cooker to partially cook them and speed up the process like I did–the beans don’t soften enough that way. Just be patient and plan ahead and remember to put the beans in a bowl with water before you go to bed. Cover the bowl with a plate and leave it on your counter and check them in the morning. If they have soaked up all the water, add a bit more, cover them back up with the plate and leave them be until about two hours before you want to cook.
Then, uncover the beans and drain them well and allow them to air-dry until they are almost completely dry–just a bit damp–on the outside. It is important to do this, because it keeps your dough from being to wet to hold together in the hot oil once you grind the beans up and go to fry them.
Thus we come to the second secret of great falafel: the texture of the dough.
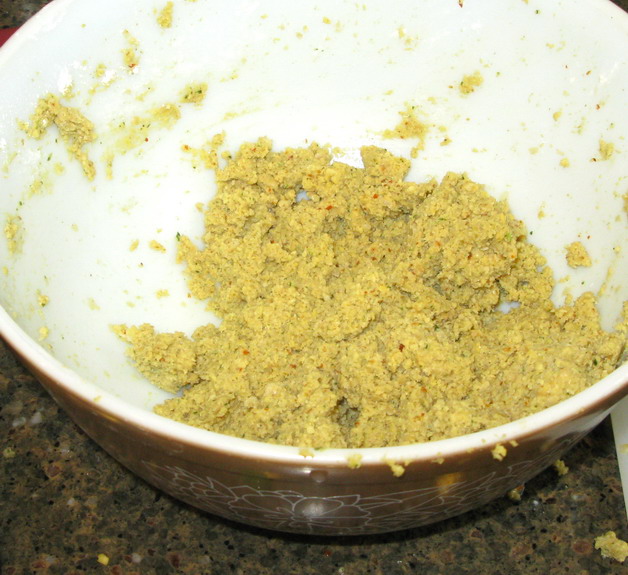
It cannot be too wet, nor can it be too dry. It must not be ground either too coarsely nor too finely–it has to be just right. When it is ground correctly, the dough will be slightly coarse and grainy, not perfectly smooth, and it will hold together well, but with slight cracking around the edges–if it is wet enough to hold together perfectly smoothly, it won’t hold together in the oil! But, when you squeeze it into shape and open your hand, it shouldn’t immediately fall apart either–in that case, it is too dry. If it is too dry, obviously you add more water, but the way I do it is by sprinkling a few drops in at a time with my fingers. If it turns out too wet, sprinkle in a bit of either all purpose flour or, chickpea (besan) flour. Too much flour will make the falafel tough, but a little bit–around a tablespoon–is fine.
The photograph above shows the ground dough–slightly coarse and pasty without being sticky.
Herbs, garlic, spices (often including cumin and chili pepper flakes), salt and onion are the main flavoring components of the dough which are ground right together with the beans. To grind the dough, I have used both my regular food processor and the Preethi: they both worked perfectly well. Some authors claim that in order to make the lightest and most delicate falafel, you must grind the dough in a meat grinder twice.
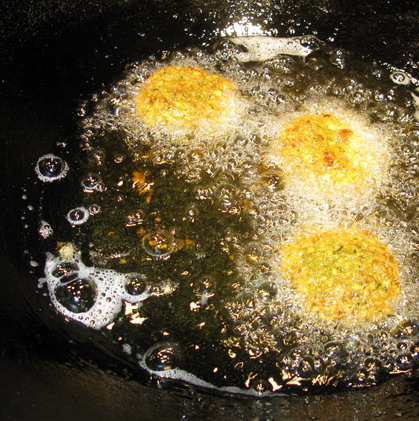
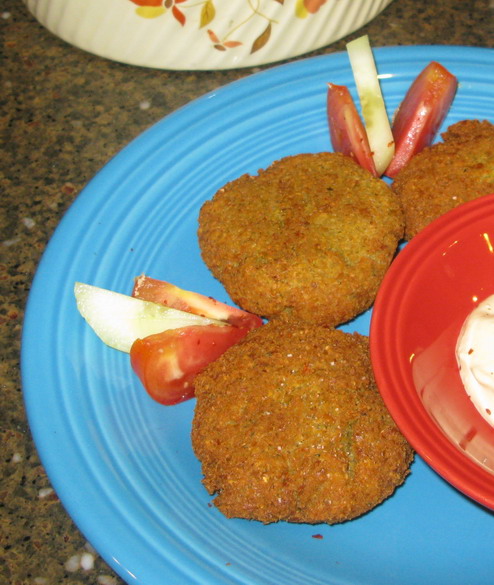
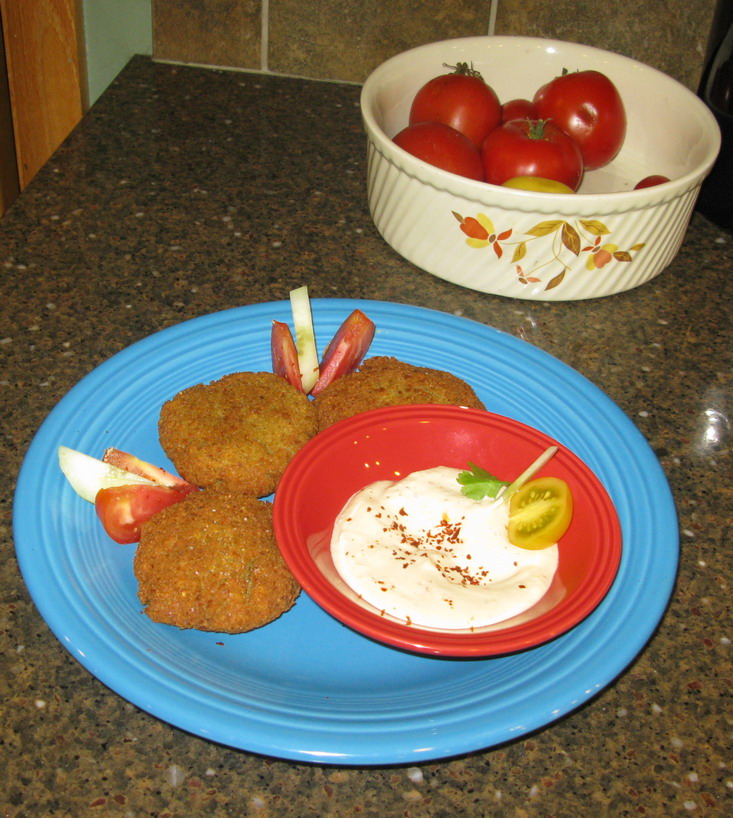
As for shaping the falafel–it can be rolled into walnut sized balls, or it can be flattened into patties like I did it, so they slip more easily into pita breads, or it can be shaped into egg-shapes or cylinders. After shaping it, you fry it–you can shallow or deep fry it according to your taste–in an oil that can withstand high temperatures like peanut or canola oil. I used my wok and shallow fried them in enough oil to cover the bottom, sides and most of the top. To check and see if the oil is hot enough, I dipped a bamboo chopstick into the wok–when the oil forms bubbles immediately around the chopstick, it is ready. You can also make a small ball of dough and drop it in and if it bubbles immediately, it is ready for the full-sized falafel.
A lot of people like yogurt sauce with falafel, but I prefer tahini sauce. A lemony, garlicky preparation made with tahini–sesame seed paste–it is rich and delicious, and versatile. Sure you can drizzle it over falafel or dip the fritters in it, but you can do quite a few other things with it. If you thin it out, you can use it for an amazingly fresh flavored salad dressing, or as a dip for crudite or pita wedges. It is also good with lamb.
I got the recipe for this tahini sauce from May Bsisu’s beautiful cookbook, The Arab Table.
I added a bit more Aleppo pepper flakes than Bsisu calls for, and the garlic I used was very fresh so it has a strong flavor, making my version of the sauce extra zippy.
I also based my falafel recipe on Bsisu’s formulation combined with Mark Bittman’s version of the recipe.
Falafel With Tahini Sauce
Ingredients:
1 3/4 cup dried chickpeas
2 cloves garlic, lightly crushed
1 small onion, quartered
1 1/2 tablespoons ground cumin
1 1/2 teaspoons Aleppo pepper flakes
1 teaspoon smoked paprika
1 cup chopped cilantro leaves (you can use fresh parsley instead if you like)
1 teaspoon salt
1/2 teaspoon baking soda
1 tablespoon lemon juice
peanut or canola oil for frying
Method:
Soak the beans in cold water to cover them by 3 inches or so. Unless you want dust and suchlike falling into the beans or your cats drinking the water from the bowl, cover the bean bowl with a plate. Soak for 24 hours, adding water as needed. Drain the beans well in a colander and then allow the surface water on them to dry for about an hour before transferring the beans to the bowl of your food processor.
Add all the other ingredients other than the oil, and grind the dough by pulsing the machine until everything is minced together but isn’t pureed into a smooth paste. Taste the dough and add extra salt, Aleppo pepper and lemon juice to taste.
Put the oil into a wok or deep saucepan to a depth of 1 1/2 inches to 2 inches–more if you want to deep fry the falafel. Heat the oil over medium-high heat until the oil shimmers and a chopstick or a bit of batter bubble immediately when you put them in the oil. (Around 350 degrees F. )
Scoop the dough out in heaping tablespoonsful, and shape it into balls or patties and fry in batches, without crowding your oil, (I did 3 at a time) turning once if you shallow fry like I did, until the falafel are nicely browned. They should fry for no longer than five minutes–about two minutes or so per side.
Drain on paper towels before serving.
Tahini Sauce
Ingredients:
2-3 cloves garlic, peeled and minced
1 cup tahini (stir in the oil that rises to the top before measuring)
3/4 cup freshly squeezed lemon juice
Aleppo pepper flakes to taste (I used about 2 teaspoons)
salt to taste
1 tablespoon minced cilantro or parsley
Method:
Put all ingredients in the jar of a blender or food processor or grinder and process until smooth. Add water until the sauce is as thick or thin as you like it. I like it a little thinner than mayonnaise.
11 Comments
RSS feed for comments on this post.
Sorry, the comment form is closed at this time.

Categories:
- Admin (rss) (55)
- Blogs and Blogging (rss) (81)
- Book Reviews: Cookbooks (rss) (43)
- Book Reviews: Non-Cookbook Food Books (rss) (38)
- Cats and Cat Blogging (rss) (47)
- Chinese Cooking Lessons (rss) (32)
- Culinary School Stories (rss) (18)
- Dairy Pruducts: Cultured and Barbaric (rss) (4)
- Documentary Filmmaking (rss) (1)
- Essays, Rants and Reflections (rss) (260)
- Fighting Hunger (rss) (12)
- Food and Kids (rss) (45)
- Food in the News (rss) (126)
- Food Media (rss) (98)
- Food Preservation (rss) (18)
- Food Safety (rss) (45)
- Gardening (rss) (30)
- Herbs and Herb Blogging (rss) (20)
- Holidays (rss) (50)
- Kat Blogging (rss) (22)
- Kitchen Science (rss) (36)
- Leftover Makeover (rss) (8)
- Life, the Universe and Everything (rss) (131)
- Local and Sustainable (rss) (227)
- Local Athens Food and Foodies (rss) (42)
- Meatless Mondays (rss) (32)
- Menu For Hope (rss) (5)
- Nutrition, Diet and Health (rss) (84)
- On The Farm (rss) (8)
- Recipes: Almost Vegetarian, Vegetarian and Vegan (rss) (294)
- Recipes: American Regional (rss) (37)
- Recipes: Appalachian Hillbilly (rss) (33)
- Recipes: Bread, Pasta, Grains (rss) (95)
- Recipes: Canning and Preserving (rss) (8)
- Recipes: Chinese (rss) (123)
- Recipes: Comfort Food (rss) (120)
- Recipes: Cookies (rss) (16)
- Recipes: Desserts (rss) (48)
- Recipes: French (rss) (25)
- Recipes: Fruits and Vegetables (rss) (302)
- Recipes: Greek, North African and Middle Eastern (rss) (31)
- Recipes: Indian (rss) (137)
- Recipes: Italian (rss) (42)
- Recipes: Japanese (rss) (7)
- Recipes: Jewish (rss) (4)
- Recipes: Korean (rss) (6)
- Recipes: Meat, Poultry and Fish (rss) (220)
- Recipes: Mexican/Native American/ Latin American/Caribb (rss) (27)
- Recipes: Original (rss) (108)
- Recipes: Thai (rss) (27)
- Recipes: Tofu (rss) (17)
- Recipes: US Regional (rss) (16)
- Recipes: Vietnamese (rss) (8)
- Restaurant Stories (rss) (28)
- Sewing, Quilting, Arts and Crafts (rss) (16)
- Simple Chinese Recipes (rss) (30)
- Slow Food and Heritage Foods (rss) (10)
- Spice Blogging (rss) (44)
- The Chinese Cookbook Project (rss) (14)
- The Chinese Pantry (rss) (39)
- The Documentary (rss) (2)
- The Kitchen Saga (rss) (17)
- The Locavore's Bookshelf (rss) (15)
- The Unsung Adventures of The Culinary Nerd (rss) (6)
- Tools and Toys (rss) (35)
- Uncategorized (rss) (10)
- With a Side of Politics (rss) (48)
Archives:
- August 2012 (9)
- July 2012 (12)
- September 2011 (3)
- August 2011 (7)
- July 2011 (8)
- June 2011 (16)
- May 2011 (17)
- April 2011 (11)
- December 2010 (9)
- November 2010 (5)
- February 2010 (1)
- December 2009 (5)
- November 2009 (7)
- October 2009 (10)
- September 2009 (16)
- August 2009 (14)
- July 2009 (14)
- June 2009 (7)
- May 2009 (17)
- April 2009 (10)
- March 2009 (25)
- February 2009 (13)
- January 2009 (10)
- December 2008 (5)
- November 2008 (5)
- October 2008 (6)
- September 2008 (13)
- August 2008 (8)
- July 2008 (11)
- June 2008 (18)
- May 2008 (13)
- April 2008 (14)
- March 2008 (16)
- February 2008 (17)
- January 2008 (19)
- December 2007 (25)
- November 2007 (18)
- October 2007 (24)
- September 2007 (16)
- August 2007 (15)
- July 2007 (15)
- June 2007 (10)
- May 2007 (14)
- April 2007 (16)
- March 2007 (17)
- February 2007 (20)
- January 2007 (13)
- November 2006 (1)
- October 2006 (8)
- September 2006 (14)
- August 2006 (25)
- July 2006 (30)
- June 2006 (28)
- May 2006 (34)
- April 2006 (29)
- March 2006 (24)
- February 2006 (30)
- January 2006 (38)
- December 2005 (40)
- November 2005 (37)
- October 2005 (32)
- September 2005 (25)
- August 2005 (30)
- July 2005 (28)
- June 2005 (21)
- May 2005 (8)
- April 2005 (22)
- March 2005 (17)
- February 2005 (29)
- January 2005 (10)
Search Site:
Links:
- Lily’s Wai Sek Hong
- 101 Cookbooks
- A cat in the kitchen
- A Veggie Venture
- Accidental Hedonist
- Cha Xiu Bao
- chez pim
- Chocolate & Zucchini
- Chopstick Cinema
- Chowhound.com
- Chubby Hubby
- Cook sister!
- Cooking with Amy
- da*xiang
- Eat Local Challenge
- Eating Liberally
- Ecocentric
- Eggbeater
- Epicurious
- Farmgirl Fare
- Fatfree Vegan
- Foodgoat
- ForkandBottle.com
- Green Olive Tree
- Hooked on Heat
- Jaden’s Steamy Kitchen
- Kalyn’s Kitchen
- Lucullian delights
- Mahanandi
- Matt Bites
- MeatHenge
- mmm-yoso!!!
- New York Times – Dining & Wine
- Pizza Goon
- Rasa Malaysia
- Ruhlman
- Sailu's Kitchen
- Serious Eats
- SF Gate: Food & Dining
- Simply Recipes
- Soul Fusion Kitchen
- Tastespotting
- The Amateur Gourmet
- The Cleaner Plate Club
- The Food Section
- The Grub Report
- thecookscottage
- U.S. Food Policy
- Wandering Chopsticks
- Washington Post Food and Dining
- Wasted Food
Meta:

Powered by WordPress. Graphics by Zak Kramer.
Design update by Daniel Trout.
Entries and comments feeds.
Mmm, love falafel. I cant bring myself to deep fry them so I just bake them in the oven. Not quite so delicious, but a lot less messy and healthier as long as you grease the cookie sheet well!
Comment by jennywenny — July 27, 2009 #
Our peeps are making them this week. Every single recipe says to chill the mixture first. I’m looking to your first hand advice to see if you think we need to.
Also, sadly, since 10 kids will be making it, we will be using well drained canned garbanzo. I know! I know!
Comment by jo — July 27, 2009 #
Jenny, that’s why I shallow fried mine–deep frying is such a drag!
Jo–I didn’t chill any of my batches and they all turned out fine. BUT–I have never made falafel from already cooked chickpeas. If I were you, I’d chill the dough before frying it.
Comment by Barbara — July 27, 2009 #
Hi Barbara, reading your recipe for falafel (which I’ve eaten but not really thought of the ingredients!) made me realize that the south Indian Vadai is very similar in consistency and ingredients used.
There are 2 kinds of vadais (also called Vada) – the plain one and the ‘masala’ vadai. The plain one is made of urad dal (black lentils), soaked, finely ground and mixed (this is optional) with chopped onions, chillies, coriander and whole pepper corns.
The masala vadai is made with chana dal (Bengal gram), that is soaked and ground into a coarse paste and then mixed with onions, chillies, ginger and curry leaves and fried in oil. You must try them sometime.. I suspect you will love them too 🙂
Comment by Roxana — July 28, 2009 #
Roxana–I am very excited to try the masala vada–they sound amazing. I love curry leaves, so that has me all thrilled.
The plain vada that I had once were not very good–but they were at a restaurant that wasn’t very good, so maybe I will try making them myself and see what I think then.
Oh, and btw–Zak asked today when we could have falafel again–so I have chana soaking right now! Maybe I will mix half of it up as falafel and half as masala vada.
It is so exciting to me that Zak has gone from a meat and potatoes diet to eat many vegetables and vegetarian foods and like them so much that he asks specifically for them!
Comment by Barbara — July 28, 2009 #
Falafel are not available anywhere in our town and I have been craving them like mad. The one time my sister tried making falafel we had a horrible disaster in the frying oil. I’m hoping to try these later in the week when I have time to do the soaking. I hope they work much better!!!
Comment by Zebe912 — July 28, 2009 #
Ah..Souvlaki’s IS still there, and apparently, still making students’ mouths water late at night…I remember ordering souvlaki sandwiches to the dorms after hours; meeting the delivery person furtively at the back door, then smuggling the food up to the third floor, painfully (and wonderfully) aware of the delectable aromas wafting out the the hot foil packets inside the paper bag…I only discovered their falafel when I was ready to graduate and leave Athens…I miss them both! I’ll try your recipe this weekend- what’s a little work in search of a memory?!
Comment by Loryn — July 30, 2009 #
I just made these yesterday and they came out perfectly. I made hummus and tabbouleh to go with them and YUM!!
Comment by Zebe912 — August 17, 2009 #
Okay, my falafel is a work in progress, I deal with two kitcen, two ours away from one another. So I made my tahini already… well actually. I’m making it now. It doesn’t look nearly as white and creamy as yours does, it looks a bit too gritty and even has some whole sesame seeds in there. Mind you, I’m making my tahini entirely from scratch.
I’m not sure if I should add water, or more oil…or what? can someone give advice?
Comment by Jillian — September 7, 2009 #
How are you grinding your tahini, Jillian? It may not be possible to make it as smooth as commercial tahini, depending on what you are using to grind it. (This is why I buy tahini from the store, and then make the sauce.)
To get the gritty out, you can try sieving the tahini through a very fine meshed sieve or strainer.
But first, beat in more water–that is what makes the sauce creamy and pale. Tahini sauce is an emulsion of tahini, garlic, lemon juice and water, with salt and other seasonings. The water is what makes it creamy. So beat in more water until it is pale and creamy and will pour easily, and then, pour it through a sieve, using a rubber spatula or wooden spoon to stir it in the sieve and push the liquidy parts through while retaining the gritty bits from the sesame seed hulls.
Comment by Barbara — September 7, 2009 #
Ahhh thank you.
Actually I hadn’t added water at all, it wasn’t in the recipe that I was following.
I was using a food processor. I think the fault lies in that I had lightly toasted (not even to a golden brown color, just a bit past warm) about 3/4 cup of sesame seeds before putting it in the food processor and then feeling like it wasn’t enough — I added sesame seeds that hadn’t been toasted, so they stubbornly did not grind down as smoothly as the rest.
I will run the recipe through the seive now though, I hadn’t thought to do that!
Also, how long do you keep your tahini sauce stored? I’ve heard between 2 and three months.
Thanks Barbara 🙂
Comment by Jillian — September 7, 2009 #