Cook Local, Eat Global
Za Jiang Mein
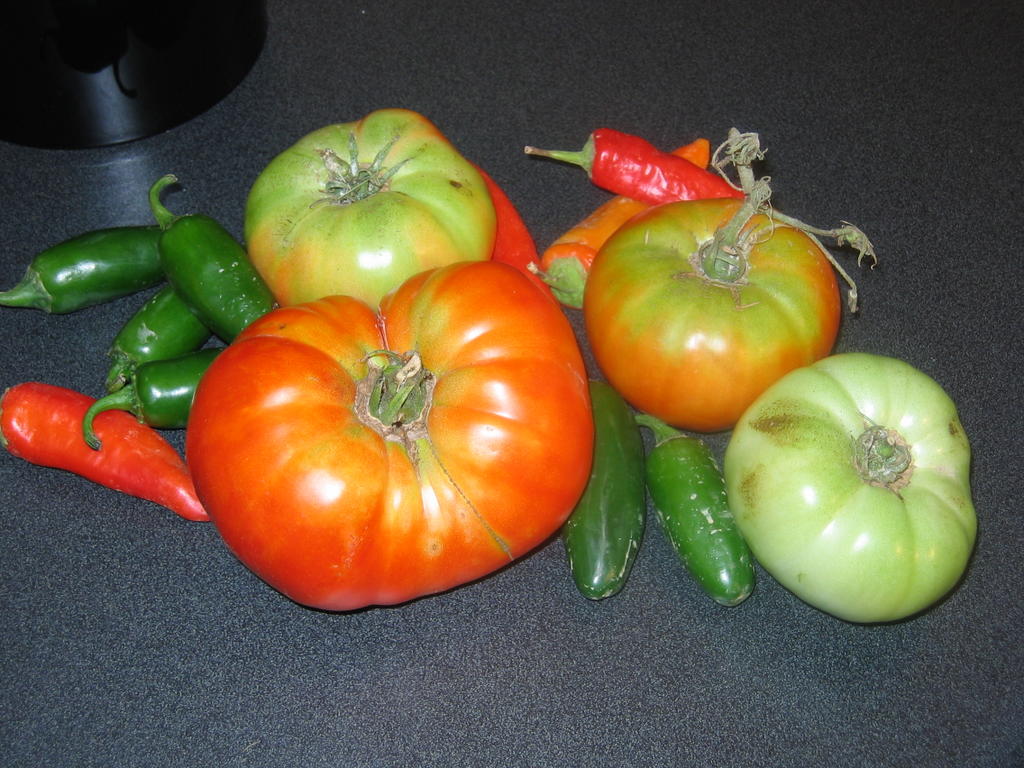
 It is hard to eat locally when you cook a lot of Asian foods.
For example, the dinner we had Friday night was not exactly what a purist locavore would have approved of.
To be sure, the ground pork came from Bluescreek Farms in Marysville, Ohio, and the onions, garlic and cucumber came from the farmer’s market here in Athens. The noodles were plain soft wheat fetuccini from Rossi Pasta–which very closely approximated fresh Chinese wheat noodles.
But the rest of it–eh–not so much. The Chinese ingredients were all from–guess where? China. Soy bean pastes and sauces, Shao Hsing wine and toasted sesame oil all came from the motherland, while the ginger and tofu were from California, and the carrots–well, I don’t know where they came from, as I bought them a while back. Near as I can tell, they came from my vegetable drawer.
But, I was in the mood for something quick, filling and delicious, and I had ground pork thawed out, and all of the ingredients in the pantry, so za jiang mein it was.
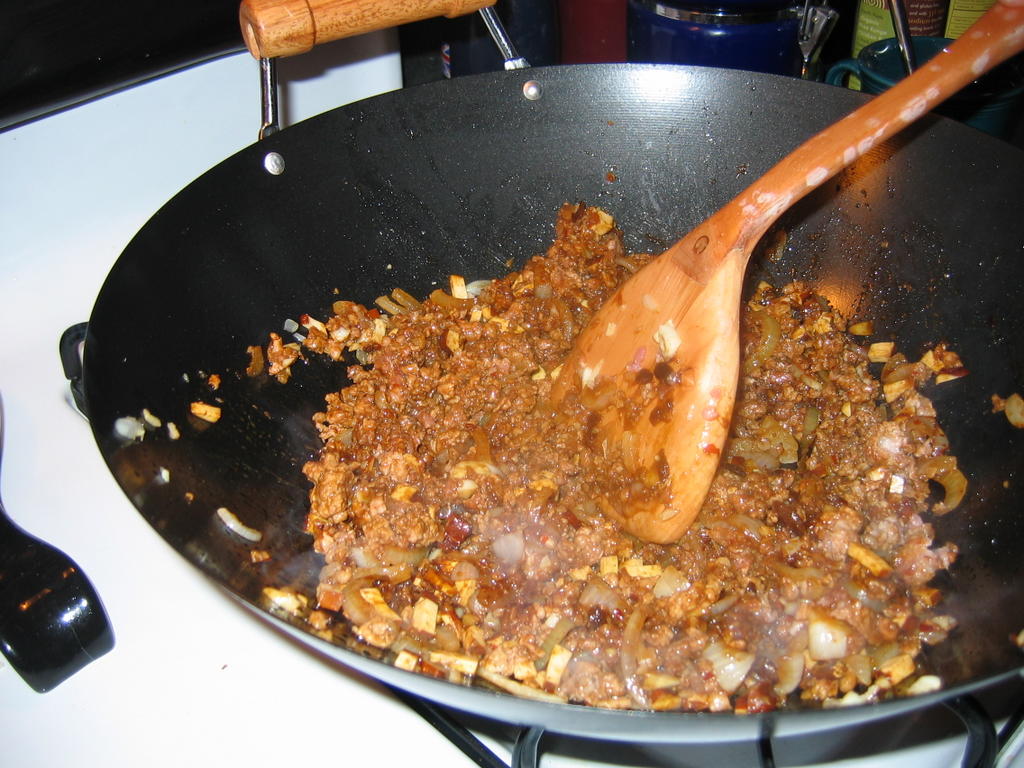
Za jiang mein is to Beijing what spaghetti with meatballs is to middle America. A hot, filling, flavorful dish of meat sauce and wheat noodles. There, however, the similarity ends; the seasonings in za jiang mein are completely unrelated in flavor to the tomato and oregano-laden Italian-American dish. The meat sauce is at once sweet and savory, salty and hot, rich and oddly light, usually due to the addition of raw or blanched vegetables as a garnish.
I first ate this dish at a pan-Asian restaurant called Noodles Corner in Columbia, Maryland, and fell in love with it immediately. It consisted of fresh egg noodles with a topping of a rich minced pork and pressed tofu sauce garnished with raw cucumber shreds and cilantro. The waiter told me that it was a dish that originated in Beijing, where it was made in homes, small cafes, and in street stalls, and that some people made it spicier and some made it sweeter. The main flavoring, he told me, was bean sauce or bean paste–the Chinese version of miso.
I tried making it years ago with miso and it turned out godawful. I have since learned that while the fermented soy bean pastes and sauces of China are similar to miso, they are not the same, and really shouldn’t be used interchangeably.
I finally decided to recreate the recipe myself Friday evening, because I was craving it something fierce.
I consulted three different recipes, from three different Wei Chuan cookbooks: Classical Chinese Cooking Noodles, Chinese Home-Cooking Noodles, and Chinese One Dish Meals. The three recipes were similar, but differed in the amounts of the various bean sauces that were used to give the dish its characteristic complex sweet-salty-rich flavor. I added ginger and garlic to the dish, because I know that they used them at Noodles Corner, and I also used the pressed tofu cut into tiny dice.
Here is a good place to talk about soy bean sauces. As I mentioned before, these fermented soybean products are similar to the Japanese miso, but have a completely different flavor profile. Sweet bean sauce should not be confused with red bean paste, which is a sweet product made from adzuki beans which have been cooked with sugar, and is used as a filling in sweet buns or pastries. Sweet bean sauce is made from fermented soybeans and isn’t actually sweet–it just isn’t as salty as regular bean sauce or chili broad bean sauce. One of the recipes I looked at used three different kinds of bean sauces, and I used them all–soy bean sauce, Sichuan broad bean paste with chili, and sweet bean sauce.
 That was the correct answer.
I went ahead and used a good amount of Shao Hsing wine, just as they do at the Hometown Oriental Deli and Carryout where they make this dish and call it “King Du Noodles.” That little dive in Columbus is a great place for homestyle foods, primarily Cantonese, though the family who owns the place is all from Hong Kong. Because of their background, the foods are a bit more complex than most purely Cantonese foods, and represent the wider tastes of Chinese regional cuisine. They also specialize in roasted duck, pork, braised pork belly and soy sauce chicken, but I digress.
Finally, I used chicken broth instead of water to make the sauce, as I saw no reason to diminish the flaovors in any way.
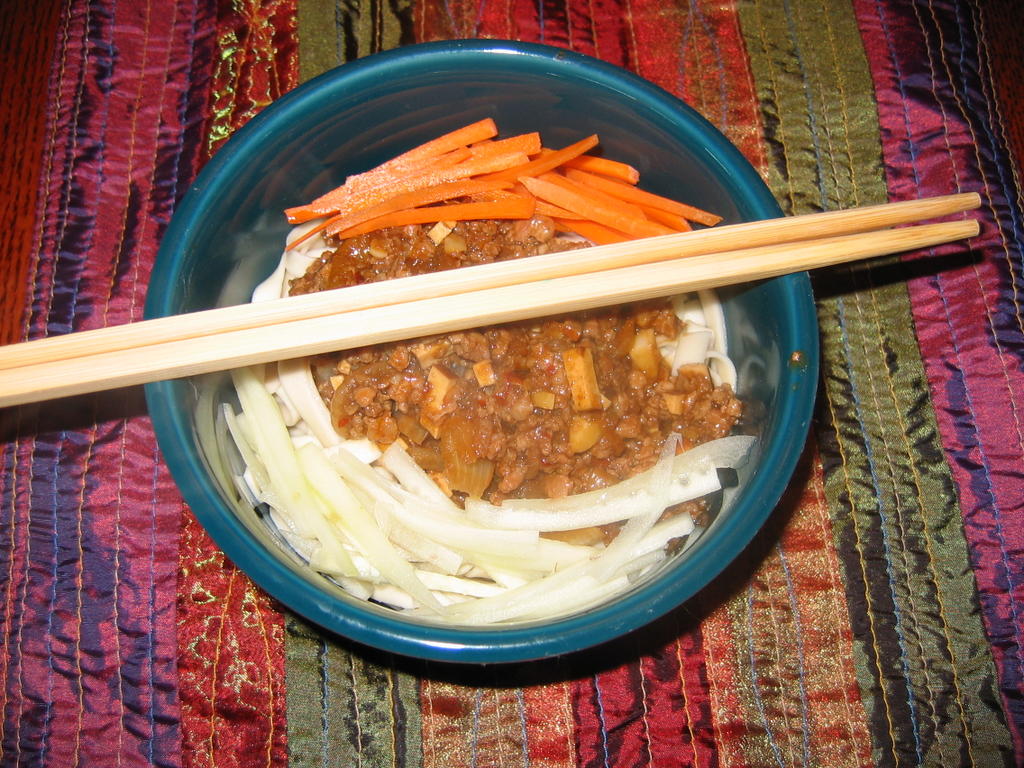
The Wei Chuan recipes all included shredded raw carrot as a garnish, so I used that, as well as the cucumber shreds, though I was the only one who ate those. Neither Zak nor Morganna will be convinced that cucumber is a good tasting vegetable, so I don’t push it.
The dish is astonishingly simple to make, tastes wonderful and comes together very quickly. Morganna loved it–it was her first time eating it, and she and Zak declared this a keeper of a recipe, though I think I will refine it the next time I make it.
I think I will add minced black mushroom caps and the mushroom soaking water to the sauce, and for fun, I may add a bit of Sichuan peppercorn. I also think that cilantro would be an amazing addition, as I could just imagine how that fresh green flavor would contrast with the rich, deeply-flavored sauce.
All in all, for such an easy dish, the flavors are amazingly complex: the sauce is sweet and salty and mildly spicy with a strong flavor of wine. The noodles are toothsome and slippery without being slimy; their velvety texture contrasts beautifully with the fresh crisp crunch of the raw vegetables. Za jiang mein is a testament to the power of the simplicity of home cooking to speak to the soul of a hungry diner.
 Za Jiang Mein
Ingredients:
2 tablespoons peanut oil
1 medium onion, thinly sliced
1″ cube fresh ginger, minced
2 garlic cloves, minced
4 ounces pressed spiced tofu, diced finely
1 pound ground or minced pork
1 tablespoon sweet bean sauce
1 tablespoon Sichuan hot bean sauce (broad bean paste with chiles)
1 tablespoon soy bean paste or sauce
1 teaspoon sugar
3 tablespoons Shao Hsing wine
1/2 cup chicken broth
1 1/2 tablespoons cornstarch dissolved in 1 tablespoon cold water
1 teaspoon sesame oil
1 cup shredded carrot
1 cup shredded cucumber
1 pound cooked fresh egg noodles, cooked al dente and drained
 Method:
Heat oil in wok for stir frying. When it is done, add onions and cook and stir until they are just beginning to take on color. Add ginger and garlic, stir fry until fragrant–about forty-five seconds or so. Add pressed tofu and continue stir frying another minute.
Add pork, soy bean pastes/sauces, and sugar, and stir and fry, chopping at the meat to separate it with your wok shovel. Cook until most of the pink is gone from the meat.
Add wine, cook off alcohol. Add chicken broth and cornstarch mixture, cook, stirring, until thickened.
Remove from heat, drizzle with sesame oil.
Divide noodles into bowls, and top with meat sauce and vegetable shreds. Serves around six moderately hungry people if there are other dishes, or serves four really hungry people with no other dishes.
Note:
Some places make this spicier than others. At Hometown Oriental Carry-Out, they add a lot of chile paste for me, because they know I like spicy food, and the dish is usually fragrant with white pepper. It is amazing–even if they don’t use the tofu or the shredded vegetables. It doesn’t matter–it is still a wonderful dish that I crave when I am really, really hungry.
It is especially good in the wintertime, though I will eat it whenever. I love spaghetti, but I think I love this even more.
The Path of Pie III: The Best Pastry Crust in the World
 As I have noted in previous posts in this short series, the thought of making pie crust used to give me fits of anxiety. I had convinced myself that not only did I lack the “touch” necessary to make good pies, but that such a touch was not a learned ability but some mystical inborn talent which had been gifted by the gods to some people and not others.
Since I have devoted this summer to learning how to make good pies, I have this to say about my former superstitious beliefs: utter balderdash and poppycock. As a rational human being I should be ashamed of myself for harboring such nonsense about the simple matter of making good pastry dough. It isn’t an inborn talent–it is a learned ability, and that is that. I am living proof of this fact, and I set before you the example of the blackberry pie I made for Morganna a couple of weeks ago as testament the fact that with a few months of focussed work and practice, I could indeed learn to make good pie.
And that means, dear reader, so can you. I offer here my recipe for a crust that combines the superior flakiness of lard and the delicious flavor and easier handling of butter, which, even in the summer, if one takes care and utilizes every trick at the baker’s disposal, will make a lovely and flavorful pie that will not cause too much in the way of weeping, wailing and gnashing of teeth in frustration.
One must simply pay attention, go slowly and be patient. This recipe makes enough dough for a double crust pie. If you are making a single crust pie, you have several options: you can simply halve the ingredients, or freeze half of the dough, or make two single crust pies with this recipe.
You will note that I am not giving food processor or mixer instructions on how to make this dough. That is because I have noticed that for every person who makes good pastry in the food processor, there is another person who mangles the same dough using the appliance. Yes, you tend to handle the dough less in the food processor with your nice warm hands, but at the same time, you also risk over processing the dough. I have also found that what makes really flaky pastry are non-uniform pieces of fat cut into the flour–some should be big, some should be crumbs. The food processor makes too uniform of a dough.
Having not had such good luck with making pie crust in the food processor, I resolved to make it by hand. It is neither an onerous or lengthy process, so I am firmly of the belief that it would harm no one to try learning how to make pie crust by hand. After you get the hang of it, it actually becomes pleasant and somewhat meditative, and might even lower one’s blood pressure.
Here is how it goes:
Barbara’s Lard-Butter Pie Crust
Ingredients:
2 3/4 cups all purpose flour
1 1/2 tablespoons raw sugar (you can leave this out–but I like it better left in)
1 teaspoon salt
1/2 cup (one stick) cold unsalted butter, cut into cubes
1/2 cup cold natural unhydrogenated lard, cut into pieces and then frozen until quite firm
6-9 tablespoons ice water
 Method:
First of all, chill your marble slab, mixing bowl and pastry cutter in the freezer. Go ahead and chill your silpat and rolling pin, too. Have several pieces of plastic wrap at the ready, as well as a couple of food storage bags. If it is really hot out, measure out your lard (I pack it into a dry measure, then level it, the displacement method gets too much liquid in the fat and is messy as hell), cut it into bits the size of your first finger joint of your index finger, more or less, and stick them in the freezer to firm up really well.
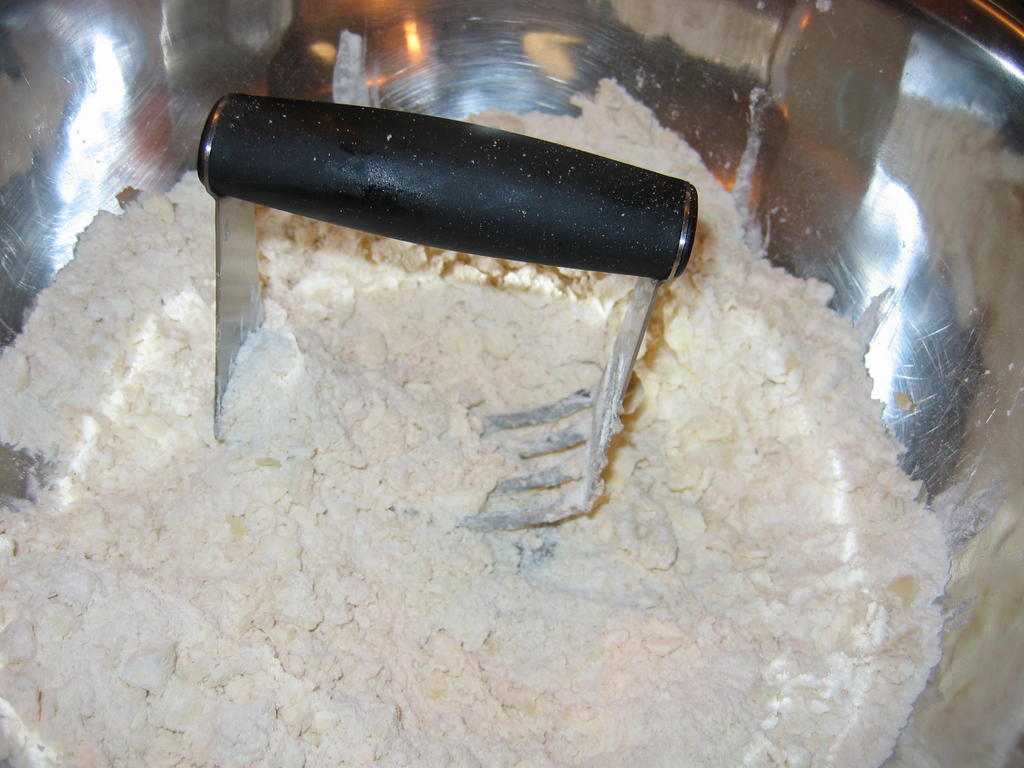
Take the mixing bowl out, wipe any condensation from its interior, and put all the dry ingredients into it, and mix thoroughly. Scatter butter cubes and lard pieces evenly over the flour and take up your pastry cutter and cut the fat into the flour using quick pouncing and rocking movements with the cutter. You will need the clear the blades with a table knife once or twice. Don’t use your fingers–you don’t want to melt the fat by playing with it with bare hands. keep up this pouncing, scraping, and rocking business until the fat and flour are mixed together in a bunch of uneven looking clumps. Some should be crumbs, some should be pea-sized and some should be bigger than peas–about the size of raggedy little lima beans. Scrape the blades of the pastry blender one more time, and if the room is really warm and the lard has started to soften a lot, put the bowl, fat and flour and all, back into the freezer to firm up a little.
If the fat is still firm, just continue onward: add the ice water to the fat and flour mixture by measuring it out tablespoon by tablespoonful, and sprinkling it evenly over the mixture. I usually start with six or seven tablespoons. After it is in there, go to the sink and rinse your hands in as cold water as you can stand, or stick them in a bowl of ice. Dry them off. Using your hands and working quickly, bring the mixture together into a smooth dough. Don’t knead it! Just try and squish it gently together into a ball. If it is still too crumbly, sprinkle another tablespoonful of water over and try again. Just add enough water to bring it together, and no more. After it clings to itself in a ball, carefully pat it down to a big disc and cut it in half–though not quite evenly. I cut it so that one piece is just a tiny bit bigger than the other, so that when you roll out the bottom crust, you actually have more dough to work with, because it needs to be slightly bigger to fit in the pan than the top crust.
Take the two disc halves, form them into discs, wrap them tightly in plastic wrap, stick them in storage bags, force out the air and stick them in the fridge for an hour or the freezer for fifteen minutes or so.
 Now, you need to take your marble slab, silpat and rolling pin from the freezer and start getting ready to roll out the dough.
Preheat your oven to 400 degrees F.
Set your marble slab onto the counter and, then lay down your silpat to cover it. Wipe down any condensation on the top of the silpat, but leave any that is on the marble, because it makes the silpat stick well to the stone. With your fingers or your flour wand, sprinkle an even layer of flour over the surface of the silpat–I use as little as possible, because one of my personal preferences in making pastry dough is to make a drier as opposed to wetter dough, as I find that with lard in the crust, drier dough handles more easily. So, you really won’t need a lot of flour to be added to the dough.
Bring out your larger dough disc, the one you intend to use for the bottom crust. Have your pie pan at the ready close by. Unwrap your dough disc, set it in the middle of the silpat, and sprinkle the top surface with a little more flour. Cut a fresh sheet of plastic wrap and lay it over the dough. (Even in cool weather, with the lard in the crust, I still use the plastic wrap to roll it out. Butter crusts I will roll out without it, but lard–nope. It is the magic of Saran Wrap that saves me every time.) Make sure you have a piece of wrap big enough to roll out a twelve inch diameter sheet of pastry. If not, use two pieces overlapped slightly.
Take up the rolling pin and start rolling. If the dough is too hard, let it warm up a little bit–no longer than five or so minutes, and try again. Julia Child whacked her dough with the rolling pin to soften it up–but that is a good way to break your cold marble slab, especially if you miss, so don’t go there. Just let it warm up a bit. After your first roll in a direction (forward is the natural way to go), I do the next roll in the opposing direction, which if forward is back. Then, I turn myself one quarter turn to the right(I turn myself to avoid turning the dough and thus handling it and risking breaking a hole in it or tearing it), I do the same forward, back roll. Then I turn the opposite way a half turn (one quarter turn to get me facing straight ahead again, one quarter turn to the left to be facing opposite of where I was facing and do the forward, back roll. Then, I pick up the stone and give it a 180 degree turn, and continue rolling. as above.
If you do this way, you will quickly have a pretty close to circular piece (though, if you make your dough as dry as mine, it will be ragged at the edges) of dough, and you will be ready to put it in the pan.
 This is accomplished by peeling up the plastic wrap, and setting it aside for the next piece of dough, then laying the pan face down on the circle of dough, centered.
Then, peel up the edges of the silpat and wrap them over the bottom of the pan. (If my description is losing you, look at the pictures–it sounds more complicated than it is. Believe me, this is the simplest way to get the pastry into the pan–I have tried all the other ways of doing it, and have had very little success with them.)

Scoot your fingers under the edge of the silpat and under the edge of the pan, and gently grasp the bottom of the pan with your thumbs, while your fingers lightly cup the bottom of the pan and the pastry through the silpat.
Take a deep breath, center yourself and with a quick flip of the wrists, turn the whole kit and kaboodle over, and unroll the silpat so that the pan is sitting on the counter or marble slab and the silpat is laying flat on top of it.
Now, it is a simple matter of peeling the silpat up from the dough, and easing the dough down into the pan. Make sure to settle the dough evenly into the bottom of the pan, and rearrange gently as necessary to make everyone even and happen.
Using dedicated kitchen shears (please don’t use the same ones you cut chicken bones with–ick), trim the ragged edges of the pastry to a simple one-half inch overhang from the rim of the pan. Fill the bottom crust with your filling of choice (recipe to follow)–for a standard-sized nine inch pan I use around five cups or so of fruit.
Roll out your top crust following the same directions (they worked so well the first time, you need to do them again to make sure) and then, put the top crust on the pie. The easiest way to do this is to peel up the plastic wrap (unless you like plastic in your pie) and slide one hand under the silpat to the center of the dough. Spread your fingers wide, and use the other hand to gather the two edges of the silpat in a loose half fold. Pick up the dough, bring it to the pie pan, drop one edge of the silpat, and invert the top crust over the pie. Peel off the silpat.
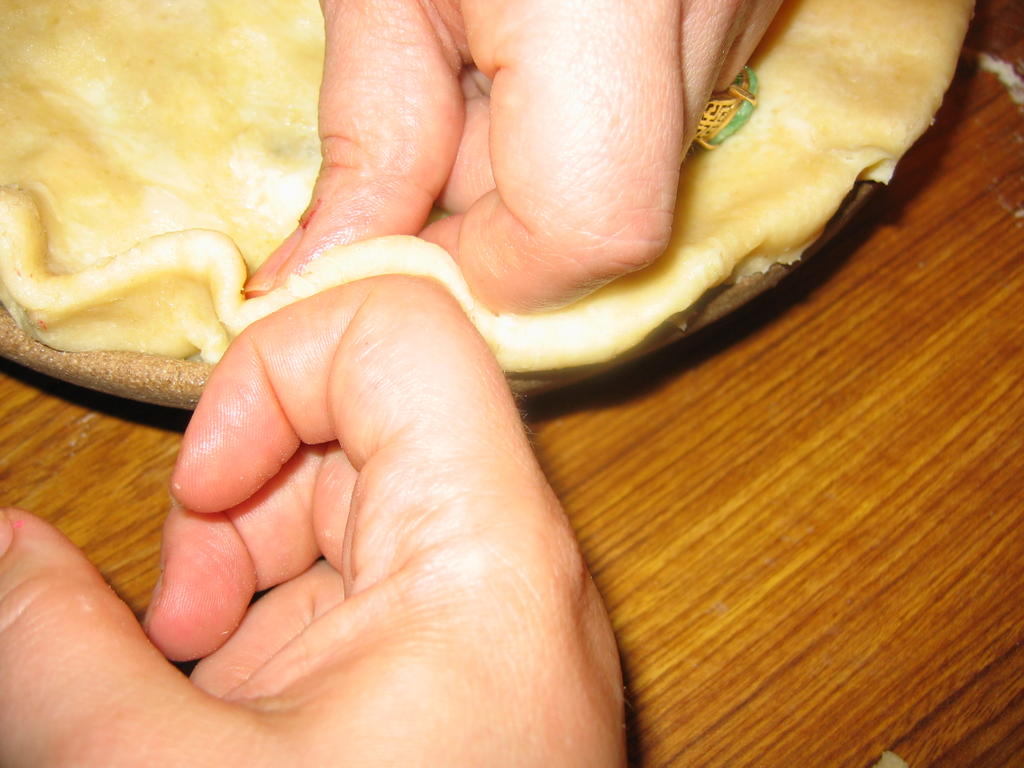 Center the top crust, trim the edges just a shade longer than the bottom crust, and turn the top crust edges under the bottom crust and pinch lightly to close.
Finish the edges as you like–I like to do flutes, but I warn you that high, dramatic flutes as pictured will droop in the oven, because lard crusts just are too soft for big flutes like that. You can trim the edges closer and thus make shorter flutes, or you can keep the big ones and not worry about how they look, because you like the crispy edges best, or you can press the edges decoratively with the tines of a fork. (I generally flute it and don’t worry if they droop, because I like the crusty edges.)
 Cut vents in the top of the pie for steam; I usually do a monogram. You can do a letter to represent the filling, or do as I did and use the first letter of the person’s name for whom you made the pie–in my case, it was an “M” for Morganna. Or you can cut flowers, little viney bits or other decorative designs using the tip of a sharp knife.
 You can brush the top of the crust with milk and sprinkle it with a scant teaspoon of raw sugar to make a nice sparkling brown finish on top that has a hint of crunchy sweetness.
Bake the pie in the four hundred degree oven for around thirty minutes. At that point, shield the edges of the pie with the chakram by placing it on top so that the flutes are covered and the rest is open(you know, it is really called a pie shield, but I so prefer chakram that I will always call it that from now on.) and lower the heat to 375 degrees F and rotate the pie 180 degrees if you have no convection fan (if you do have one, you don’t need to do the rotating thing). Bake for another 25-30 minutes, or until the top is nicely browned and the filling is bubbling thickly through the vents.
Take out and cool on a rack. It is best to let them cool almost all the way before cutting into them–when they are really hot, the texture of the crust is apt to suffer and the filling will be runnier and is likely to burn your mouth. So, be patient before cutting into it.
 Blackberry Filling
Ingredients:
2 1/2 quarts fresh blackberries
1/2 cup-1 cup raw sugar
zest of one lemon
1 teaspoon lemon juice
1-2 tablespoons rosewater
4 tablespoons cornstarch
Method:
Pick over blackberries, and wash. Drain completely. Put into a bowl with sugar to taste, the lemon zest, lemon juice and rosewater. Allow to macerate for at least one hour. Add cornstarch and toss to incorporate, then fill pie and finish and bake as directed above.
Note:
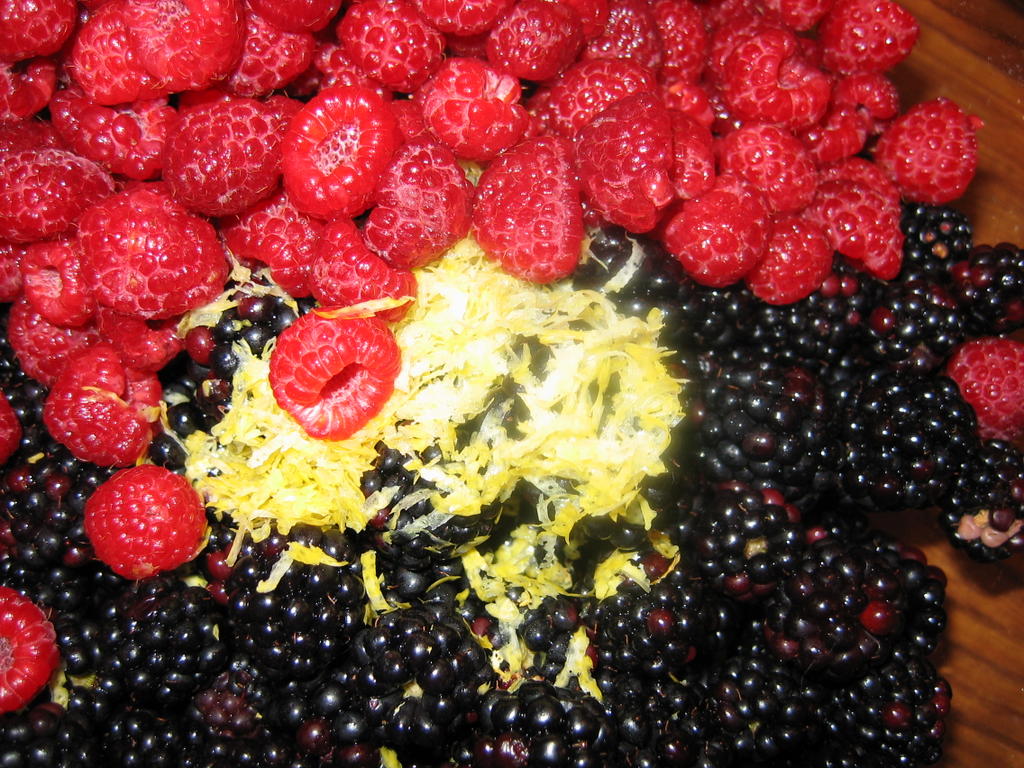
You can substitute raspberries for blackberries–just use less sugar and more lemon juice. Or, as pictured above, you can use half blackberries and half raspberries. In that case, you still use a little less sugar, as raspberries are much, much sweeter by nature than blackberries.
Weekend Cat Blogging: Cat Girl
 And now for something a little different: a cat, a girl, a catgirl.
In celebration of Morganna coming to live with us, I post a picture of her from five years ago, when we lived in Maryland. She was visiting us, and we had just bought her her “bad kitty” hoodie. She wanted to pose wearing it next to our poster of a vintage photomontage entitled, “Me and the Cat,” while holding Minna in her arms.
How could I refuse to comply?
So, there they are–my two catgirls, Morganna and Minnaloushe, cooking up mischief and looking smashing together.
Over at Farmgirl Fare, see the new orange kitty. Claire’s Kiri is looking pensive this week at Eat Stuff. And then, there is Kits, the manly cat at Boo’s place at Masak-Masak.
The Locavore’s Bookshelf: This Organic Life
 Joan Dye Gussow’s book, This Organic Life: Confessions of a Suburban Homesteader is one of those that readers either love or hate. If you want an organized instruction manual on how to grow all of your own food, you will hate it. If you like amusing memoirs which are also packed with useful information on issues of sustainable food systems, you will love it.
I chose to review this book first among the titles I have chosen to highlight this month, in large part, because Gussow set herself the challenge to eat locally a long damned time ago, and went farther with it than I think most of us would dream is possible. She then sat down and wrote a book about it, though, in truth, it is also about a lot more–the loss of a spouse, how to grow organic vegetables, how not to buy a house, and how to trap garden-demolishing varmints.
Gussow is an engaging author; while she is very much a nutritionist and retired professor, she doesn’t lecture like one. Even when she is quoting statistics, facts and figures, she comes across more as a friendly neighbor chatting over coffee than a fact-chewing drone. This may be seen as either a good thing, or a bad thing, depending on your point of view–if you don’t want to hear about remodelling a house or the death of her husband, you will get frustrated as she recounts these tales in the early chapters of the book. If you are like me, and want to know everyone’s story, then it won’t bother you a bit that it isn’t until the second half of the book where she gets down to business and starts really getting into the meat of the book, which is this: our food system is an incredible waste of resources and materials, and results in food that not only doesn’t taste so good, but isn’t necessarily that good for you.
She has her ranty moments–which is fine with me–I like a good fiery pulpit-pounding clarion call as much as anyone, and some of her rants are hilarious. Her story about how she horrified a vegetarian student in one of her classes by pointing out that farmers kill animals who try and eat their crops and that the blood of those animals is thus on the heads of those who eat those crops had me giggling gleefully. (It is the farm girl in me who is always amused at the discomfort city folks have in all the dirty, unpleasant business that goes on in a farm that gets me every time.) She also tells about her experiments with a genetically modified tomato–the tale is convoluted and long, but very amusing.
What is most valuable in this book is the fact that she set herself to only eat what she grew herself in her suburban yard (she converted grass to raised beds and grew vegetables and fruit on nearly every inch of arable space where once there was lawn) and what she could buy locally. She preserved her summer harvest for winter, and kept up this way of eating for years. Years.
She also started a community garden, so some of her neighbors could do the same.
And then she wrote a book about it, to prove that it could be done, it has been done and other Americans could do it, too.
That is the greatest value in this book, which is certainly flawed. For instance, I was disturbed at the amount of landfill waste she generated in the remodelling of her home–that didn’t seem very sustainable or organically minded to me. Her critique of veganism, while partially accurate, was still essentially flawed as well, but these minor issues do not change the fact that Gussow did what many of us food bloggers are setting out to do for a month, FOR YEARS, and not only did she survive, she thrived, and she tells us a fine and inspiring story about it, to boot.
While it isn’t perfect, it is certainly worth a read, especially this month, as some of us strive to eat more locally produced foods. Her trials and tribulations and triumphs are all very soul-sustaining and amusing, and might help us all get through some of the rough spots as we work toward our goals of eating more of our calories from the local foodshed than we currently do.
The Path of Pie II: Tools Without Tears
In my quest for perfect pie, I discovered that there are tools which are essential to the journey, and tools which do not so much help the baker as hinder her. Some gadgets are nothing but gimcrack fantasies with fatal design flaws which render them worthless in the pursuit of pastry excellence.
These paltry bits of kitchen tomfoolery I have cast aside, while the tools which have proven over time to be worthy additions to my ever-growing culinary arsenal, I will now explicate, hopefully to the edification and entertainment of all.
The first steps of making good an exemplary pastry crust involve measuring and mixing.
I went to culinary school, and was forced to take several pastry and baking classes, though it was somewhat against my will, I do admit. In these classes I was taught to measure all ingredients by -weight- not -volume-. To measure anything other than the tiniest amount by volume was the mark of an amateur cook, a housewife or a drudge, and was not only distinctly frowned upon, it was openly derided.
So, it should be surprising for the reader to see that I do not have a scale pictured as I discuss the indispensible tools for successful pastry making. I do own a scale–a very nice digital Salter, in fact, and have used it to make pie crust, but I decided not to measure my master recipes by weight, and instead measured, re-measured, tested and re-tested by using volume measures instead.
Why? Why should someone who is professionally trained do this?
I’ll tell you why–because I believe that it is perfectly possible to make very good pie crust using volume measurements, and there is nothing wrong with doing so. I am not writing for a professional audience–I am writing for cooking enthusiasts who are overwhelmingly home cooks. And not all home cooks are serious foodies who run out and buy baking scales.
So, I wanted my master recipes to be accessible to all–including those who do not own, nor are going out to buy, scales.
Besides–the recipes I started with–my grandmothers’–were measured by volume. And their pie crusts were to die for–so to heck with those culinary purists who would look down their noses at volume measurements.
So–the first items on the list of necessary tools are some really good dry measures, in cups and in teaspoons and tablespoons. I like the scoop-like ones from OXO that I use the “swoosh-dunk/sweep” method with. That method requires a straight-edged tool like my icing spatula to work. A straight edged table-knife or chef’s knife will do as well.
The next items are mixing bowls. For pie crusts mixed in the summer, I highly suggest wide, shallow metal bowls–the metal conducts temperature very well, so you can stick it in the freezer before using it, in order to keep your fat as chilled as possible while working with it. In the winter, when ambient room temperature isn’t such a problem, a wide, shallow ceramic bowl works just as well. The wide, shallow shape allows you to easily reach into the bowl and work your wrist while cutting in the flour.
 Ah, yes–cutting in the flour. I know a lot of people like using food processors to make pastry, but I think inexperienced people risk making tougher pastry by using the machine. Food processors create heat from friction, and while some may say that it doesn’t generate enough to matter, I beg to differ. When we made bread dough in professional baking classes, we had a formula which we used to figure out what the optimum temperature of the water would be to get the yeast to become lively in the shortest time possible. Factored into this equation was the room temperature and the temperature rise from the friction generated by the mixer. I say that if bread bakers are so concerned with it–it must be important.
And it is. I cannot count how many pastry doughs I have mutilated using a food processor. So, I gave up on it and do it by hand, to much better effect.
Some people use a fork to cut the fat into the flour. I find that to be uncomfortable, unwieldy and messy. Others use two table knives, but I never could get the knack of that; I always flung so much flour hither and yon that I ended up looking as if I was made up for kabuki theatre.
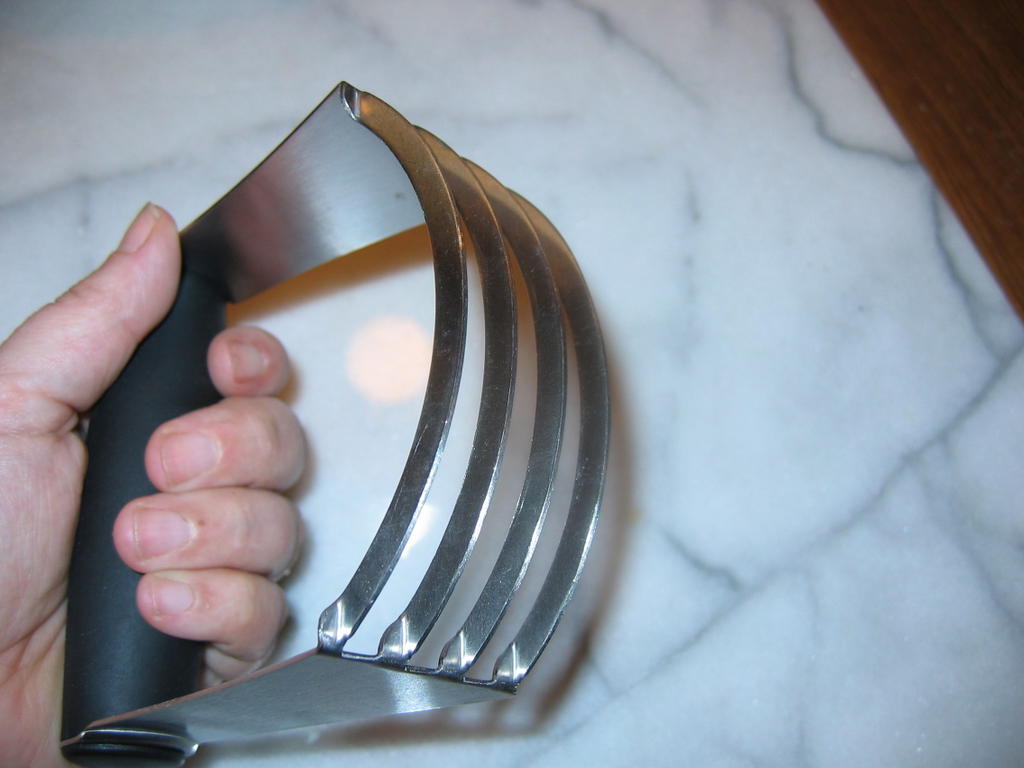
The answer, of course, is the pastry cutter.
Ah, but which pastry cutter?
One that -cuts- the fat into the flour.
In other words, one that is sharp. That has blades. Not wires–they are rounded and they -mush- the fat into the flour and they are flimsy and bend and spring and work my nerves. Not odd looking things that look vaguely like potato mashers, though they do work better than those wire hoopy-doopies. Work though it does, it is slow and clumsy; the potato masher still cannot compare to the ones that have four curved blades brought together with a handle. That model makes short work of chilled fat and cold flour. With a firm grip and quick, practiced motions of the wrist, the fat is cut in, and all is well.
One must simply scrape accumulated fat out of the blades once or twice with the straight-edged spatula or table knife, and then go on until the fat and flour mixture looks like a bunch of powdery pale, shaggy peas.
 The next most harrowing step in making pie crusts involves rolling and shaping. This is a perilous step, which if done improperly can result in tough, mealy, greasy pie crust, and as we all know, no one really wants to eat that.
So–what tools are required to avoid the cardboardy crusts we are all familiar with?
First–a marble slab really does help, particularly in keeping the dough cold. Get one and hours before you roll the dough out, make room for it in your freezer and stick it in. Or, failing that–I know some of us feel the need to stuff every weird thing we can find in our freezers, like chicken feet, quarts of stock, half a carcass of a pig and vanilla beans, that we can never find space for a big hunk of rock–put a bunch of ice in a ziplock bag and set it on the slab to chill it. That doesn’t work as well, but it does work. Just be certain to wipe any condensation off the slab before using it.
While a marble slab will keep the dough chilled, it will do nothing to affect the stickiness of the dough, which is affected more by the amount of liquid and the type of fat than it is by ambient temperature.
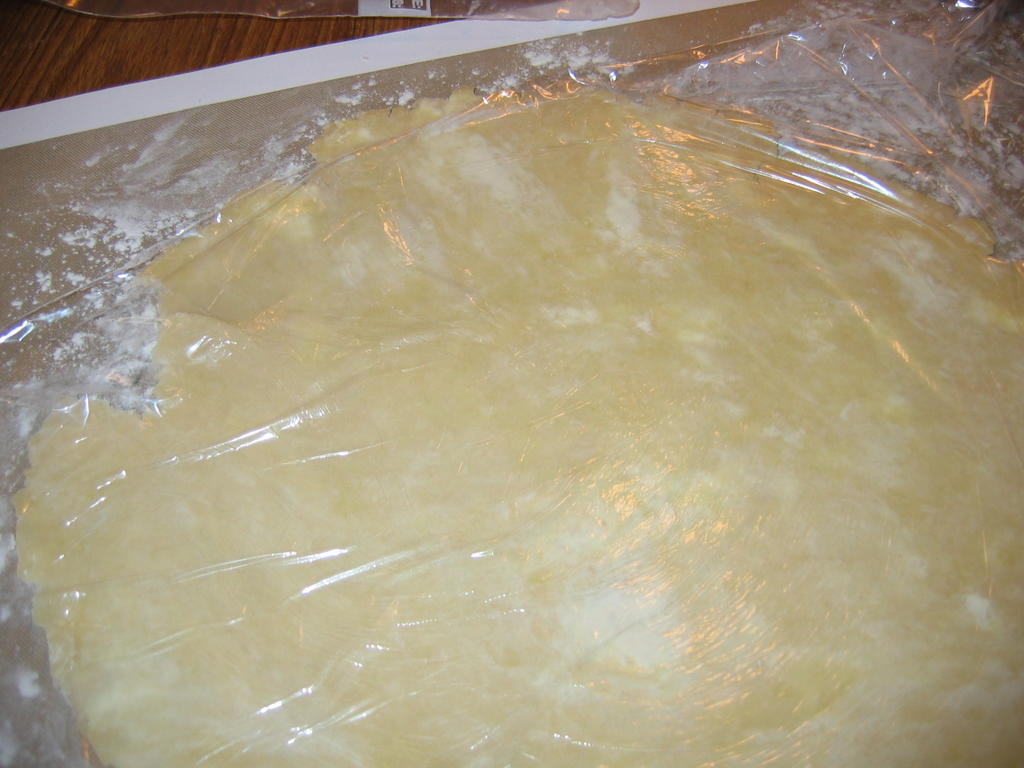
A silicone mat, known by the tradename Silpat, will go far in allowing a baker to successfully roll out pastry dough into a thin, round sheet without having it stick to the rolling surface. Some of them, like the one pictured above, are made specifically as rolling surfaces, and thus have helpful markings to show how round a 12 inch circle of dough should be. I picked mine up at Sur La Table, and have loved every minute I have used it.
You still need to flour your silicone rolling surface–that is where that weird looking wire contraption comes in. It is called a flour wand, and while it is not necessary, it is fun. You squeeze the handle and the spring opens. You dunk it headfirst into flour, then release the handle and the spring closes, trapping flour inside. Then you take it out and with a gentle shake, you can evenly sprinkle flour (or powdered sugar) over any surface without getting flour all over yourself and everything else. It only goes where you want it.
Rolling pins. You can use marble ones–I have, and I do like them–they are heavy and chillable. However, having also had one go rolling away and drop on the floor and crack–they can be dangerous. A plain wooden one like the one pictured, also does an admirable job, but my favorite is the silicone coated metal one. It is chillable, it has ball bearings inside it for a smooth roll, and the silicone, once coated with flour, makes for nonstick rolling, even of lard crusts, except in the hottest of weather.
In the case of hot August weather and lard crusts–even the silicone rolling pin cannot guarantee that there will be no sticking–in which case I suggest you use the greatest weapon in the pie-makers’ arsenal, but which is not pictured–Saran Wrap.
Yes. Plastic wrap. When it was hot in the kitchen, and Grandma had no patience, she resorted to rolling her dough out between sheets of plastic wrap. I do the same, and it works like a charm every time. I flour the silicone rolling sheet, and lay the chilled dough disc on top of it, then sprinkle flour on top of it, and then lay a sheet of plastic wrap over it and commence to rolling.
When the dough is the desired size and thickness, peel the wrap off and lay it in the pan.
 There are a couple of necessary items for playing with fillings. If you are going to use fresh sour or sweet cherries in your fillings, invest in a cherry pitter, please. It will make short work of the thankless and irritating task of pitting cherries, and as a bonus, it will pit olives as well. The one pictured is simple to use and easy to clean.
A Microplane grater makes short work of zesting lemons; it reduces the vibrant yellow skin to whisper-thin shavings in no time. I find that lemon or lime zest is a very good addition to many fruit fillings, so I have found the Microplane to be invaluable. And, finally, for grinding spices, a few almonds or lavender petals, I like my plain old marble mortar and pestle. It is perfect for grinding up small amounts of anything that is grindable, and in making flavor enhancements for pie fillings–it is always a small amount, so there is no sense in dragging out a food processor or spice grinder. Besides, the mortar and pestle are much easier to clean up and they look neat on the counter.
 Finally, we have the shaping and baking–and a handful of tools I have found to be perfect for the job.
I like my unglazed stoneware pie pan–it bakes more evenly than metal, and it looks nicer and makes a drier bottom crust than glass, though glass is my second choice.
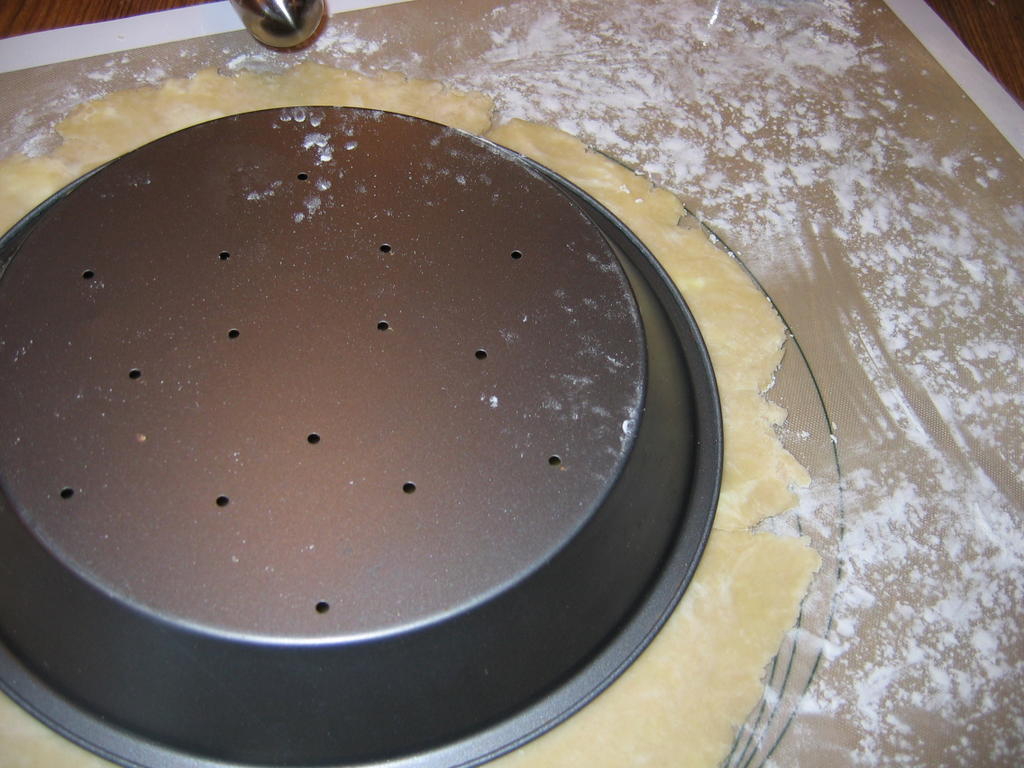
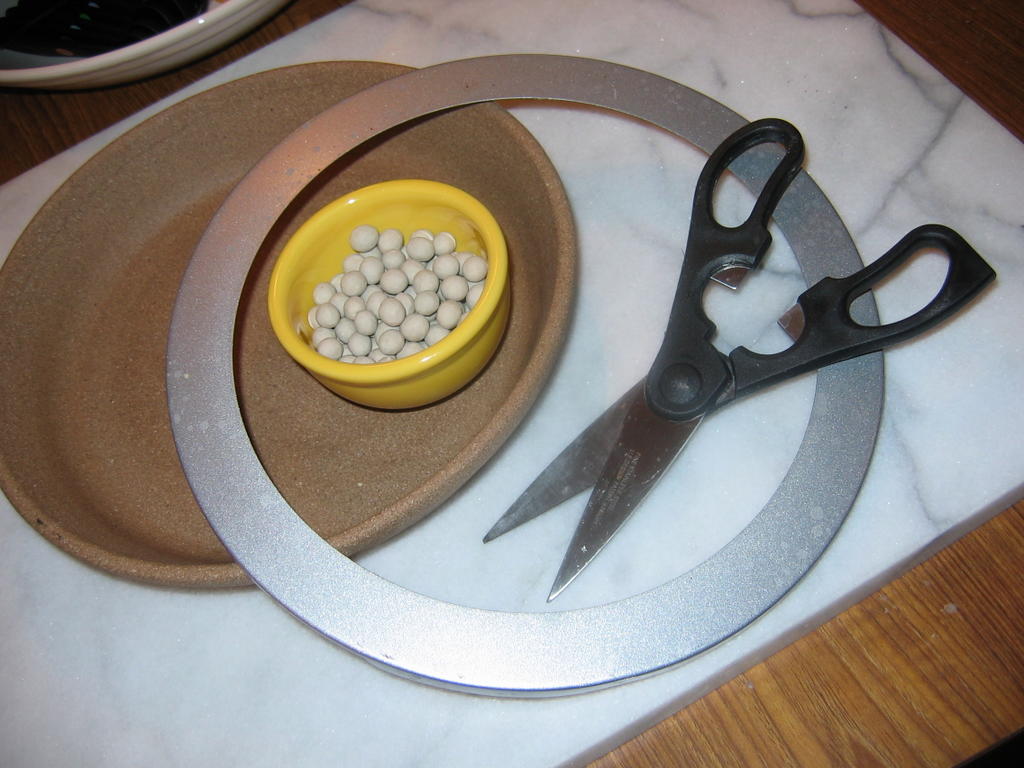
The little clay spheres are pie weights–they are used when I bake a pie crust “blind” or unfilled. You can use beans instead, but I had the pie weights, and figured I should use them. The scissors are for trimming the edges of the pie crust in order to make prettier, more even flutes.
Trimming with a knife is clumsy and sometimes dangerous–I find that a pair of dedicated kitchen shears work a hundred times better and are easier to use.
Finally, that chakram-looking thing isn’t a leftover from my Xena, Warrior Princess days–it is meant to cover the edges of the pie in order to keep them from browning too much. The fluted edges brown before any of the rest of the crust, so once it has browned to your liking–usually after the first thirty minutes of baking, you set this contraption over the pie, and it shields the edges and lets the center brown, which results in a prettier, more evenly-browned pie.
The only other tool I use, which I forgot to photograph, is the pastry brush. I don’t go for the weird silicone ones that look like squid, or anything like that. I just use a nice paintbrush that is dedicated to the task of pastry. It washes in the dish washer, and is perfect for brushing the top crust with egg or milk to make a pretty finish.
That is the roundup of tools–it isn’t a huge amount of equipment, because I tried to pare it down to the essentials. Other folks may have other things they cherish–please post and let me know what you have used that works for you. These are just the things which have helped me master the art of pie baking so that I can stand up proudly as a worthy successor to my grandmothers, both expert bakers in their own rights.

Categories:
- Admin (rss) (55)
- Blogs and Blogging (rss) (81)
- Book Reviews: Cookbooks (rss) (43)
- Book Reviews: Non-Cookbook Food Books (rss) (38)
- Cats and Cat Blogging (rss) (47)
- Chinese Cooking Lessons (rss) (32)
- Culinary School Stories (rss) (18)
- Dairy Pruducts: Cultured and Barbaric (rss) (4)
- Documentary Filmmaking (rss) (1)
- Essays, Rants and Reflections (rss) (260)
- Fighting Hunger (rss) (12)
- Food and Kids (rss) (45)
- Food in the News (rss) (126)
- Food Media (rss) (98)
- Food Preservation (rss) (18)
- Food Safety (rss) (45)
- Gardening (rss) (30)
- Herbs and Herb Blogging (rss) (20)
- Holidays (rss) (50)
- Kat Blogging (rss) (22)
- Kitchen Science (rss) (36)
- Leftover Makeover (rss) (8)
- Life, the Universe and Everything (rss) (131)
- Local and Sustainable (rss) (227)
- Local Athens Food and Foodies (rss) (42)
- Meatless Mondays (rss) (32)
- Menu For Hope (rss) (5)
- Nutrition, Diet and Health (rss) (84)
- On The Farm (rss) (8)
- Recipes: Almost Vegetarian, Vegetarian and Vegan (rss) (294)
- Recipes: American Regional (rss) (37)
- Recipes: Appalachian Hillbilly (rss) (33)
- Recipes: Bread, Pasta, Grains (rss) (95)
- Recipes: Canning and Preserving (rss) (8)
- Recipes: Chinese (rss) (123)
- Recipes: Comfort Food (rss) (120)
- Recipes: Cookies (rss) (16)
- Recipes: Desserts (rss) (48)
- Recipes: French (rss) (25)
- Recipes: Fruits and Vegetables (rss) (302)
- Recipes: Greek, North African and Middle Eastern (rss) (31)
- Recipes: Indian (rss) (137)
- Recipes: Italian (rss) (42)
- Recipes: Japanese (rss) (7)
- Recipes: Jewish (rss) (4)
- Recipes: Korean (rss) (6)
- Recipes: Meat, Poultry and Fish (rss) (220)
- Recipes: Mexican/Native American/ Latin American/Caribb (rss) (27)
- Recipes: Original (rss) (108)
- Recipes: Thai (rss) (27)
- Recipes: Tofu (rss) (17)
- Recipes: US Regional (rss) (16)
- Recipes: Vietnamese (rss) (8)
- Restaurant Stories (rss) (28)
- Sewing, Quilting, Arts and Crafts (rss) (16)
- Simple Chinese Recipes (rss) (30)
- Slow Food and Heritage Foods (rss) (10)
- Spice Blogging (rss) (44)
- The Chinese Cookbook Project (rss) (14)
- The Chinese Pantry (rss) (39)
- The Documentary (rss) (2)
- The Kitchen Saga (rss) (17)
- The Locavore's Bookshelf (rss) (15)
- The Unsung Adventures of The Culinary Nerd (rss) (6)
- Tools and Toys (rss) (35)
- Uncategorized (rss) (10)
- With a Side of Politics (rss) (48)
Archives:
- August 2012 (9)
- July 2012 (12)
- September 2011 (3)
- August 2011 (7)
- July 2011 (8)
- June 2011 (16)
- May 2011 (17)
- April 2011 (11)
- December 2010 (9)
- November 2010 (5)
- February 2010 (1)
- December 2009 (5)
- November 2009 (7)
- October 2009 (10)
- September 2009 (16)
- August 2009 (14)
- July 2009 (14)
- June 2009 (7)
- May 2009 (17)
- April 2009 (10)
- March 2009 (25)
- February 2009 (13)
- January 2009 (10)
- December 2008 (5)
- November 2008 (5)
- October 2008 (6)
- September 2008 (13)
- August 2008 (8)
- July 2008 (11)
- June 2008 (18)
- May 2008 (13)
- April 2008 (14)
- March 2008 (16)
- February 2008 (17)
- January 2008 (19)
- December 2007 (25)
- November 2007 (18)
- October 2007 (24)
- September 2007 (16)
- August 2007 (15)
- July 2007 (15)
- June 2007 (10)
- May 2007 (14)
- April 2007 (16)
- March 2007 (17)
- February 2007 (20)
- January 2007 (13)
- November 2006 (1)
- October 2006 (8)
- September 2006 (14)
- August 2006 (25)
- July 2006 (30)
- June 2006 (28)
- May 2006 (34)
- April 2006 (29)
- March 2006 (24)
- February 2006 (30)
- January 2006 (38)
- December 2005 (40)
- November 2005 (37)
- October 2005 (32)
- September 2005 (25)
- August 2005 (30)
- July 2005 (28)
- June 2005 (21)
- May 2005 (8)
- April 2005 (22)
- March 2005 (17)
- February 2005 (29)
- January 2005 (10)
Search Site:
Links:
- Lily’s Wai Sek Hong
- 101 Cookbooks
- A cat in the kitchen
- A Veggie Venture
- Accidental Hedonist
- Cha Xiu Bao
- chez pim
- Chocolate & Zucchini
- Chopstick Cinema
- Chowhound.com
- Chubby Hubby
- Cook sister!
- Cooking with Amy
- da*xiang
- Eat Local Challenge
- Eating Liberally
- Ecocentric
- Eggbeater
- Epicurious
- Farmgirl Fare
- Fatfree Vegan
- Foodgoat
- ForkandBottle.com
- Green Olive Tree
- Hooked on Heat
- Jaden’s Steamy Kitchen
- Kalyn’s Kitchen
- Lucullian delights
- Mahanandi
- Matt Bites
- MeatHenge
- mmm-yoso!!!
- New York Times – Dining & Wine
- Pizza Goon
- Rasa Malaysia
- Ruhlman
- Sailu's Kitchen
- Serious Eats
- SF Gate: Food & Dining
- Simply Recipes
- Soul Fusion Kitchen
- Tastespotting
- The Amateur Gourmet
- The Cleaner Plate Club
- The Food Section
- The Grub Report
- thecookscottage
- U.S. Food Policy
- Wandering Chopsticks
- Washington Post Food and Dining
- Wasted Food
Meta:

Powered by WordPress. Graphics by Zak Kramer.
Design update by Daniel Trout.
Entries and comments feeds.