Cook Local, Eat Global
Packing and Remembering
Tomorrow, it begins.
I have to start packing up parts of my kitchen.
We are moving sometime next month, and that means that we need to seriously start to pack.
In all honesty, I started the process months ago when I put most of our books in boxes.
Not my cookbooks of course. Just the other books. The cookbooks are still all on their shelves, dusted and happy. I couldn’t pack those.
I might need them.
But books about gardening, or novels or literature or folklore or feminist theory or spirituality–we didn’t need those.
Of course, I have already had to dig into a couple of boxes to retrieve something that Zak did indeed inform me that he needed in order to write an essay.
Oops.
So, anyway, I am eyeing my kitchen, knowing that I should pack away the things I will not be needing anytime in the next month, so I won’t have to stay up for forty-eight hours before the moving van arrives and pack in a frenzy of stressed activity.
I know I should, but I don’t want to.
Choosing what goes into boxes first is hard.
By all rights it should be simple. The fish poacher should go first. Because I have never used it, and I am not likely to poach a whole salmon just for Zak, myself and maybe the cats. Even if the cats hope for this, it is not likely to happen.
But it is so shiny. It doesn’t want to be in a box. Besides, Zak’s dad bought it for me as a gift when I graduated from culinary school.
Or the twenty-something quart stockpot. I am not going to be making beef stock for pho anytime soon. Not with only two people in the house. Nor am I going to be making jambalaya for a crowd–especially since the crowd lives where we will be moving to, not where we live now.
But I hate to do it. I always think about the first time I used the stockpot.
For our wedding feast. I made beef stew with Guinness stout. I catered the reception myself–with the exception of the cake. Never bake and decorate your own wedding cake, even if you are professional. It adds way too much strees to an already stressful event.
I am speaking from experience; I did it once, for my first wedding. Three tiers, frosting roses, festoons of icing. It was the first time I had ever done such a thing.
It is also nearly the last time I have done it.
I don’t do wedding cakes anymore.
Anyway–I look at that stockpot and I think about Zak and I getting married and I don’t want to stick it in a box.
Or Gram’s pots and pans. A large set of copper-bottomed Revereware purchased by her daughters after they got jobs at the phone company in the 1940’s. They gave them to her for Christmas., and she kept them until she went into a nursing home while I was in culinary school, in 1998. When they cleaned out her apartment, my Mom asked if I wanted anything and I asked for her soup pot. My aunt Sis, one of the two who had given it to Gram, said to just give them all to me.
So, when I use them, I think of all the meals Gram cooked and served in those, for her kids and grandkids. And when I think of putting them in a box, I get reluctant. They are full of love, and a lot of good cooking karma. They should be enshrined, not stuck in a box.
And her Fiestaware is in my cupboard, too. And the wooden spoon that was Grandma’s and the antique tea set that Zak’s grandfather brought from Japan, and the mooncake mold I bought from the Wok Shop in San Francisco on our honeymoon….
And I cannot do it. I hate to do it. I don’t want to do it.
But it is too bad. The boxes go into the kitchen empty tomorrow.
And they will come out filled.
I swear it.
Thai Basil
When I am longing for the sun, there are other flavors besides Meyer lemons that recall the sensation of warmth to my thoughts.
Thai basil is one of them–sharper and more pungent than the more familiar European varieties, it never fails to shake the cobwebs from my mind and get my chi flowing.
When paired with the wickedly-hot wee Thai chiles, Thai basil can give an unforgettable culinary kick in the pants that is not only energizing, but addictive.
But in a good way.
Thai basil is a necessary ingredient in many Thai dishes, and while for years I was forced to substitute Italian Genovese basil for it, once I found a source for the correct herb and tasted the difference it made in my cooking, I never looked back. I determined that when we moved to a place where I could have a garden, I would grow my own basils and chile peppers, and never be bereft again.
Which is what I did. The spring before last I started my own basil and mint plants. I knew that there was no way I was going to be able to afford to put in plants from a nursery and still keep Zak and I in both Thai food and pesto–the amounts needed were too high. So, I invested in seed starting trays and a grow light and turned out spare bedroom into a plant nursery.
I ended up with well over one hundred basil plants of three different kinds: Thai basil, Genovese and Holy basil.
The variety I ended up growing of the Thai basil was Siam Queen, which is a beautiful, vigorous plant, bushy and upright in habit with dark green leaves that shade to purple near the flowering tips. The square stems (a sign that shows basil’s relationship to mint–basil, like many other culinary herbs, is in the mint family) are also purple, as are the flowers, which are extremely popular with bees. The leaves, stems and flowers are all edible and are quite flavorful, though the thicker stems are too tough to be palatable. Among the three types of basil I grew that year, it was the most beautiful, and when it came time to transplant all of my baby plants into the garden, I ended up sprinkling among the roses, salvia and other perennials in the flower garden, as I ran out of room in the vegetable and herb patch.
They never failed to get attention from all of the visitors of the garden, whether they were people, bees, butterflies or hummingbirds.
And no matter how many Thai dishes I cooked that year, we were never short of basil to put in them.
Last year, I ended up with fewer basil plants; due to my mother having surgery in prime seed-starting time, I ended up not starting my baby plants. I bought ten plants of Siam Queen at a local nursery, but I had to carefully tend them and snip them in order to eke them out over the summer season.
It is coming close to time to think of dragging the seed starting stuff out of the basement and setting up a plant nursery, but since we are moving house in March and I am not sure what kind of sun exposure we will have in the new garden, I think I will resist the urge to sprinkle seeds into flats and watch hundreds of tiny plants sprout. I think it is best to see how much sun I will be getting and what kind of soil I will have to work with before throwing myself into midwifing a a huge family of tiny basils.
And once we move, if it looks like we will have a good spot for a basil patch, I can always head out to my favorite herb nursery ever and pick out some started plants. Then, next winter, around this time, I can indulge in my seed-starting passion, and watch as hundreds of little Siam Queens pop their first infant leaves above the soil.
Until then, I can assuage my longing by picking up a bunch of basil at the Asian market and putting together one of Zak’s favorite Thai dishes–Spicy Chicken with Basil.
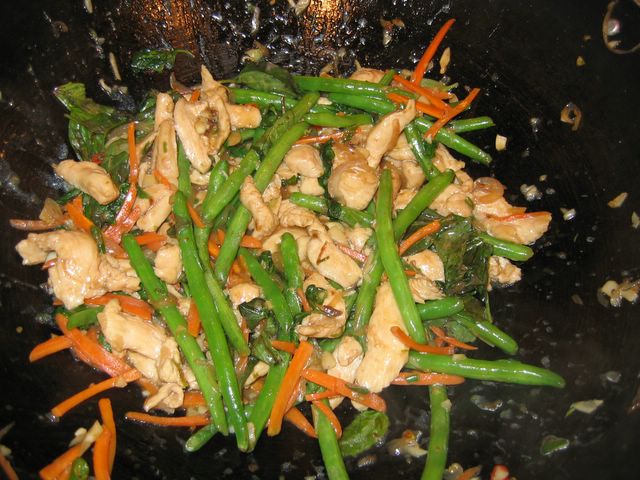
Chicken with Basil–a spicy Thai stir fry dish that features fiery chiles and sweet Thai basil with garlic and shallots.
Thai Chicken with Basil
1 lb. boneless skinless chicken breasts, cut into 1”X1/2” slices
1 tbsp. cornstarch
1 tbsp. oyster sauce
3 tbsp. peanut oil
2 large shallots, sliced as thinly as you can manage
3-5 Thai bird chiles sliced thinly on the diagonal (or to taste–with me, more is better)
zest of one lime (If you can get fresh kaffir lime leaves, 3 of them cut chiffonade are best)
8 cloves garlic minced
fish sauce to taste*
½ lb. string beans, trimmed, washed, blanched and drained
½ cup carrots cut julienne
1 1/2 cups Thai basil leaves packed
½ cup holy basil leaves, packed (optional-if you can get them)
2 tbsp. oyster sauce, or to taste
juice of one small lime
1/3 cup unsalted chicken broth or stock
Toss cut chicken with cornstarch and oyster sauce.
Heat oil in wok until smoking. Add shallots, chiles and lime zest, and cook until the shallots begin to brown. Add garlic and cook until fragrant.
Add chicken, and push into a single layer and allow to cook without stirring for about one minute, or until chicken begins to brown. Stir, and then stir constantly, cooking until chicken is nearly all white, with only a bit of pink showing.
Add some fish sauce, and let it cook down, then add carrots and cook for one minute, stirring madly. Add green beans and cook for one more minute, stirring. Add the basil leaves and stir for another minute, allowing them to wilt.
Add a dash more fish sauce, a dollop (about a tablespoon is all I use, but some folks like more) oyster sauce and lime juice, boil until sauce cooks down (this takes about thirty-45 seconds, really). Add broth or stock and cook just until sauce is barely thickened by reduction, barely a minute. The basil should be wilted, the chicken glazed with a bit of browning but mostly white and tender, and the veggies crunchy-tender.
Serve over steamed jasmine rice.
*One more thing–about fish sauce–do not be afraid of it. I know it smells funky. Believe me, I know, but you cannot cook Thai food without it. Soy sauce is not a substitute. It isn’t the same. Believe it or not, but the smell really does not indicate the beautiful, complex flavors it brings out in food. When it hits a hot wok it smells rather like someone left a sardine in their tennis shoe in a locker and let it putrify all summer. But the end result is nothing like that.
It seems to boost the natural flavors of other foods while adding its own subtleties that somehow do not have anything to do with fishiness. I don’t quite know how it all works–maybe it is magic. But at any rate, don’t leave it out unless you are allergic to fish or something.
And if you are having people over who are unitiated into the sacred mystery that is fish sauce, before you dash it into the hot wok, send them out of the kitchen, or you may frighten them out of eating dinner. Send them on an errand, out to pick up the newspaper, to walk the dog, to call their mother–anything, but do it. Trust me. I have had to do this with my Mom for years. She loves Thai food, but hates fish and I just know if she were to smell fish sauce, that would be the end. She would never eat pad thai again.
So, I always send her out for her last cigarette before dinner just before it is time to splorch the fish sauce in. It works like a charm.
Synchronicity
So, yesterday, I wrote a post about how for the past three dark and drear Ohio winters, Meyer lemons have saved me from descending into the lifestyle of a dustbunny.
Then, I get up and look at the New York Times and lo and behold, I am not the only person in the world who is interested in the oddities in the lemon world. Apparently, growers in the US are taking up the cultivation of all sorts of different lemon varieties, including ones that are so sweet that even folks without a taste for the tang can eat them out of hand. There is even a great photograph of a really interesting variety with a green striped skin when it is immature, with fragrant pink flesh.
How neat is that.
Anyway, I understand that you have to register to read the article. If that gives you the heebie jeebies and you fear that spam will descend on your email box or Da Man will come and drag you away in the middle of the night because you are a food-obessessed weirdo who wants to take the world over one plate at a time just because you gave some information to the Times, frolic off to bugmenot and deal with your issues. Become unbugged and read that story.
And look at the pretty picture. Doesn’t that just make you want to know what they taste like? Can you imagine a pale pink lemon sorbet that doesn’t rely on food coloring to get that way? What about using some unripe ones to make little cups out of the skins in order to serve said sorbet.? Very pretty.
More later, probably on a completely different topic, because that is just how I am.
The Reason for the Season
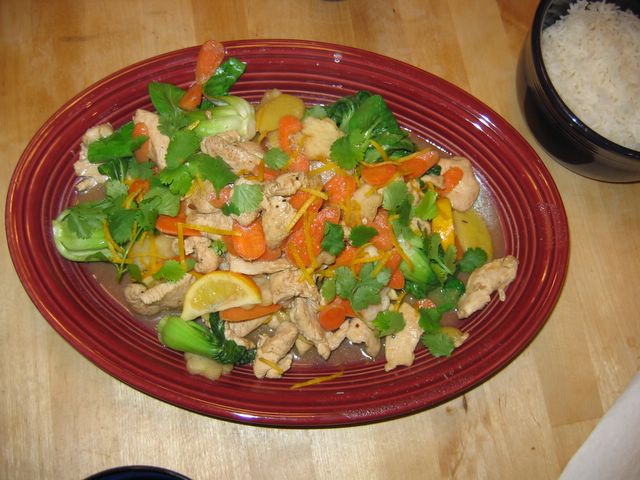
Meyer lemons add flavor, color and warmth to Winter Sunshine Chicken. The other ingredients include baby bok choi, baby carrots and jicama cut with fancy cutters.
I had a friend once who said, “February is the saddest month.”
I credit her belief to the fact that she was living in Ohio at the time; February in Ohio, unless it is enlivened by a pretty snowfall, is a cold, grey, dreary month which will turn the most cheerful person into a frowning slug. Those of us who are not normally perky and upbeat find ourselves in danger of crawling under our beds and falling into a coma until spring comes and our friends drag us out and beat us in the head with brooms by way of awakening us to the rapture that is sunlight and fresh air.
It is a good thing that February is also the shortest month of the year as well, for were it not, more people would succumb to the grey ennui of endless winter. It is a time enlivened by nothing except St. Valentine’s Day which is a horrid, commercial holiday which scars schoolgirls who get no silly valentine cards and which builds up expectation of rampant sexual congress to the point that no one can live up to the hype.
In short, there is nothing to look forward to in February but its end and the advent of March, which at least promises a hint, if not a full-blown manifestation of spring.
However, three years ago, Zak and I traveled to San Francisco in February and discovered something.
We discovered that there is a reason for the month of February to exist other than to keep the Hallmark Card company, chocolatiers, and Victoria’s Secret in business.
They are called Meyer Lemons.
We discovered them growing in a friend’s front yard: floral-scented orange-yellow spheres of pure distilled sunlight. Sweet and sour sauce in a convenient palm-sized package. Lemonade in its own biodegradable container.
I am told that they are too sour to eat out of hand. Pish. What a lie. I bit right into one and it was bliss on the tongue, a pleasant frisson of honey balanced with the electric tingle of citric acid. The peel had the scent of lemon balm in it, mixed with a bit of the terpine flavor of rosemary. It spoke to me of golden hills awash in sunlight, the heady scent of wildflowers and the steady hum of bumblebees.
I completely forgot it was February.
I was hooked.
We carried some home with us in our luggage, and I set to making the best lemon curd, lemon bars and lemonade we had ever tasted when we returned to the record snowfall which had trapped our housesitting friends while we were gone. (Let me note how surreal it is to go from a land where tulips, roses and camellias are blooming and trees are laden with fruit to a blizzard-swept landscape which had been simply barren, cold and leafless when we left. It was a shock to our systems. It was tempting to turn around and board another plane and fly back.) The parade of Meyer lemon goodies that danced out of my kitchen kept us going until the sunlight returned and the first robins bounded across our newly greening lawn.
I thought that would be the end of the Meyer lemon for me, but last year, just as winter had begun to have its way with my psyche and I was feeling the desire to creep under the nearest bit of furniture and take up the life of a dustbunny, I discovered a huge pile of Meyer lemons on sale at the local Wild Oats store.
For a not unreasonable price, I might add.
Needless to say, I gleefully filled a giant bag with pounds of them , clutched them to my bosom and trotted off to my kitchen, chortling the entire way.
Well, actually, I paid for them first, but you know what I mean.
And once again, golden delights poured from my saucepan and oven, and friends began bugging me for my recipes as I began flooding every social event with lemon bars, lemon pound cake, lemon icing and lemon-ginger flavored tea breads.
This year I noticed that I am not the only one in the frigid Midwest and East Coast who is Meyer lemon-crazed. Apparently, they are the new “in” thing. One article from Kansas goes so far as to suggest that we pathetic winter-tormented souls grow dwarf versions inside our houses.
All of this excitement must be amusing to all the folks in California who so take them for granted that they all but throw bagsful of them at people in their hurry to give them away and get rid of them.
That’s okay. Let them give the beauties away or sell them for a pittance. We sunlight-deprived shivering wretches know them for the exquisite commodity that they are. We will pay high prices and hoard them and stroke them, and call them “my Precious” and whisper our love to them in the never-ending gloom that is February. And when we can’t get the fruit itself, we will read about it, we will purchase vodka and olive oil flavored with it, and we will drink and cook and dream the dank cold away.
Hell, we may even buy little trees of our own and attempt to grow a bit of paradise in our homes. Desperation for a sign that the sun really is behind that grey curtain of sky does things to people. If the worst they do is force a little tree to live in a pot, it is a small price to pay.
This year, the lemons showed up a bit early at Wild Oats, and on Sunday, I found myself grabbing them up greedily, only there was some more competition, and the price was higher–a sure sign that these are the new “big thing.”
That is okay. I am not too stingy with my Precious. I wouldn’t begrudge fellow winter-oppressed zombies a hit of sunshine.
And in the spirit of fellowship with those who clutch sweet lemons and pray for the return of the sun, I share this recipe to showcase the golden goodness of Meyer lemons. Since Meyer lemons originally came from China, I decided to create a play on that Chinese take out standby, Lemon Chicken. This version, however, has nothing to do with breading, deep frying or that ubiquitous nuclear-yellow gloppy sauce whose provenance is unknown, and everything to do with sunshine and bold but light flavors.
I went with a very simple, Cantonese-style approach, inspired by two recipes: one from Deh ta-Hsiung in an out of print cookbook, and another from Grace YoungÂ’s The Wisdom of the Chinese Kitchen. The choice of vegetables and the addition of lemon oil to the marinade, however are my own touches.
In honor of the soul-saving properties of the Meyer lemons and the Chinese tradition of giving poetic names, I gave it a somewhat lyrical name, though you may be prosaic and call it simply, “Meyer Lemon Chicken.” However, I am of the opinion that a pretty name makes a dish taste better.
On the other hand, what you call it after you make it in your kitchen is up to you.
Now, get out from under that bed and start cooking.
Winter Sunlight Chicken
Serves 4 for a traditional Chinese meal with several dishes, or 2 if this is the main dish.
Ingredients:
1 whole boneless skinless chicken breast, trimmed and sliced into thin rectangular slices
1 tsp. thin soy sauce
1 tsp. Shao Hsing wine
3 drops Boyajian lemon oil
1 ½ tbsp. cornstarch peanut oil for stir-frying
2” square chunk of fresh ginger, peeled and sliced thinly
1 Meyer lemon, cut longitudinally in half, then into four wedges from each half
2 tbsp. Shao Hsing wine
1 tbsp. thin soy sauce
½ cup carrots, peeled and cut into very thin diagonal slices
6 fresh water chestnuts, peeled and sliced into thin round slices *
juice and zest of two Meyer lemons
1 ½ tbsp. honey
1 tsp. cornstarch dissolved into 2 tsp. water
2 scallions, green parts only, cut into 1” long diagonal slices
½ cup whole cilantro leaves
Method:
Put chicken in a bowl, and toss with soy sauce, wine and lemon oil. Allow to marinate at least twenty minutes, while you cut up vegetables. Just before cooking, toss with cornstarch.
Heat wok until smoking. Heat peanut oil until smoking, and add ginger and lemon wedges. Be careful—–damp lemon slices can cause splattering. Stir fry until ginger is golden brown and lemon is beginning to brown on edges and on skin. Remove to serving platter and set aside.
Add oil if needed, heat wok back up, add chicken, and stir to a single layer. Allow to brown on bottom side for about 1 minute, then stir and fry until nearly done—–most pink spots should be gone. Add wine and allow alcohol to cook off while stirring and frying the chicken. Add soy sauce and stir and fry 30 seconds.
Add carrots and water chestnuts and stir fry until carrots are done. Pour in lemon juice and honey, then scrape into wok the ginger and lemon wedges. Stir until liquid comes to a boil.
Add cornstarch mixture and stir until liquid is slightly thickened.
Add scallion tops, and stir fry another 20 seconds. Take off heat, garnish with lemon zest and cilantro leaves and scoop onto serving platter.
Serve with steamed rice.
*If you cannot get fresh water chestnuts, use peeled, thinly sliced jicama. You can do as I did for the picture above and use fancy cutters to give them a pretty shape.
Pastry for Butterfingers
My Grandma baked the most beautiful pies.
Part of their beauty rested in her ingredients; she only used lard, rendered from the hogs she and Grandpa raised, and the flavor was exquisite. Rich and full of the wonderful brown flavors that still speak to me of earth and its bounty. The texture was perfection itself; when you bit into those crusts, they would shatter into multitudes of flakes, then melt blissfully into your mouth.
I was an odd child–while my cousins were all gobbling down the filling and the top and bottom crust, I ate the fluted pastry edge first, and then scavenged the edges that they would leave behind. That is not to say I didn’t like the sweet fillings–I did, especially when she made cherry pie from fresh sour cherries.
But pie has always been about the crust for me.
I watched her make pie crust countless times, but I was not allowed to help. I helped with bread dough and biscuits and cookies and cakes, but pie crust was a mystery that was best left to Grandma’s talented hands.
I remember that she never measured out her flour, lard and water out very carefully. If at all. It looked rather to me like she put flour in a bowl, plumped down a glob of lard and then cut it together with either a fork or two knives, depending upon how she felt at that moment, I suppose. When the lard was worked in to her satisfaction (as I recall there were lots of different sized lumps in the bowl, some the size of peas, some granular and a few bigger pieces–not quite the size of a butter pat, but almost), then she would take a spoon, and scoop out of her glass of ice water, then drizzle what looked like precious few drops of water. Then she would gather it together with her hands, and work the dough into a ball. She’d cut it in half or quarters, depending on how many pies she was baking, and then either roll it out that minute, or chill it for a short time while she peeled and cut up apples or stirred the pumpkin on the stove or pitted cherries.
I was allowed to help with those chores, so long as I kept the number of cherries I ate to a minimum and was careful not to drop my long hair into the pot of pumpkin as it cooked down.
Then, she would roll out the dough between two sheets of saran wrap or waxed paper.
They were perfect rounds, and were seldom shaggy at the edges.
Then she would fit the bottom crusts into pans, fill them up, then roll the top crusts and lay them over the fillings. And with swift, practiced fingers, she would flute the edges beautifully–tucking the fillings into bed, she would call it. Then she would give me a little knife and I was allowed to cut vents into the top crust (so the pie could breath, she said) in the form of leaves, flowers, or letters of the alphabet. If the pie was for me, a “B†would go on it, as fancy as I could make it. If it was just a pie because that was what was for dessert, then leaves and stars and cat’s faces it was.
After watching this so many times, one would think that I would have inherited some of her pie making ability.
No such luck.
Pie making keeps me humble as a cook; if I didn’t have a culinary failing, I’d have an ego the size of Emeril’s and would be unbearable.
Though I did learn a bit from Grandma, because I don’t overwork my dough and I am careful to touch it with my hands as little as possible. She always told me that my hands were too hot to play with pie dough much–I would melt the lard, and make the crust tough. I listened to her admonitions enough times that when I cut in the fat, I never do as Madeline Kamman does, which is rub it together with her fingertips. Madeline can do that because she is special and her fingertips are magic. In fact, it looks to me like she puts a pile of flour down, and a lump of butter and then diddles her fingers in the air over it and somehow, voila! Magically, pastry dough appears, and she smiles her twinkly Alsatian smile and I am left wondering, “How the hell did she do -that-?â€
When I was in culinary school, even though I was in the chef track, not the pastry track, I had to take two baking and pastry classes. That was okay, the pastry students had to take a couple of cooking classes, so we could laugh at each other as we walked by each other’s classrooms. Baking students would giggle as they looked in the observation windows to see cooking students fumbling and dropping dough on the floor. We cooks, however, could always get back by observing a baking student staring morosely into a bubbling vat of stock, with a spoon in hand as they listlessly skimmed scum off the top and dreamed of making choux paste.
I didn’t mind my baking classes, though I did something stupid in my second baking class and admitted that I didn’t love to bake. In fact, it made me nervous. In fact, it gave me fits. I was the only one to raise my hand when our chef asked if any of us hated baking. He asked me why, and then I looked around and saw I was the only ass to have raised my hand. I scolded everyone else. “Liars! I know some of y’all hate baking–I heard you say so just outside five minutes ago.†The chef half-grinned and said, “So you are honest. Tell me why.â€
“Because it is nerve wracking, and I am clumsy and you have to measure (even in culinary school I never measured–I just cooked. Drove the other students mad.) and it is all so precise and it gives me the willies.â€
At least some of the kids nodded in agreement.
So, the chef divided us up into groups, and gave my group all of the hardest stuff–but the most fun stuff. At the end, when I presented my final project–an apple walnut strudel (yes, we hand stretched the dough) with caramel sauce and crème anglaise with a garnish of sugar stars (yes, we made those by hand, too), the chef graded it and then looked up at me slyly. “So, did you have fun?†I had to admit that I had. “And do you like baking?â€
I had to admit that I did.
But I get ahead of myself. Before that class, where we made croquembouche and strudel and spun ethereal veils of golden sugar out of syrup, I had to take the basic baking class where I ended up being in my own group by myself because the chef said that the kids in my group were so clueless that I was carrying them. So, I ended up working alone, which was great while we made bread, and wonderful when we did cakes, laminated doughs and pastry creams.
It was not so good when it came to pie dough.
By the time we got to pie dough, I had already shown that I could make tender biscuits, good baguettes, and wonderful croissants. My genoise was even up to par and the Italian buttercream and the ganache were great–they involved cooking, after all.
But when it came to rolling out the dough for a simple two crust pie, I sucked.
The chef came by and watched over my shoulder as I struggled with the rolling pin. Beneath it, my formerly round disk of dough turned into a shaggy-edged map of some unknown country where people apparently cannot make pies. There was an explosive sigh. “What the hell is that?†chef asked.
“The bottom crust?†I squeaked as he grabbed the pin from my hands and turned my map into a decent looking pie crust.
He went on, muttering, to help the other students who were turning out pies that looked like they were ready for Saint Martha Stewart to come by and bless. When we carried our pies up to have them graded, mine was lopsided, the fluting was ragged and uneven, and the cut-outs on the top were crooked. The girl behind me had made her top crust entirely of leaves cut from dough and arranged artfully over the filling. I was an utter failure.
Years later, after Zak and I bought our first house, we had my parents, my daughter and friends over for Thanksgiving. I made a sweet potato pie–mostly because it only takes one crust. I used a pate brisee recipe for the dough, and rolled out a god awful ragged edged thing, and struggled to put it in the pan, dropped it so that it hung off the counter and dangled over the floor where two cats were waiting to deposit hair on it. I scooped it up and plopped it into the pan, and struggled to get it to fit right. I ended up cutting the long edges off one side and mushing them onto the short edge of the other side. I tried to be all Martha Stewart with the scraps and cut out leaves and make the edge that way rather than flute it.
When it was ready to go into the oven, it looked pretty good. The filling certainly tasted good–I had spiked it with Bailey’s Irish Cream, so how could it be bad?
When it came out, however, it wasn’t quite so pretty.
One side of the pastry had slumped, making the edge crooked and rather pathetic looking.
It did taste good, however, and the pastry was flaky and flavorful.
So, I began the quest to make a pretty pie.
This Thanksgiving–three years later–my daughter and I made two pies–one for our household and one for my parents. The filling was apples, golden raisins and dried cranberries. I made the crust for one pie out of lard, the other out of half lard and half butter, not out of any spirit of experimentation, but because I ran short of lard.
I assembled the first pie crust, the all lard one, showing Morganna how to cut the fat into the flour, and sprinkle in just the tiniest bit of water. Then she put together the second one, and we put the crusts in the refrigerator, where they would rest until after Thanksgiving dinner the next day.
The next afternoon, we pulled out the dough, and I began rolling.
Morganna perched on the counter next to me and giggled.
“Oh my God, Mom!†she crowed. “You really can’t roll out pie crust to save your life.â€
Beneath the rolling pin what had been a round disk was turning into something jagged edged and freeform and appalling.
“It looks like a map of Australia,†she declared mirthfully. “It is so weird to see you fumble something up in the kitchen!â€
At least I was entertaining.
We put the first pie together and it slumped and slouched in its pan, the fluting resembling the rambling path of a crazed drunk. The acorn-shaped cutout I made in the center for a vent was off center and stretched so it looked like a lopsided circle. Morganna kept giggling.
While I rolled out the crusts for the second pie, I appealed to a higher authority. I appealed to St. Martha of the Pie Crusts and begged that her holy power enter my hands. (For the record, I don’t think much of Martha Stewart–I knew a chef who worked with her who never spoke ill of anyone else but her–he said she was a horrible person. On the other hand, she is the epitome of a person who makes pretty pie crusts.) As I rolled, this crust didn’t look quite so bad, as I began speaking a mantra of Marthaisms to myself.
Morganna still giggled, and the pie crust still looked like a map, this time of Germany instead of Australia, but, once the second pie was together, the fluting was straight and the crust looked quite good.
We baked them, and the first pie looked pretty bad, but the second one was quite decent. In fact, it qualified as the prettiest pie I had ever made.
Morganna said decisively, “Give Grammy and Poppy the ugly one.†I frowned. “That isn’t nice.â€
She said quite matter-of-factly, “Mom, if you give them the pretty one, they will expect every other pie you give them to be pretty. Knowing your luck, this is the only pie you will ever make that will not only taste great, but look good, too. If you give them the ugly one, and all of the rest of your pies are pretty, then it will be a pleasant surprise.â€
Her logic was impeccable.
We ate our pie–and we discovered that a mixture of lard and butter makes the best crust–flaky and tender, with a complex and utterly divine rich flavor.
A few weeks ago, at Sur la Table, I taught a class in raclette. I decided that since the main thrust of the class was about melted cheese, which doesn’t much require a recipe, I should present other recipes that would round out a menu if people wanted to have a party. I decided on a puff-pastry (no, I did not make it myself–do you think I am nuts?) crusted cheese, bacon and onion “pizza†from Alsace called a Flammenkueche for an appetizer and an apple and pear galette for a dessert.
A galette is made with a single pate brisee crust that is laid on a baking sheet, and a single layer of fruit is laid on the bottom and the edges of the pastry are folded over and perhaps pleated. It is meant to look “rustic.â€
Rustic is good if you are a fumble fingers when it comes to pastry.
The class went really well, though I started to beat myself over having to get up and make a pie crust in front of people. Morganna, who was assisting with the class started giggling early, just to practice up, I guess. The culinary coordinator, Shelley, however, pointed out that it was a hands-on class. Which meant–I could have other people demonstrate putting the dough together, rolling it out and shaping it.
As Peter Pan would say, “Oh, the cleverness of me!â€
I went ahead and made the first dough disk in order to have it properly chilled. No one was watching, so they couldn’t hear me saying “hail Marthas” under my breath.
By the time it came to make the dough and roll it out in class, I admitted up front that I am terrible at making pies. I told my students, “That is what is cool about a galette–it is a pastry made for butterfingered, pastry-inept people like me. If I can do it, you can do it.â€
I found that my admission boosted the confidence of the students, and when they came up to help put the dessert together, they did a great job. The older woman who came up to roll out the dough was a dear grandmotherly sort who swore she had never been able to roll out dough. I had her roll it out on a silpat, with a piece of saran wrap over the dough, and I stood at her side, encouraging her along the way.
She did great–it was a circle, with just a few shaggy bits at the edges. She grinned when she was done and said, “I never have been able to do that!†All she needed was coaching, I guess.
The woman who came up to shape the edges of the galette had never made pie successfully either. She was very tentative at first with the pinching and pleating, but buoyed by the simplicity of it, she ended up making it look fantastic in a rustic, informal way. Which is how it is supposed to be. Which means, it was perfect.
What was not perfect was the oven. The thermostat was off by fifty degrees, so it took longer to bake than normal. Of course, I pointed out that even if your oven is messed up, look how wonderful the result is.
And it was–I glazed it with melted apricot jelly and it really looked fine.
As I read the comments left on the form after class, several of the students said I should teach a class in how to make pies. I can only imagine the title–“Pasty for Butterfingers.â€
So, for all of you out there who shudder with horror at the thought of baking pies, let me stand as a testimony for you–there is hope. You can do it, eventually. With practice and appeals to St. Martha of the Perfect Pies, you may be able to make a lovely pie.
Or if not, make a galette. They are supposed to look different. Rustic.
And take heart–as I said to my students–you cannot be more fumble-fingered than me.
Apple-Pear Galette
I learned the trick of putting crisp cookie crumbs under the fruit so that they absorb some of the juices so there are not drastic overflows into the bottom of the oven from an article in Fine Cooking Magazine.
Do not use really juicy apples like Granny Smith in this recipe or there will be a drastic overflow, cookie crumbs be damned.
Ingredients for Pastry:
2 ½ cups all purpose flour
2 tbsp. sugar
½ tsp. salt
2 sticks unsalted butter, cut into ½ inch pieces and chilled
2/3 cup ice water
Instructions:
In a large bowl, mix together dry ingredients. Cut in the chilled butter using a stand mixer a food processor or pastry blender until the butter is evenly distributed but still in larger than a pea-sized (sugar cube sized is fine) pieces. Add the ice water all at once to the flour and butter. Mix together the dough until it begins to come together (If you are using a food processor or mixer, be careful not to over mix), and gather the dough with your hands. Cut the gathered dough in half and shape it into two disks. Wrap the disks in plastic and refrigerate for at least one hour. (This recipe makes dough for two tarts–you can freeze one of the disks for future use if you like, up to two months. Thaw in fridge one day before using.) Preheat oven to 400 degrees while dough chills.
Ingredients for filling:
½ cup crushed vanilla biscotti or crisp almond cookies
1 tbsp. all purpose flour
2 large baking apples like Cortland, Empire, Jonathan or Rome
2 large Bartlett Pears
1 disk galette dough
1 tbsp. melted butter
2 tbsp, sugar
2 tbsp. melted apricot or apple jelly–optional
Instructions:
Adjust oven rack to center of oven.
Combine biscotti crumbs and flour.
Peel, core and slice apples and pears thinly.
Put a silpat down on a rimless baking sheet, or use kitchen parchment.
On a lightly floured surface, roll out galette dough into a 15 inch round. Transfer the dough to the lined baking sheet. Sprinkle with crumb mixture evenly, leaving a 2 inch border without crumbs.
Arrange the fruit slices in concentric circles over the crumbs, overlapping slightly, still leaving the 2 inch border.
Lift edges of dough over the filling and pleat slightly to make a nice pretty edge. Brush with melted butter and sprinkle with sugar.
Bake 45 minutes–until crust is browned and the fruit is cooked and tender. Slide galette off silpat and onto cooling rack–cool 10 minutes before slicing. If you wish, you may brush with a glaze of warm apple or apricot jelly before serving to make a shiny finish.

Categories:
- Admin (rss) (55)
- Blogs and Blogging (rss) (81)
- Book Reviews: Cookbooks (rss) (43)
- Book Reviews: Non-Cookbook Food Books (rss) (38)
- Cats and Cat Blogging (rss) (47)
- Chinese Cooking Lessons (rss) (32)
- Culinary School Stories (rss) (18)
- Dairy Pruducts: Cultured and Barbaric (rss) (4)
- Documentary Filmmaking (rss) (1)
- Essays, Rants and Reflections (rss) (260)
- Fighting Hunger (rss) (12)
- Food and Kids (rss) (45)
- Food in the News (rss) (126)
- Food Media (rss) (98)
- Food Preservation (rss) (18)
- Food Safety (rss) (45)
- Gardening (rss) (30)
- Herbs and Herb Blogging (rss) (20)
- Holidays (rss) (50)
- Kat Blogging (rss) (22)
- Kitchen Science (rss) (36)
- Leftover Makeover (rss) (8)
- Life, the Universe and Everything (rss) (131)
- Local and Sustainable (rss) (227)
- Local Athens Food and Foodies (rss) (42)
- Meatless Mondays (rss) (32)
- Menu For Hope (rss) (5)
- Nutrition, Diet and Health (rss) (84)
- On The Farm (rss) (8)
- Recipes: Almost Vegetarian, Vegetarian and Vegan (rss) (294)
- Recipes: American Regional (rss) (37)
- Recipes: Appalachian Hillbilly (rss) (33)
- Recipes: Bread, Pasta, Grains (rss) (95)
- Recipes: Canning and Preserving (rss) (8)
- Recipes: Chinese (rss) (123)
- Recipes: Comfort Food (rss) (120)
- Recipes: Cookies (rss) (16)
- Recipes: Desserts (rss) (48)
- Recipes: French (rss) (25)
- Recipes: Fruits and Vegetables (rss) (302)
- Recipes: Greek, North African and Middle Eastern (rss) (31)
- Recipes: Indian (rss) (137)
- Recipes: Italian (rss) (42)
- Recipes: Japanese (rss) (7)
- Recipes: Jewish (rss) (4)
- Recipes: Korean (rss) (6)
- Recipes: Meat, Poultry and Fish (rss) (220)
- Recipes: Mexican/Native American/ Latin American/Caribb (rss) (27)
- Recipes: Original (rss) (108)
- Recipes: Thai (rss) (27)
- Recipes: Tofu (rss) (17)
- Recipes: US Regional (rss) (16)
- Recipes: Vietnamese (rss) (8)
- Restaurant Stories (rss) (28)
- Sewing, Quilting, Arts and Crafts (rss) (16)
- Simple Chinese Recipes (rss) (30)
- Slow Food and Heritage Foods (rss) (10)
- Spice Blogging (rss) (44)
- The Chinese Cookbook Project (rss) (14)
- The Chinese Pantry (rss) (39)
- The Documentary (rss) (2)
- The Kitchen Saga (rss) (17)
- The Locavore's Bookshelf (rss) (15)
- The Unsung Adventures of The Culinary Nerd (rss) (6)
- Tools and Toys (rss) (35)
- Uncategorized (rss) (10)
- With a Side of Politics (rss) (48)
Archives:
- August 2012 (9)
- July 2012 (12)
- September 2011 (3)
- August 2011 (7)
- July 2011 (8)
- June 2011 (16)
- May 2011 (17)
- April 2011 (11)
- December 2010 (9)
- November 2010 (5)
- February 2010 (1)
- December 2009 (5)
- November 2009 (7)
- October 2009 (10)
- September 2009 (16)
- August 2009 (14)
- July 2009 (14)
- June 2009 (7)
- May 2009 (17)
- April 2009 (10)
- March 2009 (25)
- February 2009 (13)
- January 2009 (10)
- December 2008 (5)
- November 2008 (5)
- October 2008 (6)
- September 2008 (13)
- August 2008 (8)
- July 2008 (11)
- June 2008 (18)
- May 2008 (13)
- April 2008 (14)
- March 2008 (16)
- February 2008 (17)
- January 2008 (19)
- December 2007 (25)
- November 2007 (18)
- October 2007 (24)
- September 2007 (16)
- August 2007 (15)
- July 2007 (15)
- June 2007 (10)
- May 2007 (14)
- April 2007 (16)
- March 2007 (17)
- February 2007 (20)
- January 2007 (13)
- November 2006 (1)
- October 2006 (8)
- September 2006 (14)
- August 2006 (25)
- July 2006 (30)
- June 2006 (28)
- May 2006 (34)
- April 2006 (29)
- March 2006 (24)
- February 2006 (30)
- January 2006 (38)
- December 2005 (40)
- November 2005 (37)
- October 2005 (32)
- September 2005 (25)
- August 2005 (30)
- July 2005 (28)
- June 2005 (21)
- May 2005 (8)
- April 2005 (22)
- March 2005 (17)
- February 2005 (29)
- January 2005 (10)
Search Site:
Links:
- Lily’s Wai Sek Hong
- 101 Cookbooks
- A cat in the kitchen
- A Veggie Venture
- Accidental Hedonist
- Cha Xiu Bao
- chez pim
- Chocolate & Zucchini
- Chopstick Cinema
- Chowhound.com
- Chubby Hubby
- Cook sister!
- Cooking with Amy
- da*xiang
- Eat Local Challenge
- Eating Liberally
- Ecocentric
- Eggbeater
- Epicurious
- Farmgirl Fare
- Fatfree Vegan
- Foodgoat
- ForkandBottle.com
- Green Olive Tree
- Hooked on Heat
- Jaden’s Steamy Kitchen
- Kalyn’s Kitchen
- Lucullian delights
- Mahanandi
- Matt Bites
- MeatHenge
- mmm-yoso!!!
- New York Times – Dining & Wine
- Pizza Goon
- Rasa Malaysia
- Ruhlman
- Sailu's Kitchen
- Serious Eats
- SF Gate: Food & Dining
- Simply Recipes
- Soul Fusion Kitchen
- Tastespotting
- The Amateur Gourmet
- The Cleaner Plate Club
- The Food Section
- The Grub Report
- thecookscottage
- U.S. Food Policy
- Wandering Chopsticks
- Washington Post Food and Dining
- Wasted Food
Meta:

Powered by WordPress. Graphics by Zak Kramer.
Design update by Daniel Trout.
Entries and comments feeds.