Cook Local, Eat Global
The Whole Enchilada Part I: The Sauce
 I used to make enchilada’s “from scratch–” meaning I took store bought corn tortillas, doctored a can of store-bought sauce, made a filling out of some sort of meat and shredded cheese and wrapped the tortillas around the filling, poured the sauce over, dumped shredded cheese in and baked it and called it “home-made.”
Yeah, well, that was a long time ago and that was how my friend from Texas did it, so I thought it was okay, and that is the thing. The results were just “okay.” There was nothing really great about the enchiladas–they were just okay. Not good, certainly, as the canned sauce tasted tinny and somewhat flat and bland, but not bad, either, in that they were edible.
So, a year or so ago, I got on a Mexican food kick, bought up all of Diana Kennedy’s books, even the ones that were out of print, dragged out some Rick Bayless, Mark Miller and Cheryl Alters and Bill Jameson’s books, and started studying up on the subject.
And I realized that there was no real reason for me to be intimidated by Mexican food. I loved chiles, I knew from tomatoes, and sauce making had lost its fear factor after having gone through culinary school, and I had a Sumeet grinder, so I had no real excuse not to throw down and develop my very own enchiladas Colorado sauce.
Colorado is the red sauce that you see on enchiladas that are not Tex-Mex in derivation; the Tex-Mex version relies on chile gravy for its saucy kick, which is a totally different beastie altogether. (Over the years, I have found that I prefer the flavors of New Mexico and Arizona to Texas, so my Mexican foods tend to be derived from those border states instead of the Tex-Mex that is more familiar to more of the country.) The main flavorings and coloring of the red Colorado sauce comes from dried chiles, though certainly tomatoes and sweet bell peppers play their part in my version as well.
 Which chiles do I use in my sauce, one might ask?
Well, several, and the kind and amount change depending on my mood, what I have in the pantry, what filling I am using, and for whom I am cooking. But three chiles are constants in this sauce: anchos, New Mexico reds and chipotles, either dried or en adobo.
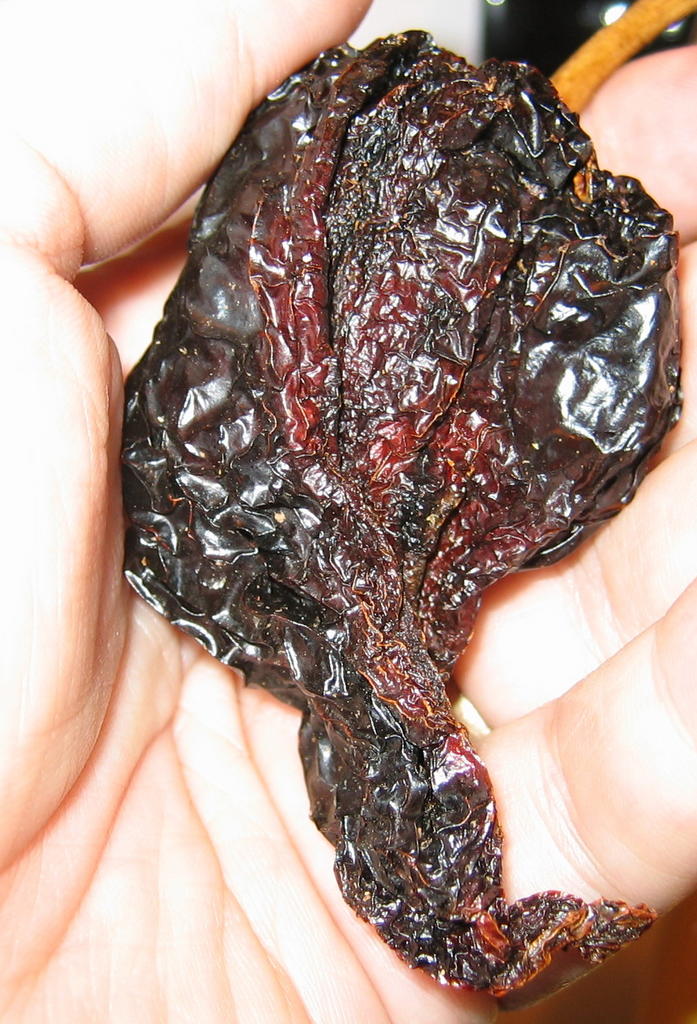
Anchos are the ripened, dried version of poblanos, which are the thick-walled, wide-shouldered green chiles that classic chile rellenos are made of. As you can see at the left, they are very wrinkly, and deep reddish to black in color, and vary in size from about two and a half inches long to three or four inches long, and half as wide.
Good ones should not be brittle, but should be somewhat soft and pliable, and should have a sweet, almost raisiny smell to them. They are very mildly hot, and add a honey-like top note to the sauce when used in moderation. When you use too many of them, they make the sauce too sweet, and darker than is appetizing. (This one is from Penzey’s.)
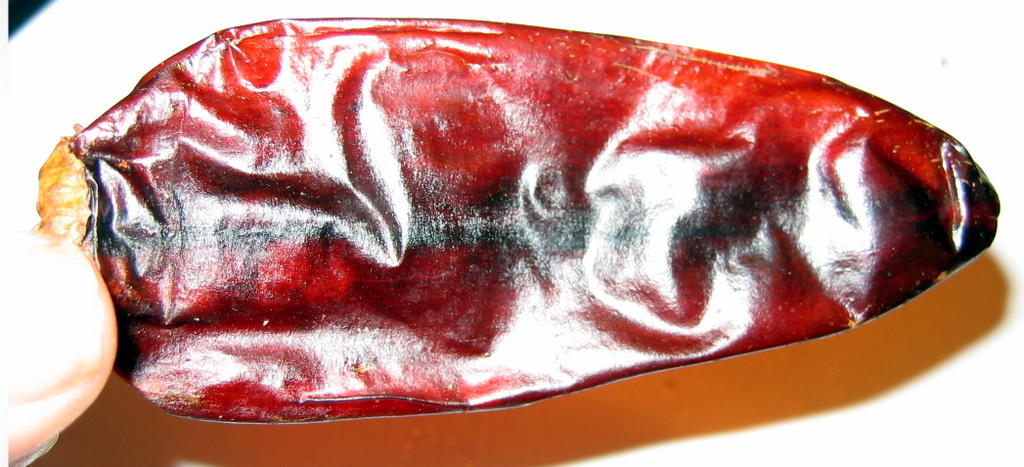 The New Mexico red chiles are the backbone of the Colorado sauce. I have also seen these chiles called chiles Colorado, but it is under the name New Mexico that you will find them marketed by the company Badia (the pictured one is a Badia chile), in grocery stores and Latin American markets. (You can substitute California chiles for the New Mexico chiles; the flavor profile is very similar.)
These give the characteristic brick-red color and soft heat to Colorado sauce. They are a rich cherry-red color, and are from three to six inches long, and fairly narrow. They are thinner-walled than the anchos, but they are still somewhat fleshy. They, too, should not be brittle, but should be pliable and somewhat leathery in texture for best flavor. Good ones smell sweet, but not as sticky-sweet as anchos, and there is definately a sharper, chile undertone that is unmistakeable.
One good rule of thumb when it comes to buying dried chiles is to try and bend them and smell them. If they do not break easily, and you can smell them through the cellophane or plastic bag they are packed in, then they are good and fresh, and will make outstanding Colorado sauce.
If they are brittle and break easily, then, you should probably pass on them and try another store where stock moves more quickly. Both Penzey’s and Badia put out good quality dried chiles, though Penzey’s is a good bit more expensive.
 The chipotles I used this time around are the canned ones en adobo. A chipotle is a ripe, smoked and dried jalapeno, and in its whole, dried form, it can be had in two ways: “chile alhumado”, and “morita.”
Chile alhumado is the traditional chipotle; it is greyish tan, and is very heavily smoked. The morita (which means, “little blackberry” is the form most often sold in the US; it is blackish, softer and less smoked, so it has a milder smokey flavor. Moritas are generally considered inferior to chile alhumado, but that doesn’t mean that they are bad–they are still quite good-tasting and useful for cooking.
For reference photographs and links to purchase either chile alhumado or moritas, look here.
The brand of chipotle en adobo I have found most commonly in the US, and which I use, is La Morena. I find that the sauce is a useful addition to any number of bastes, rubs, salsas and condiments where I just want a touch of smoky heat, and the flavor of the chiles is full, round and not at all tinny.
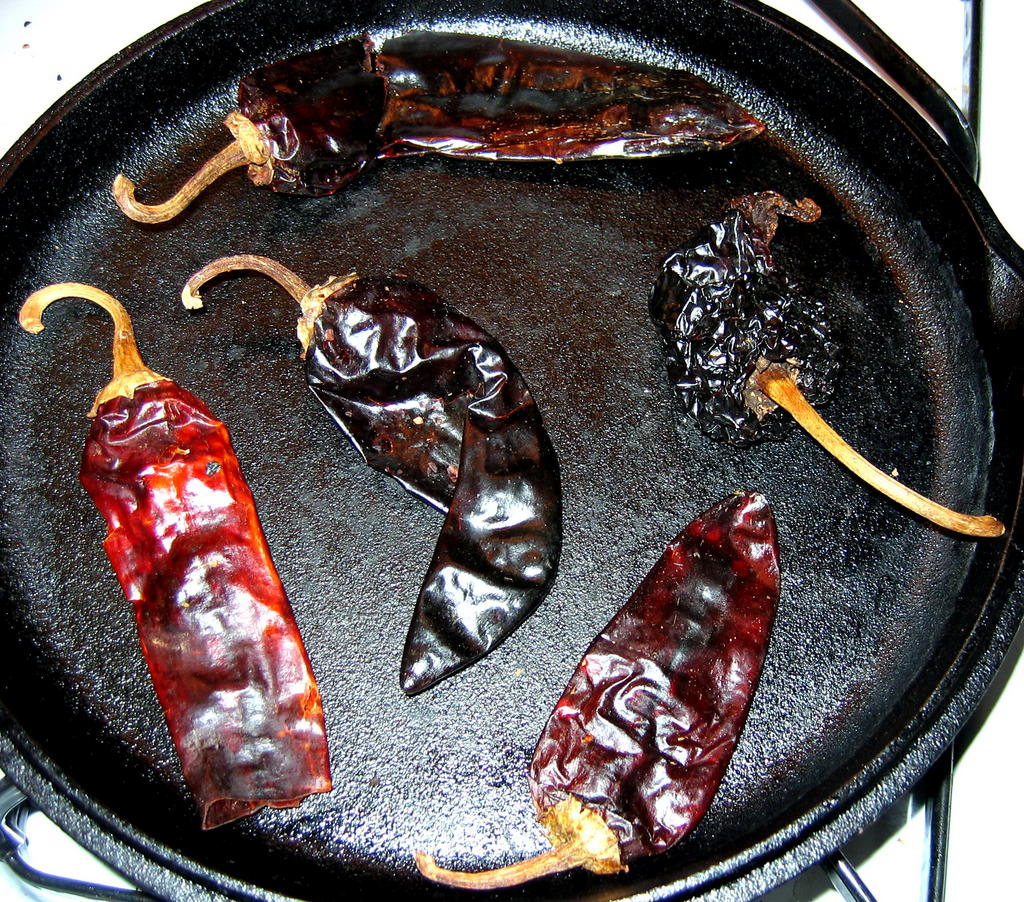 Before using the dried chiles to make a sauce, they must be toasted and soaked, then ground up.
A lot of folks apparently skip the toasting part, but Diana Kennedy and Rick Bayless both insist that toasting brings out more of the flavors of the chile; having tried it both ways, I tend to agree with the experts. Toasting does deepen the flavors of the chiles, and in particular seems to bring out a lot more of the sweetness that lurks beneath the heat.
Toasting them is a lot easier than one would think. I use the flat cast iron griddle pan, which in Mexico is called a “comal,” put it on medium-high heat, get it hot, and lay the chiles in a single layer on it. Then, I watch them obsessively, and turn them frequently, until they just start to blacken a bit and smell really good. After that, I stick them all in a bowl, and add hot water just to cover them and let them soak until they are nice and soft. The soaking can take as long as an hour, particularly for the anchos, which are quite tough-skinned and leathery. Be patient–the longer you allow them to soak, the more easily they will be to grind later.
At that point, I pop the stems off, and scrape out some of the seeds, and using my Sumeet Multi-Grind, I grind the squishy chiles, along with the chipotle en adobo into a nice, deep red smoky-sweet paste. (If you do not own a Sumeet, you can use a blender, but you must add a bit of the soaking water in order to get it to grind up well enough; if you cook a lot of Mexican, Thai and Indian food, however, I would suggest investing in a Sumeet.) At the same time as I grind the chiles, I grind toasted whole cumin, coriander and black peppercorns, along with onion and whole garlic cloves.
The resulting thick, fragrant past is the backbone of the sauce.
 The body of the sauce is made with cooking stock and roasted vegetables. The stock is the braising liquid for the meat I will use for the filling. In this case, I used Pacific Natural Foods beef broth to which beer, roasted tomatoes, caramelized onions, whole chipotle chiles, bay leaves, a pinch of Mexican Oregano and roasted red bell peppers had been added. This particular stock had been used three different times to cook beef, and had been kept and frozen between uses.
The first time I cooked beef in it, I used it in a shredded beef and rice casserole last summer. Then, it was thawed out a month or so ago when I felt the need to make enchiladas verde. After I shredded the beef for that recipe, I froze it one more time, and then thawed it out for its final run as a meat-cooking medium.
Each time I used it, I added more roasted tomatoes, (I roast tomatoes the same way I roast tomatillos for enchiladas verde) more peppers and more chiles. When it cooked down, I added either more beef or vegetable broth, and often more beer. By this third time it has been used, the stock had become rich and slightly thick with suspended particles of beef and broken down vegetables, and was filled with the promise of making a good, strong sauce. But, as there were two quarts of the stock, and I only needed one quart of sauce, I began letting it reduce over medium heat, while on two of the other burners, I roasted sweet red bell peppers.
The process of fire roasting bell peppers is simple: set them on a gas flame, and turn them as they char. Keep doing this until the skins are completely blackened, then stick them in a bowl, cover them tightly with plastic wrap and allow them to steam. After they cool to room temperature, rub the skins off with your fingers, tear off the stems, and scrape out the seeds and placenta–the white pithy bits that hold the seeds.
After the stock had reduced almost by half, I threw in the roasted red peppers, and the cup or so of chile, onion, garlic and spice paste, and stirring constantly, let the stock reduce until it was pretty much cooked down to half its original volume.
At that point, the smell is incredible; the disparate ingredients danced together into a rich melange of scents: the chiles and sweet peppers took the lead, with the beef, cumin and coriander just behind. There was the slightest bitter medicinal tang of the Mexican oregano, while the tomatoes and bay leaves were perceptible only in the tiniest whiffs.
Once that wonderful scent comes forth, it is time to break out the immersion blender and grind everything up into a thick, brick red sauce. While running the blender, I leave the pot on the heat and allow the blender to stir it as I allow the sauce to reduce the final tiny bit; this ensures that while water boils away the sauce doesn’t scortch and stick to the bottom of the pot.
It should be thick enough to coat the back of a spoon without dripping off immediately, as shown in the illustration above.
I ended up with a tiny bit more than a quart of sauce, which is enough for about four huge pans of enchiladas. If that is more than is needed, it is no hardship to freeze the leftovers; in fact, that allows me to make enchiladas in the future without having to take the time and trouble of making sauce. Colorado sauce is useful not only for enchiladas, however. It goes beautifully with huevos rancheros–“eggs, ranch-style” a classic border dish of two corn tortillas topped with red sauce and two over easy eggs served with cheese and refried beans. Tamale filling of shredded pork or beef is enriched by the use of this sauce, or one could use it as the base of a quick chili–just add shredded meat and beans.
At any rate, no matter what use one puts to it, this sauce beats the pants off of any jarred or canned enchilada sauce on the market, and if you have the appliances and the time, is well worth the effort of making.
 Sauce for Enchiladas Colorado
Ingredients:
2 quarts beef broth which has been enriched with 2 large caramelized onions, 5 cloves minced garlic, roasted tomatoes (about one pound of tomatoes, roasted, peeled and seeded) 2 bay leaves, 1 chipotle en adobo, a bottle of beer, a pinch of Mexican oregano and 1/2 teaspoon each ground cumin and coriander, in which beef for shredded beef filling has been cooked
3 ancho chiles
4 New Mexico chiles
1-2 chipotles en adobo
1/2 tablespoon whole cumin seeds
1/2 tablespoon whole coriander seeds
1/2 teaspoon black peppercorns
1 medium onion
4 large cloves garlic
2 red or orange sweet bell peppers
salt, to taste
Method:
Bring stock to a boil on medium heat, and allow to simmer uncovered to reduce while you prepare the rest of the ingredients. Keep an eye on the stock and stir now and then to keep it from sticking to the bottom of the pot.
Toast and soak chiles as directed above. Toast spices in a heavy bottomed small frying pan or saucepot, until they darken slightly and smell quite fragrant. Remove stems and some seeds from the chiles. Peel the onion, and cut into chunks. Load the chiles, spices, onion, and garlic into a blender, multi-grind or mortar and pestle, and process into a thick paste. (Even a Sumeet Multi-Grind will have some problems with the ancho chiles. Just cut it up into chunks first, and if it is more roughly ground, do not worry–the immersion blender will take care of that problem.)
Roast, skin and deseed the bell peppers as explained above. Cut into several pieces each.
When the beef stock is reduced by half, add the bell pepper pieces and the chile paste, and stir constantly. The chile paste will want to stick to itself, and will be difficult to dissolve into the stock. Keep working with it until the paste is evenly distributed into the simmering liquid.
Turn the heat down, and allow to simmer, stirring constantly until the stock is reduced by half. Using an immersion blender, puree the still simmering sauce, until it is completely smooth. Check consistency by dipping a table spoon into the sauce. If sauce coats the back of the spoon without sliding off easily, it is done. If it is still too thin, allow to reduce on the simmer further, stirring with the blender to keep the sauce from sticking.
Add salt to taste, and either use sauce immediately, hold it over 140 degrees for service, or cool down and refrigerate or freeze for future use.
6 Comments
RSS feed for comments on this post.
Sorry, the comment form is closed at this time.

Categories:
- Admin (rss) (55)
- Blogs and Blogging (rss) (81)
- Book Reviews: Cookbooks (rss) (43)
- Book Reviews: Non-Cookbook Food Books (rss) (38)
- Cats and Cat Blogging (rss) (47)
- Chinese Cooking Lessons (rss) (32)
- Culinary School Stories (rss) (18)
- Dairy Pruducts: Cultured and Barbaric (rss) (4)
- Documentary Filmmaking (rss) (1)
- Essays, Rants and Reflections (rss) (260)
- Fighting Hunger (rss) (12)
- Food and Kids (rss) (45)
- Food in the News (rss) (126)
- Food Media (rss) (98)
- Food Preservation (rss) (18)
- Food Safety (rss) (45)
- Gardening (rss) (30)
- Herbs and Herb Blogging (rss) (20)
- Holidays (rss) (50)
- Kat Blogging (rss) (22)
- Kitchen Science (rss) (36)
- Leftover Makeover (rss) (8)
- Life, the Universe and Everything (rss) (131)
- Local and Sustainable (rss) (227)
- Local Athens Food and Foodies (rss) (42)
- Meatless Mondays (rss) (32)
- Menu For Hope (rss) (5)
- Nutrition, Diet and Health (rss) (84)
- On The Farm (rss) (8)
- Recipes: Almost Vegetarian, Vegetarian and Vegan (rss) (294)
- Recipes: American Regional (rss) (37)
- Recipes: Appalachian Hillbilly (rss) (33)
- Recipes: Bread, Pasta, Grains (rss) (95)
- Recipes: Canning and Preserving (rss) (8)
- Recipes: Chinese (rss) (123)
- Recipes: Comfort Food (rss) (120)
- Recipes: Cookies (rss) (16)
- Recipes: Desserts (rss) (48)
- Recipes: French (rss) (25)
- Recipes: Fruits and Vegetables (rss) (302)
- Recipes: Greek, North African and Middle Eastern (rss) (31)
- Recipes: Indian (rss) (137)
- Recipes: Italian (rss) (42)
- Recipes: Japanese (rss) (7)
- Recipes: Jewish (rss) (4)
- Recipes: Korean (rss) (6)
- Recipes: Meat, Poultry and Fish (rss) (220)
- Recipes: Mexican/Native American/ Latin American/Caribb (rss) (27)
- Recipes: Original (rss) (108)
- Recipes: Thai (rss) (27)
- Recipes: Tofu (rss) (17)
- Recipes: US Regional (rss) (16)
- Recipes: Vietnamese (rss) (8)
- Restaurant Stories (rss) (28)
- Sewing, Quilting, Arts and Crafts (rss) (16)
- Simple Chinese Recipes (rss) (30)
- Slow Food and Heritage Foods (rss) (10)
- Spice Blogging (rss) (44)
- The Chinese Cookbook Project (rss) (14)
- The Chinese Pantry (rss) (39)
- The Documentary (rss) (2)
- The Kitchen Saga (rss) (17)
- The Locavore's Bookshelf (rss) (15)
- The Unsung Adventures of The Culinary Nerd (rss) (6)
- Tools and Toys (rss) (35)
- Uncategorized (rss) (10)
- With a Side of Politics (rss) (48)
Archives:
- August 2012 (9)
- July 2012 (12)
- September 2011 (3)
- August 2011 (7)
- July 2011 (8)
- June 2011 (16)
- May 2011 (17)
- April 2011 (11)
- December 2010 (9)
- November 2010 (5)
- February 2010 (1)
- December 2009 (5)
- November 2009 (7)
- October 2009 (10)
- September 2009 (16)
- August 2009 (14)
- July 2009 (14)
- June 2009 (7)
- May 2009 (17)
- April 2009 (10)
- March 2009 (25)
- February 2009 (13)
- January 2009 (10)
- December 2008 (5)
- November 2008 (5)
- October 2008 (6)
- September 2008 (13)
- August 2008 (8)
- July 2008 (11)
- June 2008 (18)
- May 2008 (13)
- April 2008 (14)
- March 2008 (16)
- February 2008 (17)
- January 2008 (19)
- December 2007 (25)
- November 2007 (18)
- October 2007 (24)
- September 2007 (16)
- August 2007 (15)
- July 2007 (15)
- June 2007 (10)
- May 2007 (14)
- April 2007 (16)
- March 2007 (17)
- February 2007 (20)
- January 2007 (13)
- November 2006 (1)
- October 2006 (8)
- September 2006 (14)
- August 2006 (25)
- July 2006 (30)
- June 2006 (28)
- May 2006 (34)
- April 2006 (29)
- March 2006 (24)
- February 2006 (30)
- January 2006 (38)
- December 2005 (40)
- November 2005 (37)
- October 2005 (32)
- September 2005 (25)
- August 2005 (30)
- July 2005 (28)
- June 2005 (21)
- May 2005 (8)
- April 2005 (22)
- March 2005 (17)
- February 2005 (29)
- January 2005 (10)
Search Site:
Links:
- Lily’s Wai Sek Hong
- 101 Cookbooks
- A cat in the kitchen
- A Veggie Venture
- Accidental Hedonist
- Cha Xiu Bao
- chez pim
- Chocolate & Zucchini
- Chopstick Cinema
- Chowhound.com
- Chubby Hubby
- Cook sister!
- Cooking with Amy
- da*xiang
- Eat Local Challenge
- Eating Liberally
- Ecocentric
- Eggbeater
- Epicurious
- Farmgirl Fare
- Fatfree Vegan
- Foodgoat
- ForkandBottle.com
- Green Olive Tree
- Hooked on Heat
- Jaden’s Steamy Kitchen
- Kalyn’s Kitchen
- Lucullian delights
- Mahanandi
- Matt Bites
- MeatHenge
- mmm-yoso!!!
- New York Times – Dining & Wine
- Pizza Goon
- Rasa Malaysia
- Ruhlman
- Sailu's Kitchen
- Serious Eats
- SF Gate: Food & Dining
- Simply Recipes
- Soul Fusion Kitchen
- Tastespotting
- The Amateur Gourmet
- The Cleaner Plate Club
- The Food Section
- The Grub Report
- thecookscottage
- U.S. Food Policy
- Wandering Chopsticks
- Washington Post Food and Dining
- Wasted Food
Meta:

Powered by WordPress. Graphics by Zak Kramer.
Design update by Daniel Trout.
Entries and comments feeds.
I miss America *sigh*
Interesting that you used packaged broths/stock. I always thought that was major cheating because I never make my own. When you enrich it the first time, do you just let all the extra goodies simmer away for half an hour or so?
Comment by etherbish — August 27, 2005 #
Ladi, I am picky about commercial broths–I won’t use the canned ones, because they have a metallic aftertaste to me. But the aseptically packed Pacific foods brand has a good flavor.
And yes, when I make the filling, I either use a pressure cooker, and let it cook a bit before or after the beef goes in. My second post will be about making the filling and will talk about enriching the broth into stock a bit.
(Basically, if you use a beef or pork bone of some sort in your cooking liquid while you pressure cook the meat, it extracts the marrow and gets all that good tasty stuff in the broth which eventually becomes stock.)
While I will make chicken stock at home–I really hate making beef stock. The smell as it first begins cooking is awful, and it gets into everything. Ugh.
Comment by Barbara Fisher — August 27, 2005 #
I made this tonight with vegetable broth instead of beef broth. Even before I added the paste, the stock had an incredible flavor and aroma. The cooking process was a little bit involved, but the end result is definitely worth it. The sauce is so bold and complex and amazing! Thanks very much for posting this recipe.
Comment by GC — July 16, 2006 #
GC, I am so glad to hear it that it turned out well for you. And yes, the cooking is a bit involved–which is why I don’t make enchiladas for every day, but for big dinners–the flavor is so much better than what you get by using bottled sauce, pre-made tortillas and indifferent fillings.
Comment by Barbara — July 17, 2006 #
That is one of the most in depth enchilada sauce deconstructions I have read on the web. Awesome.
Comment by bluehavana — December 10, 2007 #
Thank you–I do try to do as detailed posts as possible, especially for foods or techniques which are not necessarily familiar to many readers.
Comment by Barbara — December 10, 2007 #