Cook Local, Eat Global
Thanksgiving Report: Cooking a Heritage Turkey
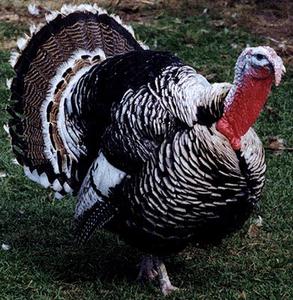 As you may recall, I posted about picking up a heritage breed turkey–more specifically, a Narragansett, from Speckled Hen Farm.
And I promised to give a full report on how I cooked the turkey, how it tasted and any differences that there were between it and the usual free-range Broad-breasted Whites that I have been cooking for the past four years.
The first difference I noted when I took the turkey out of the refrigerator to begin preparing for its brine was morphological in nature. The conformation of the bird was very different than that of a Broad-breasted White. The legs were much longer, and the wings were more well-developed than one is used to seeing in the typical grocery store turkey, or even its free-range counterpart. In addition, the breast was not so oversized, but was more in keeping with the overall size and shape of the bird; it was more balanced, in other words.
This bird was no Dolly Parton.
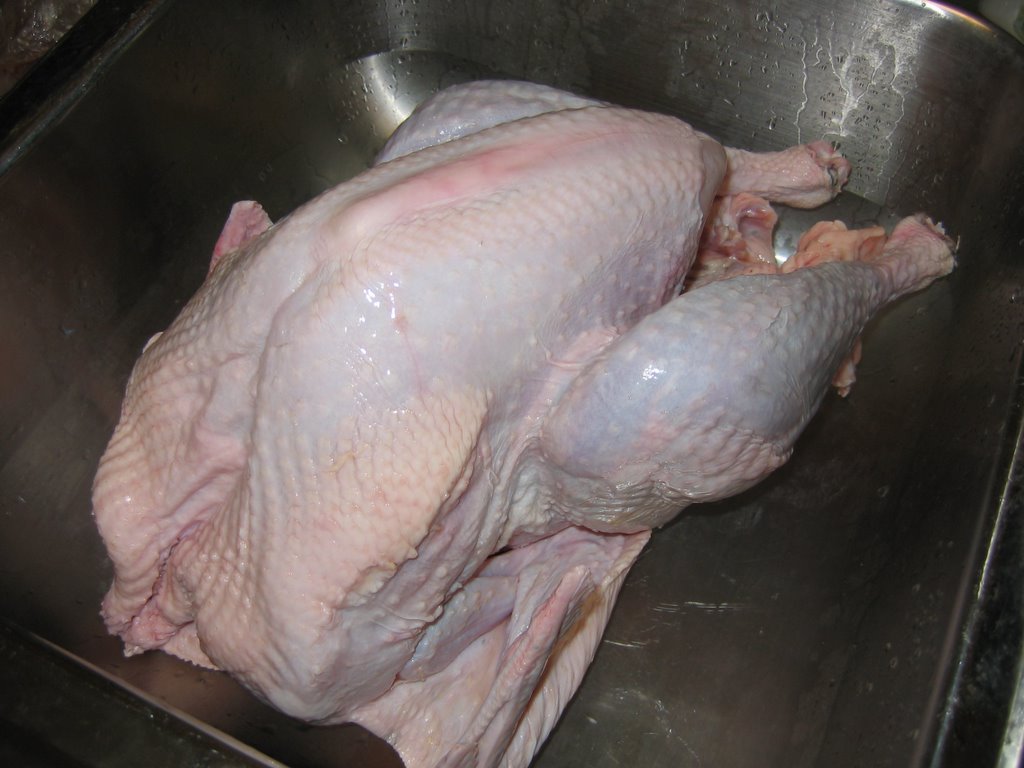 I also noticed that the skin was generally more tightly affixed to the meat and there was a general lack of fat underneath it.
I had read in several places that brining a heritage bird would cover up the flavor; however, I had also read that these birds have more inherent flavor than the Broad-breasted Whites.
This is paradoxical–if it has more flavor, then how exactly would a brine cover that flavor up?
I decided that since I have had enormous success with brining turkeys for the past four years, I would go ahead and do it again this year. Besides–it made sense to cook the bird as I normally would, and that way, I would have a more realistic comparison between two different breeds of free-range turkeys. If I changed my usual cooking method, then I would have no idea if the difference was between the birds or the cooking methods. (When experimenting, it is best to follow the scientific method and change only one variable at a time, otherwise, the resulting data will be meaningless.)
 So, I made my usual brine–one cup of kosher salt per gallon of filtered water, with 1/2 cup of sugar and 1/2 cup maple syrup added for flavoring.
I don’t add anything to the brine that will not go into a solution in water, simply because a brine works on the principle of osmosis. The salt in the water is carried across the semi-permeable cell membranes in the flesh because it will naturally go from an area of greater concentration to an area of lesser concentration. The sugar seems to be carried along with the salt water, because it, too, dissolves into a solution, however, most other flavorings that people put into bines are non-soluable particulate matter which does not seem to do much of anything.
Rather than waste peppercorns, herbs and onions in the brine, I save them for the compound butter that I make to put under the loosened skin of the brined and rinsed turkey.
The compound butter idea came about because I grew up with my grandmothers rubbing an entire stick of butter into the turkey skin. They told me that it moistened the breast meat–but after I took some biology classes, I was skeptical of this. I decided to instead of buttering the outside of the bird, butter the inside by loosening the skin with my fingers and hands, , and then packing softened butter to which minced fresh aromatics and wine had been added, directly against the flesh. Since more is better, I also pack this compound butter against the flesh of the legs and thighs–you can see the lumps under the skin of the bird in the photograph above.
You will also notice that I do not stuff my turkeys–there are several reasons for this.
One–they take longer to cook if they are stuffed. Two–I like to start out with very high heat in order to shrink the skin and brown it nicely–this will dry out any stuffing that is near the opening of the bird. And Three–the turkey cooks more evenly if you leave the body cavity essentially open to the hot air of the oven. (The only thing I will stick in the cavity of the turkey is a quartered onion.)
In addition, for the same reasons, I do not truss the turkey. Nor do I set it down inside a roasting pan–instead, I elevate it on a V-shaped roasting rack. All of these techniques lead to perfectly roasted poultry. You will get juicy meat, your dark and light flesh will be done at the same time, your drippings will go into the bottom of the pan and not collect against the skin of the bird, which results in flabby, slimy skin. Instead, the skin of the bird is crisp, golden and delightful.
Oh, and I set it in the rack breast side up. That starting the turkey breast side down and then flipping it upright–that is bogus. Some people swear by it, but if you brine your bird, you don’t need to do that. I did it once or twice and only caused myself pain and stress. Stress from fear of dropping the bird on the floor where dogs and cats circled like sharks, and pain from having hot fat drip down my arm while I was in the middle of flipping the bird. (You knew I just had to say that, didn’t you?)
And yes, I still butter the outside of the skin–to help it crisp up. I also salt and pepper the skin liberally, even though I brined the bird. The granular salt also helps crisp and dry the skin, as well as flavoring it.
The pepper, I figure is self-explanatory.
It tastes good.
Then, I stick it into a preheated 400 to 450 degree oven (depends on how the oven works as to how high I set the temperature) and roast it for about 20-30 minutes, or until the skin has crisped, browned, and shrank considerably. Then, I turn down the oven to 325 and roast until it is done–
I don’t baste the turkey while it roasts, but I do pour wine into the pan to keep the drippings from burning. It also makes for a really flavorful gravy when it is time to sit down to eat.
 Gravy with this roasting method is a simple matter. Drain the drippings that have accumulated in the cavities of the bird by tilting the rack in the pan, and allowing them to drain into the roasting pan.
Remove the V-rack and set the bird aside to rest. You can tilt one end of the V-rack up–tilt it so that the breast is lower than the rest of the bird and it helps the juices flow into the breast. (I forgot to do this this time, and the meat was still juicy and good, so I suspect that the tilting thing is about as bogus as the flipping the turkey while it is half cooked is.)
While the bird is resting and doing its “carry-over cooking” thing, set the roasting pan with the drippings on two burners on the stove, and make gravy–it is easy. If there is a lot of fat, suck most of it up with one of those basting bulb thingies, and discard it. Then, bring the drippings to a simmer, and stir them, reducing them a bit. I like to take the onion that was in the turkey cavity, cut it up (it is usually half cooked by this point) and scatter the slices in the pan with the drippings. Stir, and then add a handful of flour–I am not going to tell you how much, because it depends on how many drippings you have! About the same amount of flour as you have in fatty drippings–and cook, stirring like mad. This will turn into a brown paste–a roux–and then you add turkey or chicken broth, and or wine, and cook, stirring, until it turns into a gravy that is as thick as you like.
 That is it. Those are the secrets to my turkey.
The report on how this turkey stacked up to previous ones?
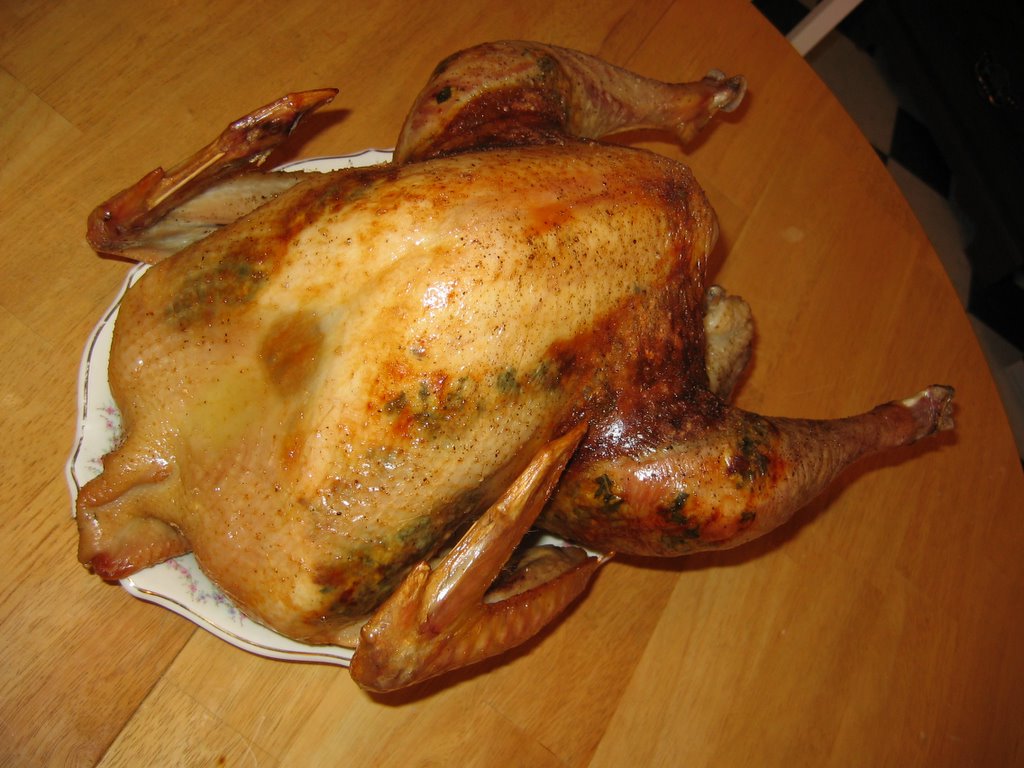
Well, Zak swore that it was better than the free-range Broad-breasted Whites we have been getting in past years. He is right–it was uncommonly juicy and it was tastier than we are used to. And the brine did not cover the flavor of the bird or make it too salty–it enhanced the natural flavors of the turkey as it is meant to.
Also, I found that the lady at the North Market was right–cooking the breast to an internal temperature of 140 degrees, and then letting it carry over cook (cook under its own heat outside the oven) for ten minutes or so until it came to 150-160 was the way to go. It was supremely juicy and firmly textured cooked that way, and the dark meat was succulent. As is usual, the skin was crackling crisp, and beneath it, the butter melted away, leaving a coating of garlic, shallot, chipotle, rosemary, sage and thyme against the flesh that gives each slice an extra little grace note of flavor.
The only other thing I noticed was that with this 12 pound turkey for four adults and one fifteen year old–we had just enough meat for a good feast, and then enough left over for a sandwitch or two and a batch of turkey jambalaya. There wasn’t as much left over as there is with the Broad-breasted White birds–and for me, that is a good thing. Because I tend to get tired of the leftovers long before they are gone, and my dogs end up eating the rest.
I was very pleased–and next year, I believe I will be patronizing Speckled Hen Farm again.
[food] [Thanksgiving] [turkey] [heritage breed] [free-range]
14 Comments
RSS feed for comments on this post.
Sorry, the comment form is closed at this time.

Categories:
- Admin (rss) (55)
- Blogs and Blogging (rss) (81)
- Book Reviews: Cookbooks (rss) (43)
- Book Reviews: Non-Cookbook Food Books (rss) (38)
- Cats and Cat Blogging (rss) (47)
- Chinese Cooking Lessons (rss) (32)
- Culinary School Stories (rss) (18)
- Dairy Pruducts: Cultured and Barbaric (rss) (4)
- Documentary Filmmaking (rss) (1)
- Essays, Rants and Reflections (rss) (260)
- Fighting Hunger (rss) (12)
- Food and Kids (rss) (45)
- Food in the News (rss) (126)
- Food Media (rss) (98)
- Food Preservation (rss) (18)
- Food Safety (rss) (45)
- Gardening (rss) (30)
- Herbs and Herb Blogging (rss) (20)
- Holidays (rss) (50)
- Kat Blogging (rss) (22)
- Kitchen Science (rss) (36)
- Leftover Makeover (rss) (8)
- Life, the Universe and Everything (rss) (131)
- Local and Sustainable (rss) (227)
- Local Athens Food and Foodies (rss) (42)
- Meatless Mondays (rss) (32)
- Menu For Hope (rss) (5)
- Nutrition, Diet and Health (rss) (84)
- On The Farm (rss) (8)
- Recipes: Almost Vegetarian, Vegetarian and Vegan (rss) (294)
- Recipes: American Regional (rss) (37)
- Recipes: Appalachian Hillbilly (rss) (33)
- Recipes: Bread, Pasta, Grains (rss) (95)
- Recipes: Canning and Preserving (rss) (8)
- Recipes: Chinese (rss) (123)
- Recipes: Comfort Food (rss) (120)
- Recipes: Cookies (rss) (16)
- Recipes: Desserts (rss) (48)
- Recipes: French (rss) (25)
- Recipes: Fruits and Vegetables (rss) (302)
- Recipes: Greek, North African and Middle Eastern (rss) (31)
- Recipes: Indian (rss) (137)
- Recipes: Italian (rss) (42)
- Recipes: Japanese (rss) (7)
- Recipes: Jewish (rss) (4)
- Recipes: Korean (rss) (6)
- Recipes: Meat, Poultry and Fish (rss) (220)
- Recipes: Mexican/Native American/ Latin American/Caribb (rss) (27)
- Recipes: Original (rss) (108)
- Recipes: Thai (rss) (27)
- Recipes: Tofu (rss) (17)
- Recipes: US Regional (rss) (16)
- Recipes: Vietnamese (rss) (8)
- Restaurant Stories (rss) (28)
- Sewing, Quilting, Arts and Crafts (rss) (16)
- Simple Chinese Recipes (rss) (30)
- Slow Food and Heritage Foods (rss) (10)
- Spice Blogging (rss) (44)
- The Chinese Cookbook Project (rss) (14)
- The Chinese Pantry (rss) (39)
- The Documentary (rss) (2)
- The Kitchen Saga (rss) (17)
- The Locavore's Bookshelf (rss) (15)
- The Unsung Adventures of The Culinary Nerd (rss) (6)
- Tools and Toys (rss) (35)
- Uncategorized (rss) (10)
- With a Side of Politics (rss) (48)
Archives:
- August 2012 (9)
- July 2012 (12)
- September 2011 (3)
- August 2011 (7)
- July 2011 (8)
- June 2011 (16)
- May 2011 (17)
- April 2011 (11)
- December 2010 (9)
- November 2010 (5)
- February 2010 (1)
- December 2009 (5)
- November 2009 (7)
- October 2009 (10)
- September 2009 (16)
- August 2009 (14)
- July 2009 (14)
- June 2009 (7)
- May 2009 (17)
- April 2009 (10)
- March 2009 (25)
- February 2009 (13)
- January 2009 (10)
- December 2008 (5)
- November 2008 (5)
- October 2008 (6)
- September 2008 (13)
- August 2008 (8)
- July 2008 (11)
- June 2008 (18)
- May 2008 (13)
- April 2008 (14)
- March 2008 (16)
- February 2008 (17)
- January 2008 (19)
- December 2007 (25)
- November 2007 (18)
- October 2007 (24)
- September 2007 (16)
- August 2007 (15)
- July 2007 (15)
- June 2007 (10)
- May 2007 (14)
- April 2007 (16)
- March 2007 (17)
- February 2007 (20)
- January 2007 (13)
- November 2006 (1)
- October 2006 (8)
- September 2006 (14)
- August 2006 (25)
- July 2006 (30)
- June 2006 (28)
- May 2006 (34)
- April 2006 (29)
- March 2006 (24)
- February 2006 (30)
- January 2006 (38)
- December 2005 (40)
- November 2005 (37)
- October 2005 (32)
- September 2005 (25)
- August 2005 (30)
- July 2005 (28)
- June 2005 (21)
- May 2005 (8)
- April 2005 (22)
- March 2005 (17)
- February 2005 (29)
- January 2005 (10)
Search Site:
Links:
- Lily’s Wai Sek Hong
- 101 Cookbooks
- A cat in the kitchen
- A Veggie Venture
- Accidental Hedonist
- Cha Xiu Bao
- chez pim
- Chocolate & Zucchini
- Chopstick Cinema
- Chowhound.com
- Chubby Hubby
- Cook sister!
- Cooking with Amy
- da*xiang
- Eat Local Challenge
- Eating Liberally
- Ecocentric
- Eggbeater
- Epicurious
- Farmgirl Fare
- Fatfree Vegan
- Foodgoat
- ForkandBottle.com
- Green Olive Tree
- Hooked on Heat
- Jaden’s Steamy Kitchen
- Kalyn’s Kitchen
- Lucullian delights
- Mahanandi
- Matt Bites
- MeatHenge
- mmm-yoso!!!
- New York Times – Dining & Wine
- Pizza Goon
- Rasa Malaysia
- Ruhlman
- Sailu's Kitchen
- Serious Eats
- SF Gate: Food & Dining
- Simply Recipes
- Soul Fusion Kitchen
- Tastespotting
- The Amateur Gourmet
- The Cleaner Plate Club
- The Food Section
- The Grub Report
- thecookscottage
- U.S. Food Policy
- Wandering Chopsticks
- Washington Post Food and Dining
- Wasted Food
Meta:

Powered by WordPress. Graphics by Zak Kramer.
Design update by Daniel Trout.
Entries and comments feeds.
There is a way to stuff your turkey without waiting too long. This is the way mom did it–she did the butter thing, and then, because she didn’t soak it first (there was never room in the fridge) she covered it and roasted it unstuffed until it was not quite cooked through. She then browned the onions and celery in butter, poured HOT broth into the mixture, and then stuffed and surrouned the turkey. More butter rubbed on, the turkey uncovered for the last 1/2 hour or so of baking, and voila! You can’t call stuffing stuffing if it isn’t stuffed. you can call it savory bread pudding or whatever else…and the flavor is great.
Comment by yourauntjudy — November 28, 2005 #
That’s why I call my “stuffing” (if I stuffed it in the bird) “dressing.”
Because I get irritated when folks call stuff that was never stuffed into anything stuffing.
😉
I will have to try Gram’s way, though. I could keep the high heat beginning to the roasting, and the low heat finish.
Maybe next year, now that we know that the heritage birds do taste good, I will change the roasting method to “The Way of Gram.” I am sure that the Four Directions Dressing will make an excellent stuffing.
Remember–change one variable at a time….
Comment by Barbara Fisher — November 28, 2005 #
I am so glad you bought a turkey from Speckled Hen Farm. That makes me very happy. Just think, I heard your bird gobble over the phone!
: D
Comment by Tana — December 4, 2005 #
Hey, Tana! Welcome!
You did hear my turkey gobble–I think that is wonderful!
I will be buying another turkey from them next year, and probably sometime, I will see about picking up some chickens, too. Though, the chickens that the local farmer here in Athens raises are pretty darned good, so maybe I will have a Speckled Hen chicken now and again as a treat.
I just think it is great that here in Ohio, there is still enough farm communities that I can have choices of farmers to buy from. It makes me want to support each and every one of them!
Comment by Barbara Fisher — December 4, 2005 #
This year my wife decided to have a dry run thanksgiving day to test out her recipes. We soaked the bird in a brine solution she got at William Sonoma, it really kept it moist. OMG, the turkey was so good and I get to do it again in a few days!
Comment by retro — November 17, 2007 #
Brining does wonders, retro. We’ll be brining the bird we pick up tomorrow.
Comment by Barbara — November 19, 2007 #
[…] With all the time you’ll save looking at recipes, you might want to read this article by Marian Burros about turkeys, both commercial and heritage. It’s really interesting — the short story is “flavor sacrificed to meet commercial ends. Try a heritage breed for real flavor,” though Burros of course says it more eloquently. If you were lucky enough to get yourself a heritage turkey this year, you can read an account from Barbara at Tigers and Strawberries has some about her first time cooking one. Wanted a heritage turkey but didn’t get yourself one in time? I’m gonna’ do my darndest to remind you in time for next year. And you can still order one for your holiday dinner: start your search here. […]
Pingback by Giving thanks, but no recipes! « The Cleaner Plate Club — November 19, 2007 #
I am so happy to have came across your blog because we’re cooking a heritage turkey this year for the first time too. I was quite perplexed about brining the bird this year because I had the same concern about it possibly distorting it’s natural flavor.
Thanks so much for your post. It was certainly very helpful.
-Carmen
Comment by Carmen — November 20, 2007 #
Loved the idea of using wine to enhance the drippings. My mother broke down and bought an organic/free-range bird this year, but when I suggested using wine in the baking, she protested, “But then we won’t have any left to drink!” Oh well.
Comment by Maria P. — November 22, 2007 #
please support the dying ways of a small family farm. I am one of them and it is so sad that many familys have to sell out because of taxes. If you can meet your farmer you can see what will and will NOT go in your food. It great that Tana and Barbara got to hear the turkry gobble. Now they know were thier food comes from, not the store in plastic but from the farm were the birds can have a real life!!! Now THATS what I am thankful for! ;):);)
Comment by Kira — November 19, 2009 #
I made my first heritage turkey this year and followed your instructions exactly and it came out incredible! I stunned my guests! thank you!
Comment by Whitney — November 26, 2010 #
I am glad that my post helped you, Whitney. The flavor and texture of a heritage turkey is incomparable, and I am very happy to have helped you make a memorable holiday meal!
Comment by Barbara — November 26, 2010 #
Hi Barbara,
I have specially ordered a heritage bird this year, and it’s my first time making a turkey. I would love to use your recipe, but I think I need a little help! Do you have a step-by-step recipe written out somewhere? Here are some of my questions:
-How far in advance of the cooking do we start the brine?
-Does the sugar/syrup brine impart a sweet flavor to the turkey (would it be ok for diabetics?)
-How much brine do you need – enough to submerge the turkey?
-What goes in the compound butter and how much do we need?
-Can oil be substituted for butter in the recipe?
-How liberally do we butter the outside of the turkey and do we use compound butter there or just plain?
-When the turkey comes out (at 140?), do we tent with foil to encourage carry-over cooking?
-What if the turkey never gets up to 160-165? Do we put it back in the oven?
-Suppose dinner is at 5, ideally when do we want to take the turkey out of the oven?
-For the main part of the cooking at 325, could you give a rough guide of how long that will take (per lb?)
-How much wine do you add during the cooking to prevent burning (i.e. how much do we want in the pan) and how much when making the gravy?
-Where do the innards come in (or do they) when making the gravy?
Thanks so much in advance!!
Lily
Comment by Lily — November 14, 2011 #
Thanks for the step-by-step. We raised and sold heritage turkeys for the first time this year. Please say a bit about the color of the meat on the legs and breast.
Comment by Leann Hines — November 23, 2011 #