Cook Local, Eat Global
Preserving The Chili Pepper Harvest: Chinese Chile-Garlic Sauce
This year, I planted a whiskey barrel with Thai chilies and basil; eight starts of Thai Dragon chilies, a dozen of Siam Queen basil. These relatively few plants kept us in fresh Thai ingredients for the entire summer and early fall. The rainy early summer resulted in lush growth but the first chilies were fairly mild; however, the drought that fell upon Ohio in the late summer (something like eight weeks without appreciable rain) made for smoking-hot ripe chilies.
The same was true for all of the farmers around here–their first chilies were mild, the ones harvested after the drought, no matter what variety, were at the hotter end of what that variety can be.
It all has to do with water content in the fruits. The less water the plants get, the less water is able to be stored in the tissues of the fruit. The less water in the fruit, the more concentrated the essential oils and flavoring components in the chile, and the better they will be.
By the end of September, there were so many chilies on the plants that they were leaning over, unable to support the weight of the plethora of ripe fruits. Because we are going out of town for ten days, I decided yesterday that I needed to go ahead and pick the ripe chilies and preserve them somehow and leave the green ones on the plants to pick when we came back. Once I got close to the plants, though, I noticed that there were very few green fruits, except on one plant that is still covered with blooms.
So, using scissors, I cut the heads off of all the chile plants, except the one that was still blooming, and brought the bundle of plant tops, all filled with brilliant scarlet fruits, inside.
I spread them out on the dining room table, put on latex gloves and went to work stripping the chilies off of the stalks.
Every now and then, a green fruit would appear, and those I set aside, with their stems intact, to be frozen. The red fruits, however, went together in a bowl, to be turned into my own homemade chile-garlic sauce. The red fruits I very carefully separated from their stems and the little green caps that attach the fruit to the stem–these tough bits of plant matter would not be tasty ground up inside my Chinese-style chile garlic sauce.
I had help in my work from Delia, who decided to gnaw upon a green chile after she picked up one of the plant tops and dashes away with it.
Karma was instant and brutal; the kitten jumped straight up in the air and dashed away.
She didn’t stay away long–while I was still patiently snapping green caps off of the red chilies, she jumped up on the table and watched the proceedings intently, while she batted at the chile leaves idly with her polydactyl paws.
It is imperative to wear gloves even when harvesting chilies–the oils, especially in really hot varieties like these Thai chilies–can be very irritating to skin, and even if it doesn’t bother your hands, if you should rub your eye or nose, you could be in for a world of pain.
(Can you tell I have done that before? It really, really sucks, so now I am quite cautious.)
But, let us talk about how to make Chinese Chile-Garlic Sauce.
This is one of my pantry staples, and last year, I decided to go ahead and make my own. One may ask why, since it is easily obtained in the store, is cheap and tastes pretty darned good. Well, it has to do with the satisfaction of doing something yourself–of growing something from a seedling to a ripe fruit, picking it and turning it into something else. Not only is it satisfying on its own, every time you use the results of your efforts over the next year, that satisfaction from a little bit of self-sufficiency returns to you. Besides–as good as the store bought versions taste–the homemade ones are better.
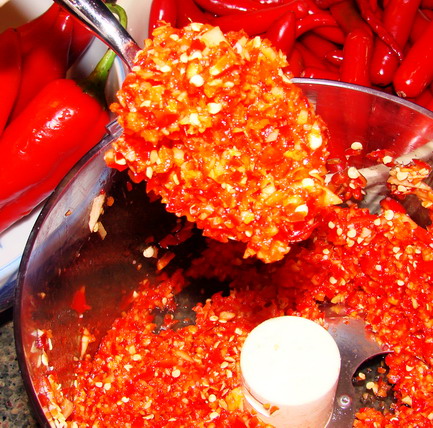
The version I made last year was fairly tame, but very flavorful, since I made it with red New Mexico chilies, serranos and cayennes. This year’s version was made with my own Thai chilies and two types of cayenne, both bought from the Farmer’s Market. I put together mixed red chilies with fresh garlic, also from the Farmer’s Market, with some salt, some sugar and some locally made apple cider vinegar (rice vinegar is more traditional, but apple cider vinegar is local and works fine, too), and ground it all into a thick paste in the food processor.
While grinding the chilies, it is a good idea to put the vent hood on in your kitchen and open the windows, especially if you are using really hot chilies. Otherwise, you might find it hard to breathe, and if you have asthma, the capsaicin in the air my trigger an attack of wheezing. So, keep your albuterol handy, and keep the ventilation going, even if it is cold outside. Better to put on a jacket and breathe, I say!
After everything is ground together, I add more vinegar–enough to make the sauce somewhat fluid–it thins as it ages–and then I stir it all up well. Once it is stirred, I scrape the resulting sauce into a jar, screw on or lock down the lid and let it sit on my counter for a day in a slightly warm place. After that, I let it finish aging in the refrigerator–it is ready to eat in about a week, but it tastes best after a month. I still have a tiny bit of the gallon I made last fall, and it is divine; this batch will be hotter, but with an amazing garlicky aroma from the hardy German garlic I used this time around.
I use this Chinese chile-garlic sauce in lots of my stir-fries, and Zak loves to put a big spoonful into his ramen. It can be used to spice anything up, but I like it best in my Chinese recipes–it tastes better than any store-bought version I have ever had. The chile fragrance is just amazing, and the garlic is much more pronounced than the commercially made types.
Of course, this is not the only way to preserve the chile harvest. I also made kimchi Hunan salted chilies and frozen chilies. Last year, I also made kimchi-style cucumber pickles, which I just opened two nights ago. WOW, were they amazingly good–they tasted great on bulgogi burgers with lettuce, tomatoes, homemade chile-garlic sauce and ketchup. I also discovered that I really like just snacking on these pickles, when I need a pick-me-up during the day. They sure are an eye-opener.
But this recipe is probably the easiest to manage for a beginning pepper preserver. While the Hunan salted chilies are technically simpler, having only two ingredients, I have heard from folks who have had them go awry. This can happen with lactic acid fermentation, so if you are wary of losing a batch of chilies to the problem of not enough salt and rot, I suggest you try this sauce. The vinegar keeps everything chilled out and fresh.
Chinese Chile-Garlic Sauce
Ingredients:
1 1/2 pound red chilies–at least 1/3 of them Thai if you like really hot foods sauce–if you like it milder, make 1/2 of the chilies fresh red New Mexico chilies
1 3/4 pounds fresh garlic cloves, peeled
1/3 cup kosher salt
1/2 cup vinegar, divided (either apple cider vinegar or wine vinegar taste fine with this recipe–I used rice last year and apple cider this year) *
1 tablespoon raw sugar
Method:
Wash your hands very well with lots of soap and water. Wash all of your utensils–you will need a food processor, a large bowl for mixing and a storage jar–one that holds two quarts is perfect. If you have a dishwasher, just run the utensils and storage jar–and lid–through the dishwasher and put it on the heat dry cycle. This will sterilize them effectively.
Put latex or other protective gloves on your hands before starting this recipe. While working, do not touch yourself, your cat, anyone else (unless it is someone you really dislike), your clothes–anything–while you have chile oil on your gloves. If you need to go to the bathroom, pull off the gloves, throw them away, and wash your hands and wrists well with cold water and lots of soap. Go to the bathroom, wash your hands, come back and put on new gloves, then finish the recipe.
Remove the stems and green caps from the tops of the chilies. Wash them well under cold water and let them drain in a colander until they are mostly dry.
Place 2/3 of the chilies, half of the salt, and 1/4 cup of the vinegar into the food processor and grind into a paste. Put the paste into your mixing bowl.
Put the garlic cloves into the food processor with the rest of the chilies, salt and sugar, and grind to a fine paste.
Mix with the chile paste, then add the rest of the vinegar. Pour sauce into prepared jar, push any paste clinging to the sides of the jar down, and put into the fridge.
*If your paste is too thick without much liquid at all, add a little bit more vinegar. This will depend on how juicy your garlic is–some is dryer than others. But it should be thicker than you eventually want it to be–as it ages over the next week to two weeks, the chilies will break down and become more fluid. So, don’t worry if it is a little bit thick and dry.
Put the lid on the jar tightly and allow to sit on a warm counter top for twenty-four hours. Then, store in the refrigerator. Allow to age for one to two weeks before tasting. Keep refrigerated.
Mine lasts about a year if properly refrigerated.
9 Comments
RSS feed for comments on this post.
Sorry, the comment form is closed at this time.

Categories:
- Admin (rss) (55)
- Blogs and Blogging (rss) (81)
- Book Reviews: Cookbooks (rss) (43)
- Book Reviews: Non-Cookbook Food Books (rss) (38)
- Cats and Cat Blogging (rss) (47)
- Chinese Cooking Lessons (rss) (32)
- Culinary School Stories (rss) (18)
- Dairy Pruducts: Cultured and Barbaric (rss) (4)
- Documentary Filmmaking (rss) (1)
- Essays, Rants and Reflections (rss) (260)
- Fighting Hunger (rss) (12)
- Food and Kids (rss) (45)
- Food in the News (rss) (126)
- Food Media (rss) (98)
- Food Preservation (rss) (18)
- Food Safety (rss) (45)
- Gardening (rss) (30)
- Herbs and Herb Blogging (rss) (20)
- Holidays (rss) (50)
- Kat Blogging (rss) (22)
- Kitchen Science (rss) (36)
- Leftover Makeover (rss) (8)
- Life, the Universe and Everything (rss) (131)
- Local and Sustainable (rss) (227)
- Local Athens Food and Foodies (rss) (42)
- Meatless Mondays (rss) (32)
- Menu For Hope (rss) (5)
- Nutrition, Diet and Health (rss) (84)
- On The Farm (rss) (8)
- Recipes: Almost Vegetarian, Vegetarian and Vegan (rss) (294)
- Recipes: American Regional (rss) (37)
- Recipes: Appalachian Hillbilly (rss) (33)
- Recipes: Bread, Pasta, Grains (rss) (95)
- Recipes: Canning and Preserving (rss) (8)
- Recipes: Chinese (rss) (123)
- Recipes: Comfort Food (rss) (120)
- Recipes: Cookies (rss) (16)
- Recipes: Desserts (rss) (48)
- Recipes: French (rss) (25)
- Recipes: Fruits and Vegetables (rss) (302)
- Recipes: Greek, North African and Middle Eastern (rss) (31)
- Recipes: Indian (rss) (137)
- Recipes: Italian (rss) (42)
- Recipes: Japanese (rss) (7)
- Recipes: Jewish (rss) (4)
- Recipes: Korean (rss) (6)
- Recipes: Meat, Poultry and Fish (rss) (220)
- Recipes: Mexican/Native American/ Latin American/Caribb (rss) (27)
- Recipes: Original (rss) (108)
- Recipes: Thai (rss) (27)
- Recipes: Tofu (rss) (17)
- Recipes: US Regional (rss) (16)
- Recipes: Vietnamese (rss) (8)
- Restaurant Stories (rss) (28)
- Sewing, Quilting, Arts and Crafts (rss) (16)
- Simple Chinese Recipes (rss) (30)
- Slow Food and Heritage Foods (rss) (10)
- Spice Blogging (rss) (44)
- The Chinese Cookbook Project (rss) (14)
- The Chinese Pantry (rss) (39)
- The Documentary (rss) (2)
- The Kitchen Saga (rss) (17)
- The Locavore's Bookshelf (rss) (15)
- The Unsung Adventures of The Culinary Nerd (rss) (6)
- Tools and Toys (rss) (35)
- Uncategorized (rss) (10)
- With a Side of Politics (rss) (48)
Archives:
- August 2012 (9)
- July 2012 (12)
- September 2011 (3)
- August 2011 (7)
- July 2011 (8)
- June 2011 (16)
- May 2011 (17)
- April 2011 (11)
- December 2010 (9)
- November 2010 (5)
- February 2010 (1)
- December 2009 (5)
- November 2009 (7)
- October 2009 (10)
- September 2009 (16)
- August 2009 (14)
- July 2009 (14)
- June 2009 (7)
- May 2009 (17)
- April 2009 (10)
- March 2009 (25)
- February 2009 (13)
- January 2009 (10)
- December 2008 (5)
- November 2008 (5)
- October 2008 (6)
- September 2008 (13)
- August 2008 (8)
- July 2008 (11)
- June 2008 (18)
- May 2008 (13)
- April 2008 (14)
- March 2008 (16)
- February 2008 (17)
- January 2008 (19)
- December 2007 (25)
- November 2007 (18)
- October 2007 (24)
- September 2007 (16)
- August 2007 (15)
- July 2007 (15)
- June 2007 (10)
- May 2007 (14)
- April 2007 (16)
- March 2007 (17)
- February 2007 (20)
- January 2007 (13)
- November 2006 (1)
- October 2006 (8)
- September 2006 (14)
- August 2006 (25)
- July 2006 (30)
- June 2006 (28)
- May 2006 (34)
- April 2006 (29)
- March 2006 (24)
- February 2006 (30)
- January 2006 (38)
- December 2005 (40)
- November 2005 (37)
- October 2005 (32)
- September 2005 (25)
- August 2005 (30)
- July 2005 (28)
- June 2005 (21)
- May 2005 (8)
- April 2005 (22)
- March 2005 (17)
- February 2005 (29)
- January 2005 (10)
Search Site:
Links:
- Lily’s Wai Sek Hong
- 101 Cookbooks
- A cat in the kitchen
- A Veggie Venture
- Accidental Hedonist
- Cha Xiu Bao
- chez pim
- Chocolate & Zucchini
- Chopstick Cinema
- Chowhound.com
- Chubby Hubby
- Cook sister!
- Cooking with Amy
- da*xiang
- Eat Local Challenge
- Eating Liberally
- Ecocentric
- Eggbeater
- Epicurious
- Farmgirl Fare
- Fatfree Vegan
- Foodgoat
- ForkandBottle.com
- Green Olive Tree
- Hooked on Heat
- Jaden’s Steamy Kitchen
- Kalyn’s Kitchen
- Lucullian delights
- Mahanandi
- Matt Bites
- MeatHenge
- mmm-yoso!!!
- New York Times – Dining & Wine
- Pizza Goon
- Rasa Malaysia
- Ruhlman
- Sailu's Kitchen
- Serious Eats
- SF Gate: Food & Dining
- Simply Recipes
- Soul Fusion Kitchen
- Tastespotting
- The Amateur Gourmet
- The Cleaner Plate Club
- The Food Section
- The Grub Report
- thecookscottage
- U.S. Food Policy
- Wandering Chopsticks
- Washington Post Food and Dining
- Wasted Food
Meta:

Powered by WordPress. Graphics by Zak Kramer.
Design update by Daniel Trout.
Entries and comments feeds.
Handy! I planted just one Thai chile plant, but it has produced chiles like crazy. I’ve frozen some, but I’ll give this sauce a try, too. I have a mini food processor for small jobs. I’ll just run it outside to keep the fumes down!
Comment by Kitt — October 3, 2008 #
My husband had a little chile oil problem when he went to the bathroom after chopping some habanero peppers without gloves. He said that things felt “interesting” afterwards.
Comment by Pam — October 3, 2008 #
A significant part of the reason I planted my first garden this year was that I wanted to make a lacto-fermented Tabasco style hot sauce. Unfortunately, my cayennes didn’t agree with my new gardening skills, as only one plant survived out of 12 seedlings, and it died halfway through the season. But the serranos and jalapenos I planted flourished, especially the serranos. They were much shorter than the kind you see at the store, almost ball-shaped, but there were dozens and dozens on each plant! So I made a ‘sriracha’ style sauce since that stuff is so good. The first half of summer yielded about a quart and a half, plus whatever I picked green for salsa. I got it to grind to a very smooth sauce by steaming the chilies whole until just soft, 3-4 minutes. Then when whizzed up, they were silky smooth and all the flavorful oils were released. Any ideas on what I should do with the second half of summer’s bounty, which is about to finish ripening? (My serranos seem to set two separate crops, flowering, setting, and ripening all at once, then doing it over again in my long, long Florida summer.)
Comment by B. — October 4, 2008 #
I think I will try this next summer, my husband would love it and I think it would perk up any (eastern, maybe not Indian so much) Asian dish really.
Question: is there any special advice you can give re: Thai basil–I had purple and Thai this year and the Thai, despite starting strong, suddenly mysteriously died while the purple kept going the whole summer. Fluke or is there some special key to growing the Thai basil?
Comment by Laura — October 5, 2008 #
B–give this chili garlic sauce a shot. Yours won’t be so spicy, but it will still be good. Don’t steam your chilies first, though, this is supposed to be chunky.
Laura–
I just grow my Thai basil like I grow regular basil–I keep it barely damp all summer, then it does fine. If you keep it really wet, the roots will tend to want to rot, and the flavor will not be as intense in the leaves. I also plant it in really rich soil, with lots of compost and manure.
Comment by Barbara — October 6, 2008 #
Great post.
Comment by Brett — October 7, 2008 #
Barbara – can this be made with dried chilies and if so, how?
Thanks.
Comment by Harry — October 7, 2008 #
I don’t know on how I stumbled upon this cooking blog., All I know is that I’d better check out the archives for a good read. Ha-ha! Just droppin’ to say hi!
Oh. You might want to check this out: http://www.technocooks.com for uhm…a different “menu.â€
Comment by Bob LaGatta — November 9, 2008 #
This is really good. I made it with normal long red chillies and it’s not too hot. Tastes great. Thanks
Comment by Brad — June 20, 2011 #