Cook Local, Eat Global
Barbara vs. The Raw Food Fad
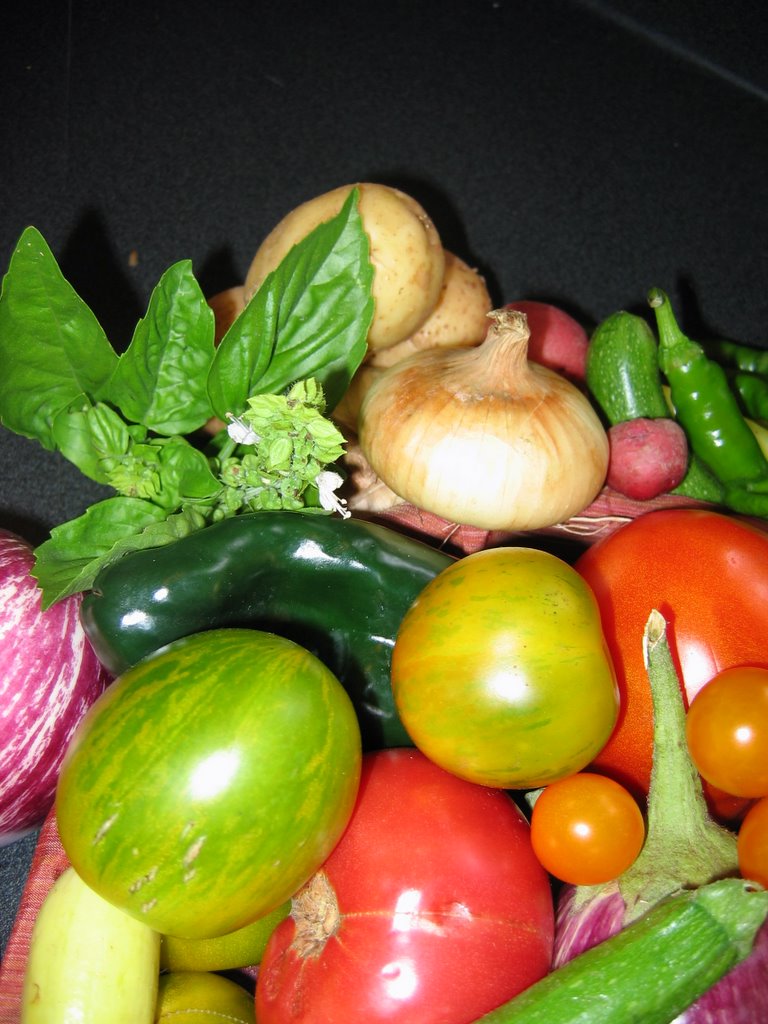 I love vegetables.
In fact, I was just now, not five minutes ago, merrily munching on some raw carrots.
But, the fact is, I cannot stand raw food faddists, or the spurious health claims that they make.
Why is this?
Well, I’ll tell you.
I have some experience in raw foods, because when I was a personal chef, a pair of my clients were raw food faddists. And if I had known when they called me up to hire me, how flaky their nutritional ideals and beliefs were, I would never have worked for them.
Because, when they hired me, they told me they were vegans.
Vegans! Great. I love vegans. Vegans are generally very nice people who like tofu and beans and grains and all of those lovely foods that I know how to cook. Vegans, I know from.
But, I should have known, because when the lady called me up for a consultation, she said, “Can you do juicing? We drink a lot of juice.”
I had never touched a juicer in my life, but I figured, “How hard can it be to drive one of those bad boys?”
So, I said, “Sure.”
The lady paused and then said, “Can you make us raw foods? We are trying to eat a lot of raw foods in our diet, you know they are healthy.”
I was a naive little personal chef. I had visions of vegan Vietnamese spring rolls and salads. I love to make salads and wonderful dressings based on pureed fruits. So, I said, “Oh, of course.”
I didn’t know that what she meant by “We are trying to eat a lot of raw foods,” was, “We are True Believers in the Anti-Aging Effects of the One True Faith of Raw Foodism.”
You know, if she had spelled it out to me clearly, I would have started babbling in a different language and claim that she had the wrong number and then just never answer the phone when she inevitably called back.
Because losing a client, even a potentially well-paying one, was preferable to my descent into the “Hell of the Wide-Eyed, Unsupported, Unscientific Health Claims of the Flaky Raw Foodists.”
It started slowly, innocuously. I started with cooking them fairly standard vegan foods, which they lapped up with great glee. I stir fried tempeh with ginger, garlic and tamari, I made brown basmati pillau, and even vegan lasagne with faux bechamel–though it was ruined by that wretched tofu-cheez nastiness.
I even made vegan sushi. And vegan Vietnamese spring rolls.
And I learned how to drive not one, but two models of juicers, and life was pretty good for a while.
Until the “cookbooks” appeared.
I say “cookbooks,” because they all featured uncooked recipes.
And they all featured pictures of the widely-smiling, emaciated authors, on the front or back covers.
And most of the recipes sounded, frankly, vile.
But, they were my clients, and I was infected with the American saying, “The customer is always right.”
So, I started “cooking” raw foods for them.
I learned to sprout lentils, wheat and barley.
I ground up perfectly good nuts, seeds and dried fruits into splicky purees.
I used their oven on low to dehydrate various mysterious glops and pastes into faux “baked goods.”
I made ersatz “pasta” out of strands of summer sqash that I employed a spiral cutter to create, then dressed it with a sauce made from raw tomatoes, peppers, onions and garlic with a healthy handful of chopped fresh basil.
I made “raw” soups out of winter squashes that tasted like melons, and almond “cheese” dumplings that tasted like neither almonds, nor cheese, nor even dumplings, but they looked okay floating in the orange “soup.”
I even made a dessert that still gives me nightmares–raw “brownies.”
These consisted of pureed dates and bananas, mixed with shredded fresh coconut meat, carob powder and chopped walnuts. This brown, slimy goop was then shaped into vaguely rectangular form, (they were more like flattened ovoid logs) and put into a very low oven to dry for oh, about twelve hours.
They were among the most unappetizing things I have ever made in my life. They tasted–slithery, and oddly too sweet, and they looked like nothing other than something that an unlucky jogger might step on in the park.
I still get queasy when I think about them, nearly five years later.
 I put my foot down, however, when it came to the “raw pizza.” The recipe directed me to take wheat and barley, both of which are high protein items, sprout them, then grind them into yet another unappealing paste, then spread it into thin sheets and dry it in a 110 degree oven for over twelve hours.
I refused.
Proteinous foods like grain mush are perfect hiding places for food-borne bacteria. Bacteria need several things to survive, thrive and breed like mad. Food, moisture and a habitable temperature, preferably between 40 and 140 degrees, are all that bacteria really need to move in and take over.
That crust recipe was a disaster waiting to happen.
So, I explained the reason why I wouldn’t make it, and my clients backed down, thankfully, though after that discussion, I found myself on the receiving end of lectures on nutrition, enzymes and raw-foodist philosophy. My employer took on my eating and cooking habits with missionary zeal, and she claimed that cooked food was poison, and that if you cooked foods you destroyed the natural enzymes that were in them, and so our bodies had to use our own enzymes to digest food, and that led to depletion of our life force, disease and old age.
I looked at her.
She was on the far side of middle age, and her face lifts were no longer helping.
She used to be a glamorous woman, but had gained weight, and now was unhappy with her appearance.
And she was entering the twilight of her life, her path leading inexorably towards death.
And she looked to the miracles of raw foods, enzymes and vegetative life force to save her.
At that moment, I pitied her greatly, and hated those smiling scrawny bastards who had written those books and suckered her in with lies, pseudo-science and hype, just so they could play cult-leader and make money off of poor souls like her.
She was afraid of growing old, getting ugly and dying.
And instead of seeing that we all age, true beauty comes from within, and death is a natural endpoint to a life well lived, she retreated from logic and sense, and fell into the waiting arms of true-believing food-faddist predators who just love to soothe the fears of the gullible, while lining their own pockets with money fleeced from their frightened followers.
I ground my teeth in frustration, and the next time she started her preaching to me, I tried a gentle application of logic, sound nutrition and scientific evidence.
To utterly no avail.
I explained to her my credientials. Not only had I been trained in culinary school, and knew a great deal about food in general and cooking in specific, I had taken many nutrition classes as electives. In addition, when I was getting my bachelor’s degree, I was for a time a pre-med major, as I wanted to pursue training as a veterinarian, and thus had taken microbiology, biochemistry, anatomy and physiology classes.
I then explained that the enzymes in food are all destroyed by the acidic environment in our stomachs before they can get to the small intestine where digestion takes place. I told her that our body makes our own enzymes out of the food we eat through chemical synthesis, and that so long as we eat a nutritionally sound diet, we will not run out of enzymes. I explained that cooking does destroy some vitamins, but it also makes the proteins and complex carbohydrates in foods more digestible, and that some phytochemicals, such as the cancer-fighting lycopene in tomatoes, was more fully released after cooking.
Her eyes glazed over, and I saw the haze of disbelief pass like a curtain across her mind.
In the end, I was glad that we moved back to Ohio, and I couldn’t work for my client anymore.
I just couldn’t bear one more moment of fanatical spouting of unscientific, nutritionally unsound claptrap from a woman I had come to care about to the point that I was actually worried for her health. I couldn’t bear watching her turn herself into a vegetable-sucking zombie–a woman who had a brain, but refused to use it to test the claims of her raw-foodist gurus.
So there it is–that is why I hate the raw food fad.
Generally, I will cater to whatever diet a person favors–the decision of what to eat and how to eat it is a highly personal one, and I have no business telling other people that they need to eat something else because their diet offends me.
However, I do despise people who promulgate unsupportable, wildly-unbelievable unscientific beliefs such as “cooked food is poison,” and “raw is law.”
I just want to bonk these numbnuts in the head with fully cooked bone-in leg of lamb and scream, “Human beings have been cooking foods for over 10,000 years! If cooked food were poisonous, we would not be alive to have this stupid conversation you blithering imbecile!” (Of course after bonking them over the head with the lamb, I’d want to then lecture them on food-borne bacteria and how cooking food tends to prevent our ingesting of these nasty bugs and -dying-.)
I cannot abide people who claim that raw food is -the- original, natural human diet–the one our paleolithic ancestors ate, because I know better.
In order to eat these raw diets, one has to use a dehydrator, a food processor, a juicer and various other smaller bits of equipment in order to pre-digest some of the food so it will not just go straight through the gut unabsorbed.
 The fact is–if early humans (who, as far as we know, lacked electricity to run their Cuisinarts and VitaMixes) had tried to eat that way, they would have died from caloric deficit. The amount of energy put into preparing a raw food meal without electrical kitchen appliances, with its emphasis on ground up sprouted grains, lentils and nuts, is way more than caloric gain one would get from eating it.
That said, I do not doubt that people should eat some more raw vegetables and fruits, and that some raw food dishes are clever, interesting and tasty. In fact, I learned one stuffed mushroom recipe that utilized soaked, ground barley, that was very tasty.
But there is a difference between making flavorful, healthy food that enhances a varied, balanced diet, and promoting a dogmatic unscientific belief that smacks of dietary religion.
I mistrust fundamentalist behavior and beliefs wherever I find them.
Even in the kitchen.
[food & drink] [raw foods] [vegan] [fad]
Kitchen Update: Countertops!
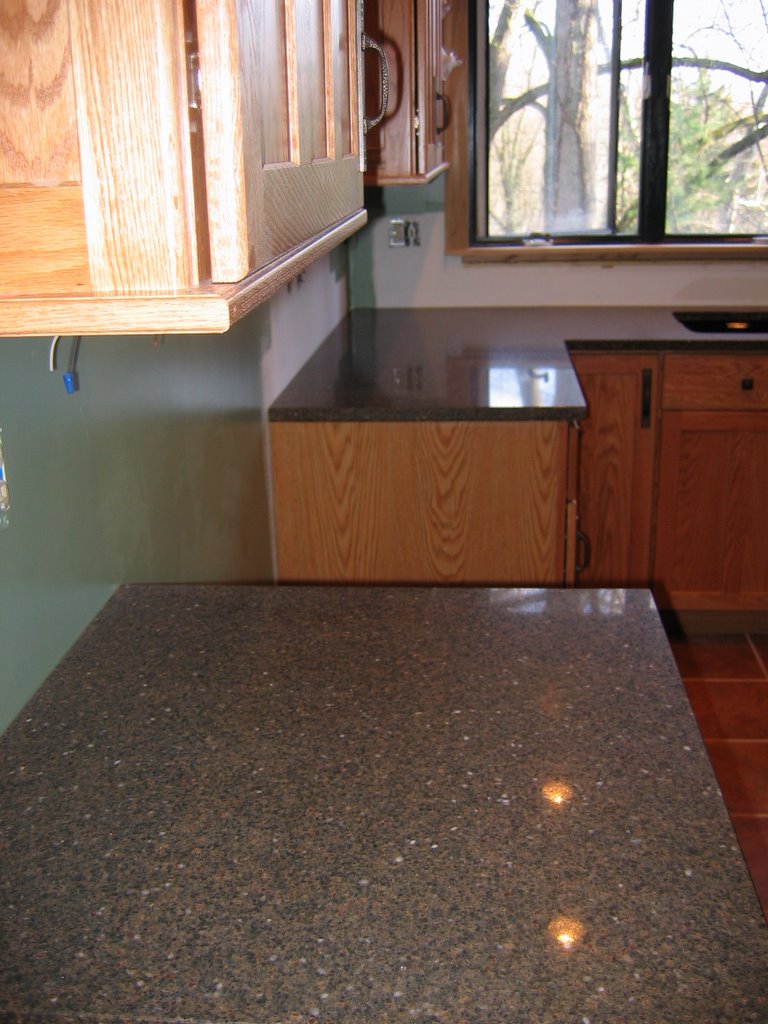
 The countertops have been installed!
Of course, the kitchen now smells of silicone and solvents, but it is beautiful, so the smell–well, I can live with it for a day or two.
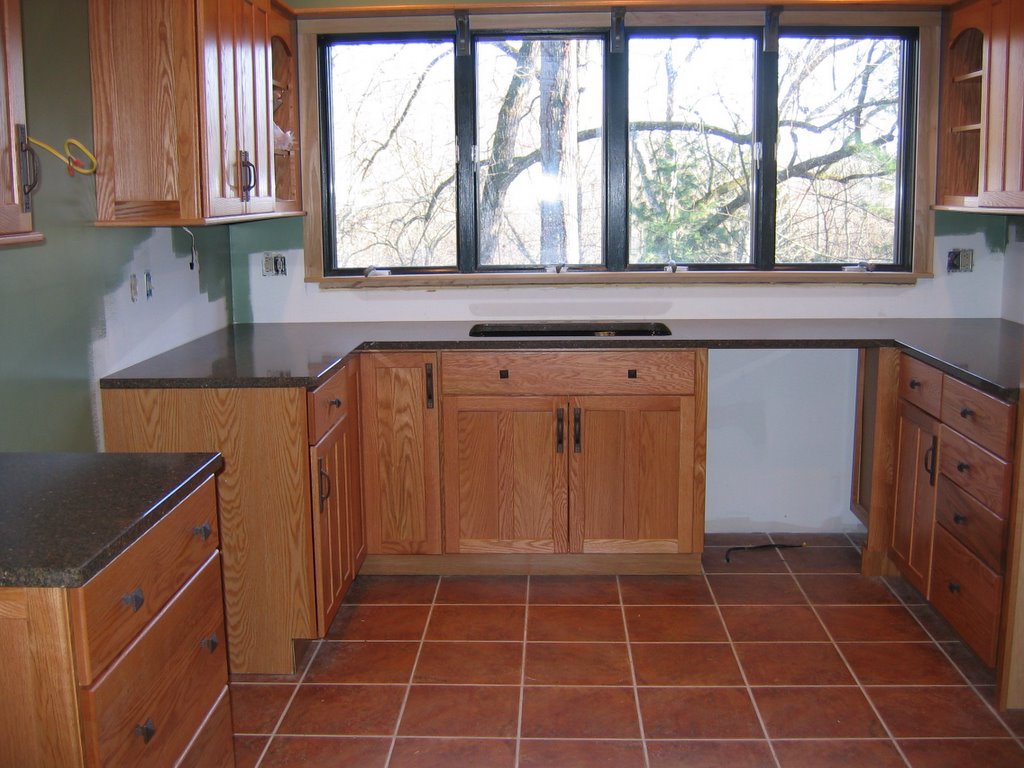
To the right you can see the desk, by the door to the kitchen. The kitchen is the first room anyone sees in the house because that is the door everyone comes into.
Below is the color of the engineered quartz countertop–it is Zodiaq from DuPont, and the color is called “Smoky Topaz.” If you look on the color chart, the photograph Dupont provides really doesn’t do the material justice–it is a mossy green, with reddish bits, black bits, golden brown and grey.
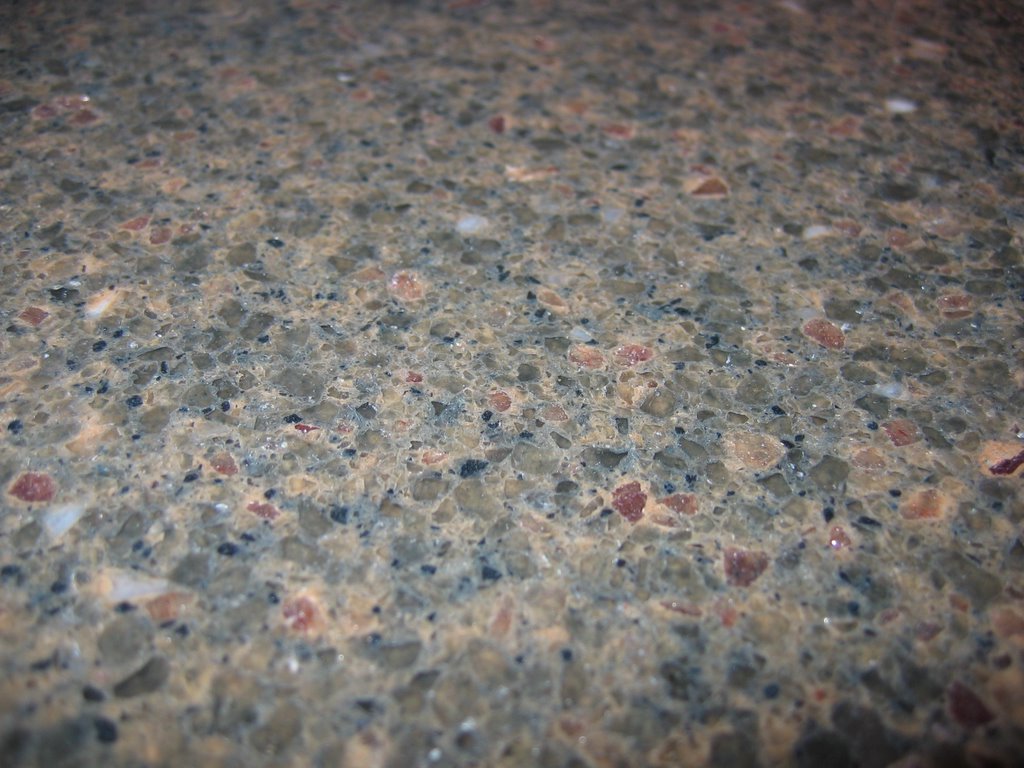 The photograph to the left here is still not really a good representation of of the countertop material, but you get the idea. (The official photo is too dark–this one I took is too light and washed out looking. The actual colors are somewhere between these two extremes.)
What is neat is that it has all of the colors of the kitchen in it–the greens of the cabinetry and walls, the red in the floor tiles, the golden brown of wood (and it brings out the reddish highlights in the oak), and the black that is in the windowframe and that will be in the hood and the appliances. (All of them except for the stove will be black.)
And, I found out that all of the appliances are at Clintonville Electric and are ready to be shipped, so after the tiling is done next Monday or Tuesday (the tile is great–it, like the countertop–echoes all of the colors of the kitchen), we can have the appliances delivered and installed.
 Sometime this week, the plumbing for the sink–which you can see part of in the photograph below–will be done. The faucets are old fashioned-looking and in oil rubbed bronze finish to match the hardware on the cabinetry.
There will be a filtration system for the drinking water and we bought a kick-ass garbage disposal for them to install.
Also the rest of the window frame will be painted this week.
Oh, and I found the perfect lightswitch covers and outlet plates for the room–they echo the Arts and Crafts movement feel to the bronze hardware on the cabinets–they have the same details in the corners.
I’ll have to order those tonight so that they can get here in decent time.
 Morganna came home from school and was ecstatic to see the counters–her eyes brightened up, and she danced around. She is very excited to know that we will have our kitchen done by Christmas so we can do baking in it.
She wants to have a Christmas cookie party here–which of course, I cannot help but agree with.
She darted around from place to place on the counter, saying, “We can put one person’s work station here, another here and here and here, and then one on the rolling cart, and if we need to, we can sit someone at Mom’s desk in the corner!”
I cannot help but share her enthusiasm.
 As more developments occur, have no fear–more pictures will be posted. The sink and painting should be done this week.
And then, it is tiling!
And finally–appliances.
And then! What then? Well, then I can have a party and finally turn forty for honest and for true.
I just have to figure out what kind of food to make for the birthday bash….
Zak says we need to have a Chinese feast.
I think he may be right.
Why Do I Fear Cooking Fish?
 Why do people have cooking phobias?
I had to ask myself that last night, because I pan fried some catfish coated in stoneground cornmeal and spices, to the raptures of Zak and Morganna.
I pan-fried catfish, because Morganna asked me to, because it is one of her favorite dishes, and she wanted something good for supper the night before she went back to school.
And so, even though I was worried I would screw it up in some undefined but horrible way, I bought the catfish filets at Krogers, brought them home and cooked them.
And nothing exploded.
The world did not end.
And the fish tasted phenominally good.
 I cannot determine the root cause of my fear of cooking fish. My terrors involving piecrust and pastry make some sense, as they are finicky and difficult to produce, but fish–it really isn’t that hard.
Part of it may be that I grew up only eating fish as a special treat. West Virginia being as landlocked a state as possible, I grew up with no large body of water where edible fish dwelt, waiting to be caught and put on a plate.
Sure, the Kanawha River runs right through the city of Charleston, but in my youth, because of the chemical pollutants, it was advised that no one eat any fish caught in the river. Carbon tetrachloride is apparently not a savory flavoring for carp or gar. (Those were only two kinds of fish I ever saw come out of that august body of water–neither of which are particularly tasty.)
The only time we had fish, other than fish sticks, was when an uncle went trout fishing way up in the clean waters of the Elk River, or when we fished the stocked pond at my grandparents’ farm. Or, when I went out to eat–if trout was on the menu, I would order that, it being a favored dish.
 Perhaps it was because my mother hated fish, that I developed some idea in my head that it was difficult to prepare properly. I know she always said, “Well, it is alright if it is cooked right, but otherwise….” Her voice would trail off and she would shudder, rolling her eyes like a frightened horse.
Perhaps I feared it because of my inherent mistrust of the fish department at Krogers–the one here in Athens has no smell, but the one in Pataskala always smelled of fish guts, and that is not a confidence-inspiring odor, nor an appetizing one.
Maybe my mother’s hatred of fish or the smell of fish guts, or plain old lack of confidence in cooking something that I didn’t grow up cooking are at the root of my fish phobia, but for whatever reason, the thought of cooking fish and doing well has always inspired worry into my usually placid psyche.
That has apparently ended.
Last week, after Morganna left for her visit with her father, I cooked a farmed salmon-trout filet from Canada for Zak and I. (His first choice was catfish, but there was none at the store.) I pan-fried it, as I did the catfish last night, and I followed a procedure that is nigh on foolproof.
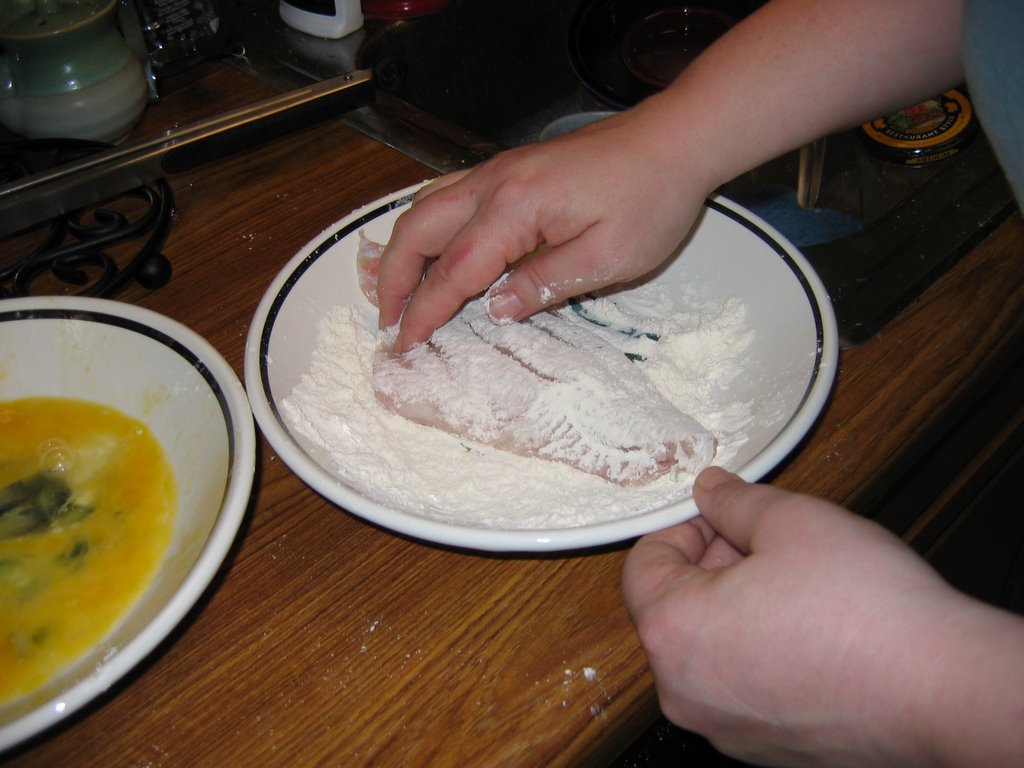
 First, for pan-fried fish, you want to have some sort of coating on the filet. Breading is appropriate–batter works better in deep fat frying than it does in shallow pan frying. A crisp coating of crumbly goodness is what is called for–and the crumbs can be just about anything, really. Breadcrumbs, cracker crumbs or matzoh meal all work beautifully, but my favorite and I believe, the absolute best breading material is stoneground cornmeal mixed with herbs and seasonings.
Cornmeal is the obvious choice for anyone whose ancestry derives south of the Mason-Dixon line, but there is good reason besides it being cheap and plentiful, for it to be popular as a coating for fried fish.
Fresh, coarse, wholemeal stoneground cornmeal is amazing crunchy, nutlike and filled with the golden flavor of corn, redolent of sun-warmed fields. Wholemeal cornmeal, which should be kept refrigerated, has the germ of the corn in it, and because of that, it is deliciously full flavored and very nutritious. The coarser grind gives a great toothsome crunch to the coating, which contrasts brilliantly with the tender, sweet fish.
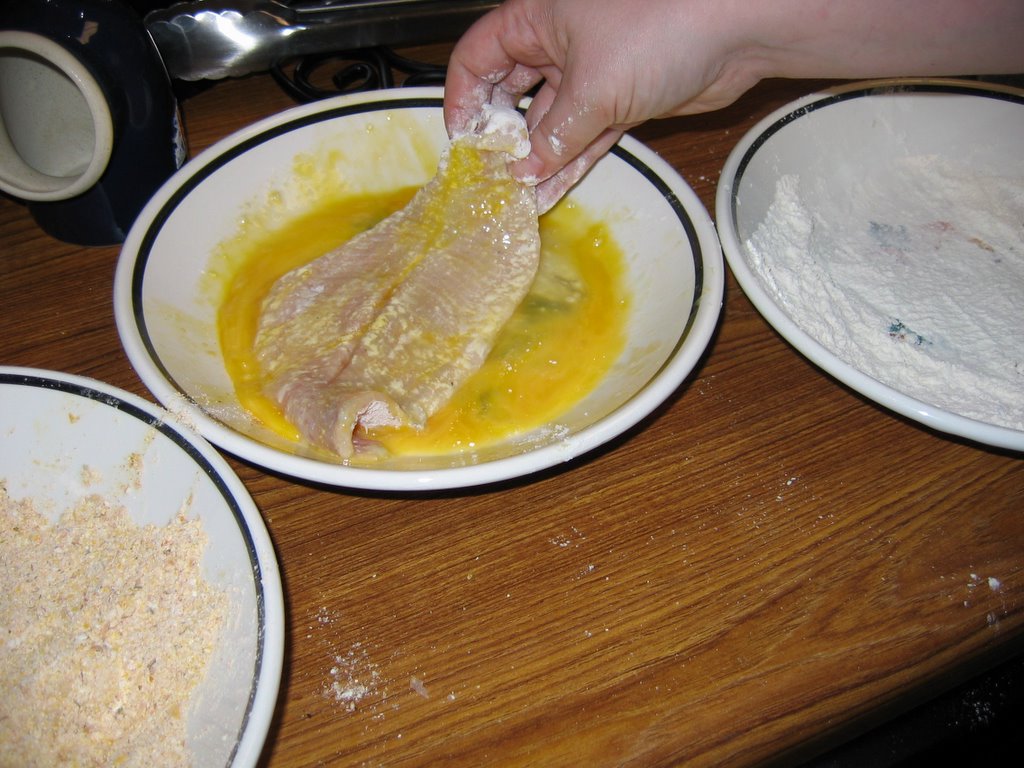
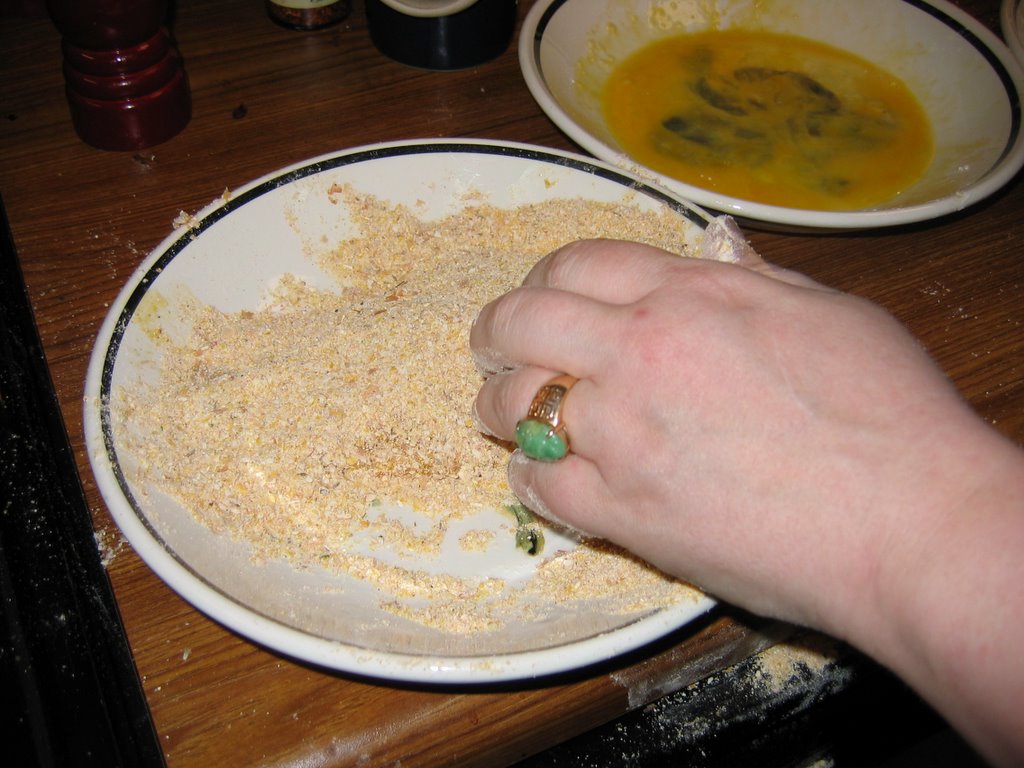 The proper way to go about breading a fish filet is not to just dunk it in egg and then in the cornmeal.
To bread fish or anything else you want to pan fry, first, you dredge the food item in seasoned flour. When I say seasoned, I mean, at least salted and peppered–you want seasoning in it, because it is the first layer of your breading and it touches your food directly. So, season it.
What does the flour do?
It gives the egg something to hold onto.
At Johnson & Wales Culinary, this method of breading was called, “The Standardized Breading Procedure,” and it was beaten into every novice chef wannabe’s brains, and for all that it was treated like it was just this side of the Gospel According to St. Escoffier, there was a good reason–it worked.
Meat and fish are both slippery, and if you just dunk a cutlet or filet into egg and then into crumbs, you will be lucky if the coating waits until you put it in the hot fat to roll right off leaving the item to be cooked naked as a jaybird. The flour dredge prevents that. Because the meat or fish is already naturally slightly damp, it adheres, and its dry, powdery surface makes the egg glom onto it just like glue. Then, when you put the item into the breading, it latches onto the egg and voila! A breaded cutlet or filet is ready for the pan.
 It is almost magical.
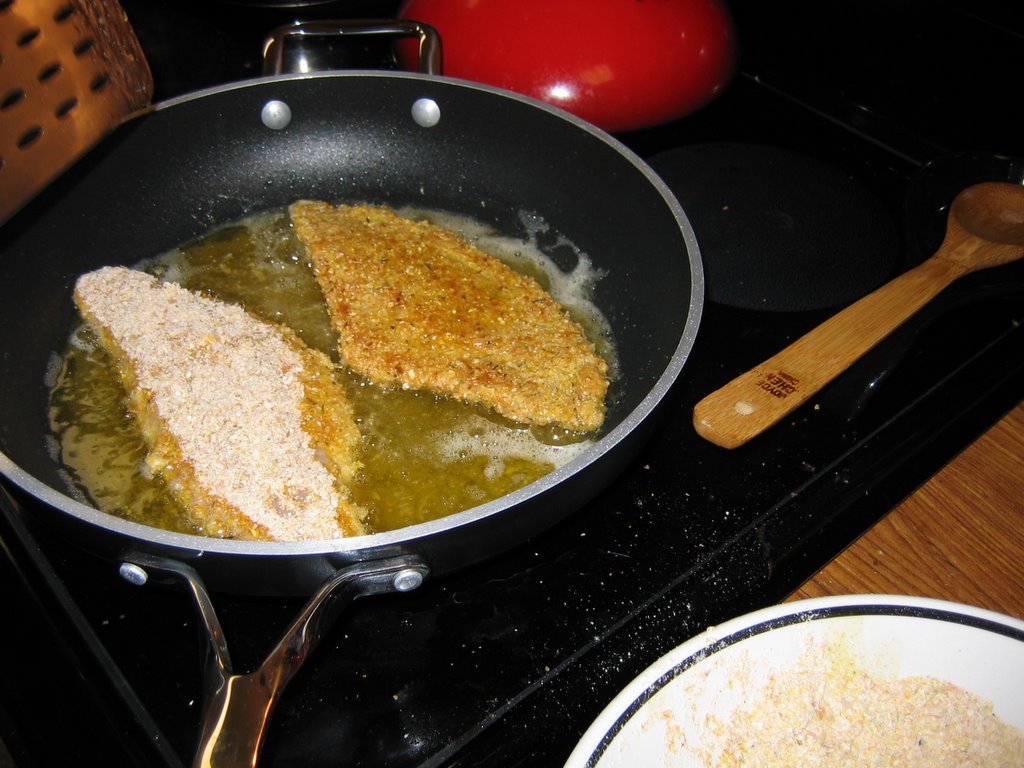
The other necessity for pan frying fish is good, hot oil. When I did the salmon trout, I used canola, but for the firmer, sweeter catfish, I used peanut oil, and it was a winner. The flavor of the oil brought out the nutty aroma of the cornmeal.
I used only enough to be about 1/4 of an inch deep in the frying pan, and heated it on medium-high until it was below the smoking point, but still quite hot (here’s the old country way to test your oil to see if it is hot enough–sprinkle a little flour in and see if it foams up immediately–if it does, it is ready), and then I slipped the filets gently into the pan, flat side first.
Here is the part that honestly worried me.
The worst thing one can do to a fish is overcook it, and so I was worried that would be the fate of my catfish.
I needn’t have worried. The signs of it being done are clear–the fish is ready to turn when the edges look cooked and golden and the breading there has hardened. When that happens, the fish is ready to turn.
When one turns it, one can take note of how the fish’s texture is–like chicken, it gives sure signs to its level of doneness–it solidifies a bit and becomes stiffer, while being springy to the touch. Raw fish is soft and a finger poked into it just pushes into the meat. When you pick it up, it droops from your hand or tongs. Fish that is just cooked is firmer, and definately has a “spring” to its touch–when a finger pokes at it, it pushes back slightly. Also, when picked up in tongs, it will not droop, but will lay as flat as it was when cooked.
That was it. I guess I cooked each filet a couple of minutes per side. I only cooked two at a time, to avoid lowering the heat of the oil too much, and I breaded them right before cooking–if you bread ahead of time, you risk having your crumb coating get gloppy and gross. In order to keep the first ones cooked warm, I set them on a paper-towel lined plate in an oven heated 170 degrees.
My next fish project is to pan sear a tuna steak in my cast iron skillet. Since I can pan sear a beef steak in that way with my eyes closed, and come up with beautifully rare meat, I figure I can do the same with tuna.
Wish me luck, and as always, I will report back.
 Country Pan-Fried Catfish
Ingredients:
Catfish filets
Flour, as needed (plan on about 2 tablespoons per filet)
Salt and pepper to taste
1 or 2 eggs, well beaten
Fresh wholemeal stoneground cornmeal, as needed (just like the flour–figure on 2 tablespoons per filet or so)
Dried seasonings as you like–chipotle chile powder, adobo seasoning, thyme, marjoram, Spanish smoked paprika, coarsely ground peppercorns–the possibilities are endless.
Salt and pepper to taste
Peanut oil to cover the bottom of your frying pan to 1/4 inch depth (no, I didn’t measure any of this….)
Method:
Check your filets for any obvious bones, and pull them out if you can. You can accomplish this by bending the filets back and forth and noting if any bones pop out. When they do, nab them, and pull them out–especially check at the thinner portion at the tail end.
Season flour lightly with salt and pepper, and put in a bowl or plate big enough to accomodate the filets. Beat eggs well and place them in a similar bowl, on the counter, left of the flour bowl. Stir together the cornmeal and your seasonings of choice, along with salt and pepper, and place it in a third bowl or plate, left of the egg wash. If you want to minimize the possibilities for mess, set this breading station up next to your stove, just to the right of the burner you are going to use.
Heat oven to 170 degrees, and line an oven-safe plate with several layers of paper towels. Set them to the left of the stove and burner. (If you are left handed, do all of this backwards!)
Pour your oil into the pan, and start heating it on medium high. Before coating fish, check to see that the oil is nearly hot enough by sprinkling a little flour into it, and see if it foams. When it foams, start breading the first two filets.
Dredge your first filet in the flour, starting with the flat side. (Cat fish filets are flat on one side and very rounded on the other. Start on the flat side.) Press it down with your fingers to make sure that flour contacts the surface completely. Flip it over and very carefully do the same with the rounded side. Pick it up, examine and make sure that the flour completely coats the rounded side. If it doesn’t, lay it back down in the flour and play with it until it does.
Take it out of the flour, shake lightly over the flour to dislodge any loose particles and then carefully and gently, lay it in the bowl with the egg wash–on the flat side first. Now, before you pick that fish out of the egg to flip it over, designate a “wet” hand and a “dry” hand. Whichever one is your wet hand, pick the fish up with, let it drip over the egg bowl, then carefully lay it–flat side down–onto the cornmeal plate.
With your wet hand, gently pat the fish to get it settled into the cornmeal so it coats well on the flat side. With your dry hand, scoop up some cornmeal mixture and pat it onto the surface of the rounded side. Scoop and pat until that side is completely covered. With the wet hand, pick it up, shake it gently, make sure it is completely coated.
Set filet gently in the oil, and then bread the next one. When you place the second filet in the oil, let the two of them cook about two minutes. Turn them over gently with a long, wide spatula or tongs. When they have turned, cook two more minutes. Push gently on the fish that isn’t under oil and see if the texture is firm and springy. (If it is overdone, it will feel quite hard and not be as springy–it will feel more brittle.)
Remove from oil and place on towel lined plate, and put plate in warmed oven to hold until all fish is done.
[food] [recipes] [catfish] [cornmeal] [Southern cooking]
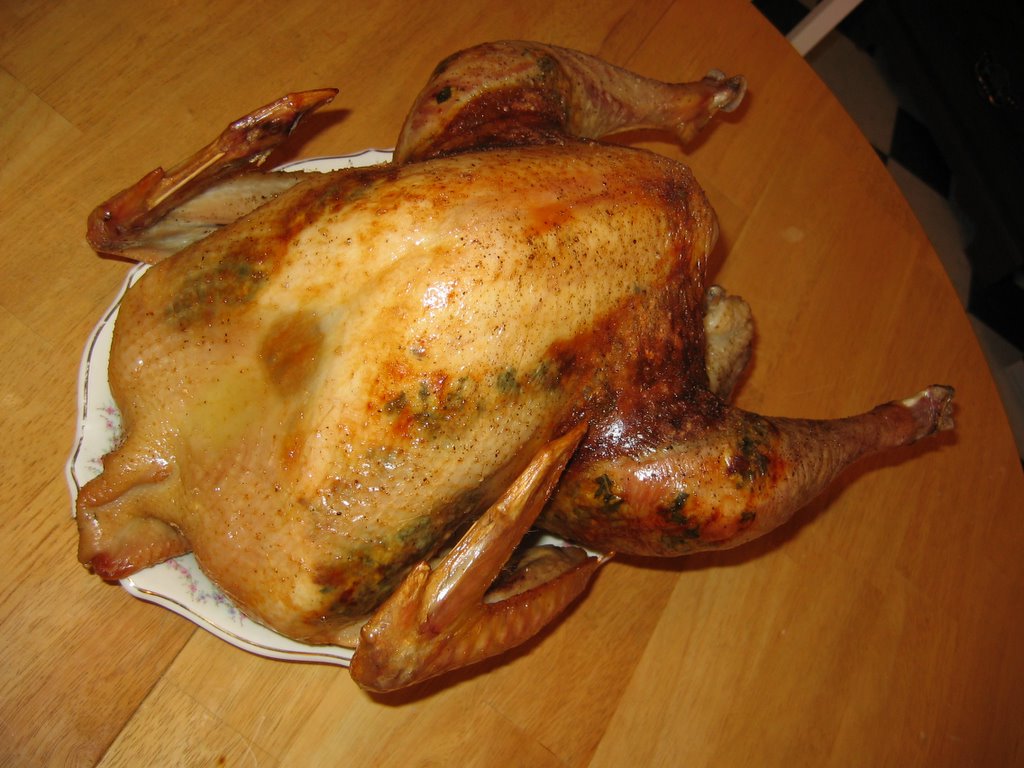
Thanksgiving Report: Cooking a Heritage Turkey
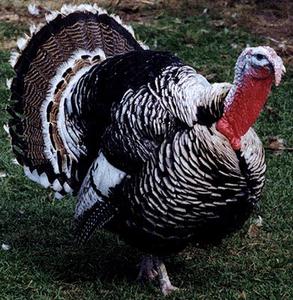 As you may recall, I posted about picking up a heritage breed turkey–more specifically, a Narragansett, from Speckled Hen Farm.
And I promised to give a full report on how I cooked the turkey, how it tasted and any differences that there were between it and the usual free-range Broad-breasted Whites that I have been cooking for the past four years.
The first difference I noted when I took the turkey out of the refrigerator to begin preparing for its brine was morphological in nature. The conformation of the bird was very different than that of a Broad-breasted White. The legs were much longer, and the wings were more well-developed than one is used to seeing in the typical grocery store turkey, or even its free-range counterpart. In addition, the breast was not so oversized, but was more in keeping with the overall size and shape of the bird; it was more balanced, in other words.
This bird was no Dolly Parton.
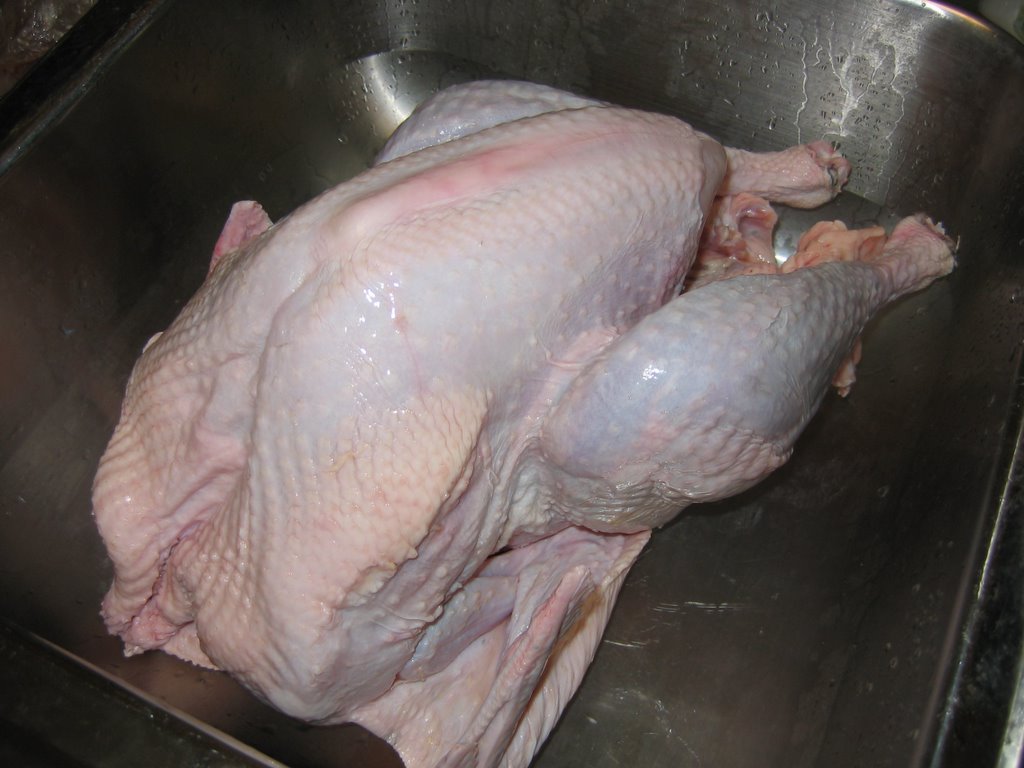 I also noticed that the skin was generally more tightly affixed to the meat and there was a general lack of fat underneath it.
I had read in several places that brining a heritage bird would cover up the flavor; however, I had also read that these birds have more inherent flavor than the Broad-breasted Whites.
This is paradoxical–if it has more flavor, then how exactly would a brine cover that flavor up?
I decided that since I have had enormous success with brining turkeys for the past four years, I would go ahead and do it again this year. Besides–it made sense to cook the bird as I normally would, and that way, I would have a more realistic comparison between two different breeds of free-range turkeys. If I changed my usual cooking method, then I would have no idea if the difference was between the birds or the cooking methods. (When experimenting, it is best to follow the scientific method and change only one variable at a time, otherwise, the resulting data will be meaningless.)
 So, I made my usual brine–one cup of kosher salt per gallon of filtered water, with 1/2 cup of sugar and 1/2 cup maple syrup added for flavoring.
I don’t add anything to the brine that will not go into a solution in water, simply because a brine works on the principle of osmosis. The salt in the water is carried across the semi-permeable cell membranes in the flesh because it will naturally go from an area of greater concentration to an area of lesser concentration. The sugar seems to be carried along with the salt water, because it, too, dissolves into a solution, however, most other flavorings that people put into bines are non-soluable particulate matter which does not seem to do much of anything.
Rather than waste peppercorns, herbs and onions in the brine, I save them for the compound butter that I make to put under the loosened skin of the brined and rinsed turkey.
The compound butter idea came about because I grew up with my grandmothers rubbing an entire stick of butter into the turkey skin. They told me that it moistened the breast meat–but after I took some biology classes, I was skeptical of this. I decided to instead of buttering the outside of the bird, butter the inside by loosening the skin with my fingers and hands, , and then packing softened butter to which minced fresh aromatics and wine had been added, directly against the flesh. Since more is better, I also pack this compound butter against the flesh of the legs and thighs–you can see the lumps under the skin of the bird in the photograph above.
You will also notice that I do not stuff my turkeys–there are several reasons for this.
One–they take longer to cook if they are stuffed. Two–I like to start out with very high heat in order to shrink the skin and brown it nicely–this will dry out any stuffing that is near the opening of the bird. And Three–the turkey cooks more evenly if you leave the body cavity essentially open to the hot air of the oven. (The only thing I will stick in the cavity of the turkey is a quartered onion.)
In addition, for the same reasons, I do not truss the turkey. Nor do I set it down inside a roasting pan–instead, I elevate it on a V-shaped roasting rack. All of these techniques lead to perfectly roasted poultry. You will get juicy meat, your dark and light flesh will be done at the same time, your drippings will go into the bottom of the pan and not collect against the skin of the bird, which results in flabby, slimy skin. Instead, the skin of the bird is crisp, golden and delightful.
Oh, and I set it in the rack breast side up. That starting the turkey breast side down and then flipping it upright–that is bogus. Some people swear by it, but if you brine your bird, you don’t need to do that. I did it once or twice and only caused myself pain and stress. Stress from fear of dropping the bird on the floor where dogs and cats circled like sharks, and pain from having hot fat drip down my arm while I was in the middle of flipping the bird. (You knew I just had to say that, didn’t you?)
And yes, I still butter the outside of the skin–to help it crisp up. I also salt and pepper the skin liberally, even though I brined the bird. The granular salt also helps crisp and dry the skin, as well as flavoring it.
The pepper, I figure is self-explanatory.
It tastes good.
Then, I stick it into a preheated 400 to 450 degree oven (depends on how the oven works as to how high I set the temperature) and roast it for about 20-30 minutes, or until the skin has crisped, browned, and shrank considerably. Then, I turn down the oven to 325 and roast until it is done–
I don’t baste the turkey while it roasts, but I do pour wine into the pan to keep the drippings from burning. It also makes for a really flavorful gravy when it is time to sit down to eat.
 Gravy with this roasting method is a simple matter. Drain the drippings that have accumulated in the cavities of the bird by tilting the rack in the pan, and allowing them to drain into the roasting pan.
Remove the V-rack and set the bird aside to rest. You can tilt one end of the V-rack up–tilt it so that the breast is lower than the rest of the bird and it helps the juices flow into the breast. (I forgot to do this this time, and the meat was still juicy and good, so I suspect that the tilting thing is about as bogus as the flipping the turkey while it is half cooked is.)
While the bird is resting and doing its “carry-over cooking” thing, set the roasting pan with the drippings on two burners on the stove, and make gravy–it is easy. If there is a lot of fat, suck most of it up with one of those basting bulb thingies, and discard it. Then, bring the drippings to a simmer, and stir them, reducing them a bit. I like to take the onion that was in the turkey cavity, cut it up (it is usually half cooked by this point) and scatter the slices in the pan with the drippings. Stir, and then add a handful of flour–I am not going to tell you how much, because it depends on how many drippings you have! About the same amount of flour as you have in fatty drippings–and cook, stirring like mad. This will turn into a brown paste–a roux–and then you add turkey or chicken broth, and or wine, and cook, stirring, until it turns into a gravy that is as thick as you like.
 That is it. Those are the secrets to my turkey.
The report on how this turkey stacked up to previous ones?
Well, Zak swore that it was better than the free-range Broad-breasted Whites we have been getting in past years. He is right–it was uncommonly juicy and it was tastier than we are used to. And the brine did not cover the flavor of the bird or make it too salty–it enhanced the natural flavors of the turkey as it is meant to.
Also, I found that the lady at the North Market was right–cooking the breast to an internal temperature of 140 degrees, and then letting it carry over cook (cook under its own heat outside the oven) for ten minutes or so until it came to 150-160 was the way to go. It was supremely juicy and firmly textured cooked that way, and the dark meat was succulent. As is usual, the skin was crackling crisp, and beneath it, the butter melted away, leaving a coating of garlic, shallot, chipotle, rosemary, sage and thyme against the flesh that gives each slice an extra little grace note of flavor.
The only other thing I noticed was that with this 12 pound turkey for four adults and one fifteen year old–we had just enough meat for a good feast, and then enough left over for a sandwitch or two and a batch of turkey jambalaya. There wasn’t as much left over as there is with the Broad-breasted White birds–and for me, that is a good thing. Because I tend to get tired of the leftovers long before they are gone, and my dogs end up eating the rest.
I was very pleased–and next year, I believe I will be patronizing Speckled Hen Farm again.
[food] [Thanksgiving] [turkey] [heritage breed] [free-range]
Four Directions Dressing
 I grew up eating fairly typical bread stuffing and dressing for the Thanksgiving and Christmas turkeys. My Mom and Grandma would take white bread, cut into cubes, and toast it in the oven until they were crisp, and then on the day the turkey was cooked, they would mix it with broth in which they had cooked giblets, onions, celery and sage, then use this mixture to stuff the turkey and fill the roasting pan around the bird.
And it was very tasty and good. Nothing wrong with it at all.
But, as I was in the produce aisle of the grocery store about six or years ago, I had an inspiration.
What if I made a cornbread-based dressing and added to it a bunch of ingredients native to the United States? What would it taste like?
And what ingredients would I use?
 Well, I had already decided to use corn. Cranberries came to mind next–and since the new dried “Craisins” had just come out on the market, those are what I picked up. As I had just addicted Zak to chiles–chipotle en adobo seemed a natural choice–especially since it involved both chile and tomato. Two native ingredients in one! What else could I add to the mixture?
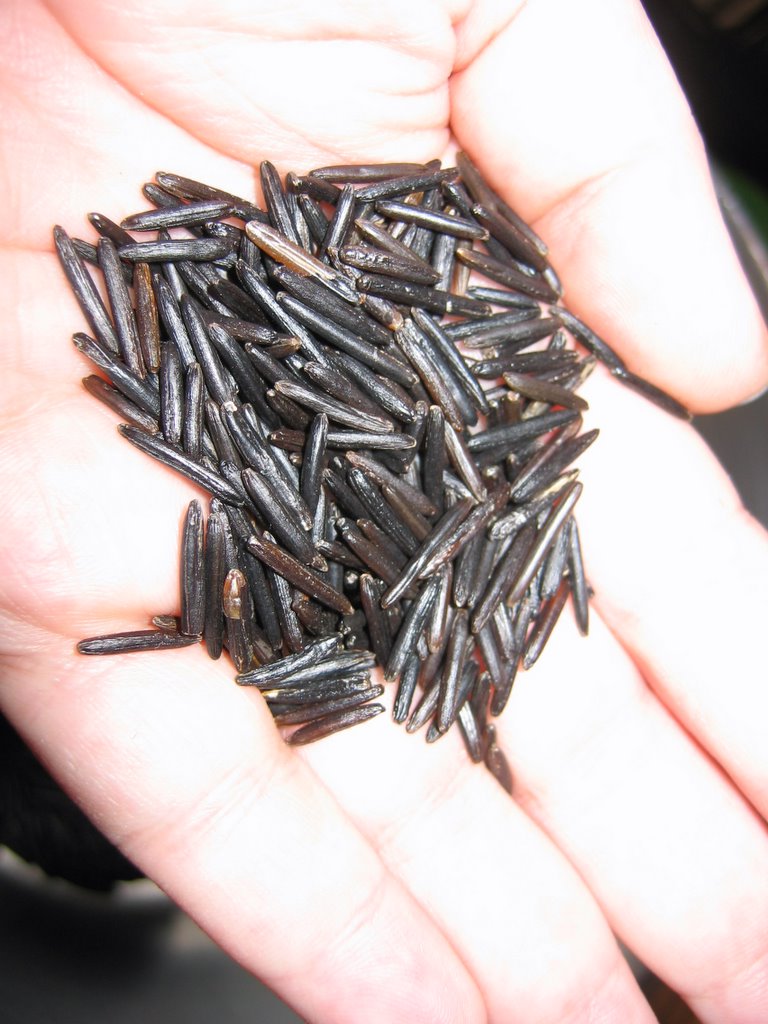
Maple syrup is the native sweetener–and I love the flavor of it with turkey anyway, so of course, in that went. I thought I might want something crunchy, so I added both pecans and black walnuts–both native to these shores. While I was grabbing ingredients, my eye fell upon the long, graceful black quills of wild rice and I nabbed it up, and threw it in the cart. It may not really be rice, but it tasted delightful, and so into the recipe it went.
Wild rice is interesting. It grows on the edges of standing water and in boggy ground up around the Great Lakes region, and was (and still is, in some places) harvested by Native Americans in canoes. One person paddled, steering the canoe alongside stands of the grass, letting the grain-laden stalks droop over the floor fo the canoe, while their partner used sticks to knock the grains into the canoe.
While it isn’t really a rice, it can be used like rice. The black, shiny grains are generally cooked in a lot of boiling water–three times as much water as grain–until they are at several levels of doneness. To do a pilaf style rice, it can be cooked al dente. To mix it with white or brown rice, it can be cooked a bit softer (just to the point where the glossy dark seed coat starts to split and show the white interior) then stirred into the rice.
 I have learned over the years that in order to use it with this dressing recipe, it is best to cook the grains fully–until the starch inside the seedcoat bursts and the seed splits entirely, as shown on the left. While I like it best al dente, especially if I am eating it seasoned as a side dish, if you put it in the dressing cooked that way, it dries out in the oven way too much and become crisp and tooth-breakingly hard.
So, I just boil it until it is completely soft, and the black coat has turned to a rich brown and the starch inside is fully exposed. When it bakes in the oven, mixed with all the other ingredients, it takes on a delicious, nutty chewiness that is similar how it tastes al dente.
 I also added sausage, onions, apples, garlic, sage, rosemary and thyme to the mixture. Venison sausage is my first choice–it carrying on the Native American theme beautifully–but regular pork breakfast sausage does just fine as well. Apples–well, they are not native to the United States–they are originally from the steppes near China, and were brought here by British colonists. However, they taste good and all over the country, one can find apple trees from long-forgotten orchards just growing wild in pastures and in thin woodlands, still bearing flowers and fruit.
One could, if one harvests ramps, substitute frozen ones for the onions and garlic and keep to the theme of native foods, but one doesn’t have to–I generally only eat ramps fresh myself, as I don’t care for how they can stink up an overstuffed freezer. (My freezer is always overstuffed.)
The way the dish goes together is simple. First, a few days before you plan on making the dressing, bake a pan or two of plain cornbread. By plain, I mean nothing overly sweet or fancy, just cornbread. (I will include the recipe that I used below.) After you take it from the oven and cool it completely, break it apart into bite-sized and slightly smaller pieces, and allow it to sit out at room temperature for a couple of days to go nice and crispy stale. Or, you can crisp it in the oven–but I will warn you–if you don’t pay attention, you can easily burn it.
Then, you cook up your wild rice, and when it is fully exploded, drain it and refrigerate it. You can do both of these steps two or three days before you cook your feast.
 Then, on the day you are making the dressing, you saute all of the flavoring ingredients together until everything is browned and nicely scented. Then you add the wild rice and fry it a bit longer, then add maple syrup and about a quart or so of chicken or turkey broth.
Then, you pour all of that over your cornbread crumblies and mix that in until everything is nice and moist, with your hands. Then, you pack it in a buttered baking dish, pop butter on top of it and bake it until it is golden brown and dried to your liking.
About drying it to your liking–some people like squishy, wet dressings and stuffings, and some like them dry and toasty and crumbling. This is a matter of personal taste–I like them either way, to tell the truth, but I tend to make this dressing pretty much on the dry side. Wet, gooshy cornbread is not something I am into, so I bake it until you can scoop the dressing out in cohesive lumps, but it isn’t so sticky that it has the texture of granular wall paper paste.
If you make this recipe, bake it until the texture is where you like it.
As for the name–it refers to the sacred four directions that many Native American tribes spoke of. Being as many of them deified the land itself, they spoke of the spirits of the North, South, East and West. Since I ended up choosing ingredients that are native to this continent in many directions, I felt that the name was especially appropriate.
Four Directions Dressing
Ingredients for Cornbread:
1 cup stoneground cornmeal
1 cup flour
2 teaspoons sugar
1/2 teaspoon salt
3 teaspoons baking soda
1 cup milk
1 tablespoon oil
2 eggs, lightly beaten
Method:
Preheat oven to 350 degrees. If you are going to bake this in a cast iron skillet heat skillet in oven while preheating.
Mix dry ingredients together in a medium bowl. Mix wet ingredients in a measuring cup or small pitcher until well combined.
Pour the wet into the dry and stir into a nice, thick batter.
If you are using the cast iron skillet, take it out, grease it well, and pour batter into it. Bake for about 20-25 minutes if using preheated skillet. If using a regular baking pan–not preheated–then bake for 25-35 minutes, or until toothpick inserted in center of bread comes out clean.
Cool completely on wire rack, then crumble and break apart into bits.
(I use two pans of this for one 9″X13″ pan of dressing.)
Ingredients for Dressing:
2/3 cup wild rice
2 cups water
2 tablespoon olive oil
1 large onion, diced finely
1 apple, peeled and diced
1 teaspoon lightly crushed celery seeds
5 cloves garlic minced
1 or 2 chipotle en adobo, minced
1 pound sage breakfast sausage
3/4 cup dried cranberries, roughly chopped
1/2 cup pecans or black walnuts, roughly chopped
1/4 cup fresh sage, minced
2 tablespoons fresh rosemary, minced
1 tablespoon fresh thyme leaves
1/2-3/4 cups maple syrup (this is to your taste)
1 to 1 1/2 quarts chicken or turkey broth
1 tablespoon butter, cut into small pieces
Method:
Put the wild rice and water in a pan, and bring to a boil. Boil until the grain bursts, then drain and set aside.
Preheat oven to 350 and grease or butter a 9″X13″ baking pan.
Heat olive oil in a frying pan or saute pan. Add onions, apple and celery seeds, and cook, stirring, until onions are dark golden. Add garlic, chipotle and sausage–break up the sausage, and continue cooking, until sausage is completely browned. When the sausage is still about halfway pink, add cranberries, nuts, herbs and the drained wild rice.
When sausage is completely done, add maple syrup, and stir in to combine. Add broth and heat until it is warmed through, but not boiling hot.
Pour over the cornbread crumbs, and stir with your hands to moisten and combine everything. Pat mixture into the prepared pan and bake for about 15 minutes. At that time, drop butter pieces onto top of dressing and keep baking until it is as browned and dry as you like it.

Categories:
- Admin (rss) (55)
- Blogs and Blogging (rss) (81)
- Book Reviews: Cookbooks (rss) (43)
- Book Reviews: Non-Cookbook Food Books (rss) (38)
- Cats and Cat Blogging (rss) (47)
- Chinese Cooking Lessons (rss) (32)
- Culinary School Stories (rss) (18)
- Dairy Pruducts: Cultured and Barbaric (rss) (4)
- Documentary Filmmaking (rss) (1)
- Essays, Rants and Reflections (rss) (260)
- Fighting Hunger (rss) (12)
- Food and Kids (rss) (45)
- Food in the News (rss) (126)
- Food Media (rss) (98)
- Food Preservation (rss) (18)
- Food Safety (rss) (45)
- Gardening (rss) (30)
- Herbs and Herb Blogging (rss) (20)
- Holidays (rss) (50)
- Kat Blogging (rss) (22)
- Kitchen Science (rss) (36)
- Leftover Makeover (rss) (8)
- Life, the Universe and Everything (rss) (131)
- Local and Sustainable (rss) (227)
- Local Athens Food and Foodies (rss) (42)
- Meatless Mondays (rss) (32)
- Menu For Hope (rss) (5)
- Nutrition, Diet and Health (rss) (84)
- On The Farm (rss) (8)
- Recipes: Almost Vegetarian, Vegetarian and Vegan (rss) (294)
- Recipes: American Regional (rss) (37)
- Recipes: Appalachian Hillbilly (rss) (33)
- Recipes: Bread, Pasta, Grains (rss) (95)
- Recipes: Canning and Preserving (rss) (8)
- Recipes: Chinese (rss) (123)
- Recipes: Comfort Food (rss) (120)
- Recipes: Cookies (rss) (16)
- Recipes: Desserts (rss) (48)
- Recipes: French (rss) (25)
- Recipes: Fruits and Vegetables (rss) (302)
- Recipes: Greek, North African and Middle Eastern (rss) (31)
- Recipes: Indian (rss) (137)
- Recipes: Italian (rss) (42)
- Recipes: Japanese (rss) (7)
- Recipes: Jewish (rss) (4)
- Recipes: Korean (rss) (6)
- Recipes: Meat, Poultry and Fish (rss) (220)
- Recipes: Mexican/Native American/ Latin American/Caribb (rss) (27)
- Recipes: Original (rss) (108)
- Recipes: Thai (rss) (27)
- Recipes: Tofu (rss) (17)
- Recipes: US Regional (rss) (16)
- Recipes: Vietnamese (rss) (8)
- Restaurant Stories (rss) (28)
- Sewing, Quilting, Arts and Crafts (rss) (16)
- Simple Chinese Recipes (rss) (30)
- Slow Food and Heritage Foods (rss) (10)
- Spice Blogging (rss) (44)
- The Chinese Cookbook Project (rss) (14)
- The Chinese Pantry (rss) (39)
- The Documentary (rss) (2)
- The Kitchen Saga (rss) (17)
- The Locavore's Bookshelf (rss) (15)
- The Unsung Adventures of The Culinary Nerd (rss) (6)
- Tools and Toys (rss) (35)
- Uncategorized (rss) (10)
- With a Side of Politics (rss) (48)
Archives:
- August 2012 (9)
- July 2012 (12)
- September 2011 (3)
- August 2011 (7)
- July 2011 (8)
- June 2011 (16)
- May 2011 (17)
- April 2011 (11)
- December 2010 (9)
- November 2010 (5)
- February 2010 (1)
- December 2009 (5)
- November 2009 (7)
- October 2009 (10)
- September 2009 (16)
- August 2009 (14)
- July 2009 (14)
- June 2009 (7)
- May 2009 (17)
- April 2009 (10)
- March 2009 (25)
- February 2009 (13)
- January 2009 (10)
- December 2008 (5)
- November 2008 (5)
- October 2008 (6)
- September 2008 (13)
- August 2008 (8)
- July 2008 (11)
- June 2008 (18)
- May 2008 (13)
- April 2008 (14)
- March 2008 (16)
- February 2008 (17)
- January 2008 (19)
- December 2007 (25)
- November 2007 (18)
- October 2007 (24)
- September 2007 (16)
- August 2007 (15)
- July 2007 (15)
- June 2007 (10)
- May 2007 (14)
- April 2007 (16)
- March 2007 (17)
- February 2007 (20)
- January 2007 (13)
- November 2006 (1)
- October 2006 (8)
- September 2006 (14)
- August 2006 (25)
- July 2006 (30)
- June 2006 (28)
- May 2006 (34)
- April 2006 (29)
- March 2006 (24)
- February 2006 (30)
- January 2006 (38)
- December 2005 (40)
- November 2005 (37)
- October 2005 (32)
- September 2005 (25)
- August 2005 (30)
- July 2005 (28)
- June 2005 (21)
- May 2005 (8)
- April 2005 (22)
- March 2005 (17)
- February 2005 (29)
- January 2005 (10)
Search Site:
Links:
- Lily’s Wai Sek Hong
- 101 Cookbooks
- A cat in the kitchen
- A Veggie Venture
- Accidental Hedonist
- Cha Xiu Bao
- chez pim
- Chocolate & Zucchini
- Chopstick Cinema
- Chowhound.com
- Chubby Hubby
- Cook sister!
- Cooking with Amy
- da*xiang
- Eat Local Challenge
- Eating Liberally
- Ecocentric
- Eggbeater
- Epicurious
- Farmgirl Fare
- Fatfree Vegan
- Foodgoat
- ForkandBottle.com
- Green Olive Tree
- Hooked on Heat
- Jaden’s Steamy Kitchen
- Kalyn’s Kitchen
- Lucullian delights
- Mahanandi
- Matt Bites
- MeatHenge
- mmm-yoso!!!
- New York Times – Dining & Wine
- Pizza Goon
- Rasa Malaysia
- Ruhlman
- Sailu's Kitchen
- Serious Eats
- SF Gate: Food & Dining
- Simply Recipes
- Soul Fusion Kitchen
- Tastespotting
- The Amateur Gourmet
- The Cleaner Plate Club
- The Food Section
- The Grub Report
- thecookscottage
- U.S. Food Policy
- Wandering Chopsticks
- Washington Post Food and Dining
- Wasted Food
Meta:

Powered by WordPress. Graphics by Zak Kramer.
Design update by Daniel Trout.
Entries and comments feeds.