Cook Local, Eat Global
Don’t Fear the Fish Sauce
 I am continually amazed at how fearful salty fermented fish squeezings can make people.
Every time I have taught a class in Thai cooking (which has been many times over the past five years or so), I have had one or two people hang towards the back of the room, and when I launch into my spiel about how necessary fish sauce is to getting that correct “Thai flavor” in their cooking, one of them puts up a tentative hand, and in a quavery voice asks, “Do you -have- to use fish sauce? I mean, is it -really- necessary?”
I try very hard not to sigh or bark back at them, “What did I just get through telling you? Weren’t you listening?”
Instead, I very patiently go over why fish sauce is necessary in the making of Thai food, and how even some Thai vegetarians even use it, but that if it really bothers you or if you are allergic to fish you can use Thai soy sauce, but be aware that your dishes will not taste like the ones you eat out in Thai restaurants, because you will be lacking a crucial ingredient.
This usually causes the fearful ones to settle down until I start doing cooking demonstrations and pour a liberal amount of fish sauce into a hot wok. When the scent of boiling fish hits them in a cloud of steam, the fearful ones usually step back and snivel, their faces screwed up into expressions of disgust and mistrust.
I usually resort to humor at that point, and tell folks that when I cook Thai food for the first time for guests, I always make up a pretext to send them out of the kitchen when it comes time to whip out the fish sauce and throw it in the wok. For instance, I always send my Mom out to the porch for a last cigarrette before dinner is ready. Any number of friends have been sent out on various pretexts: go set the table, feed the dog, look at the garden, oh, wow, there is a deer in the yard, go look–you name it, I have used it.
But that is only for the squeamish and uninitiated, and that was only done years and years ago when I was less confident. These days, my friends and family are old pros and they know, that no matter what smells may issue forth at intervals from my stove, the end result is always divinely edible, so they wait it out in anticipation.
Some of them, like me, have learned to salivate when they smell the fish sauce spashed against a hot wok.
 Because here is the deal: fish sauce grows on you. It may not smell to conventional Western tastes, what one would call good, but after a while, it doesn’t smell bad, either. And then, as you cook with it more and more, and your palate and nose begin to associate the smell of fish sauce with the delicious results of pad thai, green curry or tom kha gai, you begin to actually like the smell of it. It becomes comforting, homey and appetizing.
Once you start making dipping sauces out of it by combining it with sugar, lime juice and chiles, it starts to smell and taste downright good in its own right.
At that point, my friend, you will know that you have learned to love that which you once feared. And that is a good place to be.
Because fish sauce can then become a secret ingredient in your kitchen arsenal. Of course you will use it in Thai food and Vietnamese food, because you can’t make the stuff without it. But after you learn what beautiful, mysterious things it can do to food, you will find yourself bringing it out to use in dishes that never saw southeast Asia, except maybe in a travel brochure.
I have used it to pick up a few Italian sauces that tasted somehow flat. This sounds disgusting and surprising, until you take into account that fish sauce is made from salted, fermented anchovies–a wee fish that is used often to round out the flavors in Italian foods. I have added it to vegetable soups that lacked a savory depth, probably because I didn’t use a good soup bone in making them.
I have not gone so far as to add it to any desserts or breads, but you never know. I once added duck sauce to a batch of cookies, and invented a new recipe that people adore, so watch out.
Fish sauce may well appear in a tart someday.
 But, for now, I tend to prefer to use fish sauce for its intended purpose, which is to make Thai food addictively, splendiferously, delectable.
This Saturday, I made a little Thai/Chinese supper for the friends; I was supposed to make steamed buns, but after the ordeal of nearly breaking my nose by closing the hatchback of our car in it (I knocked myself out for a few seconds–it was quite exciting–I scared Zak to death and irritated myself because after that, I was not only hobbling with a very bruised foot, I had a cut and a bruise on the bridge of my nose), I could not face playing with bun dough.
But, I found when I awoke on the dirty floor of our garage, with blood coming out of my nose and Zak frantically shaking me, was that I had a sudden craving for nam sod.
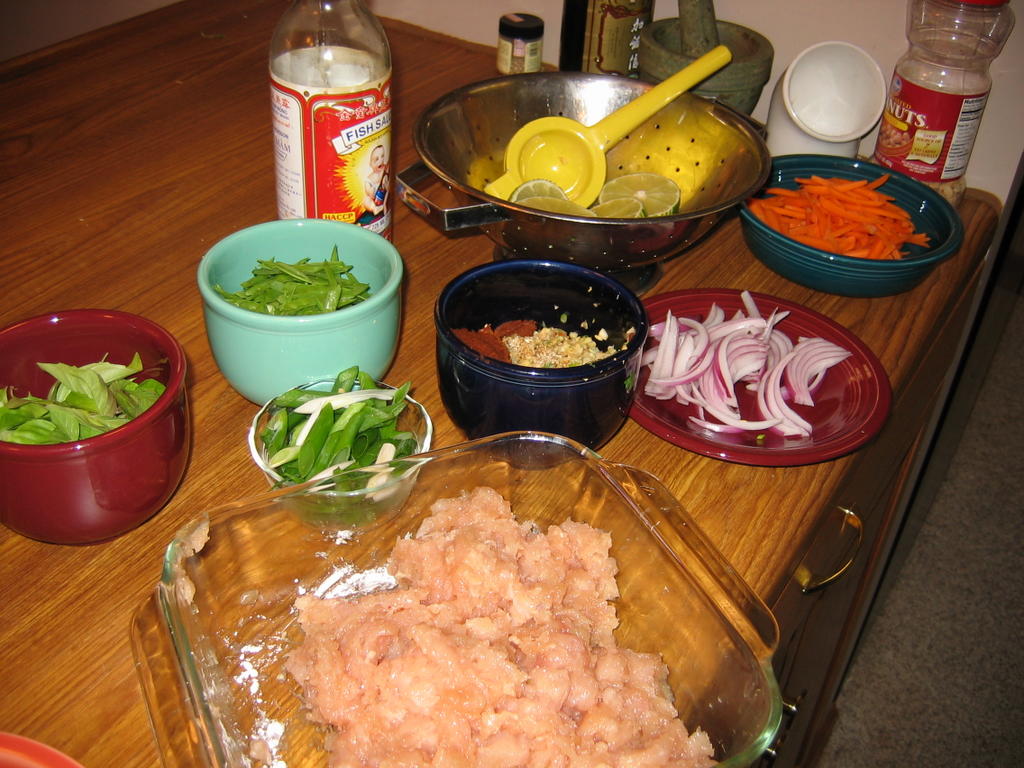
Nam sod is a wonderful Thai salad that is supposed to be made out of minced or ground pork. It is also supposed to have only some slivers of red onion, some herbs and minced ginger and chiles in it, and is garnished with crushed peanuts. The dressing is fish sauce and lime juice, though I have had it with sugar added to it, though I prefer the flavor without the sweetness.
My version, however, is made with hand minced chicken breast, julienned snow peas and carrots in addition to the red onion, lots of finely minced ginger, garlic and chiles, and has lots of herbs and sprouts to garnish it. I also discovered on Saturday night that really sweet, ripe cherry tomatoes are absolutely to die for as a garnish.
It tastes good the way I make it, even if it is so different from the original recipe that I shouldn’t even call it nam sod. But I wouldn’t know what else to call it, so there we are.
Besides, I patterned mine off of the nam sod they had on the menu at Siam Square in Providence, Rhode Island, which to this day, is still my favorite Thai restaurant anywhere, so there is precident for some of my unorthodox presentation. They, too, used minced chicken, which I know they minced by hand, because every time I ordered it, I could hear the chef pounding away at the chicken with two cleavers to mince it up finely and quickly. It wasn’t until I was well and truly addicted to it that I found out that it is supposed to be made of pork. When I tried it with pork, I didn’t like it, so, here’s the deal–you come to my house, I make nam sod–it is made with minced up chicken, and that is the way it is.
The slivers of red onion–that is orthodox nam sod. The slivers of snow peas and baby carrots–that is classic Barbara. The cilantro (and sometimes mint, when I have it) is traditional; the Thai basil and lime peel are my own innovations. The lightly crushed peanuts belong there; the tomatoes came about because they are in season, and shimmer like little gems when cut in half and sprinkled along the dish.
They also taste fantastic.
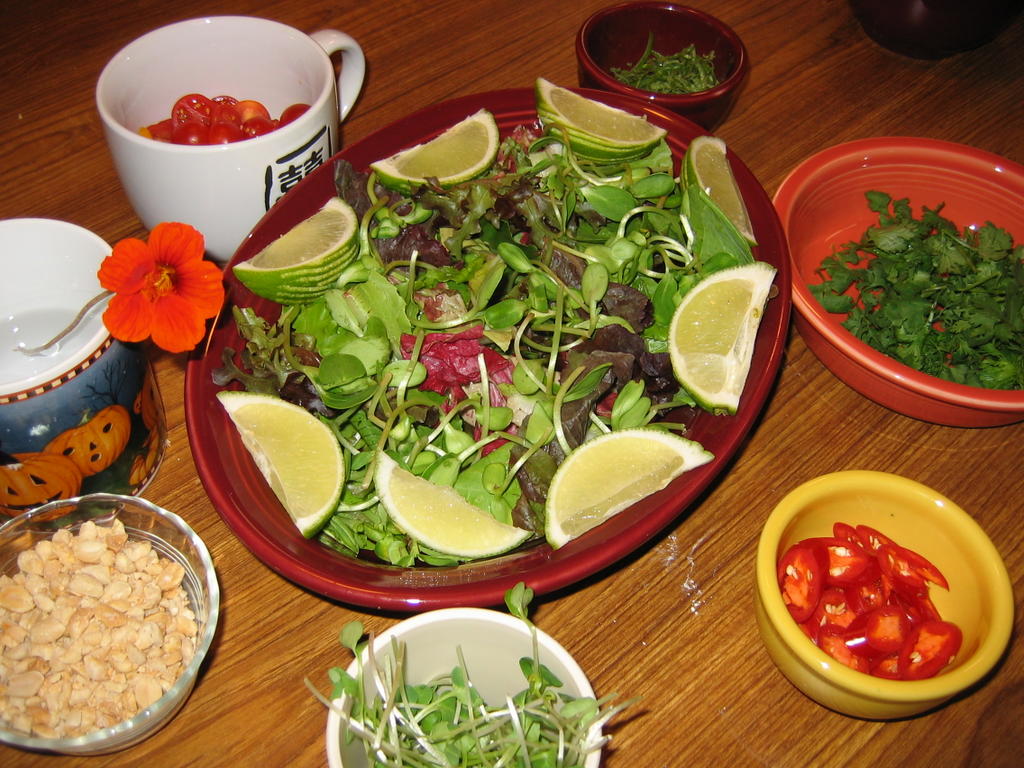 Edible flowers such as nasturtium blossoms are not a necessity to the dish, but they sure do look pretty. Lettuce in some form, however, is required. I like to use a salad mix with as many different colors, textures and flavors of greens as possible. As shown to the left, I have a mixture of leaf lettuces with romaine, radiccio and sunflower sprouts in the serving platter. I edged the platter with lime wedges so diners can snag a wedge and add more lime to the flavor mixture as they like.
I realized as we were eating the nam sod tonight, that this is yet another recipe that I learned at the behest of a friend, who upon visiting Providence while I was in culinary school, tried it at Siam Square and fell in love with it. In order to ensure that she would get to eat it again, she entreated me to learn how to make it, so I ordered it a few times, looked up some recipes and then started experimenting in the kitchen. Eventually, I came up with the version that I make to this day, and she said she liked it better than the one she had at the restaurant.
 At any rate, this is a very simple dish, and it can be dressed up or down with as many garnishes as you like. I loved the serrano chiles and cherry tomatoes in this version, and the radish sprouts really added a nice cooling zing to the moderately spicy dish.
You can also make it as hot and spicy as you like, simply by adding more Thai chiles or red curry paste to the dish. Or, you can add less.
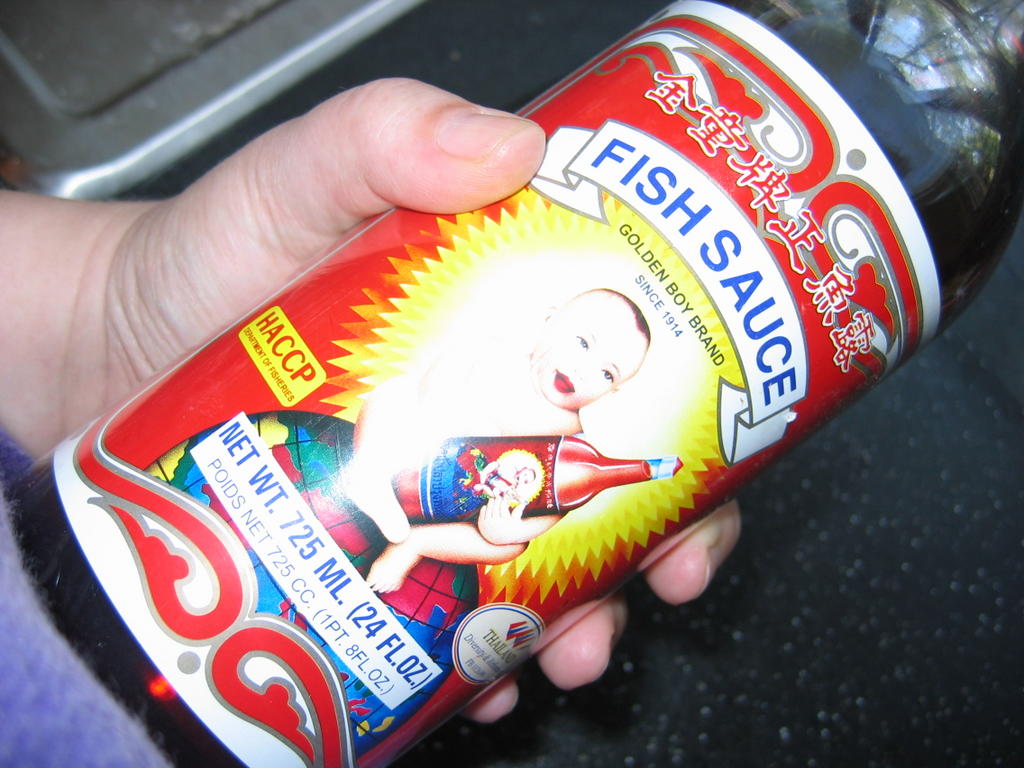
One thing you absolutely must not skimp on is the fish sauce. You must use a lot of it. And use good fish sauce. I prefer Golden Boy brand–you can recognize it by the little laughing Buddha-bellied baby boy on the label. He is a fat, happy little guy, holding a bottle of fish sauce in one hand and giving a thumb-up sign with the other while grinning like a big ole ‘possum. You can’t miss him. At any rate, that is one of the best fish sauces on the market–it has a very light flavor, and is tangy and salty without being overpoweringly so.
 Nam Sod
Ingredients:
1 1/2 pounds boneless skinless chicken breast
2 tablespoons fish sauce
1 1/2 tablespoons cornstarch
3 tablespoons peanut oil
5 cloves garlic, minced finely
1 1/2″ cube fresh ginger, peeled and minced finely
1-8 Thai chiles, minced finely
1 tablespoon Thai red curry paste
1 tablespoon cilantro stems and roots, washed well and minced finely
1 teaspoon freshly ground white peppercorns
fish sauce, to taste (about 2 tablespoons or so)
1 cup julienned slices carrot
1 cup julienned slices red onion
1 cup julienned slices snow peas (I cut them on the diagonal)
1 cup packed Thai basil leaves
1/4 cup mint leaves (optional)
zest of two limes, in thin strips
juice of two limes
1/2 cup lightly crushed peanuts
5 cups mixed greens, torn into bite sized pieces and laid on a serving platter
1 cup cilantro sprigs, rinsed and dried
3 red ripe serrano chiles, sliced on the diagonal (optional)
1 cup cherry tomato halves (optional)
1 cup radish sprouts (optional)
lime wedges for serving
Hot steamed jasmine rice for serving
Method:
Trim all membranes and most of the fat from the boneless skinless chicken breasts and remove all tendons. Cut the meat into a rough dice, then mince by hand. It should be unevenly done, with some larger pieces and some much finer–this is why it is easiest to do this by hand. Using a food processor or buying ground chicken results in a texture which is too uniform. (In order to see an example of of mincing chicken with two cleavers, there is a reference photograph in my post about minced chicken in lettuce cups.)
Mix chicken in a bowl with fish sauce and cornstarch and set aside in a bowl while prepping the vegetables and garnishes
Heat wok until smoking, add oil. When it is very hot, add minced garlic, ginger, chiles, curry paste, cilantro, and peppercorns and stir fry until very fragrant–about one minute. Add chicken all at once and stir fry, chopping at the chicken with the wok shovel to get it to stop sticking together. When chicken is half done (when roughly half of it is white and half is transluescent pink), add fish sauce.
When chicken is mostly done, add carrots and stir fry about thirty seconds, then add onions and stir fry until chicken is done. Add snow peas, herbs, lime zest and the juice of two limes, and continue stir frying until the herbs begin to wilt–about thirty or forty seconds.
Add half of the peanuts and stir to combine.
Pour contents of wok onto serving platter and mound decoratively. Scatter cilantro sprigs around and over mound.
Garnish with remaining peanuts and whatever garnishes you choose to use.
To serve, flatten a serving of rice on a plate, and scoop up nam sod, being certain to get some of the lettuce leaves, and put on top. Serve with a lettuce wedge on the side.
Notes:
If you do not have homemade curry paste in your freezer (I realize not everyone does), you can use Mae Ploy’s red curry paste. It comes in a resealable plastic tub that seems to last forever in the fridge.
You can make this as hot or as mild as you like depending on how many Thai chiles you use, and how much red curry paste you use. This batch was pretty mild–I actually used no Thai chiles whatsoever in making it and use fresh local serranos, which were mild even for serranos, and the curry paste.
Nasturtium blossoms make really stunning garnishes to top this recipe–especially since they taste nice and peppery, which goes well with the dish.
Weekend Cat Blogging: Animal Rescue Charities
 Grimalkin and Ozy are looking cozy in these photographs we took of them in our old house last year, but that is because they had a house to live in and a big pillow to lay on. (They still have a house, but it is a different one. That pillow, however, is long gone, I am sad to say.)
While I still urge everyone to donate to the American Red Cross and America’s Second Harvest to help take care of the thousands of people devastated by Hurricane Katrina, I would also like all the animal lovers out there to remember the displaced pets of that area.
Plenty of cats, dogs and other companion animals are without homes, food or shelter, and are often separated from their families. And many evacuees are traumatized by having to leave their pets behind, as reported on CNN.
So, this week’s Cat Blogging post is dedicated to giving links to some charities which are working to help save the pets of New Orleans, Alabama and Mississippi who are in need.
 Noah’s Wish is an organization dedicated to helping domestic animals who are caught in the middle of natural disasters. Friends of mine tell me that these folks do good work, so take a look at their website and maybe donate a little bit of cash, maybe the amount you would spend on a movie or dinner out.
They have already set up an emergency animal shelter in Louisinana and have an address where individuals can ship or drop off supplies such as food and medicines if you are in that area and want to help. They also offer volunteer training for those who are interested in helping out.
The Humane Society of the US is also working to help out the companion animals affected by Katrina. I don’t think I need to tell you who they are–their good works on behalf of domestic and wild animals is well known.
The HSUS also has information on disaster preparedness for your pets with lots of useful tips on how to safely evacuate and house your pets in the case of natural disaster.
You all know who the ASPCA is, or at least, I figure you do. The American Society for the Prevention of Cruelty to Animals also has a disaster relief fund set up to assist organizations and animal shelters who are there for the animals caught in the floodwaters of Katrina.
For more links to more pix of lots of other food bloggers happy, healthy and adorable cats, check out Clare’s place and gaze upon her adorable Kiri in a sailor suit.
Hurricane Relief Funds
New Orleans has always been one of my favorite cities, even if I have never visited it.
Full of history and a unique, life-loving culture, New Orleans is one of the cradles of jazz, and is a place that I always dreamt of visiting from the time I was small. I wanted to walk the square where Marie Laveau put on her Voodoo rituals, and dine on the spicy creole foods that were famous the world over. I wanted to dance to syncopated rhythyms of a blaring trumpet in the French Quarter, and I wanted to have my fortune told by Mambo Miriam at the Rampart Street Voodoo Temple. I wanted to eat beignets and sip bitter chicory coffee, and just watch people as they bustled past, their heads filled with thoughts, dreams and wonders of which I could only imagine.
My girlhood dreams may never come to pass.
And worse than that–the people who cook that glorious food, who play the raucous music, who bare their breasts and party in the streets crying, “Laissez le bon temps rouler!” are suffering. Some are dead and dying, and others are struggling to survive the aftermath of what may turn out to be the greatest natural disaster we have known in the United States.
The conditions in the shelters in New Orleans are horrific; there is very little food, water and medicine available to help those who need help desperately now.
So, that is why I am asking anyone and everyone who reads this blog to take the time to donate to the American Red Cross and America’s Second Harvest.
Please, open up your hearts to the thousands of people who have had thier homes, businesses, and jobs taken away.
Thank you.
August Flows into September: Will You Still Eat Locally?
 Well, I meant to talk a bit about the end of the August Local Eating Challenge yesterday, but life, in the form of a possibly broken foot, intervened. I took a tumble in the street yesterday, and have since been keeping my foot on ice, and elevated to no avail. Yes, I will be going to the doctor tomorrow, to have it x-rayed.
But on to more interesting things than my silly foot and its peculiarities.
Yesterday was the last day of August, so technically, the August Local Eating Challenge is at an end.
However, since I try all year around to obtain as much of my family’s food from local sources, my adventures in local eating will continue. I am pretty excited by some of the discoveries I made over the month, from the local tofu to the Holmes County, Ohio dairy products, so I am pretty psyched to continue my food sleuthing over the next season.
Also, as the photograph above attests, the Athens Farmer’s Market is starting to fill with the bounty of late summer and early autumn: tomatillos, onions, apples, greens, sweet potatoes, serrano chiles, elephant garlic, apples, pears and bitter melons. Yes, bitter melons!
Hopefully, this evening we will have chicken with bitter melon, made from mostly local ingredients. That is, if I am not in the ER having my foot x-rayed. Zak is being insistent that I go today.
At any rate, I’ll continue the series, “The Locavore’s Bookshelf;” I could only read so many books in one month, and I have several more titles I would like to feature. I never got around to doing my in-depth articles on the Athens Farmer’s Market, or on local businesses and farmers; there were too many back to school errands and paperwork bits to carry out for me to do as much writing as I wanted. That is no matter–I will do them as I come to them, throughout the year.
I still am curious to see if I can get a hold of locally grown and ground flour, and I would like to know if anyone around here grows corn that I can treat with lime and grind into my own masa. As the year turns, I will find these things out and report on them.
 My feeling is simple–eating local is not just something that I strive to do for one month out of the year. It is what I do, as naturally as breathing. Sure, it would be simpler if I just did all of our shopping at the local Krogers, but it wouldn’t be as much of an adventure, nor would dinner taste as good, nor would I trust it to be as healthy and nutritious as the foods that I find produced locally.
Besides, I feel good every time I visit the farmer’s market and “spend the time of day” as they say in the South, with the farmers and vendors. With every visit to the North Market in Columbus, I strengthen the bonds I have with the farmers who raise the beef, pork, goat and lamb we eat. It is good to create community in this way–it feels good knowing the people you buy your food from. It is fun to hear about what is going on in their lives and have them ask after you and your kids.
Human connections are as necessary for us to live and thrive as food is; eating locally satisfies both of those hungers.
I hope that everyone who participated in this challenge will go on to try and eat more local foods not just for one month out of the year, but for the rest of their lives, and in doing so, become a little closer to the folks who grow and produce that food. Anything we do that helps strengthen our bonds of kinship and community to other humans is a blessing.
Anyway, thanks for following along with me on my local foods journey–and I hope that in the months to come, I can uncover some more local food gems to share with you.
The Whole Enchilada Part III: The Tortillas
 The soul of the enchiladas isn’t the sauce, nor is it the filling.
It is the simple, humble tortilla.
Which is why I don’t make enchiladas with store-bought tortillas anymore. To put it bluntly, they suck. They taste like soggy cardboard and have a mealy texture. There is nothing about them that evokes the flavor or aroma of corn.
And corn is the essence of tortillas.
So, I make them fresh. At the moment, I do it with pre-ground masa that can be bought in five pound bags in Latin American markets; I do have some dried corn and slaked lime to use to make them really from scratch, following the directions put forth by Diana Kennedy. (I appreciate her a great deal; she is a woman after my own heart–dedicated to the point of obsessive when it comes to matters culinary.) I am just lacking a corn grinder; my Sumeet -can- grind the corn, but in the amounts needed for masa dough, I suspect it would be tedious to use the Multi-Grind to do the job. So, I am scouting around for a corn grinder of some sort in order to take up full-scale tortilla making. (After the corn grinder, my next step is to find a farmer to grow the proper kind of corn for me, so I can have locally made tortillas. At that point–who knows–maybe I wil start a tortilla factory.)
 The first time I made tortillas from scratch, I was surprised at two things. One, at how simple the process really was, and two, how -good- the tortillas tasted. They smelled like freshly parched corn–if you have ever smelled that–or stoneground cornmeal fresh from the hopper. They were heavenly to eat, too—the corn flavor comes through the highly seasoned sauce, the cheese and meat and really gives a structure not only to the enchiladas themselves, but to the layered flavors.
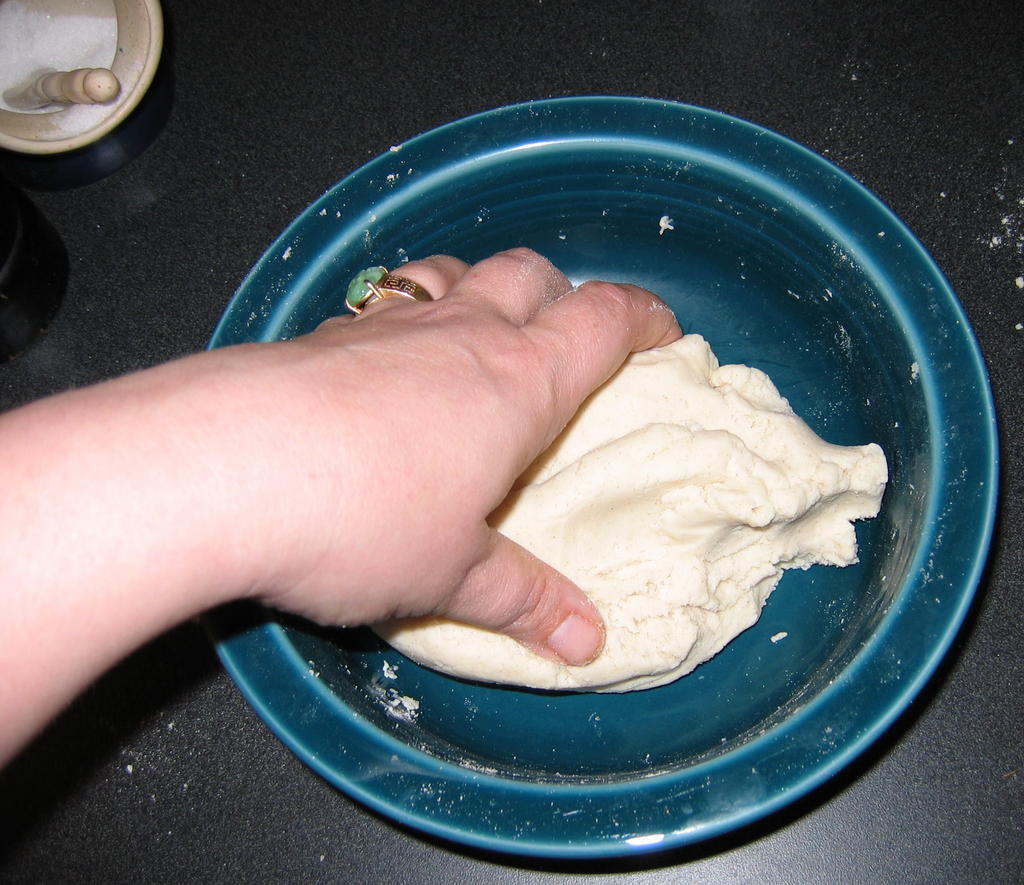
But making them–it was utterly foolproof. They are made with two ingredients: masa flour and water. You follow the directions on the package (I use Maseca brand) and add 1 1/8 cups of water to 2 cups of masa, and then knead it into a smooth dough by hand. You know it is ready when it takes on the texture and pliability of Play-Doh. Yes, Play-Doh. (That was my favorite toy as a kid–I was always “baking” things with it. Are we surprised? No, I suspect not.)
At that point, it is time to divide the dough into sixteen equal balls.
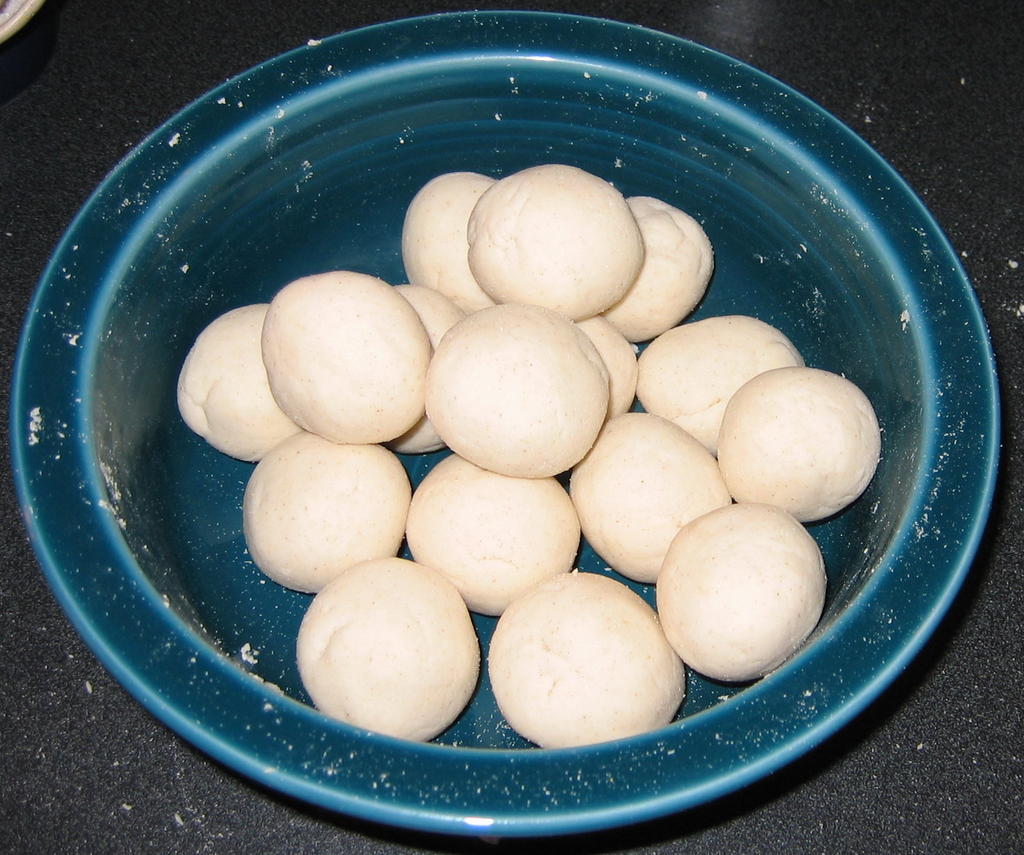 I do this by rolling into one ball and then cutting it into quarters. These I roll into balls and cut in half, which gives me eighths. Each eighth, I roll into a ball and cut in half, and voila! Sixteenths, which I roll into equal sized, smooth balls, pile back into the mixing bowl and cover with a damp towel while I start pressing and cooking the tortillas.
Now, we need to talk about tortilla presses.
I know that there are a lot of very practiced abuelas out in the world who eschew tortilla presses and pat the masa out by hand into beautiful, flat, thin cakes. Well, I am not one of them. I am a gringa who didn’t grow up eating real, live corn tortillas and watching my mamma pat them out by hand, so I have no clue. Hell, I went to culinary school and can’t toss pizza dough without endangering the ceiling, so patting tortillas by hand is not going to happen.
And if you are anything like me, and I bet that you are, you need a tortilla press.
You can get cheap aluminum ones anywhere it seems, and my first one was one of those.
I ended up hating the damned thing, and gave it away to the Salvation Army. Who knows what someone picked it up to use it for, but there we are.
 The kind of tortilla press you need is a cast iron one that is nice and heavy. They are made in Mexico and you have to use very little pressure to make nice thin tortillas. You can get them in various sizes, and they aren’t very expensive, and from what I can tell, they will last until the world ends, so if you get one, expect to pass it down to your great-grandchildren. I bought mine here.
To use the tortilla press, you want to line both the top and the bottom with plastic. Some folks use plastic wrap, but I sacrificed a nice heavy Ziploc bag by cutting it apart and have used that for months now. You just wipe it clean with a damp cloth and put it away with the tortilla press. The plastic keeps the tortillas from sticking to the press and making a godawful mess.
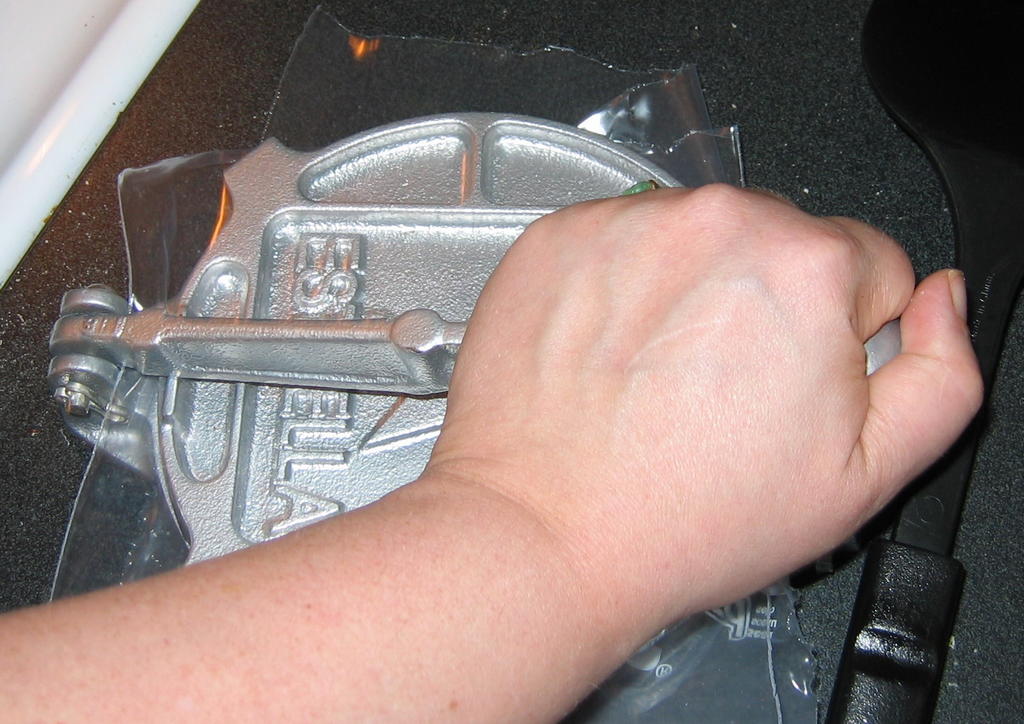 What you do is just put one piece of plastic on the bottom, put the ball of dough slightly off-center on the press, flatten it slightly with your palm, place the other piece of plastic over it, and then close the press. Bring the lever down with mild pressure, then lift up, and voila!
You have a tortilla.
Pick it up with the sheets of plastic, and peel off the top sheet, then the bottom sheet, and flip it into your preheated cast iron pan.
Ah, the pan.
You can use a traditional flat Mexican griddle called a comal, but you don’t have to. I just use the well-seasoned lid to a deep cast iron skillet, turned upside down. (This particular piece is meant to be used as griddle anyway.)
Just remember not to grease your cooking surface in any way, and get it nice and hot before you lay a tortilla down on it.
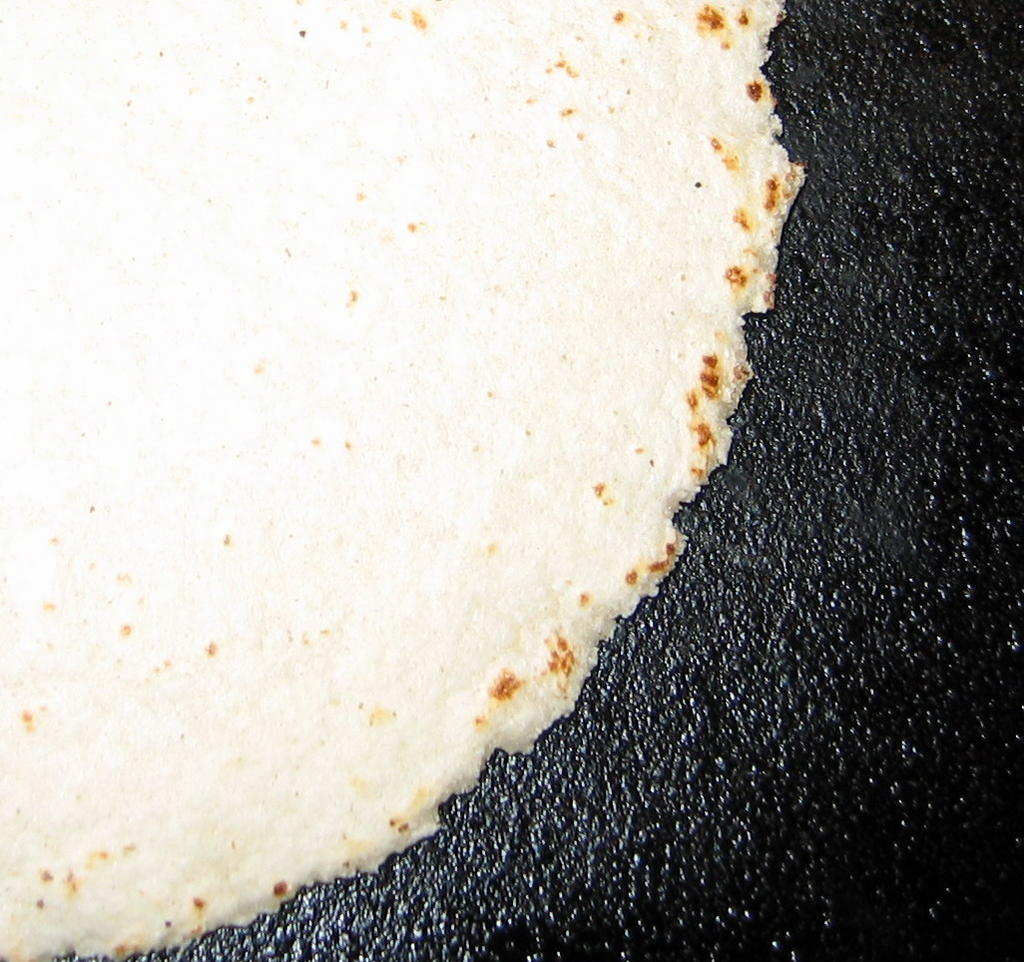 I use high heat and cook it for about forty-five seconds to a minute on the first side, then flip it once, and cook it about the same on the other side. When you flip it, there should be some browned freckles on the cooked side, as shown at left.
Unlike leavened pancakes, tortillas don’t really give you any visible sign that they are getting cooked, except they smell like nice toasty corn. But there are no bubbles, no sizzling, nothing. They just bake silently and stealthily on the smooth cast iron, which means the first ones you make, you will flip them more than once, maybe more than twice, until you get a feel for how long they need to cook.
 I have found that if I am cooking alone, that if I take a tortilla out of the press, and lay it on the hot pan, I have enough time to lay the plastic down, put out another masa ball and play with the upper sheet of plastic and press it, before I need to flip the cooking tortilla. After I flip it, I open the press, peel the plastic away, then scoop up the first tortilla and lay down the second one into the its place on the hot iron.
If I am cooking by myself, I usually put the tortillas into one of those big heavy plastic tortilla keepers to keep them nice, warm and pliable.
However, if you are working with a second person, you can toss the cooked tortillas directly on a work surface, and they can fill and shape them, then lay them in a pan to await the drizzle of sauce and sprinkle of cheese.
I always put cheese -in- my enchiladas as well as on them, along with whatever shredded meat I have, some black or pinto beans, and lots of cilantro. Sometimes I add strips of fire roasted bell or poblano peppers as well, particularly if I am making vegetarian enchiladas.
 Then, I fold them up into half-moon or taco shapes, rather than roll them. Unless I am in a mood for stacked enchiladas–then I layer sauce on the bottom of the pan, then tortillas to cover it, then cheese, fillings and sauce and tortillas, sauce, fillings, cheese and tortillas, then sauce and cheese. It is kind of a Mexican casserole thing–sort of a New World lasagne.
Whether I fold or stack them, I always spray my baking pan with some canola oil spray and then spread a couple of tablespoons of sauce in the bottom to keep the enchiladas from drying out or sticking. Then, I layer them in whatever fashion until the pan is full, then ladle sauce over them in strips. I don’t completely inundate them with sauce; I generally leave some edges of the tortillas out in the open to brown and get nice and crispy for a textural contrast. Then, I sprinkle cheese over and bake them–and when they come out of the oven, a bit of roughly chopped cilantro goes over it all.
 Master Recipe for Enchiladas
Ingredients:
32 freshly made corn tortillas
1 pound of shredded cheese, preferably a mixture of queso blanco and sharp cheddar
1 pound of shredded meat filling
2 cups or so of sauce (verde or Colorado)
1-2 cups of cooked black or pinto beans or strips of fire roasted sweet or poblano peppers, or grilled corn cut from the cob, or caramelized onions or sauteed bitter greens such as kale or collards (or all of the above)
1 cup roughly chopped fresh cilantro
1 cup sliced scallions (optional)
canola oil spray or canola oil
Method:
Preheat oven to 375 degrees.
Spray three 9″X9″ glass baking pans with canola oil and spread the bottom with a couple of tablespoons of sauce.
Lay a tortilla flat on work surface, and sprinkle with a tablespoon or so of cheese, then the fillings of your choice. I like to make certain to include some fresh cilantro and/or some scallion slices in the filling.
Fold the tortilla into a half-moon shape over the filling, and lay half-upright in the baking dish. Continue with all other tortillas, fitting about ten or eleven or so enchiladas per pan. When they are all fitted in, pour a ladleful of sauce down each row of tortillas and top with more shredded cheese.
Bake for 20-30 minutes, or until cheese is melted and bubbly and the sauce is molten, and the exposed bits of tortilla are crispy. As soon as you remove them from the oven, sprinkle with more cilantro and/or scallions, to allow the garnish to wilt slightly.
Garnish with fresh salsa, guacamole and sour cream, if you wish.

Categories:
- Admin (rss) (55)
- Blogs and Blogging (rss) (81)
- Book Reviews: Cookbooks (rss) (43)
- Book Reviews: Non-Cookbook Food Books (rss) (38)
- Cats and Cat Blogging (rss) (47)
- Chinese Cooking Lessons (rss) (32)
- Culinary School Stories (rss) (18)
- Dairy Pruducts: Cultured and Barbaric (rss) (4)
- Documentary Filmmaking (rss) (1)
- Essays, Rants and Reflections (rss) (260)
- Fighting Hunger (rss) (12)
- Food and Kids (rss) (45)
- Food in the News (rss) (126)
- Food Media (rss) (98)
- Food Preservation (rss) (18)
- Food Safety (rss) (45)
- Gardening (rss) (30)
- Herbs and Herb Blogging (rss) (20)
- Holidays (rss) (50)
- Kat Blogging (rss) (22)
- Kitchen Science (rss) (36)
- Leftover Makeover (rss) (8)
- Life, the Universe and Everything (rss) (131)
- Local and Sustainable (rss) (227)
- Local Athens Food and Foodies (rss) (42)
- Meatless Mondays (rss) (32)
- Menu For Hope (rss) (5)
- Nutrition, Diet and Health (rss) (84)
- On The Farm (rss) (8)
- Recipes: Almost Vegetarian, Vegetarian and Vegan (rss) (294)
- Recipes: American Regional (rss) (37)
- Recipes: Appalachian Hillbilly (rss) (33)
- Recipes: Bread, Pasta, Grains (rss) (95)
- Recipes: Canning and Preserving (rss) (8)
- Recipes: Chinese (rss) (123)
- Recipes: Comfort Food (rss) (120)
- Recipes: Cookies (rss) (16)
- Recipes: Desserts (rss) (48)
- Recipes: French (rss) (25)
- Recipes: Fruits and Vegetables (rss) (302)
- Recipes: Greek, North African and Middle Eastern (rss) (31)
- Recipes: Indian (rss) (137)
- Recipes: Italian (rss) (42)
- Recipes: Japanese (rss) (7)
- Recipes: Jewish (rss) (4)
- Recipes: Korean (rss) (6)
- Recipes: Meat, Poultry and Fish (rss) (220)
- Recipes: Mexican/Native American/ Latin American/Caribb (rss) (27)
- Recipes: Original (rss) (108)
- Recipes: Thai (rss) (27)
- Recipes: Tofu (rss) (17)
- Recipes: US Regional (rss) (16)
- Recipes: Vietnamese (rss) (8)
- Restaurant Stories (rss) (28)
- Sewing, Quilting, Arts and Crafts (rss) (16)
- Simple Chinese Recipes (rss) (30)
- Slow Food and Heritage Foods (rss) (10)
- Spice Blogging (rss) (44)
- The Chinese Cookbook Project (rss) (14)
- The Chinese Pantry (rss) (39)
- The Documentary (rss) (2)
- The Kitchen Saga (rss) (17)
- The Locavore's Bookshelf (rss) (15)
- The Unsung Adventures of The Culinary Nerd (rss) (6)
- Tools and Toys (rss) (35)
- Uncategorized (rss) (10)
- With a Side of Politics (rss) (48)
Archives:
- August 2012 (9)
- July 2012 (12)
- September 2011 (3)
- August 2011 (7)
- July 2011 (8)
- June 2011 (16)
- May 2011 (17)
- April 2011 (11)
- December 2010 (9)
- November 2010 (5)
- February 2010 (1)
- December 2009 (5)
- November 2009 (7)
- October 2009 (10)
- September 2009 (16)
- August 2009 (14)
- July 2009 (14)
- June 2009 (7)
- May 2009 (17)
- April 2009 (10)
- March 2009 (25)
- February 2009 (13)
- January 2009 (10)
- December 2008 (5)
- November 2008 (5)
- October 2008 (6)
- September 2008 (13)
- August 2008 (8)
- July 2008 (11)
- June 2008 (18)
- May 2008 (13)
- April 2008 (14)
- March 2008 (16)
- February 2008 (17)
- January 2008 (19)
- December 2007 (25)
- November 2007 (18)
- October 2007 (24)
- September 2007 (16)
- August 2007 (15)
- July 2007 (15)
- June 2007 (10)
- May 2007 (14)
- April 2007 (16)
- March 2007 (17)
- February 2007 (20)
- January 2007 (13)
- November 2006 (1)
- October 2006 (8)
- September 2006 (14)
- August 2006 (25)
- July 2006 (30)
- June 2006 (28)
- May 2006 (34)
- April 2006 (29)
- March 2006 (24)
- February 2006 (30)
- January 2006 (38)
- December 2005 (40)
- November 2005 (37)
- October 2005 (32)
- September 2005 (25)
- August 2005 (30)
- July 2005 (28)
- June 2005 (21)
- May 2005 (8)
- April 2005 (22)
- March 2005 (17)
- February 2005 (29)
- January 2005 (10)
Search Site:
Links:
- Lily’s Wai Sek Hong
- 101 Cookbooks
- A cat in the kitchen
- A Veggie Venture
- Accidental Hedonist
- Cha Xiu Bao
- chez pim
- Chocolate & Zucchini
- Chopstick Cinema
- Chowhound.com
- Chubby Hubby
- Cook sister!
- Cooking with Amy
- da*xiang
- Eat Local Challenge
- Eating Liberally
- Ecocentric
- Eggbeater
- Epicurious
- Farmgirl Fare
- Fatfree Vegan
- Foodgoat
- ForkandBottle.com
- Green Olive Tree
- Hooked on Heat
- Jaden’s Steamy Kitchen
- Kalyn’s Kitchen
- Lucullian delights
- Mahanandi
- Matt Bites
- MeatHenge
- mmm-yoso!!!
- New York Times – Dining & Wine
- Pizza Goon
- Rasa Malaysia
- Ruhlman
- Sailu's Kitchen
- Serious Eats
- SF Gate: Food & Dining
- Simply Recipes
- Soul Fusion Kitchen
- Tastespotting
- The Amateur Gourmet
- The Cleaner Plate Club
- The Food Section
- The Grub Report
- thecookscottage
- U.S. Food Policy
- Wandering Chopsticks
- Washington Post Food and Dining
- Wasted Food
Meta:

Powered by WordPress. Graphics by Zak Kramer.
Design update by Daniel Trout.
Entries and comments feeds.