Cook Local, Eat Global
More Food in the News
 Lunch Doesn’t Have to Suck
More schools and universities seem to be jumping on the sustainable, local agriculture bandwagon. Yet another story hits the New York Times on the subject of public and private schools seeking locally grown alternatives to the products of corporate agriculture.
One reason cited for the growth of this trend is the attempt by administrators to get kids and young adults to eat more healthy food as a means to fight the growing obesity epidemic. Even though transitioning to locally grown foods often leads to higher food costs, especially in the short term, many administrators are sold on the idea of helping kids learn to like and eat more healthy foods.
“Children’s obesity issues have highlighted the farm to school program,” said Marion Kalb, director of the national farm to school program for the Community Food Security Coalition. “It appeals to taste as well as nutrition and how to get kids to change their eating habits.” The nonprofit coalition works to build sustainable food systems that ensure access to affordable, nutritious food.
Another factor cited in the article for the growing number of school systems turning to local alternatives is the rapid increase in oil prices.
Considering that oil just reached a record seventy dollars a barrel today, and might go over one hundred dollars a barrel due to the devestation of Hurricane Katrina, my prediction that prices for non-locally produced fresh foods will jump may come true sooner than I had expected.
I will make another prediction: I think that more and more institutions like schools will turn toward locally produced food as the artificially low prices on non-local petroleum-based agricultural products begin their inevitable rise. I also think that we will see more farmer’s markets open up, and more small farmers get into the game as demand rises for local products.
Why the Hell is Organic Food So Damned Expensive, Anyway?
So, now that I have your attention, I want you all to trot on over to Grist Magazine and read this article by Christy Harrison. You remember that irritating column by Julie Powell in the New York Times, where she claimed that those of us who eat organic food are a bunch of elitist food snobs and railed about how awful it was that the stuff was so expensive? Remember how shallow it was, in that it pointed out a problem in regards to organic food production, but didn’t give any thought as to why that might be, and instead decided to fling accusations and call people names? (Artful mudslinging is a hallmark of fine yellow journalism.)
Well, this article answers some of the legitimate questions that were raised in her column, and explains, in a much more succinct fashion than I could manage myself, why organic produce is often more expensive in the grocery store than its conventionally produced corporate counterparts. (It does ignore the basic fact that if you buy at a farmer’s market, that same organic food is often cheaper than the price they charge in a grocery store, but that is apparently a side issue.)
Here’s a little peek at what is inside the article:
“Conventional crops are heavily subsidized by the federal government in the United States, making them artificially inexpensive. Couple those subsidies — which have been in place since the New Deal — with the cost of cleaning up pollution and treating health problems created by conventional farming, and we’re paying a lot in taxes in order to pay a pittance at the grocery store.
“When we make the argument that low-income people can’t afford organics, we’re assuming that the prices of conventionals are the prices we should be paying,” says a USDA economic researcher who asked to remain anonymous. “But those prices externalize a lot of costs, like pollution and higher energy inputs.”
A study last year by Iowa State University economists showed that the annual external costs of U.S. agriculture — accounting for impacts such as erosion, water pollution, and damage to wildlife — fall between $5 billion and $16 billion. (For context, that’s as much as twice the EPA’s 2005 budget.) And Michael Duffy, a coauthor of the Iowa paper, says his team’s estimate is conservative.”
There is a lot more in that gem–it is worth a read–trust me.
How to Find a Mad Cow
Now, y’all just know it wouldn’t be Food in the News at Tigers & Strawberries if I didn’t make some mention of BSE. Yes, bovine spongiform encephalopathy is one of my favorite hobby horses, because it is a nightmare of humanity’s own making; someone, somewhere, at some time thought it might be a good idea to feed an herbivorous life-form protein rendered from meat. More specifically, some dipshit took a dead cow, rendered it down into cattle feed and fed it to live cows, and thought that was just fine and dandy.
Right.
My grandpa never went to college, but he raised cows most of his life, and he could have told said dipshit exactly why that was a bad idea. “Cows were meant to eat grass! They are built to eat it. If they were meant to eat meat, they’d have teeth like dogs or cats!” I can hear him ranting now.
Well, anyway, the news this week is, there may be a new test on the way to detect BSE and its human counterpart, Creutzfeld-Jakob disease, in the bloodstream of cattle and humans before they show symptoms or drop dead with holes in their brains. Basically, it increases the number of prions already present in a given blood sample in order to make them detectible. This would eliminate the need for samples of brain tissue to confirm a case of BSE.
This new procedure has the potential to help prevent the spread of the human form of the disease through transfusions, and it might make it easier to diagnose and destroy sick cattle before there is a risk of them wandering into our food supply.
Well, it might help keep sick cows out of our food supply so long as the USDA actually went to the effort of testing a decent number of the cows in the US herds. And since the USDA doesn’t seem overly eager to test very many cows in the first place, I am not so certain that it would work.
But it is a nice idea, and I applaud the fine researchers at the University of Texas Medical Branch at Galveston for coming up with the procedure.
It isn’t their fault that the USDA is in the pocket of the cattle industry.
And with that sarcastic remark, thus concludes the second installment of Food in the News.
Y’all eat well, now, y’hear?
The Whole Enchilada Part II: Filling and Fixin’s
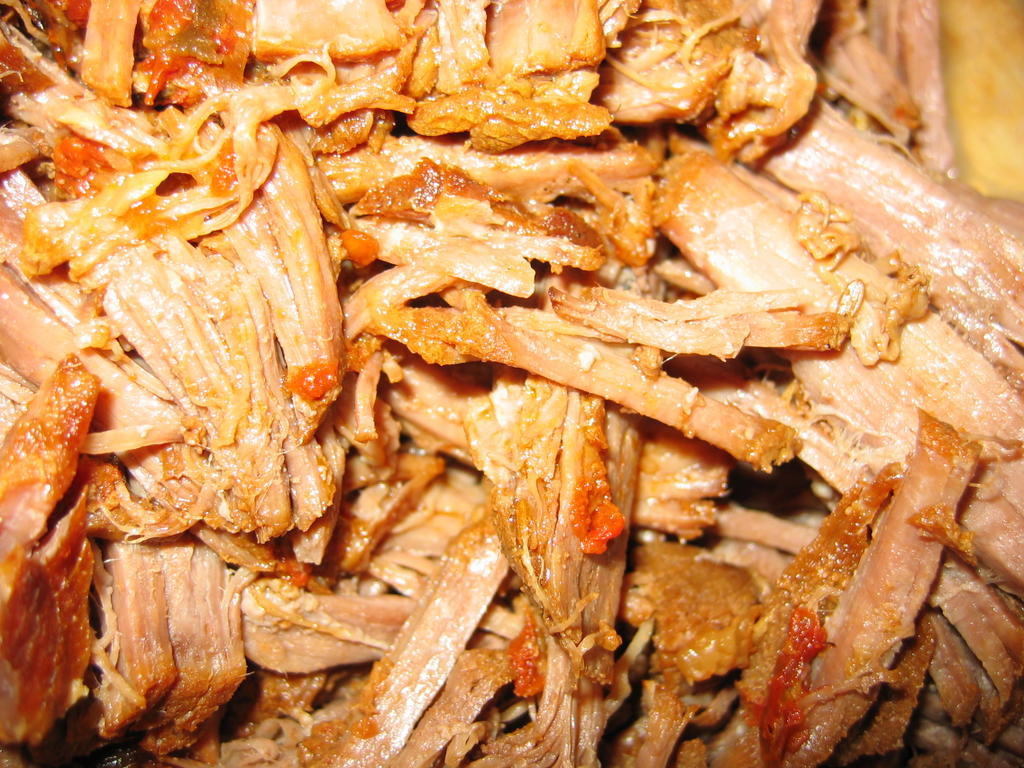 I like shredded meat fillings in enchiladas, which I will often mix with beans or strips of fire roasted poblano chiles. For vegetarian fillings, I will use the beans and poblano strips, mixed perhaps with roasted sweet bell pepper strips, and sauteed bitter greens like kale or collards.
No matter what filling I use, there is always cheese. I like to use a mixture of sharp cheddar cheese and queso blanco. Queso blanco is a white Mexican cheese that melts beautifully into a creamy, buttery-flavored mass. A decent substitute is montery jack cheese, but I like the nutty-buttery flavor of queso blanco better.
The wonderful thing about making a shredded meat filling is that the cooking liquid can eventually be used as the foundation of the Colorado sauce; if I don’t want to use it right away, I will cool it completely to room temperature, and then put it into a freezer container and freeze it to either reuse the next time I make shredded meat or for the basis of a sauce or a soup.
Any kind of meat can be shredded successfully: pork, beef, chicken, lamb and game all make very nice shredded meat fillings. The key is choosing the right cut of meat to braise and eventually shred.
For pork, I prefer the shoulder or the Boston butt. For beef, the chuck roast (either bone in or boned) has immense beefy flavor and a texture that shreds beautifully. To make shredded chicken, an older stewing chicken is a must. Lamb shanks make lovely shredded lamb; you can also use the shoulder roast or a leg roast, particularly if you can get one from an older animal. For shredded venison, the haunch is a great cut to braise.
Once you have the correct cut of meat, you need to decide how much time you have to spend on braising it. If you have all day, by all means stick it in a stewpot and simmer as long as you need to until the meat is tender and falling off the bones, and all of the fat and connective tissues have melted and dissolved into gelatin. Whatever you do–do not underestimate how much time you will need to bring the meat to the point where it is falling-apart tender; each cut of meat from each animal is individual and unique, and sometimes they just plain take longer to cook, and it is better to have a late dinner that is fantastic than a meal that is on time, with tough, dried out meat.
If you have any thought that you may not have time to braise your meat properly, I suggest you run right out and buy a pressure cooker. This instant. Go, go, go. It is quite simply, the best investment for a cook who lacks time to spend all day in the kitchen. A pressure cooker works simply–you seal up your food item in the cooker with an amount of boiling water. When the steam cannot escape, it creates pressure within the cooking chamber–usually up to 15 psi, which raises the temperature at which water boils, and has the effect of cooking foods faster.
Using a pressure cooker to braise meats is like having a fail-safe device to obtain fork-tender meat with a minimum of time and effort. There are just a few rules to be aware of: after you have cooked your meat the recommended amount of time, do not immediately release the pressure by pressing the “quick release” valve, especially if you are cooking beef. Instead, take the pressure cooker off the heat, and allow it to release the pressure slowly and naturally over a fifteen or twenty minute period. If you use the quick release method, the fast temperature and pressure inversion has the potential to take your very tender, succulent meat and turn it into a tough, chewy mess. For some reason, the tissues in beef will often firm back up when treated in this way.
 Making shredded meat fillings is so simple, I have never had a recipe for them, but for the blogosphere, I will write it down now. Instead of giving a specific recipe for a specific meat, I will write this as generally as possible, so that one can use it as a master recipe to be altered depending on what cut of meat one uses.
Shredded Meat Filling
Ingredients:
Piece of meat, about two and a half pounds, bone in or not
3 cloves garlic, sliced thinly
2-3 tablespoons olive oil or bacon grease
1 onion, sliced thinly
2 cloves garlic, minced
1 chipotle en adobo
1 teaspoon freshly ground cumin
1 tablespoon freshly ground coriander (The spices can be varied to taste–see suggestions below)
2 quarts broth or stock to match meat (For pork or lamb one can use commercial vegetable or chicken broth; for venison, one can use beef broth.)
1 bottle lager beer
1 bay leaf
1 pinch Mexican oregano, or regular oregano
1 pound fire roasted fresh tomatoes, seeded and peeled, then cut up (Or, use 1 can Muir Glen fire roasted diced tomatoes.)
1 ripe (not green) sweet pepper, fire roasted, peeled, seeded and diced
salt and black pepper to taste
Method:
Cut meat up into managable chunks. (If using a whole stewing chicken, cut as if you were going to fry it, except don’t separate thighs from legs and wings from breast, and leave back and neck in the pot so that all the flavor is extracted from them during cooking.) For a beef chuck roast of about two pounds or so, I usually cut it into four or six pieces depending on whether or not I have a bone in the roast. (Bones are good for adding flavor to the cooking liquid, so do not be afraid of using roasts with the bones.)
Cut slits into the meat with the tip of a sharp knife, and insert slices of garlic into slits. (With chicken, you can insert the garlic under the skin if you don’t want to pierce the meat.)
Heat up oil in the bottom of your stew pot or pressure cooker until it is quite hot and add onions. Cook, stirring constantly, until the onions turn a medium brown. Add garlic, chile and spices, and cook a few more seconds, until the whole is very fragrant. Add meat and brown on all sides.
Add the rest of the ingredients and bring to a boil. If you are using the pressure cooker, cover with the lid, lock it down, and bring up to full pressure, then turn the heat down to low, and allow to cook for the manufacturer’s recommended time, and release pressure naturally as discussed above. If you are using a regular stew or stockpot, turn heat down, skim any scum off the top of the broth, cover and allow to simmer until the meat is so tender it falls off the bones, or when you stick a meat fork into it, it falls apart and the fork can be pulled out without the meat chunk sticking to it and coming out of the pot with it.
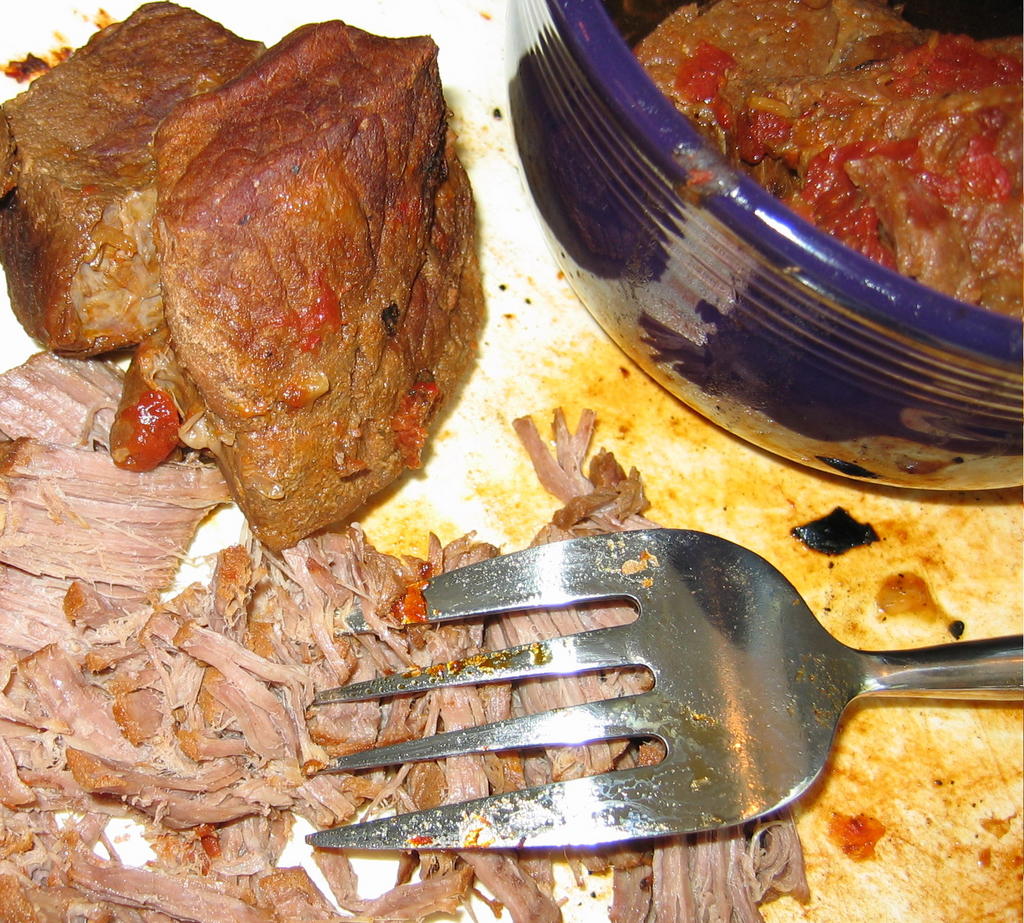
When meat is done, pull it out of the liquid, set it on a plate and allow to cool until you can easily handle it. Remove all hunks of skin, fat and connective tissue, and with a fork, gently shred the meat. Generally, I hold the fork tines down, as if I was holding a piece of meat to cut it, and hold the piece of meat steady with my other hand, and in a gentle up and down motion, attack the meat with the fork, tearing it into thin shreds.
Any accumulated juices on the plate should be poured over the meat. (You can also moisten the meat with some of the cooking liquid–this helps keep it from drying out while you wait to fill the enchiladas.)
Cover the meat until it is to be used as a filling.
Notes:
Spices can be varied according to what meat one is using. For beef, I use more cumin and less coriander, and a lot of black pepper and some dried or fresh thyme. For pork, I use more coriander than cumin, about a teaspoon of juniper berries, and a little bit of rosemary. For chicken, I use sage and rosemary, more coriander than cumin, and a pinch of allspice. For lamb, I use rosemary and thyme, more garlic and a lot of ground black or white pepper. For venison, I use lots of garlic and thyme, a teaspoon and a half of juniper berries and a lot of black pepper.
To use the cooking liquid, it is best if you remove as much fat as possible before using it to make a sauce; to do so, cool it completely and the fat will congeal at the top, making it simple to lift out by hand or with a spoon. I like to leave some fat, though–that is where the flavor is, and it will make a sauce with more body than a completely defatted broth will.
Shredded meat can be further seasoned, if you wish, with caramelized onions, roasted sweet or hot peppers or more spices. Ths is great to do if you are using it as taco meat, but if you are using it for enchiladas, which have a sauce, it is not necessary. For tamale filling, it is customary to mix the meat with a sauce before using it to fill the little masa packets, so extra seasoning is usually not necessary. Remember, you want people to be able to taste the meat, not just the sauces and spices.
 When I make enchiladas, I always make guacomole to serve on the side. With enchiladas Colorado, it provides a lovely contrast in color; with enchiladas verde, it provides a contrast in texture and especially in flavor.
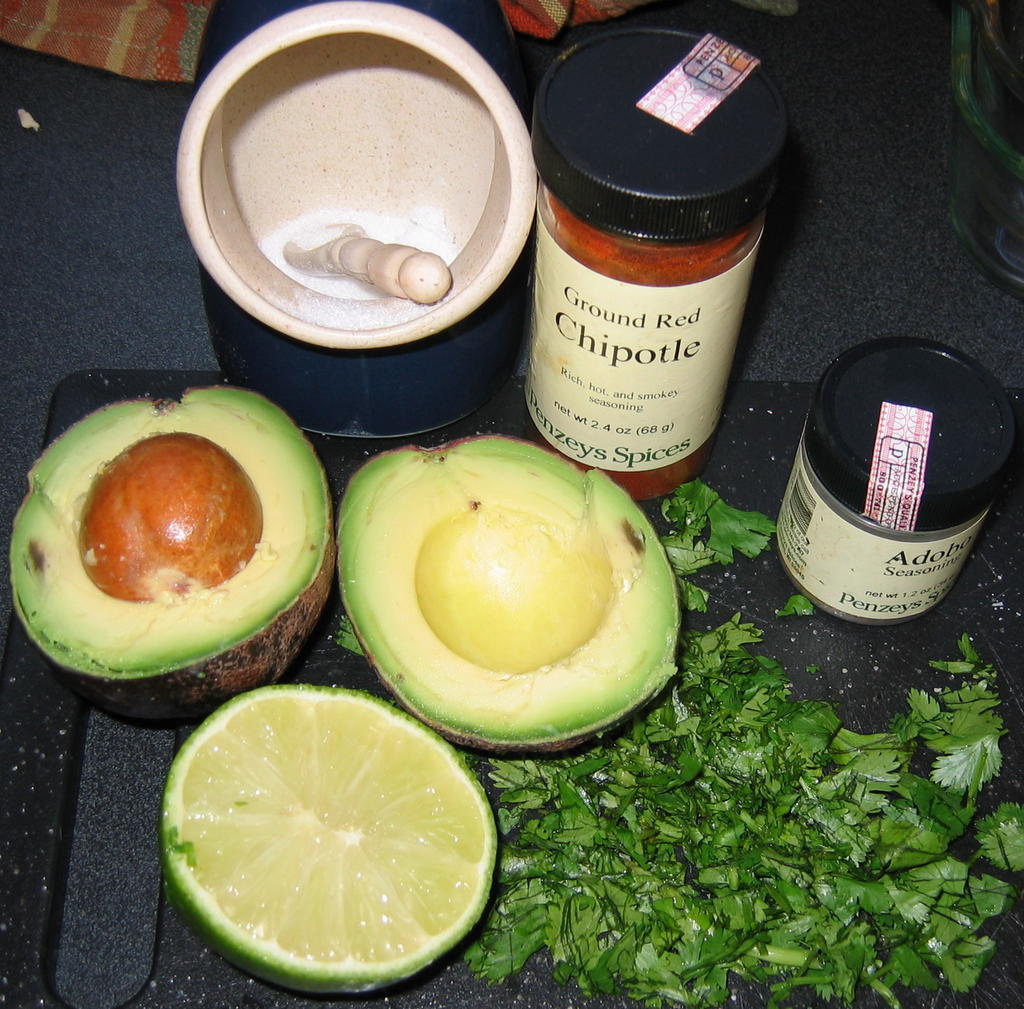
Quacamole is one of those recipes where less is more. The first homemade quacamole I had included either sour cream or Miracle Whip salad dressing, and while that was tasty, I have come to love a more traditional, minimalist’s version where the richness of the avocado is offset by the smoky warmth of ground chipotle, the bite of raw garlic and the sparkle or lime juice. I finish it off with salt, a tiny sprinkling of adobo seasoning or ground cumin (about a pinch’s worth) and freshly chopped cilantro. Anything else seems to muddle the flavors and cover the natural beauty of the avocado.
Oh, and I only use Haas avocados–those are the bumpy-skinned black ones about the size of my palm that make me really understand why avocados are sometimes called “alligator pears.” They have a fuller flavor and better texture than those big bright green waxy-skinned ones. I always choose ones that are fairly soft, as well, without being completely squishy–I like mine a little less ripe than other people do, apparently. But they should give to gentle pressure without threatening to burst and go “spoo” all over the place. The really mushy ones like that are either overly ripe or have been bruised and pummelled about and will make really ugly quacamole.
 Guacamole
Ingredients:
1 good sized, ripe Haas avocado
1 lime
1 small clove garlic, minced
1/4 cup freshly chopped cilantro
salt to taste
ground chipotle to taste
1 pinch ground cumin or adobo seasoning
Method:
Cut avocado in half, and remove pit. Squeeze pulp into a small bowl.
Squeeze the juice from half the lime over pulp, add minced garlic and cilantro. Mash avocado to a lumpy paste (smoothly pureed guacomole is yucky, in my opinion) and add salt, chipotle and cumin or adobo seasoning to taste.
If the avocado is particularly rich, you may need to add just a bit of the rest of the juice from the other half of the lime.
Notes:
How do you keep your guacamole from turning brown? Do not expose it to the air. I usually manage this by making it right before I serve it, but if you are making a bunch of it for a party, you can do this by doing as late as you can before your party, and then when it is done, covering the top completely with plastic wrap that is set down completely over the surface of the avocado pulp, sealing out the air. The myth about the pit stopping the browning is just that–a myth–Harold McGee debunked it in his book, “The Curious Cook” years ago.
Weekend Cat Blogging: Grimalkin
 Here is Grimalkin, also known as Grimmy, Grimble, Grimblkins, Grimsy and Gimblekitten. You have seen my round busybody girl cat here before.
For such a round cat, Grimmy is certainly acrobatic, however, in today’s photo, she is just sitting on a box which contains some shelves that should be assembled and hanging on the wall above my keyboard in my office, but currently are useful as a cat platform. She is peering around my desk; it is her favorite place to sleep and keep me company when I write.
I hate to take it away from her, which is my excuse for not building the shelves.
The real reason is that they are going to be beastly to build, but Grimmy’s continued happy presence gives me a really good reason to procrastinate.
That is also where I set cookbooks to wait between being looked through and then reshelved.
Grimalkin is my helper cat–she helps me write by sitting in front of my computer screen or delicately picking her way across the keyboard on the way to my lap. She plays fetch with little mousey toys and goes through phases where she is a cuddle bug and where she wants to have nothing to do with anyone. She is extremely playful, though and has fun no matter what she is doing.
Right now she is in the same place on the box, curled up asleep.
I bet she is dreaming of mousies.
To see what other food blogger’s cats are up to, check out
Farmgirl Fare for a glimpse at a flying cat. Okay, really, he is sleeping, but he looks like he is flying if you have an imagination. I bet he is dreaming he has wings!
Masak-Masak brings us her Bollywood edition of WCB, with courtship and a tree!
Tasha shows us how cats sleep down under at A Few of my Favorite Things.
Handsome Hamlet lounges on a desk at Anne’s Food.
Abe & Ike are watching CatTV at Restaurant Widow.
The Whole Enchilada Part I: The Sauce
 I used to make enchilada’s “from scratch–” meaning I took store bought corn tortillas, doctored a can of store-bought sauce, made a filling out of some sort of meat and shredded cheese and wrapped the tortillas around the filling, poured the sauce over, dumped shredded cheese in and baked it and called it “home-made.”
Yeah, well, that was a long time ago and that was how my friend from Texas did it, so I thought it was okay, and that is the thing. The results were just “okay.” There was nothing really great about the enchiladas–they were just okay. Not good, certainly, as the canned sauce tasted tinny and somewhat flat and bland, but not bad, either, in that they were edible.
So, a year or so ago, I got on a Mexican food kick, bought up all of Diana Kennedy’s books, even the ones that were out of print, dragged out some Rick Bayless, Mark Miller and Cheryl Alters and Bill Jameson’s books, and started studying up on the subject.
And I realized that there was no real reason for me to be intimidated by Mexican food. I loved chiles, I knew from tomatoes, and sauce making had lost its fear factor after having gone through culinary school, and I had a Sumeet grinder, so I had no real excuse not to throw down and develop my very own enchiladas Colorado sauce.
Colorado is the red sauce that you see on enchiladas that are not Tex-Mex in derivation; the Tex-Mex version relies on chile gravy for its saucy kick, which is a totally different beastie altogether. (Over the years, I have found that I prefer the flavors of New Mexico and Arizona to Texas, so my Mexican foods tend to be derived from those border states instead of the Tex-Mex that is more familiar to more of the country.) The main flavorings and coloring of the red Colorado sauce comes from dried chiles, though certainly tomatoes and sweet bell peppers play their part in my version as well.
 Which chiles do I use in my sauce, one might ask?
Well, several, and the kind and amount change depending on my mood, what I have in the pantry, what filling I am using, and for whom I am cooking. But three chiles are constants in this sauce: anchos, New Mexico reds and chipotles, either dried or en adobo.
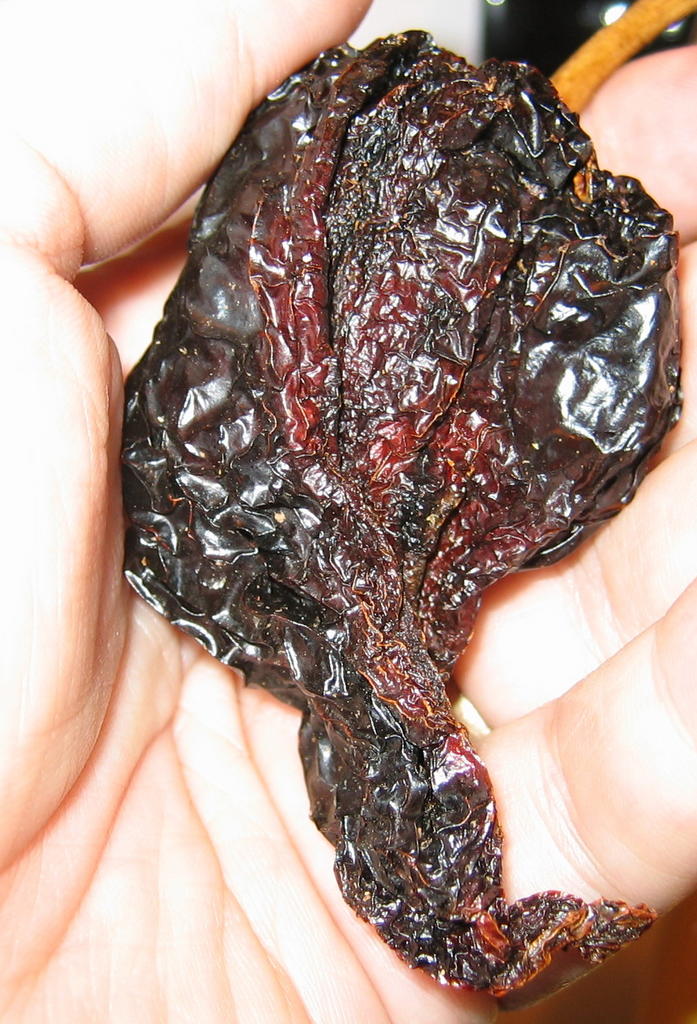
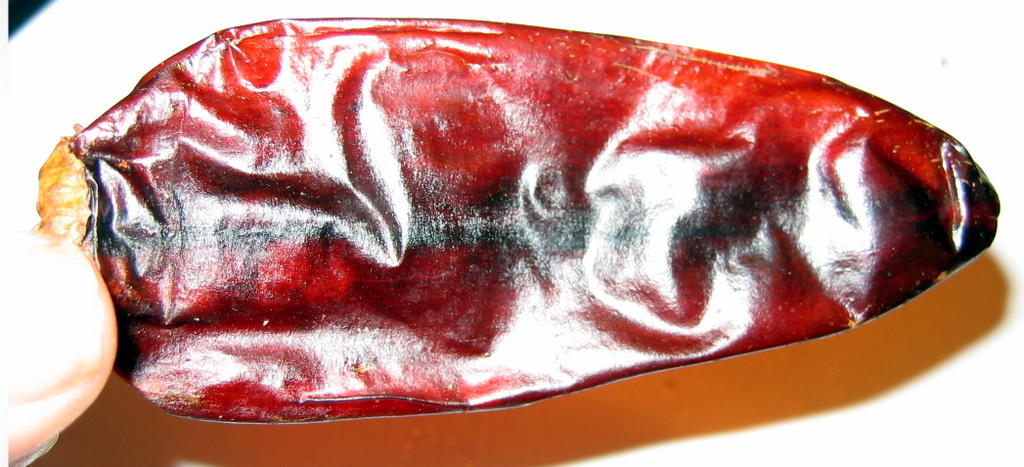
Anchos are the ripened, dried version of poblanos, which are the thick-walled, wide-shouldered green chiles that classic chile rellenos are made of. As you can see at the left, they are very wrinkly, and deep reddish to black in color, and vary in size from about two and a half inches long to three or four inches long, and half as wide.
Good ones should not be brittle, but should be somewhat soft and pliable, and should have a sweet, almost raisiny smell to them. They are very mildly hot, and add a honey-like top note to the sauce when used in moderation. When you use too many of them, they make the sauce too sweet, and darker than is appetizing. (This one is from Penzey’s.)
 The New Mexico red chiles are the backbone of the Colorado sauce. I have also seen these chiles called chiles Colorado, but it is under the name New Mexico that you will find them marketed by the company Badia (the pictured one is a Badia chile), in grocery stores and Latin American markets. (You can substitute California chiles for the New Mexico chiles; the flavor profile is very similar.)
These give the characteristic brick-red color and soft heat to Colorado sauce. They are a rich cherry-red color, and are from three to six inches long, and fairly narrow. They are thinner-walled than the anchos, but they are still somewhat fleshy. They, too, should not be brittle, but should be pliable and somewhat leathery in texture for best flavor. Good ones smell sweet, but not as sticky-sweet as anchos, and there is definately a sharper, chile undertone that is unmistakeable.
One good rule of thumb when it comes to buying dried chiles is to try and bend them and smell them. If they do not break easily, and you can smell them through the cellophane or plastic bag they are packed in, then they are good and fresh, and will make outstanding Colorado sauce.
If they are brittle and break easily, then, you should probably pass on them and try another store where stock moves more quickly. Both Penzey’s and Badia put out good quality dried chiles, though Penzey’s is a good bit more expensive.
 The chipotles I used this time around are the canned ones en adobo. A chipotle is a ripe, smoked and dried jalapeno, and in its whole, dried form, it can be had in two ways: “chile alhumado”, and “morita.”
Chile alhumado is the traditional chipotle; it is greyish tan, and is very heavily smoked. The morita (which means, “little blackberry” is the form most often sold in the US; it is blackish, softer and less smoked, so it has a milder smokey flavor. Moritas are generally considered inferior to chile alhumado, but that doesn’t mean that they are bad–they are still quite good-tasting and useful for cooking.
For reference photographs and links to purchase either chile alhumado or moritas, look here.
The brand of chipotle en adobo I have found most commonly in the US, and which I use, is La Morena. I find that the sauce is a useful addition to any number of bastes, rubs, salsas and condiments where I just want a touch of smoky heat, and the flavor of the chiles is full, round and not at all tinny.
 Before using the dried chiles to make a sauce, they must be toasted and soaked, then ground up.
A lot of folks apparently skip the toasting part, but Diana Kennedy and Rick Bayless both insist that toasting brings out more of the flavors of the chile; having tried it both ways, I tend to agree with the experts. Toasting does deepen the flavors of the chiles, and in particular seems to bring out a lot more of the sweetness that lurks beneath the heat.
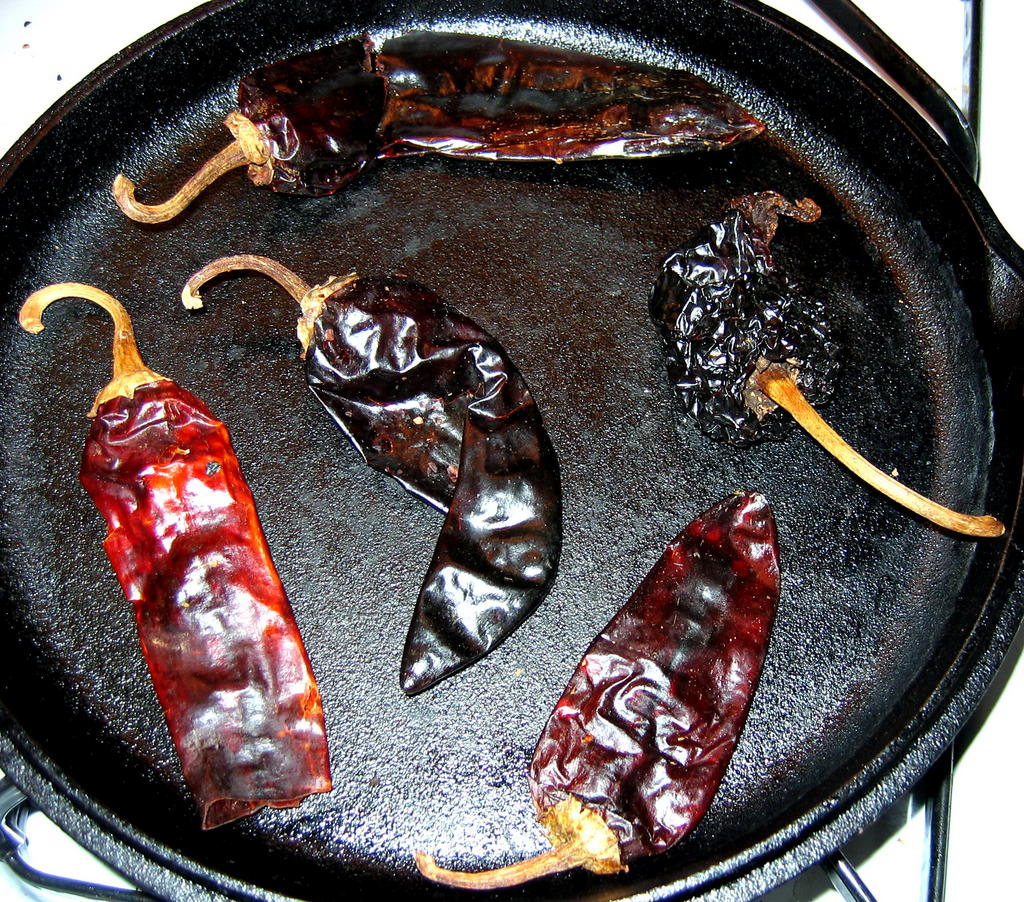
Toasting them is a lot easier than one would think. I use the flat cast iron griddle pan, which in Mexico is called a “comal,” put it on medium-high heat, get it hot, and lay the chiles in a single layer on it. Then, I watch them obsessively, and turn them frequently, until they just start to blacken a bit and smell really good. After that, I stick them all in a bowl, and add hot water just to cover them and let them soak until they are nice and soft. The soaking can take as long as an hour, particularly for the anchos, which are quite tough-skinned and leathery. Be patient–the longer you allow them to soak, the more easily they will be to grind later.
At that point, I pop the stems off, and scrape out some of the seeds, and using my Sumeet Multi-Grind, I grind the squishy chiles, along with the chipotle en adobo into a nice, deep red smoky-sweet paste. (If you do not own a Sumeet, you can use a blender, but you must add a bit of the soaking water in order to get it to grind up well enough; if you cook a lot of Mexican, Thai and Indian food, however, I would suggest investing in a Sumeet.) At the same time as I grind the chiles, I grind toasted whole cumin, coriander and black peppercorns, along with onion and whole garlic cloves.
The resulting thick, fragrant past is the backbone of the sauce.
 The body of the sauce is made with cooking stock and roasted vegetables. The stock is the braising liquid for the meat I will use for the filling. In this case, I used Pacific Natural Foods beef broth to which beer, roasted tomatoes, caramelized onions, whole chipotle chiles, bay leaves, a pinch of Mexican Oregano and roasted red bell peppers had been added. This particular stock had been used three different times to cook beef, and had been kept and frozen between uses.
The first time I cooked beef in it, I used it in a shredded beef and rice casserole last summer. Then, it was thawed out a month or so ago when I felt the need to make enchiladas verde. After I shredded the beef for that recipe, I froze it one more time, and then thawed it out for its final run as a meat-cooking medium.
Each time I used it, I added more roasted tomatoes, (I roast tomatoes the same way I roast tomatillos for enchiladas verde) more peppers and more chiles. When it cooked down, I added either more beef or vegetable broth, and often more beer. By this third time it has been used, the stock had become rich and slightly thick with suspended particles of beef and broken down vegetables, and was filled with the promise of making a good, strong sauce. But, as there were two quarts of the stock, and I only needed one quart of sauce, I began letting it reduce over medium heat, while on two of the other burners, I roasted sweet red bell peppers.
The process of fire roasting bell peppers is simple: set them on a gas flame, and turn them as they char. Keep doing this until the skins are completely blackened, then stick them in a bowl, cover them tightly with plastic wrap and allow them to steam. After they cool to room temperature, rub the skins off with your fingers, tear off the stems, and scrape out the seeds and placenta–the white pithy bits that hold the seeds.
After the stock had reduced almost by half, I threw in the roasted red peppers, and the cup or so of chile, onion, garlic and spice paste, and stirring constantly, let the stock reduce until it was pretty much cooked down to half its original volume.
At that point, the smell is incredible; the disparate ingredients danced together into a rich melange of scents: the chiles and sweet peppers took the lead, with the beef, cumin and coriander just behind. There was the slightest bitter medicinal tang of the Mexican oregano, while the tomatoes and bay leaves were perceptible only in the tiniest whiffs.
Once that wonderful scent comes forth, it is time to break out the immersion blender and grind everything up into a thick, brick red sauce. While running the blender, I leave the pot on the heat and allow the blender to stir it as I allow the sauce to reduce the final tiny bit; this ensures that while water boils away the sauce doesn’t scortch and stick to the bottom of the pot.
It should be thick enough to coat the back of a spoon without dripping off immediately, as shown in the illustration above.
I ended up with a tiny bit more than a quart of sauce, which is enough for about four huge pans of enchiladas. If that is more than is needed, it is no hardship to freeze the leftovers; in fact, that allows me to make enchiladas in the future without having to take the time and trouble of making sauce. Colorado sauce is useful not only for enchiladas, however. It goes beautifully with huevos rancheros–“eggs, ranch-style” a classic border dish of two corn tortillas topped with red sauce and two over easy eggs served with cheese and refried beans. Tamale filling of shredded pork or beef is enriched by the use of this sauce, or one could use it as the base of a quick chili–just add shredded meat and beans.
At any rate, no matter what use one puts to it, this sauce beats the pants off of any jarred or canned enchilada sauce on the market, and if you have the appliances and the time, is well worth the effort of making.
 Sauce for Enchiladas Colorado
Ingredients:
2 quarts beef broth which has been enriched with 2 large caramelized onions, 5 cloves minced garlic, roasted tomatoes (about one pound of tomatoes, roasted, peeled and seeded) 2 bay leaves, 1 chipotle en adobo, a bottle of beer, a pinch of Mexican oregano and 1/2 teaspoon each ground cumin and coriander, in which beef for shredded beef filling has been cooked
3 ancho chiles
4 New Mexico chiles
1-2 chipotles en adobo
1/2 tablespoon whole cumin seeds
1/2 tablespoon whole coriander seeds
1/2 teaspoon black peppercorns
1 medium onion
4 large cloves garlic
2 red or orange sweet bell peppers
salt, to taste
Method:
Bring stock to a boil on medium heat, and allow to simmer uncovered to reduce while you prepare the rest of the ingredients. Keep an eye on the stock and stir now and then to keep it from sticking to the bottom of the pot.
Toast and soak chiles as directed above. Toast spices in a heavy bottomed small frying pan or saucepot, until they darken slightly and smell quite fragrant. Remove stems and some seeds from the chiles. Peel the onion, and cut into chunks. Load the chiles, spices, onion, and garlic into a blender, multi-grind or mortar and pestle, and process into a thick paste. (Even a Sumeet Multi-Grind will have some problems with the ancho chiles. Just cut it up into chunks first, and if it is more roughly ground, do not worry–the immersion blender will take care of that problem.)
Roast, skin and deseed the bell peppers as explained above. Cut into several pieces each.
When the beef stock is reduced by half, add the bell pepper pieces and the chile paste, and stir constantly. The chile paste will want to stick to itself, and will be difficult to dissolve into the stock. Keep working with it until the paste is evenly distributed into the simmering liquid.
Turn the heat down, and allow to simmer, stirring constantly until the stock is reduced by half. Using an immersion blender, puree the still simmering sauce, until it is completely smooth. Check consistency by dipping a table spoon into the sauce. If sauce coats the back of the spoon without sliding off easily, it is done. If it is still too thin, allow to reduce on the simmer further, stirring with the blender to keep the sauce from sticking.
Add salt to taste, and either use sauce immediately, hold it over 140 degrees for service, or cool down and refrigerate or freeze for future use.
The Locavore’s Bookshelf III: Coming Home To Eat
 Gary Paul Nabhan writes in the poetic phrases of a prophet, his words ringing with eloquent truth as he weaves myriad different threads of fact, memory, experience, statistic and dream into a complex narrative that is filled with the wild and domesticated flavors of the Sonoran desert.
Coming Home to Eat: The Pleasures and Politics of Local Food is ostensibly a book about a man who decided to take on the experiment to eat as locally as possible, with emphasis upon the wild, native foods of his Arizona home. And while generally, Nabhan does thematically stay with the subject of his experiences in trying to eat a majority of his diet locally with emphasis upon the traditional desert foods available in Arizona, his narrative does stray hither and yon, often going far afield on tangents that at first glance seem to lack relevance. However, as the reader plows forward, the threads that bind the seemingly tangential material to the central theme of the importance of a local, sustainable food supply come into sharp focus.
Eventually, the seeming mish mash of fact, statistic, memory and experience, come together into a tapestry that illustrates Nabhan’s central point: “life,” he asserts, ” tastes good.”
There are flaws in the book, to be certain. I found that there was a certain amount of romanticization of the past, particularly of hunter-gatherer ways of life, that I found to be irritating, especially when the author noted that he was being unreasonably idealistic about the realities of subsistence farming and hunter-gatherer societies, and yet continued in that vein anyway. He is an idealist, and somewhat obsessive in his quest for local foods, to the point where I found some of his actions to be distinctly-off putting.
He is also a pessimist, and much of his narrative focuses on the negative actions of the dominant society surrounding his attempts at eating locally and seasonally. His tales of land developer’s greed and rapacious behavior in the Sonoran Desert are disheartening, and all-too based on fact, however, when contrasted with his very militant reaction to commercial foods which used the image of the Sonora–the saguaro cactus–to sell non-cactus related products, I found his guesture to be wasteful, childish and futile, which was profoundly sad. It accomplished nothing to help conserve the saguaro, and didn’t even seem to make the author feel any better.
These jarring bits of storyline, however, do not erase the essential beauty of the tales told within the book. Nabhan is a born storyteller, and when he relates his and his brothers’ journey to their ancestral home–a tiny village in the mountains of Lebanon, I found myself moved to tears as I experienced with him the joy of homecoming and the flavor of welcome. When he tells of his experiences gathering traditional desert foods such as the fruit of the saguaro and “sand food” with the O’odham, I was spellbound, eagerly savoring every word and phrase he crafted to evoke those memories.
In the end, I found that while Coming Home to Eat was certainly inspirational, it was less useful to me than Joan Dye Gussow’s This Organic Life: Confessions of a Suburban Homesteader. Too many of Nabhan’s experiences and tales were specific to one ecosystem–that of a desert which is unique in all of the world, while Gussow’s experiences were more universally adaptable by anyone with the willingness to take up seed packet and spade, canning jar and drying rack.
That is not so say I regret having read the book, and feel that it serves no purpose. On the contrary, while I found myself at times more irritated by the author than charmed by him, I would not have missed the eloquence of his prose and the emotive strength of his narrative for any amount of money in the world. His writing is much more facile than Gussow’s; his voice is tinged with the poetic authority of Annie Dillard and his ability to pull a reader into the immediacy of his tale is reminiscent of Barbara Kingsolver’s works.
Coming Home to Eat is the kind of book for us food-obsessed folk to curl up with in a comfortable corner chair, something to savor in nibbles and gulps, while a pot on the stove bubbles merrily away, cooking up something hopefully local, fresh and delicious.

Categories:
- Admin (rss) (55)
- Blogs and Blogging (rss) (81)
- Book Reviews: Cookbooks (rss) (43)
- Book Reviews: Non-Cookbook Food Books (rss) (38)
- Cats and Cat Blogging (rss) (47)
- Chinese Cooking Lessons (rss) (32)
- Culinary School Stories (rss) (18)
- Dairy Pruducts: Cultured and Barbaric (rss) (4)
- Documentary Filmmaking (rss) (1)
- Essays, Rants and Reflections (rss) (260)
- Fighting Hunger (rss) (12)
- Food and Kids (rss) (45)
- Food in the News (rss) (126)
- Food Media (rss) (98)
- Food Preservation (rss) (18)
- Food Safety (rss) (45)
- Gardening (rss) (30)
- Herbs and Herb Blogging (rss) (20)
- Holidays (rss) (50)
- Kat Blogging (rss) (22)
- Kitchen Science (rss) (36)
- Leftover Makeover (rss) (8)
- Life, the Universe and Everything (rss) (131)
- Local and Sustainable (rss) (227)
- Local Athens Food and Foodies (rss) (42)
- Meatless Mondays (rss) (32)
- Menu For Hope (rss) (5)
- Nutrition, Diet and Health (rss) (84)
- On The Farm (rss) (8)
- Recipes: Almost Vegetarian, Vegetarian and Vegan (rss) (294)
- Recipes: American Regional (rss) (37)
- Recipes: Appalachian Hillbilly (rss) (33)
- Recipes: Bread, Pasta, Grains (rss) (95)
- Recipes: Canning and Preserving (rss) (8)
- Recipes: Chinese (rss) (123)
- Recipes: Comfort Food (rss) (120)
- Recipes: Cookies (rss) (16)
- Recipes: Desserts (rss) (48)
- Recipes: French (rss) (25)
- Recipes: Fruits and Vegetables (rss) (302)
- Recipes: Greek, North African and Middle Eastern (rss) (31)
- Recipes: Indian (rss) (137)
- Recipes: Italian (rss) (42)
- Recipes: Japanese (rss) (7)
- Recipes: Jewish (rss) (4)
- Recipes: Korean (rss) (6)
- Recipes: Meat, Poultry and Fish (rss) (220)
- Recipes: Mexican/Native American/ Latin American/Caribb (rss) (27)
- Recipes: Original (rss) (108)
- Recipes: Thai (rss) (27)
- Recipes: Tofu (rss) (17)
- Recipes: US Regional (rss) (16)
- Recipes: Vietnamese (rss) (8)
- Restaurant Stories (rss) (28)
- Sewing, Quilting, Arts and Crafts (rss) (16)
- Simple Chinese Recipes (rss) (30)
- Slow Food and Heritage Foods (rss) (10)
- Spice Blogging (rss) (44)
- The Chinese Cookbook Project (rss) (14)
- The Chinese Pantry (rss) (39)
- The Documentary (rss) (2)
- The Kitchen Saga (rss) (17)
- The Locavore's Bookshelf (rss) (15)
- The Unsung Adventures of The Culinary Nerd (rss) (6)
- Tools and Toys (rss) (35)
- Uncategorized (rss) (10)
- With a Side of Politics (rss) (48)
Archives:
- August 2012 (9)
- July 2012 (12)
- September 2011 (3)
- August 2011 (7)
- July 2011 (8)
- June 2011 (16)
- May 2011 (17)
- April 2011 (11)
- December 2010 (9)
- November 2010 (5)
- February 2010 (1)
- December 2009 (5)
- November 2009 (7)
- October 2009 (10)
- September 2009 (16)
- August 2009 (14)
- July 2009 (14)
- June 2009 (7)
- May 2009 (17)
- April 2009 (10)
- March 2009 (25)
- February 2009 (13)
- January 2009 (10)
- December 2008 (5)
- November 2008 (5)
- October 2008 (6)
- September 2008 (13)
- August 2008 (8)
- July 2008 (11)
- June 2008 (18)
- May 2008 (13)
- April 2008 (14)
- March 2008 (16)
- February 2008 (17)
- January 2008 (19)
- December 2007 (25)
- November 2007 (18)
- October 2007 (24)
- September 2007 (16)
- August 2007 (15)
- July 2007 (15)
- June 2007 (10)
- May 2007 (14)
- April 2007 (16)
- March 2007 (17)
- February 2007 (20)
- January 2007 (13)
- November 2006 (1)
- October 2006 (8)
- September 2006 (14)
- August 2006 (25)
- July 2006 (30)
- June 2006 (28)
- May 2006 (34)
- April 2006 (29)
- March 2006 (24)
- February 2006 (30)
- January 2006 (38)
- December 2005 (40)
- November 2005 (37)
- October 2005 (32)
- September 2005 (25)
- August 2005 (30)
- July 2005 (28)
- June 2005 (21)
- May 2005 (8)
- April 2005 (22)
- March 2005 (17)
- February 2005 (29)
- January 2005 (10)
Search Site:
Links:
- Lily’s Wai Sek Hong
- 101 Cookbooks
- A cat in the kitchen
- A Veggie Venture
- Accidental Hedonist
- Cha Xiu Bao
- chez pim
- Chocolate & Zucchini
- Chopstick Cinema
- Chowhound.com
- Chubby Hubby
- Cook sister!
- Cooking with Amy
- da*xiang
- Eat Local Challenge
- Eating Liberally
- Ecocentric
- Eggbeater
- Epicurious
- Farmgirl Fare
- Fatfree Vegan
- Foodgoat
- ForkandBottle.com
- Green Olive Tree
- Hooked on Heat
- Jaden’s Steamy Kitchen
- Kalyn’s Kitchen
- Lucullian delights
- Mahanandi
- Matt Bites
- MeatHenge
- mmm-yoso!!!
- New York Times – Dining & Wine
- Pizza Goon
- Rasa Malaysia
- Ruhlman
- Sailu's Kitchen
- Serious Eats
- SF Gate: Food & Dining
- Simply Recipes
- Soul Fusion Kitchen
- Tastespotting
- The Amateur Gourmet
- The Cleaner Plate Club
- The Food Section
- The Grub Report
- thecookscottage
- U.S. Food Policy
- Wandering Chopsticks
- Washington Post Food and Dining
- Wasted Food
Meta:

Powered by WordPress. Graphics by Zak Kramer.
Design update by Daniel Trout.
Entries and comments feeds.