Cook Local, Eat Global
Fusion Fun: Thai Pesto Noodles
I am not always one for fusion dishes. Quite a few of them come across as less fusion and more like confusion, with muddled flavors and odd combinations of unrelated ingredients.
t
But, as I was planting my Thai basil this spring, right next to a planter full of Italian and Greek basil, I thought, “I wonder what it would taste like if I took the idea of pesto and made it Thai? I couldn’t imagine it would be bad, and besides, pesto is similar in some respects to Thai curry pastes (and it is very similar to green cilantro chutney in Indian cuisine, but that is beside the point), so there is enough similarity going on that I thought it must be doable.
So, I got to thinking of the ingredients that are in traditional Genovese pesto: basil, garlic, toasted pine nuts, olive oil, Parmesan cheese and salt and pepper.
And I thought, what are the cognates in Thai cuisine? Well, basil is simple–I’d just use Thai sweet basil instead of the Italian type. Garlic is garlic, all around the world, and it is always good. Instead of pine nuts, I could use peanuts. And I could replace olive oil, with fragrant cold pressed peanut oil. But what about the Parmesan cheese?
I was stuck there for a few minutes until I came at the problem from a different direction. Instead of worrying that there is no traditional cheese in Thailand, I thought about what function the Parmesan cheese serves in pesto. I pondered on the issue for a time and realized that while it adds some salt that isn’t the main function of the Parmesan. It isn’t in there to taste “cheesy” either–good pesto doesn’t ever have an overwhelming cheese flavor.
It is there to give the sauce that fifth taste–the jolt of umami–that savory “je-ne-sais-quoi” that you may not be able to identify in a dish, but if it is missing, you notice its lack.
Aha! I had it–what in Thai food is used to give the umami burst? Fish sauce is the most obvious answer, but I didn’t want to use it because I didn’t want to add more liquid to the sauce. Shrimp paste, which is used in many Thai curries is the obvious answer, and were I not possibly allergic to shrimp, that is what I would have used. (And that is what I suggest those who experiment with this recipe use, if they can get it and if they can eat shellfish with impunity, unlike myself. Lucky devils!)

What I ended up using was anchovy paste. Which, while it is an Italian ingredient, makes sense in a Thai context because fish sauce is made from anchovies. Voila!
My basic ingredients were set, but I decided to add some fresh Thai chilies, because I thought the sauce would taste better with them, and because I have been known to add chile flakes to my regular old Italian pesto. And, I decided to add a squeeze of lime juice at the end, after the noodles were tossed, to give a little sparkling finish to the flavors, as is done in many Thai recipes.
And, as I was grinding up the pesto itself in the food processor, I tasted it when it was about halfway there, and realized something about the physical properties of Thai basil vs. Italian basil. Firstly, the leaves are a bit drier in texture, so they don’t emulsify and puree quite so readily and secondly, they are a little bit stringier in texture as well.
I decided that the sauce would need something to help smooth it out and make it creamier. I could have added some water to the mix, in order to make up for the lack of water in the basil’s leaves, but I was afraid it would water down the flavor too much. Instead, I added about three good heaping tablespoons of nice, well-stirred coconut milk.

That was the ticket–when I finished pureeing the sauce and tasted it–it was perfect in texture, color and flavor. It was pesto, but it was Thai, and it was delicious.
Then, I had to figure out what I was going to stir my fragrant, verdant, silky-smooth sauce into.
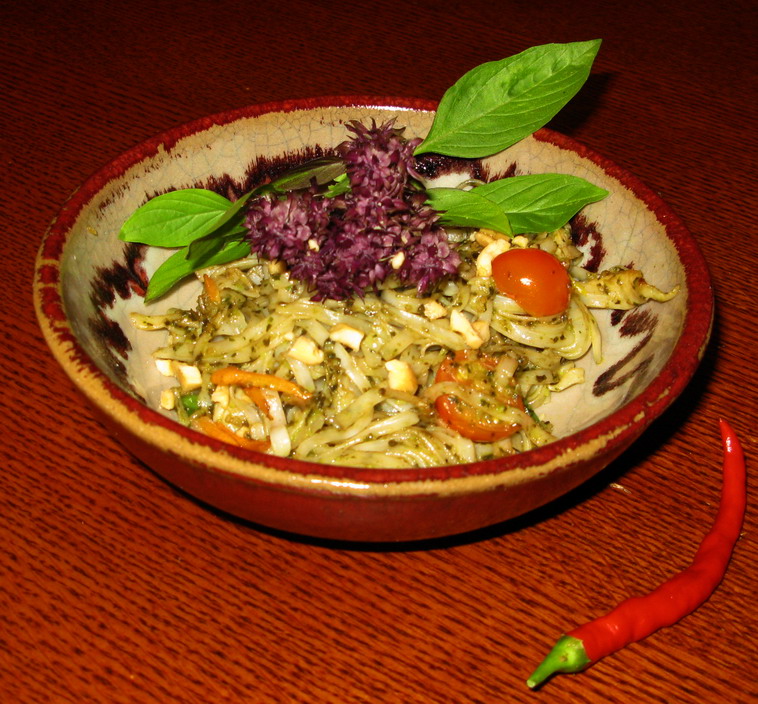
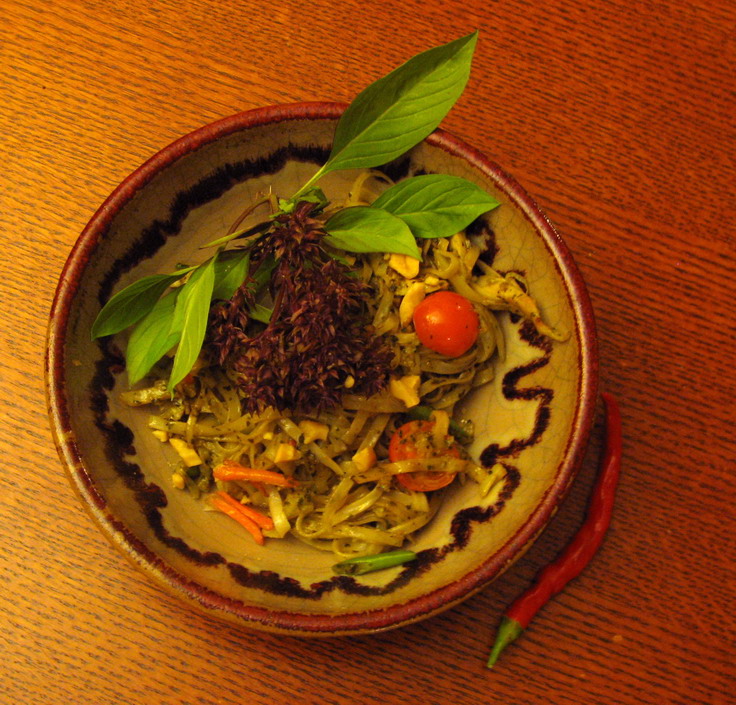
I decided to make a dish of stir-fried rice rice noodles with thin slivers of chicken, julienne-cut carrots, diagonally sliced haricot vert, halved cherry tomatoes and julienned yellow bell pepper. The seasonings for this stir fry were simple: thinly sliced shallots, fish sauce, and a bit of sugar.
This set a fairly neutral stage for the Thai pesto which was tossed in along with a generous squeeze of lime juice after everything else was cooked and I had taken the wok off the heat. After that, I garnished each portion with a few lightly crushed bits of peanut and some shaggy, deep purple Thai basil flowers.
How did it turn out?
It was bright and sparkly–the lime juice finish really perks the dish up and makes it sing. The peanut oil, which really needs to be a good fragrant, barely refined cold-pressed oil like Loriva or Spectrum, gave the nutty base notes to the sauce, while the anise-like Thai sweet basil sang and danced out front, taking up all of the attention on the tongue until the garlic and chilies kicked in and made tingles shiver through the palate. The anchovy paste added that umami punch that you couldn’t quite put your finger on, but was there, and really tied the ensemble together.
Oh, wow. That is what everyone said as they took their first bites. Morganna’s first words after “Oh, wow,” were, “Mom, when you open your restaurant, I assume this is going on the menu?”
“Yeah,” was the one-word reply.
Brittney’s exclamation said it all: “Amen.”
Thai Pesto Noodles
Ingredients For The Pesto:
2-3 cups fresh Thai sweet basil leaves, all stemmy bits removed
2-5 cloves garlic–this depends on how garlicky your garlic is, and how garlicky you want your pesto to be
1/3 cup toasted unsalted peanuts–use the best peanuts you can find for this.
1-3 fresh Thai bird chilies–depending on how spicy you want your sauce to be
1/2 teaspoon anchovy paste or about 1/3 teaspoon Thai shrimp paste (if you are a vegetarian, use either red or white miso here instead)
1/3-1/2 cup really good cold pressed hardly refined, fragrant peanut oil–Loriva or Spectrum are my favored brands
2-3 good heaping tablespoons of thick coconut milk–i used Chaokoh brand here.
salt to taste
Method For Pesto:
Put the basil, garlic, peanuts, chilies and anchovy paste into the food processor and start grinding. While it is going, pour in the peanut oil. Stop grinding and scrape down workbowl. Add coconut milk, then finish processing the sauce into a thick, brilliant green paste. Do this -right before- you are going to cook the noodles–if you do it before you do all of your prep, the pesto will oxidize and turn from green to brown. As it is, the pesto turns quickly once you toss it with the rice noodles, but there is no sense in starting out with it already a dull greenish brown, is there?
Ingredients For The Noodles:
1 14 ounce package 1/4″ wide rice sticks or rice noodles
1 chicken breast, cut into 1″X!/4″X1/8″ strips
2 tablespoons fish sauce
1 tablespoon raw or palm sugar
1 1/2 tablespoons cornstarch
canola or peanut oil for stir frying (about 3 tablespoons should be sufficient)
1/2 cup thinly sliced shallots
2 tablespoons fish sauce
1 cup julienne-cut carrots
1 cup topped and tailed then diagonally sliced haricot verts or very young stringless green beans
1/3 cup julienne-cut yellow bell pepper
1/2 cup halved cherry tomatoes (I used Sungold–yum!)
1/3-1/2 cup chicken or vegetable stock or broth
juice of 1/2 lime or to taste
cilantro leaves, Thai basil flowers or leaves and lightly crushed unsalted peanuts for garnish
Method:
Soak the noodles in warm water until they are pliable and turn from translucent to opaque white. Drain well and allow to dry in the air slightly while you do the rest of your prep.
Toss the chicken with the fish sauce, sugar and cornstarch and set aside for at least twenty minutes.
When the noodles are drained and lightly dried, and the chicken is done marinating, the vegetables are cut and the peso is ground up, heat your wok over high heat until a thin ribbon of smoke rises from it. Add the peanut oil to the wok and allow it to heat briefly until it shimmers.
Add the shallots, and cook, stirring, until they take on a bit of golden brown color–about two to three minutes. Add the chicken and stir it into a single layer on the bottom fo the wok. Allow it to rest, undisturbed for about a minute or so to brown on the bottom, then start stirring.
Cook until most of the pink has turned to brown or white. Add the fish sauce and continue cooking, scraping any browned bits of marinade off the sides of the wok until most of the fish sauce has bubbled away.
Add the carrots and haricots verts and continue cooking until they brighten in color and are nearly properly crisp-tender. Add the pepper strips and cherry tomatoes, then the noodles, Cook, stirring, until the noodles soften slightly. Add the broth and continue cooking and stirring until the vegetables are done and the noodles are soft, yet still a bit chewy. Remove from heat and scrape the pesto into the wok and toss the noodles and pasta until they are thoroughly combined. Squeeze in the lime juice and toss to combine, then dish into warmed individual serving bowls.
Top each serving with the garnishes and serve immediately.
Meatless Monday: Summer Salade Composee
Salade composee translates into English as “Composed Salad,” which makes vegetables sound like musical notes or something; Translations aside, what it really means is that you make or compose a salad out of many different ingredients, some cooked, some raw, which showcase different flavors, colors and textures. All of the ingredients are cut in shapes which enhance their flavors, and each ingredient is tossed in the vinaigrette dressing separately, allowing the cook to marinate each ingredient for as long or as short a time period as needed to create the flavor and texture profile desired by the cook.
Summer is the perfect time to make a salade composee, but truly, you can make one in the spring, fall or winter as well. You just need to collect an array of seasonal vegetables, fruits, nuts and salad greens, and if you like, cheese and meat, and prepare them as you wish in order to get the flavors and textures you wish to present to your guests. Then, make a vinaigrette that will enhance the flavors of the different components of the salad, and toss each ingredient separately in it, then, right before serving, place the ingredients on the plate or in the bowl in an artful, pleasing fashion that shows the different colors and shapes of the ingredients to the greatest advantage.
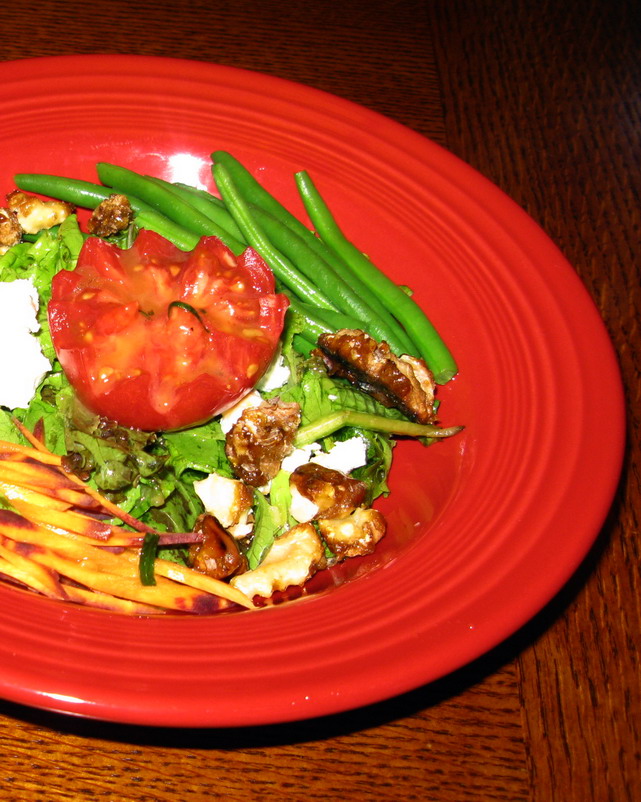
A salade composee can be a first course, as this one was, or it can be an entire meal. It can be light or hearty, all depending on what ingredients you choose to combine.
This salad is made of tender mixed leaf lettuces, a sweet, yet tangy Rose de Berne tomato, finely julienned purple and orange carrots, dear, tender little haricot vert (thin French green beans) blanched in broth and garlic, sugar-glazed English walnuts, and fresh chevre. I tossed everything separately with a honey-Dijon tarragon vinaigrette, some ingredients just before serving, and some an hour before dinner.

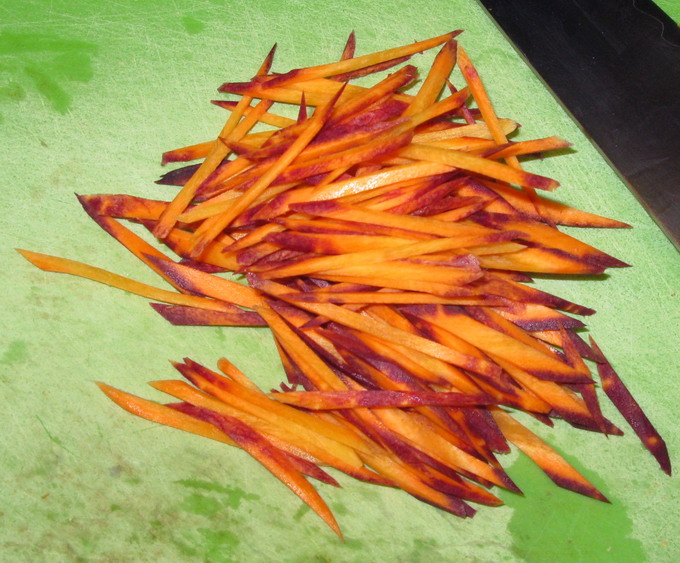
You could use plain old orange carrots in this salad, but the purple ones look so pretty when cut into thin julienne bits–orange sticks with burgundy-purple tips. Carrots are sweet and very crunchy, so I cut them very thin and very small in order to make them more delicate in flavor, as well as to show off the coloration to greatest effect. You see, in this variety of purple carrots, the purple is only apparent in the skin and in the flesh just below it, so when you peel the carrots, do so very gently and lightly, so as to remove only the skin, without taking a large layer of flesh beneath it, thus preserving the purple coloration. Then, in order to do a very fine julienne, cut the carrot into thin, diagonal slices, then stack two to four slices up, and cut those into thin sticks.
You could blanch the carrots if you wanted them to have a more softened, velvety texture, but I wanted them to retain their crisp nature. I tossed the carrots with the dressing right before serving the salad so the carrot flavor shone through.
On the other hand, the haricot vert needed to be blanched. In order to give them a bit of a flavor boost, I simmered garlic in about a cup and a half of vegetable stock until it softened and then tossed in the beans which had been topped and tailed (they have very little in the way of strings, so you just need to slice or pluck the stem end and the string end off of the beans) and left at their original length. After the beans simmered for about three minutes, they had softened to a slight velvety texture on the skin while retaining crunch on the interior. They also had a light garlic flavor. Then, I cooled them quickly in a bowl of ice, and then tossed them in the vinaigrette as soon as they were cool, so they could soak up plenty of the dressing’s tang which enhanced the very green flavor inherent to the beans themselves.
The tomatoes I cut into lotus blossoms. This looks complicated, but it really isn’t. I didn’t have anyone in the kitchen to photograph the process, so hopefully I can describe it adequately. You take a whole, clean, dry tomato, and if you wish, you can core it first. Rose de Berne tomatoes have small cores, so I didn’t bother with it. Then, with a very sharp, pointed paring knife, you plunge the point into the tomato at an angle (it should look like this: / ) along the equator of the fruit. The knife should sink to about the center of the tomato–and no farther. Pull it out and then make another cut against the first cut, also at an angle, and at the same depth, but like this, instead: \ . The two should meet in the middle and make an upside down “V” shape. You continue in this way, connecting all of the cuts all around the middle of the tomato until you have made a series of cuts that look like this: WWWWWWWWWWWWW.
Then, you grasp the tomato at the top and bottom and gently pull it apart twisting it slightly to the left or right as you go.
And voila–you have two lovely lotus blossoms. (I guess I should do a post in the future showing this with photographs, huh?)
You can do it with any size or shape of tomato–cherry tomatoes done this way make a beautiful garnish for any dish.
I marinated the tomatoes for about a half hour in the vinaigrette so they would take on plenty of its delicious flavor.
Now, for the walnuts. Sugaring nuts is a great way to give them added texture, flavor and color, but it is a bit tricky.
Start with about a cup of untoasted walnut pieces, and place them in a heavy-bottomed non-stick frying pan. Heat them up on medium heat, shaking them until they begin to toast–they will start darkening on the edges and the scent of walnut will start wafting through the air.
Sprinkle about 2/3 cup of white sugar over the walnuts and shake the pan to get the sugar to sift down evenly over the nuts to the bottom of the pan. Using a spatula or spoon that are safe for a non-stick pan and stir the nuts and sugar together. The sugar will start to melt and darken–and can start burning easily. Regulate the heat by picking up the pan and pulling it away from the heat–if the sugar starts to darken too much, take it off the heat, shake and stir vigorously to cool everything down a bit. Then, put t back on the heat a bit to get the sugar melting again. Cook, stirring, shaking and moving on and off the heat, until the nuts are coated with a shiny coat of caramelized sugar. (You can use more sugar if you want, but no less than 2/3 cup–less than that and the coating won’t be as regular.
Scrape the nuts out of the pan onto a silpat lined counter, baking pan or plate, or if you have no silpats, use a sheet of parchment paper. Allow the nuts to cool briefly, until you can touch them with your fingertips, and separate them so they aren’t stuck together in clumps. (Or, you can use two forks to pull them apart and save your fingertips from burns.) The nuts are great in salads, but they also make great snacks, coatings for cheese spreads or canapes, and fillings for dates or sweetmeats.
I tossed the nuts in the dressing just before serving so that the crisp sugar coating stayed crispy.
The lettuce leaves were tossed just before service, too–I didn’t want them to wilt.
And the cheese was tossed about ten minutes before serving so that it got some of the taste of the dressing, but not an overwhelming amount–I still wanted the tangy natural flavor of the cheese to stand out.
And then, I put it all together as you can see in the photograph above.
Use whatever you like in your salade composee–raw pears, roasted beets and toasted almonds would be great together with bleu cheese and lightly bitter greens like endive mixed with some sweeter lettuces. Sauteed summer squashes mixed with raw tomatoes, halved kalamata olives and raw sweet red peppers would also be delicious, especially with some crisp romaine and some shredded Parmesan cheese and maybe some toasted pine nuts.
The possibilities are endless.
Here is the recipe I used for my Honey-Dijon Vinaigrette with Tarragon–it would go well with the first alternate combination I mentioned above. For the second one with the summer squashes, I would use a balsamic vinaigrette with basil–substitute balsamic for the cider vinegar, use about a quarter teaspoon of anchovy paste instead of the mustard–or, leave them both out, add a tiny quarter teaspoon of tomato paste, and about three tablespoons of fresh, minced basil leaves. You could add a tiny bit of minced fresh garlic to it as well.
Honey-Dijon Vinaigrette With Tarragon
Ingredients:
1/4 cup apple cider vinegar (I used some homemade cider vinegar from a farmer here in Athens–it was light and delicious–better than the usual stuff from the grocery store!)
3/4 cup extra virgin olive oil
1 1/2 teaspoons Dijon mustard
2 teaspoons honey
2 tablespoons minced fresh tarragon leaves
salt and pepper to taste
Method:
I’m lazy. I don’t whisk my vinaigrette. I put everything except the salt and pepper into a clean jar that will hold it all, and screw the lid on and then shake vigorously. It’s easier on my wrists this way. Then, I open the jar, taste the dressing and add salt and freshly ground pepper to taste and then close it up, give it another good shake and voila! Vinaigrette!
It will keep nicely in the fridge for about a week if you have any left over.
Toyota Farm To Table Tour Comes To Athens Farmer’s Market
Next Saturday, from 9:30am to 1:30pm at the Athens Farmer’s Market, Toyota will be hosting a Farm To Table event where up to twelve of our very talented local chefs, in partnership with one or more local farmers, will be presenting samples of delicious dishes with ingredients sourced right here in Athens County. Guests will have a chance to not only sample the delicious foods presented by our chefs, but they can also take in the sights and sounds of the Athens Farmers Market as well as take a ride in Toyota’s 3rd generation hybrid Prius cars.
I’m thrilled to be a part of this event, but I am even more pleased that out of all of the farmer’s markets in the US, Toyota is choosing twelve to feature on this tour, and Athens is one of them. That just goes to show what I have been saying all along–that the local food scene here in this little corner of Appalachian Ohio really is something special that we should be proud of.
As for me, I will be spending lots of time this week preparing for the event; I am going to be partnered with Rich Blaizer of Harmony Hollow Farms and will be presenting his amazingly delicious rabbit and bacon in my dish: Marsala Braised Rabbit with Wild Mushrooms served over Garlic Mashed Potatoes with Caramelized Tomato Confit. This means that I may blog less this coming week, but for those of you who cannot come to the event, have no fear–I’ll be posting a short video featuring my dish as well as other exciting footage from the market.
And yeah, after the event, I will post the recipes!
For those who are interested in attending, I will be in Tent 4 from 11 am to noon.
Wish us all luck!
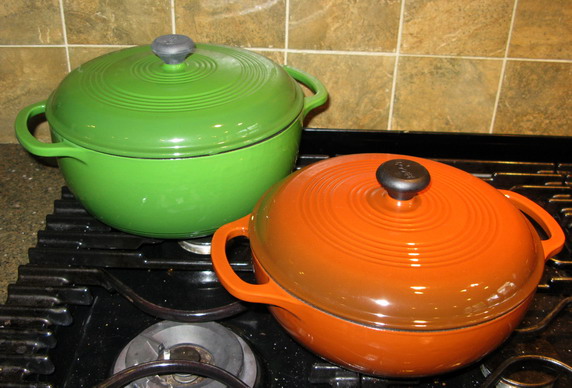
Test-Driving Lodge Enameled Cast Iron
I have a small collection of Le Creuset cast iron: a grill pan and a round French oven that were gifted to me by Zak’s grandmother when she became too frail to lift them anymore, a tiny skillet I got free for registering for Le Creuset back when Zak and I got married (fifteen years ago or so) a large braiser and a skillet that were given to me by Karl and Tessa for my birthday last year.
And I LOVE, absolutely love these pieces and I use them all the time.
I wanted to get a few more pieces of enameled cast iron, considering my new fascination with French cookery and braising, so I looked at the oval French ovens and tried hard not to flinch at the price. I say tried–because I failed. I still flinched.
Now, I could have gone on eBay, and gotten either Staub or Le Creuset cast iron at pretty great prices, but I remembered somewhere in the back of my mind that Lodge, the makers of the old American standard cast iron skillets (both traditional and pre-seasoned, both of which are fantastic) beloved by chefs and grandmas everywhere, had taken up making enameled cast iron cookware.
Hrm.
I looked on Amazon and found that not only is Lodge making colorful enamel-coated cast iron, so were a bunch of other manufacturers, most of them in China, and many of them sold under the names of famous chefs and cooks, such as Paula Deen and Mario Batali.
Mind you, the Lodge enameled pots are made in China as well, but I read that they had the same number of layers of enamel coating, fired between each coating, as the Le Creuset models, and I read that they have been reviewed favorably by Fine Cooking Magazine.
I trust Fine Cooking, so I decided to get a smaller, round casserole dish (3 quarts) to replace the buffet casserole that I gave to Morganna when she moved out (another gift from Zak’s grandmother) and a Dutch oven that is larger than the French oven I have–it is a four quart model, and I bought Lodge’s six quart oven.
I bought them from Amazon.com with free shipping, and paid easily two hundred dollars less for the larger pot and one hundred dollars less for the smaller one than I would have paid for the French cookware.
They are very pretty, as you can see. The three quart brown one has graduated color that is absolutely lovely, and the green is very similar the old style green that you can only get in Le Creuset these days from Williams Sonoma. They look great in my kitchen, which is all greens, browns, and blacks.
They are also just as hefty as their French counterparts (actually, they are a bit heavier as the walls a tiny bit thicker)–it takes a significant strength to hoist these babies up and down, around and through. That’s fine–I have strong arms!
How do they cook?
The truth is, I can detect no difference between these pieces and the French ones. They all cook like a dream. Food sticks if anything, a bit less in the Lodge cookware, perhaps because of the thicker walls, though in truth, few foods stick to either the Le Creuset or Lodge enameled surfaces. They both heat evenly and hold heat perfectly, allowing the cook to use less energy to cook braises, stews and roasts than they would in pots made from other materials.
Alas, however, Lodge doesn’t make oval ovens that you can use to roast or braise a whole chicken, so I will have to look into other possibilities.
I am thinking Staub for my next enameled cast iron purchase, though I might try out one of the cheaper Chinese manufactured ones -if- I can stand to buy something with Paula Deen’s face on it. (That said, I’d be more likely to get one from Mario Batali, just because I like the persimmon color a lot and the folks on Chowhound seem to like them!)
Does anyone else have a favored brand of enameled cast iron cookware?
Poulet Roti
I realized last night when I was thinking about French cuisine, that I remembered only one actual recipe, probably because I made it more than once, and that was Boeuf Bourguignon. Now, I am not counting the recipes for sauces: bechamel, veloute, brun, demi-glace, tomato, and hollandaise along with many of their derivatives, are indelibly imprinted on my memory. I am talking about recipes for specific dishes. (Wait, wait–I have another actual recipe committed to memory, again, from making it multiple times–Creme Brulee, though in truth, it is debatable over whether or not this dessert is of British or French origin.)
What I do remember of French cuisine, and this is the important part–is the techniques.
French cuisine, especially as it is practiced in restaurants, is all about correct, precise technique. And once these techniques–of cutting, of sauce making, of braising, roasting, of sauteing–are mastered, one can apply them to any collection of ingredients and produce a dish which may not be French in a traditional sense, but will certainly be French in character and spirit.
That is the true glory of French cuisine, at least in my eyes–the techniques that are used in its production can be used in the creation of any dish from any cuisine and you will almost always get an excellent result. (Chinese cuisines are also technique-based and as such, these techniques can be used in other cuisines to produce a superior dish as well. French and Chinese cuisines are like the Western and Eastern pillars of grand food culture in the world.)
So, now we come to the topic of the day–Poulet Roti–or as we say in English, Roast Chicken.
This is one of the most basic dishes in any sort of European-based cookery, and is one of the dishes I think that anyone, even a complete kitchen novice can learn and quickly master. (Anthony Bourdain says that if you can’t make a decent roast chicken, “you are one helpless, hopeless. sorry-ass bivalve in an apron.” I don’t think I would put it so harshly, because the fact is, very few people are taught any of the good techniques for roasting chicken in the United States. No, you don’t just stick in the oven.)
And once it is mastered, Roast Chicken is extremely versatile. You can make pan sauces for it, gravies, or you can baste it in cream and wine, then reduce that into a sauce with sauteed mushrooms. You can serve it hot or cold and you can use leftovers for panini sandwiches or salad.
Now that I have said all of that, the truth is, there is no one “right” way to roast a chicken! I have my way to do it, Bourdain has his, and Julia Child has hers. And every other good chef and cook has their method. Some folks truss the birds up like Bettie Page (as Bourdain would say), while others slit the skin of the bird and tuck the legs in the flaps as a sort of self-trussing method. Some folks lay the bird down in a roasting pan on the top of a bunch of tasty vegetables which get to roast in the flavorful chicken juices. Other folks set the chicken on a rack of some sort, and scatter vegetables around the rack. Some baste in stock, some in wine, some in butter. Some stuff their birds with elaborate dressings, while others just stick aromatics inside, while others just leave the cavity empty.
And the really cool thing about this fact is that most of those methods result in really great roast chicken.
I think that the secret to great roast chicken is two-fold: first, obtain a really good chicken that is naturally full of flavor, preferably from a local farmer, but failing that a free-range or kosher bird from the grocery store will do. Second, don’t overcook your chicken once you have expended all the time and effort to find it, obtain it and prepare it for the oven. That’s the thing, if you start with a good bird in the first place and don’t dry it out by cooking it for longer than is necessary, you are pretty well guaranteed a good dinner.
So, here is the way that I make Poulet Roti, and my method is based on Julia Child’s along with a couple of methods I learned in culinary school. The seasonings I happened to use this time are based on the flavors of the blend of herbs called Herbes de Provence, which includes fennel, basil, tarragon, thyme, lavender flowers, marjoram and rosemary. You can use other herbs if you like. The type of wine can be changed–you could use sherry or marsala instead, for example.
Poulet Roti
Ingredients:
1 3 pound roasting chicken
2 tablespoons of softened butter
1/4 teaspoon salt
1 1/2 tablespoons mixed fresh herbs (I used rosemary, tarragon, thyme, basil, and lavender buds), well minced
1 teaspoon finely shredded lemon zest
1 garlic clove, finely minced
1 tablespoon softened butter
1 teaspoon kosher or coarse sea salt
freshly ground black pepper to taste
1 lemon, cut in half
2 cloves garlic, sliced
1 large sprig fresh rosemary
1 large sprig fresh thyme
3 tablespoons olive oil, divided
1 cup dry white wine, or sherry or vermouth
3 cups chicken stock or broth
2 tablespoons of the same mixed fresh herbs, this time chopped roughly
Method:
First, preheat the oven to 425 degrees F. (The general roasting time for a 3 pound chicken is about an hour and 10-20 minutes. For the last half of the roasting time, check the bird often for doneness–prick it in the fattest part of the leg and if the juice runs out clear yellow, it is done. If there is still a rosy color to the juices, it needs to roast longer.)
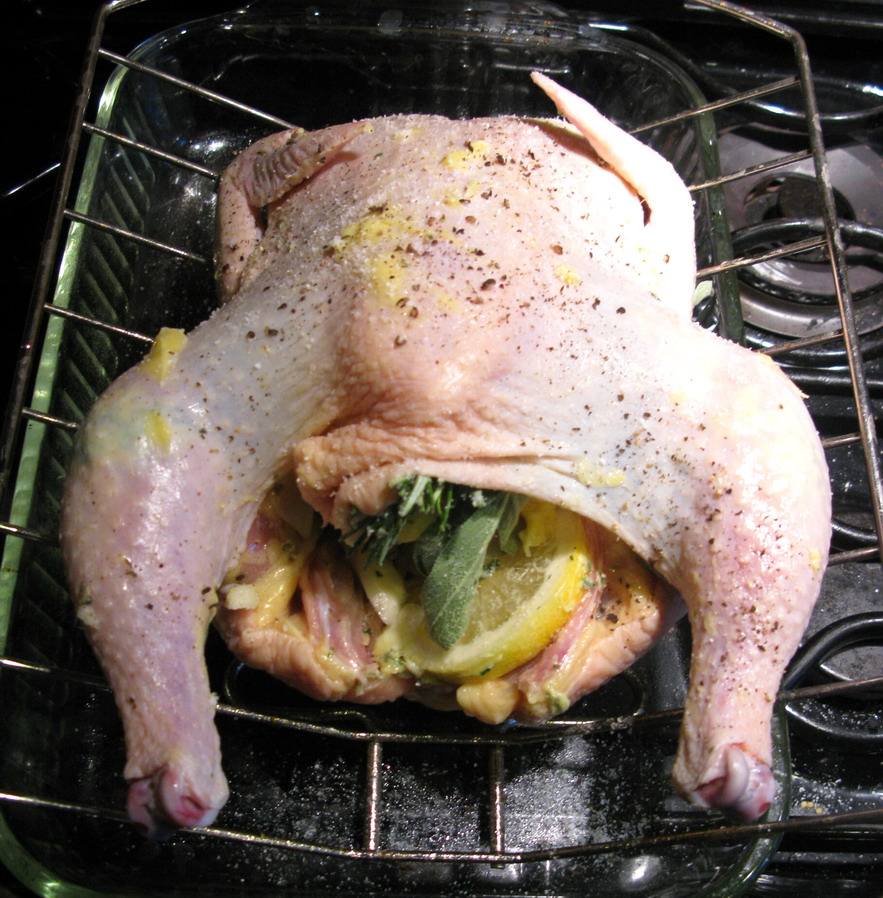
Then, prepare the chicken. Remove any giblet packet (mine just had the neck), and rinse well with cold water. Remove any feather bits and then pat well to dry. Trim any excessive skin and excess interior fat from the bird.
Then, blend together the two tablespoons of softened butter with the first measure of salt, the minced herbs, the lemon zest and minced garlic.

Gently, with your fingers, loosen the skin of the chicken at the edge of the breast, and carefully stuff half of the seasoned butter under each side of the breastbone, spreading it over the flesh of the breast as evenly as possible, so that the butter is between the skin and meat. You have to be careful not to pierce the skin from underneath with your fingers, but other than that, this is a simple operation.
Rub the outside of the skin with the 1 tablespoon of butter and then sprinkle it with salt and however much freshly ground black pepper you like. Salt and pepper the inside of the chicken as well.
Now stuff the cavity with 1/2 of the lemon (when you put it in the bird, squeeze it a bit to get some juice in there), one clove’s worth of the garlic slices and the rosemary and thyme sprigs.
Now your chicken is prepared for the oven. Set it breast side up on a V-shaped roasting rack or just a plain old cooling rack inside a roasting pan which has been rubbed all over with 1 tablespoon of the olive oil (I prefer V-racks as you can see–lots of hot air gets around and in the chicken with those and you get crisp, golden brown skin all over that way) and put it into the oven.
Meanwhile, put the 1/2 of the wine, stock, the remaining clove of garlic slices and the giblets into a pot and bring to a simmer. Cook at a simmer until the liquid is reduced to about a cup. Turn the heat off and let the giblets and the garlic steep in the pot.
After the chicken has been in the oven for about ten to fifteen minutes, the skin should be fairly evenly browned. Turn the heat down to 350 degrees F. and pour the remaining half cup of wine in the bottom of the roasting pan. Baste now and again with the remaining two tablespoons of olive oil. If the chicken drippings begin to burn, turn the heat down slightly, and if the skin darkens too much, cover it lightly with a tent of foil.
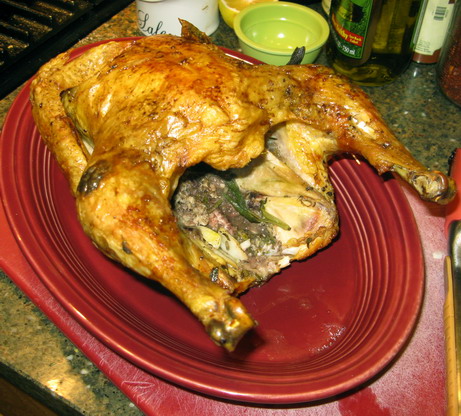
Check the chicken for doneness after about a hour and five minutes of roasting: the signs that it is finished cooking are that the breast swells up slightly and will spring back when pushed with a forefinger, the aforementioned clear yellow juices when the leg or the meaty part of the thigh are pricked, the skin should be lightly puffed and crisp. If you take hold of the drumstick, it should joggle easily in its socket. For a final check, lift the chicken slightly and drain the juices from its vent–they should also be clear yellow. If they are still rosy, then roast it for another five minutes or so.
When the bird is done, remove it from the pan with its rack and set it on a carving board or serving platter to rest while you make the pan sauce.
Put the roasting pan on top of the stove and turn the burner up on medium high heat. Remove all but 1 or 2 tablespoons of fat from the pan. Strain the stock, discarding the giblets and garlic slices and pour the liquid into the pan. Stir and cook, scraping up all the browned bits (which are called fond) from the bottom of the pan, dissolving them in the stock. Reduce the liquid until it barely coats the back of a spoon and then sprinkle half of the roughly chopped herbs into the sauce, whisking them in well. (If you want, you can add a teaspoon or two of butter to the sauce to enrich it–but really, we have used plenty of butter already, so it is up to you if you want to do it.) Drizzle a spoonful of the sauce over the bird and sprinkle it with the rest of the herbs, then serve the rest of the sauce on the side.
This bird is great with roasted vegetables like baby carrots, fingerling potatoes and pearl onions.

Categories:
- Admin (rss) (55)
- Blogs and Blogging (rss) (81)
- Book Reviews: Cookbooks (rss) (43)
- Book Reviews: Non-Cookbook Food Books (rss) (38)
- Cats and Cat Blogging (rss) (47)
- Chinese Cooking Lessons (rss) (32)
- Culinary School Stories (rss) (18)
- Dairy Pruducts: Cultured and Barbaric (rss) (4)
- Documentary Filmmaking (rss) (1)
- Essays, Rants and Reflections (rss) (260)
- Fighting Hunger (rss) (12)
- Food and Kids (rss) (45)
- Food in the News (rss) (126)
- Food Media (rss) (98)
- Food Preservation (rss) (18)
- Food Safety (rss) (45)
- Gardening (rss) (30)
- Herbs and Herb Blogging (rss) (20)
- Holidays (rss) (50)
- Kat Blogging (rss) (22)
- Kitchen Science (rss) (36)
- Leftover Makeover (rss) (8)
- Life, the Universe and Everything (rss) (131)
- Local and Sustainable (rss) (227)
- Local Athens Food and Foodies (rss) (42)
- Meatless Mondays (rss) (32)
- Menu For Hope (rss) (5)
- Nutrition, Diet and Health (rss) (84)
- On The Farm (rss) (8)
- Recipes: Almost Vegetarian, Vegetarian and Vegan (rss) (294)
- Recipes: American Regional (rss) (37)
- Recipes: Appalachian Hillbilly (rss) (33)
- Recipes: Bread, Pasta, Grains (rss) (95)
- Recipes: Canning and Preserving (rss) (8)
- Recipes: Chinese (rss) (123)
- Recipes: Comfort Food (rss) (120)
- Recipes: Cookies (rss) (16)
- Recipes: Desserts (rss) (48)
- Recipes: French (rss) (25)
- Recipes: Fruits and Vegetables (rss) (302)
- Recipes: Greek, North African and Middle Eastern (rss) (31)
- Recipes: Indian (rss) (137)
- Recipes: Italian (rss) (42)
- Recipes: Japanese (rss) (7)
- Recipes: Jewish (rss) (4)
- Recipes: Korean (rss) (6)
- Recipes: Meat, Poultry and Fish (rss) (220)
- Recipes: Mexican/Native American/ Latin American/Caribb (rss) (27)
- Recipes: Original (rss) (108)
- Recipes: Thai (rss) (27)
- Recipes: Tofu (rss) (17)
- Recipes: US Regional (rss) (16)
- Recipes: Vietnamese (rss) (8)
- Restaurant Stories (rss) (28)
- Sewing, Quilting, Arts and Crafts (rss) (16)
- Simple Chinese Recipes (rss) (30)
- Slow Food and Heritage Foods (rss) (10)
- Spice Blogging (rss) (44)
- The Chinese Cookbook Project (rss) (14)
- The Chinese Pantry (rss) (39)
- The Documentary (rss) (2)
- The Kitchen Saga (rss) (17)
- The Locavore's Bookshelf (rss) (15)
- The Unsung Adventures of The Culinary Nerd (rss) (6)
- Tools and Toys (rss) (35)
- Uncategorized (rss) (10)
- With a Side of Politics (rss) (48)
Archives:
- August 2012 (9)
- July 2012 (12)
- September 2011 (3)
- August 2011 (7)
- July 2011 (8)
- June 2011 (16)
- May 2011 (17)
- April 2011 (11)
- December 2010 (9)
- November 2010 (5)
- February 2010 (1)
- December 2009 (5)
- November 2009 (7)
- October 2009 (10)
- September 2009 (16)
- August 2009 (14)
- July 2009 (14)
- June 2009 (7)
- May 2009 (17)
- April 2009 (10)
- March 2009 (25)
- February 2009 (13)
- January 2009 (10)
- December 2008 (5)
- November 2008 (5)
- October 2008 (6)
- September 2008 (13)
- August 2008 (8)
- July 2008 (11)
- June 2008 (18)
- May 2008 (13)
- April 2008 (14)
- March 2008 (16)
- February 2008 (17)
- January 2008 (19)
- December 2007 (25)
- November 2007 (18)
- October 2007 (24)
- September 2007 (16)
- August 2007 (15)
- July 2007 (15)
- June 2007 (10)
- May 2007 (14)
- April 2007 (16)
- March 2007 (17)
- February 2007 (20)
- January 2007 (13)
- November 2006 (1)
- October 2006 (8)
- September 2006 (14)
- August 2006 (25)
- July 2006 (30)
- June 2006 (28)
- May 2006 (34)
- April 2006 (29)
- March 2006 (24)
- February 2006 (30)
- January 2006 (38)
- December 2005 (40)
- November 2005 (37)
- October 2005 (32)
- September 2005 (25)
- August 2005 (30)
- July 2005 (28)
- June 2005 (21)
- May 2005 (8)
- April 2005 (22)
- March 2005 (17)
- February 2005 (29)
- January 2005 (10)
Search Site:
Links:
- Lily’s Wai Sek Hong
- 101 Cookbooks
- A cat in the kitchen
- A Veggie Venture
- Accidental Hedonist
- Cha Xiu Bao
- chez pim
- Chocolate & Zucchini
- Chopstick Cinema
- Chowhound.com
- Chubby Hubby
- Cook sister!
- Cooking with Amy
- da*xiang
- Eat Local Challenge
- Eating Liberally
- Ecocentric
- Eggbeater
- Epicurious
- Farmgirl Fare
- Fatfree Vegan
- Foodgoat
- ForkandBottle.com
- Green Olive Tree
- Hooked on Heat
- Jaden’s Steamy Kitchen
- Kalyn’s Kitchen
- Lucullian delights
- Mahanandi
- Matt Bites
- MeatHenge
- mmm-yoso!!!
- New York Times – Dining & Wine
- Pizza Goon
- Rasa Malaysia
- Ruhlman
- Sailu's Kitchen
- Serious Eats
- SF Gate: Food & Dining
- Simply Recipes
- Soul Fusion Kitchen
- Tastespotting
- The Amateur Gourmet
- The Cleaner Plate Club
- The Food Section
- The Grub Report
- thecookscottage
- U.S. Food Policy
- Wandering Chopsticks
- Washington Post Food and Dining
- Wasted Food
Meta:

Powered by WordPress. Graphics by Zak Kramer.
Design update by Daniel Trout.
Entries and comments feeds.