Cook Local, Eat Global
Preserving the Local Harvest: A General Introduction to Pressure Canning
This year’s Eat Local Challenge revolves around preserving the harvest, and like eating locally, this is something I do just as a natural course of events. When I told Morganna what the theme of this year’s challenge was, she said, “But what is the big deal–everyone knows about canning and freezing, don’t they?”
Well, in West Virginia, where we both grew up, yeah, a lot of folks know all about preserving food. That is because agriculture and self-sufficiency are still extent parts of Appalachian culture; what Morganna didn’t understand was that not everyone grew up like we did. So, she said I should write about what it is like to can salsa or something, just to give readers a glimpse of home canning on a small scale.
If you have been following my blog for a while, you know that I have written about making fresh marinara and pesto and freezing them along with freezing fresh chiles, I have made kimchi, and Hunan salted chilies.
This year, since I bought a ten quart pressure cooker to replace my old and worn out seven quart one, I realized that it was large enough that I could do some small batch canning in it. Very small batch, in that it can only process four half pint jars at a time, but that is something. Enough to tide me over until I can get a real pressure canner for my birthday in October, at least.
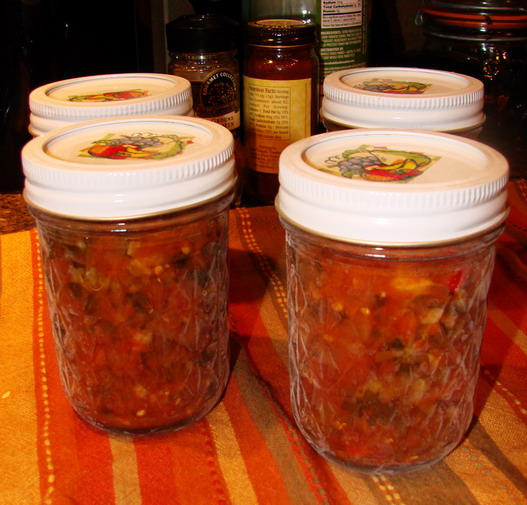
So, I bought about four pounds of plump, juicy heirloom tomatoes at the farmers market (Mr. Stripey, Green Zebra, Brandywine and Black Krim were the varieties, if you are curious) and made a batch of my Calico Salsa with them along with some beautiful sweet and hot peppers in shades of yellow, orange, red, green and purple, along with local purple onions, elephant garlic and cilantro, and set about preparing to can it. (The only non local ingredients in this batch of salsa, by the way, are the limes and the salt.)

I grew up helping my grandmother freeze, can and ferment her harvest, and I know what a lot of work it can be. Long hours I spent in the garden, the kitchen and the basement (she had a stove and sink down there, and we often canned there because being underground–it was cooler down there.) Sometimes, however, we’d run upstairs to the regular kitchen and downstairs to the basement kitchen, because we had different batches of stuff processing in each kitchen. Preserving the harvest can give you a really good aerobic workout–especially if you are putting up huge batches like we used to–a hundred quarts of tomatoes at a time, for example, or thirty pints of strawberry jam.
But when you can only work with four pints of anything at a time, one is forced to work in small batches, and that is a bit less worrisome. But, you still need a few special tools to use your pressure cooker to can and the photograph above illustrates some of them.
That odd set of tongs is a jar lifter–you use that to take the sterilized jars out of boiling water, and the sealed jars out of the canner. These guys are going to be your best friends when it comes to canning–so get a pair and don’t even try to use a set of tongs or silicone potholders or something equally silly. Pressure canners push water up to 240 degrees F.–and you DON’T want to touch glass that has been bathing in that. The burn you would get is beyond nasty. Just get a jar lifter and avoid the pain.
There is also a strange looking little blue plastic wand thing–that has a magnet on the end, and is used to pick up the flat sealing lids out of the sterilizing water. I remember back in the day when they didn’t have those magnet thingies yet, trying to get those lids out of the water. It was a right pain in the butt, so be grateful for the magnetic revolution and get your magic wand and use it, too. That clear stick thing next to the wand is a tool used to remove trapped air bubbles in your food product before putting on the lid. Trapped air interferes with the seal on the lid, and that is super bad juju for canning. You want a really, really good seal, otherwise you are courting foodborne illness.
You can also see the widemouthed funnel–get one of those, too. It keeps you from slopping hot food product all over the clean jars, your counter, yourself, the floor, your foot–you get the picture. Get one. They are cheap. Heck, they are so inexpensive, Grandma had three of them. Which helped if we were canning two different things at once, or we just had a huge batch to pack in jars–that let three of us pack at the same time.
Oh, and you need a pressure cooker or canner to do pressure canning. To pressure can in a pressure cooker, you need it to have at least a ten quart capacity. Mine is a ten quart cooker by Fagor, You will also need a canning rack to fit in your cooker to basically keep your jars off the bottom of the pot and from banging against each other. Fagor markets a canning kit for its ten quart cooker that includes all of the tools mentioned above in one box, along with a special instructional manual for canning in your pressure cooker.

Once you have all of your tools at the ready, washed in hot soapy water and rinsed well, you need to look into getting some canning jars.
And when I say canning jars, I mean jars made specifically for canning. Don’t think you can be clever and recycle mustard and mayonnaise jars. I mean, you -can- do it–but it isn’t a good idea to do it, even if you can get sealing canning lids to fit those jars, and here is why.
Canning jars are tempered very specifically to be used over and over again. They are made to be strong, and not to crack, chip or break easily. They are made to withstand the high temperatures and pressures of a pressure cooker or canner over and over again.
Recycled commercial condiment jars are made to withstand high heat and pressure ONCE. After that, they may put up with being reused in a pressure canner a few times, but you never know when one will crack, chip or bloody well burst in your cooker, and believe me, you don’t want to clean that up. So, just plain old don’t go there. Beg, borrow or buy real live canning jars.
Ball makes most of the canning jars sold in the US–okay, well, no it doesn’t really. Not anymore. But why do all the canning jars in the stores say “Ball” on them? Because the home canning jar business was sold off from Ball, but instead of changing the name, the new company kept it, because of the years of tradition and consumer trust built up behind Ball products. But anyway, most of the canning jars in the US are going to say “Ball” on them, and they are usually pretty inexpensive, and quite well made. My Grandma’s Ball (and Kerr) canning jars are still going strong after being used and reused for about, oh, in some cases, seventy years or so. That is pretty impressive. So, go out and get yourself some canning jars. If you are going to do a lot of canning and preserving, they are well worth the investment.
That said, there are other brands out there. Kerr makes good jars, (they should be–they are made by the same company that makes Ball jars now–Jardin Corporation) and you can also find pretty European styled canning jars like Leifheit in some stores and through online retailers. The really pretty ones would make containers for home-made goody gifts, if you want to share the bounty after you have successfully canned your first batches of produce.

Before you use your jars, you need to take them out of their packaging and undo the rings and flat lids. The rings are reusable multiple times–they are good until they rust and corrode, which depending on how well they are treated can take years. The flat lids which are what seals your food up and keeps it preserved, can only be used once. Don’t get some bizarre idea in your head that you can use them again, because I will have to come crawling through this Internet connection and whump you upside your silly head. That is the path to bacteria, botulism and death, right there. Don’t go there. Buy new lids every time. Heck, if you hauled off and tried to use lids twice, the spirit of my Grandma might just have to come and haunt you for the rest of your life–she lectured me so many times on the safety aspects of canning, which she took seriously. VERY seriously. And you should, too.
After you have taken them apart, run your fingertips over the rim of your jars. They should be absolutely smooth and perfect, free of chips, cracks and rough spots. If there are any defects in the rim, DO NOT USE THE JAR. Why? Because if there is a defect with the rim, the lid won’t seal and if the lid won’t seal, you will surely perish. It is as simple as that. A nick in the rim of a canning jar=death. Keep that in mind. Make sure that the rest of the body of the jar is free of cracks as well.
{I realize that I have probably horrified my readers into never trying to can. Please stick with me, and give it a shot sometime–it is a serious business, canning, but it is also well worth it. And trust me–anyone can do it, if they just have the right equipment and tools, treated properly, fresh ingredients, and attention to detail blended with patience.)
After you have inspected the jars wash them, the lids and rings in hot soapy water and rinse very well with cool water. You don’t want to leave any detergent residue in your jars or lids–that might make your food taste a bit weird. We wouldn’t want that.
After they are washed, just set them on the counter on clean dishcloths to dry.
At this point you need to prepare your food item for processing. Please use approved recipes for pressure canning and follow the instructions exactly. There are lots of really good books out that have recipes suitable for canning, (some of which I will be reviewing soon) and usually your pressure cooker or canner will include a booklet of recipes to start out with. You can change a few things about the recipes–like you can add more garlic and less olive oil for example, but remember, do not reduce acidic components, as they are part of the preservation process. In fact, it is just best to follow recipes until you really have a lot of experience with canning and understand why recipes are formulated the way they are.
For hot packing your food, it has to have been brought to a boil, and then taken down to a simmer before packing the jars.
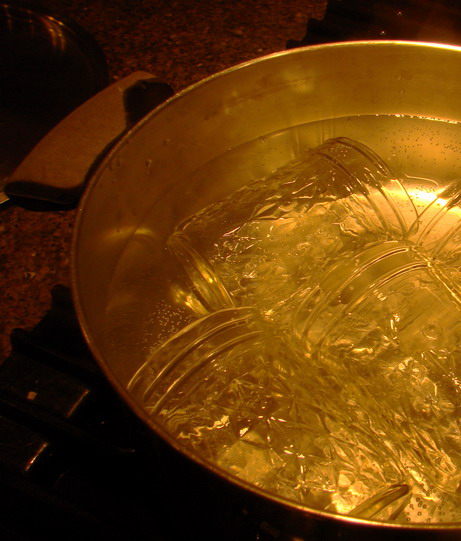
While the food is cooking, bring two pots of water, along with am extra pot or kettle of water, to the boil. One pot must be big enough to hold your jars, and the other one is meant to hold your flat lids (you don’t need to sterilize the rings by boiling them–in fact it is easier to deal with them at room temperature.) Bring the water to a boil in the pot for the lids, and then turn down the heat to a simmer. Add the lids, and allow them to simmer for at least five minutes. Do not let them boil–the heat from boiling water can mess up the sealing compound on the edge of the lids. The larger pot for the jars–that one can boil. I tend to let it heat to just below a simmer, and then put the jars in, making certain that they are completely covered with water. Once the jars are in the pot, bring the water to a boil.
Once the jars and lids are sterilized and the food is prepared and hot, you are ready to start filling the jars. Take a clean ladle (my Grandma used to sterilize her ladle and wide-mouth funnels, too, btw–whether you do or not is up to you–some books say to, some do not) and the funnel and have them ready. Take your jar lifter, and pick a jar up out of the water, tipping it to the side to empty it of the boiling water. Be careful and don’t splash yourself with boiling water. That hurts. Nah–I don’t know about that from experience or anything….

Set the steaming hot jar down on a folded clean dishtowel. If you put it on your cool or cold counter top, you risk the temperature difference putting a crack in the glass, especially if you are using a jar that has been used over and over and over for years. (Glass, no matter how well tempered, eventually gets tired after years of hard work–just like people.) I saw my Mom put a hot jar on a ceramic counter once, and yep, broke in half. Fortunately, the ladle of boiling tomatoes she was about to ladle into it hadn’t gone in yet, or she would have had some nasty burns on her bare feet. (Grandma always tried to tell her to wear shoes in the kitchen, but Mom seldom wears shoes for any reason–yep–she is a hillbilly–and proud of it!)
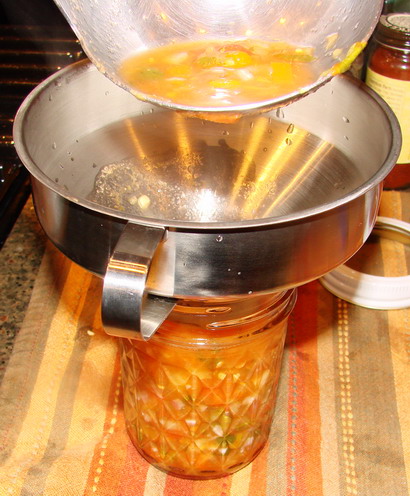
Pop your wide mouthed funnel in the top of the jar and ladle your food into it. Be sure and leave the specified amount of headroom at the of the jar. It will be specified in the recipe, but in general, jams and jellies need 1/4 inch of space at the top, acidic foods need about a 1/2 inch and non-acidic foods take a full inch. Run the little plastic air-bubble removal tool around the edge of the food from the top to the bottom, all the way around. Remove the funnel and wipe off the rim of the jar with a damp clean cloth, then pick up a lid from the simmering water with the magnetic wand and dry it with the clean cloth. Set it on top of the jar, center it well and then carefully screw on the ring. Do not tighten it overmuch–air needs to escape during the sealing process while the jar is in the canner. On the other hand, the ring shouldn’t be so loose that it doesn’t hold the lid in place on the jar–then water can enter the jar and mess up the food. So–you tighten the ring enough to hold the lid into place but not so much that you’d have to work hard to open it back up.
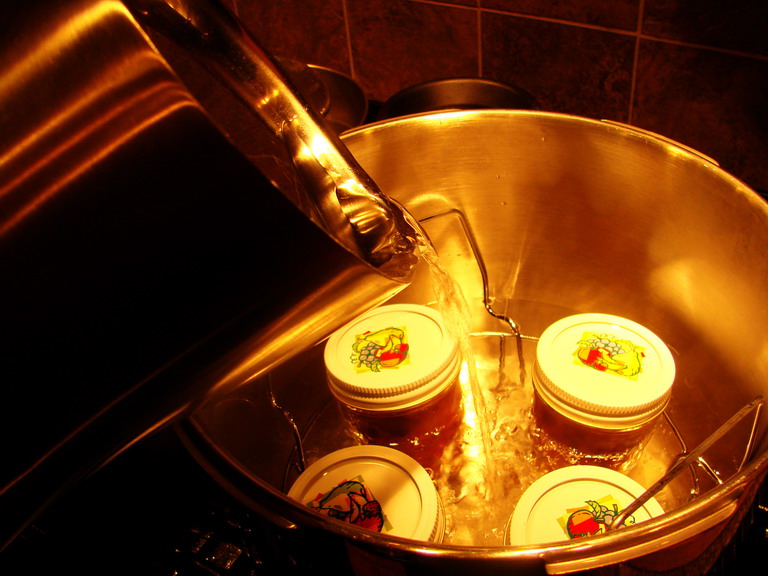
Then, take your kettle full of boiling water, and pour it into the pressure cooker or canner which already has the jar rack in place. Using the jar lifter, set the jars on the rack. Bring the heat up to high under the cooker/canner, and then, if you need to, add more boiling water so that the jars are covered by one inch of water. Be sure to aim the water so that you are pouring in the center of the pot, not directly on the jars, thus avoiding shocking the glass. Again, if you are using older jars which have been used over and over, you can potentially have one crack or break by having boiling water poured directly on it. This is one of those times when the new electric kettles that boil water super fast is quite useful–I mean they are already great for making fast pots of tea or French press coffee, but they are also super for adding boiling water to a canner. But you can use whatever you have to boil water–just be sure and have some ready to top off your pot.
Then, you make certain that the water in the canner/cooker is on a full rolling boil. When it is, put the lid on, lock it into place, and set the pressure to high. Once the pressure indicator shows that it is sealed and pressure is at full, turn the heat down to medium or low–whichever will keep the pressure up, and set the timer for the amount indicated by the recipe. (For my salsa, it was a full thirty-five minutes at full pressure.)
Then, you can leave the pot alone, and just check back on it now and again as needed.
When the timer goes off, turn the heat off under the pressure cooker/canner and allow the pressure to reduce naturally. Do not either use the cold water method of bringing the pressure down quickly or open the steam valve to hasten the process. This is a sure way to crack or break the jars. Just let the pressure come down naturally–which takes about twenty minutes with most pressure cookers.
After the pressure indicator shows that the pressure has normalized, unlock and open the lid. Look inside at your jars and see if anything has gone obviously awry. It probably hasn’t, so don’t fear–but it never hurts to check anyway. Then, let the jars sit in the still hot water for about fifteen minutes while the water cools. After that, you can take them out with the jar lifter and set them once more on a clean folded dishtowel. Leave them for about eighteen hours undisturbed.
After that, you need to check the seal on the jars. The jar lids should be slightly concave (sunken toward the inside of the jar) and there should be no give or movement up and down on them when you press them. Open the rings and check the seal on the edges–there should be no gaps, leaking or food seepage along the edges. Then put the rings on and tighten them well, and label and date your jars.
For safety’s sake, it is best to use home canned foods within a year. We ate Grandma’s stuff that was up to five years old, but she had been canning literally tons of food her entire life–she was the child of farmers who married a farmer, and she lived through the Depression and the second World War, so she really was an expert.
For a really great online source of information on canning, check out Jardin’s website, Fresh Preserving. If you need more direct help, please call your county extension office; the agents who work there are experts in all matters regarding food preservation safety. They are there to help you and will be able to answer your most urgent questions quickly and easily.
I hope this introduction hasn’t scared anyone off from trying to can at least a few jars of salsa or tomatoes for the winter. This month is the time for it, and I think that even if you just do small batches in a pressure cooker like I did, you are still taking more of a step toward food independence and who knows–maybe next year, you will jump into canning on a larger scale and really make yourself some food which is fresh, local and kept edible and safe for consumption months later!
Besides, it always gives a great sense of accomplishment to look at rows of home canned foods which you know are tasty and good for you, because you know exactly what went into them.
13 Comments
RSS feed for comments on this post.
Sorry, the comment form is closed at this time.

Categories:
- Admin (rss) (55)
- Blogs and Blogging (rss) (81)
- Book Reviews: Cookbooks (rss) (43)
- Book Reviews: Non-Cookbook Food Books (rss) (38)
- Cats and Cat Blogging (rss) (47)
- Chinese Cooking Lessons (rss) (32)
- Culinary School Stories (rss) (18)
- Dairy Pruducts: Cultured and Barbaric (rss) (4)
- Documentary Filmmaking (rss) (1)
- Essays, Rants and Reflections (rss) (260)
- Fighting Hunger (rss) (12)
- Food and Kids (rss) (45)
- Food in the News (rss) (126)
- Food Media (rss) (98)
- Food Preservation (rss) (18)
- Food Safety (rss) (45)
- Gardening (rss) (30)
- Herbs and Herb Blogging (rss) (20)
- Holidays (rss) (50)
- Kat Blogging (rss) (22)
- Kitchen Science (rss) (36)
- Leftover Makeover (rss) (8)
- Life, the Universe and Everything (rss) (131)
- Local and Sustainable (rss) (227)
- Local Athens Food and Foodies (rss) (42)
- Meatless Mondays (rss) (32)
- Menu For Hope (rss) (5)
- Nutrition, Diet and Health (rss) (84)
- On The Farm (rss) (8)
- Recipes: Almost Vegetarian, Vegetarian and Vegan (rss) (294)
- Recipes: American Regional (rss) (37)
- Recipes: Appalachian Hillbilly (rss) (33)
- Recipes: Bread, Pasta, Grains (rss) (95)
- Recipes: Canning and Preserving (rss) (8)
- Recipes: Chinese (rss) (123)
- Recipes: Comfort Food (rss) (120)
- Recipes: Cookies (rss) (16)
- Recipes: Desserts (rss) (48)
- Recipes: French (rss) (25)
- Recipes: Fruits and Vegetables (rss) (302)
- Recipes: Greek, North African and Middle Eastern (rss) (31)
- Recipes: Indian (rss) (137)
- Recipes: Italian (rss) (42)
- Recipes: Japanese (rss) (7)
- Recipes: Jewish (rss) (4)
- Recipes: Korean (rss) (6)
- Recipes: Meat, Poultry and Fish (rss) (220)
- Recipes: Mexican/Native American/ Latin American/Caribb (rss) (27)
- Recipes: Original (rss) (108)
- Recipes: Thai (rss) (27)
- Recipes: Tofu (rss) (17)
- Recipes: US Regional (rss) (16)
- Recipes: Vietnamese (rss) (8)
- Restaurant Stories (rss) (28)
- Sewing, Quilting, Arts and Crafts (rss) (16)
- Simple Chinese Recipes (rss) (30)
- Slow Food and Heritage Foods (rss) (10)
- Spice Blogging (rss) (44)
- The Chinese Cookbook Project (rss) (14)
- The Chinese Pantry (rss) (39)
- The Documentary (rss) (2)
- The Kitchen Saga (rss) (17)
- The Locavore's Bookshelf (rss) (15)
- The Unsung Adventures of The Culinary Nerd (rss) (6)
- Tools and Toys (rss) (35)
- Uncategorized (rss) (10)
- With a Side of Politics (rss) (48)
Archives:
- August 2012 (9)
- July 2012 (12)
- September 2011 (3)
- August 2011 (7)
- July 2011 (8)
- June 2011 (16)
- May 2011 (17)
- April 2011 (11)
- December 2010 (9)
- November 2010 (5)
- February 2010 (1)
- December 2009 (5)
- November 2009 (7)
- October 2009 (10)
- September 2009 (16)
- August 2009 (14)
- July 2009 (14)
- June 2009 (7)
- May 2009 (17)
- April 2009 (10)
- March 2009 (25)
- February 2009 (13)
- January 2009 (10)
- December 2008 (5)
- November 2008 (5)
- October 2008 (6)
- September 2008 (13)
- August 2008 (8)
- July 2008 (11)
- June 2008 (18)
- May 2008 (13)
- April 2008 (14)
- March 2008 (16)
- February 2008 (17)
- January 2008 (19)
- December 2007 (25)
- November 2007 (18)
- October 2007 (24)
- September 2007 (16)
- August 2007 (15)
- July 2007 (15)
- June 2007 (10)
- May 2007 (14)
- April 2007 (16)
- March 2007 (17)
- February 2007 (20)
- January 2007 (13)
- November 2006 (1)
- October 2006 (8)
- September 2006 (14)
- August 2006 (25)
- July 2006 (30)
- June 2006 (28)
- May 2006 (34)
- April 2006 (29)
- March 2006 (24)
- February 2006 (30)
- January 2006 (38)
- December 2005 (40)
- November 2005 (37)
- October 2005 (32)
- September 2005 (25)
- August 2005 (30)
- July 2005 (28)
- June 2005 (21)
- May 2005 (8)
- April 2005 (22)
- March 2005 (17)
- February 2005 (29)
- January 2005 (10)
Search Site:
Links:
- Lily’s Wai Sek Hong
- 101 Cookbooks
- A cat in the kitchen
- A Veggie Venture
- Accidental Hedonist
- Cha Xiu Bao
- chez pim
- Chocolate & Zucchini
- Chopstick Cinema
- Chowhound.com
- Chubby Hubby
- Cook sister!
- Cooking with Amy
- da*xiang
- Eat Local Challenge
- Eating Liberally
- Ecocentric
- Eggbeater
- Epicurious
- Farmgirl Fare
- Fatfree Vegan
- Foodgoat
- ForkandBottle.com
- Green Olive Tree
- Hooked on Heat
- Jaden’s Steamy Kitchen
- Kalyn’s Kitchen
- Lucullian delights
- Mahanandi
- Matt Bites
- MeatHenge
- mmm-yoso!!!
- New York Times – Dining & Wine
- Pizza Goon
- Rasa Malaysia
- Ruhlman
- Sailu's Kitchen
- Serious Eats
- SF Gate: Food & Dining
- Simply Recipes
- Soul Fusion Kitchen
- Tastespotting
- The Amateur Gourmet
- The Cleaner Plate Club
- The Food Section
- The Grub Report
- thecookscottage
- U.S. Food Policy
- Wandering Chopsticks
- Washington Post Food and Dining
- Wasted Food
Meta:

Powered by WordPress. Graphics by Zak Kramer.
Design update by Daniel Trout.
Entries and comments feeds.
Open-kettle canning is fine for high acid foods like salsa, but certainly pressure canning reduces the worry about potential food poisoning.
You need a bigger pressure cooker, though; we wouldn’t get through canning season if we could only do four jars at a time!
Comment by Shay — September 26, 2007 #
Shay, I know that acidic foods can be cooked in a hot water bath canner–which I do have–but I was not certain that my salsa would have enough acid in it to be safe. Hence, rather to be safe than sorry I used the pressure cooker.
I am getting an early birthday gift from my in-laws on Friday–a twenty one and a half quart pressure canner! That way, instead of four half pints, I can process up to nineteen pints or seven quarts at a time.
To be honest, I am much more used to working on a bigger scale, so this tiny batch canning experience–which I wanted to do to show that someone could take a baby step into pressure canning if one had a pressure cooker large enough–was mostly illustrative.
An experiment–just to show it can be done.
I couldn’t do it with this tiny pressure cooker in any way shape or form on a large scale. I would go instantly mad.
Comment by Barbara — September 26, 2007 #
Here you say that you canned a batch of your “Calico Salsa”. When I go to your Calico Salsa recipe you say that “Canning this salsa isn’t a very good idea”
Now, I am old enough to know that life is full of contradictions.
Comment by Rob — September 27, 2007 #
My mother put up our canning with 2, sometimes 3, 4-jar pressure cookers and a turkey roaster for a hot bath. Doing it all on the wood stove in late August through September. Putting up batches of up to 80 jars is definitely crazy that way. I remember her being so happy to get her new 10 jar pressure cooker.
I had never used metal lids, only the rubber rings & glass tops on the jars with bails, so I learned something new there too.
Comment by Dan Jenkins — September 27, 2007 #
Rob–in general, the usual Calico Salsa recipe is wasted being canned–the nature of it is going to be changed completely by canning it. We’ll see if it makes a good completely cooked salsa. This is an experiment insisted upon by Morganna the elder daughter.
Dan–your mother’s Kung Fu is greater than mine–I don’t think I would have the patience to put up that much produce using just a pressure cooker or two and a turkey roaster.
I know that Grandma would have pulled her hair out over it, too.
Comment by Barbara — September 27, 2007 #
What a great tutorial Barbara! I am totally intimidated by the though of pressure canning, but I do a lot of boiling water canning- specifically salsas, jams, pickles, fruits, and chutneys. You make pressure canning look a little less fearful to me, thank you.
Comment by Erika — September 27, 2007 #
What is the difference in results between pressure canning and open boiling canning? We always did the open one, and I never knew there was another way to do it.
Comment by Christy — September 28, 2007 #
I used to can tomatoes and green beans a lot but stopped a few years ago. Now I find that my canning jars (Kerr) tend to explode in the hot water bath. So I have given up (not such a problem since it is only my husband and I). I did use to enjoy canning a lot, though.
Comment by Grace — September 30, 2007 #
Erika–it isn’t so hard. It will be easier now that I have my birthday gift from my in-laws–I just have to take the pressure gauge down to the county extension office to have it tested before I can start processing the tomatoes.
Christy–the usual water bath canning is great for high acid foods such as fruits and pickles and for jellies and jams. And it used to be the preferred method for tomatoes as well.
However, the USDA tested the pH of tomatoes in the 1990’s and found that they had started being less acidic than they had been, so they recommended pressure canning instead of hot water bath canning.
Now–you can still can tomatoes in a hot water bath canner–but you need to add acid to them.
However, if you use a pressure canner for them, not only do you not need to add acid, you cook it for a shorter time at a higher temperature, so that vitamins and minerals tend to be preserved better.
Grace–it could be the age of the jars. After being used over and over, some of them will just go splewy and shatter.
You might need new jars….
I find it fun to can–though I do different stuff than Grandma did. She never made salsas, though she did make her own spaghetti sauces and can them. I will be doing some of that–I already processed about seven quarts of homemade marinara for the freezer, but I will probably do some canned too–it is just so convenient and tastes better than store bought.
Comment by Barbara — October 1, 2007 #
[…] Canning primer @ Tigers and Strawberries. […]
Pingback by Tomato-Date Chutney » jugalbandi — October 9, 2007 #
[…] In informative posts, learn how to sweat onions and mushrooms at 101 Things Every Cook Should Cook, find out how to cook an artichoke at A Year at Oak Cottage, read top cooking tips from Ferran Adria over at Chez Pim, David Lebovitz provides 8 Tips for Using Olive Oil, learn how to season a wok at A Daily Obsession, learn how to pressure can and how to make Chinese chicken and pork stock from Tigers and Strawberries, and find out how to arrange a buffet table at Apartment Therapy. […]
Pingback by Columbus Foodie » Blog Archive » September 2007 Roundup — November 6, 2007 #
Barbara, I don’t know if you check comments on old posts but I have two quick questions:
1. Can you use a normal pressure cooker or do you need one that is actually designed for canning?
2. Have you ever seen plastic disks that are somehow meant to be used for canning? I bought some a couple of years ago out of desperation when I couldn’t find proper canning jars – and then I finally did find the jars so the disks have been sitting in my cupboard ever since. I spoke with an elderly English lady about them briefly – but she seemed to think they were so basic I was embarrassed to ask for too many details. It seems like they are used by Europeans for re-using non-canning jars (yes, I know!). Anyway, just curious if you have ever come across them…?
Comment by Meg — September 8, 2008 #
[…] Tigers & Strawberries » Preserving the Local Harvest: A GeneralThis year’s Eat Local Challenge revolves around preserving the harvest, and like eating locally, this is something I do just as a natural course of events. … Well, in West Virginia, where we both grew up, yeah, a lot of folks know all about preserving food. That is because agriculture and self-sufficiency are still… […]
Pingback by Preserving strawberrys | EtravelChoice — April 27, 2011 #