Cook Local, Eat Global
Asian Ways With American Winter Greens, Part II
I have found that nearly everyone, the world over, eats greens, in one form or another.
In my native Southern Appalachian tradition, we cook them long and slow, over low heat, with some sort of smoked pork product. Often, onions, garlic and hot peppers are added, and then, at the end, they are dressed with vinegar. The vitamin (and pork fat) filled liquid, called “pot likker” by us hillbillies, turns into a rich, heady brew by the end, and is often sopped up with cornbread or biscuits. Richly smoky and intensely flavored, the greens and likker, kissed with the tartness of apple cider vinegar, are a supreme comfort food for those of us who grew up in the South, no matter our race, creed or socio-economic background.
But, one cannot live by pot likker alone, and so I have been exploring different ways to go about cooking my beloved kale, chard, turnip, mustard, collard and beet greens, and have found some really great inspirations from the kitchens of Asia.
Last week, I posted about how steamed American mustard greens with Chinese fermented black beans are a real treat; this week, I want to give you a recipe that dips into the deep traditions of Southern India, which I have mostly learned about by reading Indira’s wonderful blog, Mahanandi.
Most of my Indian recipes are strongly rooted in the cuisines of northern India, Pakistan and Bangladesh, in large part because these are the foods most often presented in American Indian restaurants. The fact that I learned a lot of recipes by cooking for a Pakistani/Bangladeshi Muslim family also played an important role in the process of my education in Indian foods. However, as I have read Indira’s beautiful descriptions and clear recipes, an interest in the cookery of Southern India has been kindled, and so, I have been reading cookbooks, memoirs and, most importantly, experimenting in the kitchen.
This recipe, which uses a mixture of American greens (my favorite combination for this is collards, kale and mustard) is not only inspired by Indira’s writings but contains an ingredient which she introduced to me: dahlia powder. She also calls it, in her language, pappula podi, or putnala podi, but in our house, Morganna, Zak and I refer to it as “Indira’s Magic Powder,” because she sent me a jar of it months ago, and I have been using it since then in vegetable curries to a splendid effect that is nothing short of alchemical.
Made simply of roasted, skinned and split chana (chickpeas), which are ground up with dried chiles, coconut, cumin and salt ground together, “Indira’s Magic Powder” thickens curries and flavors them with a surprising depth. The roasted chickpeas have a nutty aroma that complements nearly any vegetable, but which especially goes well with the slightly bitter tanginess of mixed greens, while the coconut adds richness and the chiles and cumin contribute fire and spice.
Having long since run out of the original jar, I have gone on to make my own stash of Indira’s Magic Powder, and I suggest that you do the same. Just follow the link to her recipe, collect the ingredients, grind them together and store them in an airtight container and you are good to go.
As for the rest of the ingredients for this dish–they are simple to obtain: mustard oil, whole mustard seeds, cumin seeds and fresh curry leaves can all be found at the Asian or Indian market near you, or can be sourced online, while everything else can be found at any American supermarket.
I served this dish on New Year’s Eve night, when we had an Indian feast to celebrate the holiday, and this past Sunday for Morganna’s seventeenth birthday party. Both times, it was received with great enthusiasm, and I am very proud that not only was it loved by the people of Indian descent who ate it, but also by my mother, who had never had Indian food before in her life.
Mom wanted the recipe, so here it is.
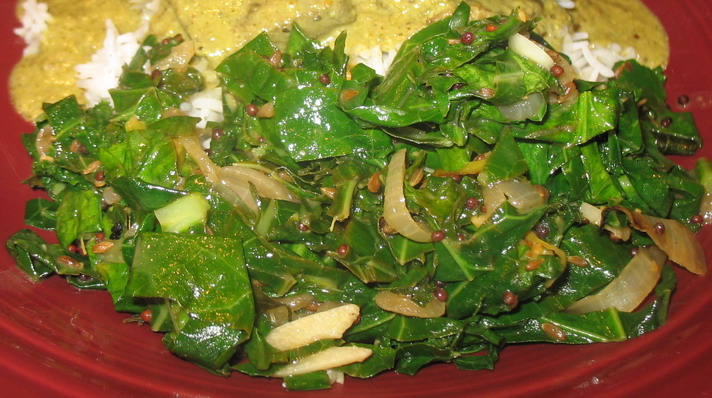
Indira’s Magic Greens
Ingredients:
4 tablespoons mustard-flavored oil (or ghee or canola oil)
1 large onion, peeled and very thinly sliced (about a cup and half)
1/2 teaspoon salt
3 large cloves garlic, peeled and thinly sliced
fresh cayenne chiles, green or red, thinly sliced on the bias (optional–use as many or few as you like)
20 fresh curry leaves (optional)
1 tablespoon whole mustard seeds
1/2 tablespoon whole cumin seeds
1 pound mixed greens, well-washed, large stems removed and cut into thin ribbon-like slices (try to use at least some mustard greens here–their spiciness makes them delicious cooked like this)
1/2 cup water
3-5 tablespoons Indira’s Magic Powder (pappula podi)
juice of one lime
salt to taste
Method:
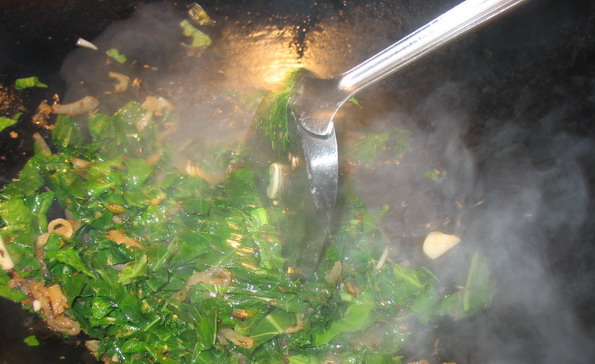
Heat wok, or large, deep cast iron frying pan until it smokes. Add oil and when it is hot (about twenty seconds), add the onions and salt. Stir fry until the onion is golden colored. Add the garlic, the chiles and curry leaves, and keep stirring until the onions are beginning to really turn brown. Add the whole spices, and keep stirring until the onions turn reddish brown and the mustard seeds pop.
Add the greens, and pour in the water. Stir the hot onions on top of the greens, then briefly cover the wok or pan with a lid or an upside down bowl to allow the greens to steam for about a minute or two. Uncover, and if there is very little water left, add some more–a quarter cup at a time, and stir until the greens deepen in color and start to go limp.
Stir in the Magic Powder, and keep stirring until the water thickens to a nice curry paste. Add the juice of one lime and salt to taste, then serve immediately with rice and various other curries.
Let’s Talk Woks
I have always invited readers to email me with any questions they may have on matters culinary; every now and then the questions I get give me the idea for a post.
This is one of those times.
I have talked about woks here in the past, holding forth on my opinion that thin Cantonese cast iron or good carbon steel woks produce a superior result compared to non-stick, stainless steel or anodized aluminum woks, and have given my thoughts on what are the most essential bits of kitchen equipment for the cooking of Asian foods. However, a reader asked me some specific questions about woks that I thought merited a further post about the subject.
Gordon, from Brisbane, Australia, wrote to me asking about flat-bottomed woks. Here is an excerpt from his email:
“I had tried a flat bottomed, carbon steel wok on an electric cooktop in the past. Based on the advice of people such as Grace Young I purchased a wok that only had a smaller flat surface area of around 5 inches as it was suggested that any more than this and it is not really a wok and no more useful than a skillet. However I found this surface area too small and needed to cook in very small batches and sometimes ended up stewing the food. This time round I’m thinking of buying a carbon steel wok with a larger surface area on the bottom of around 8 inches after seeing a few Asian home cooks using wider based woks on TV shows? But before doing this I would be grateful of any advice you can provide on what I should look for in a flat bottomed wok. Note I have also tried a thick, cast iron, flat bottomed wok but it turned out to be a real pain because of lack of temperature control, handling difficulties and having to wait around for it to cool down before I could clean up etc. I’m also nervous about using a thin Cantonese type, cast iron wok because of their fragility.”
As much as I admire and love Grace Young’s work, and find her writing and herself to be charming and filled with a wealth of information on wok culture, I disagree with her on the point about the flat surface area of a flat bottomed wok needing to be very small in order to properly function as a wok. This is just not the case in my experience. The Cantonese flat-bottomed thin cast iron wok I purchased from Tane Chan at The Wok Shop has a bottom diameter of 6 1/2 inches, and it functions just as well as a round bottomed wok. I purchased it originally to use on flat top electric stoves, but have since been using it on my AGA gas range and have only had great results with it.
I suspect that an eight inch bottom diameter of the wok would still work -so long as- the outer edge of the wok was proportional to the bottom. In other words, the outer diameter would have to be rather wide for the wok to function really well as a wok.
However, in my experience, the 6 1/2″ diameter bottom allows me to cook quite a bit of food without steaming or stewing it, even without cooking batches. I can cook dishes for up to four or five people in the wok without much in the way of batching.
What would I look for in a flat-bottomed wok? I would choose either thin cast iron with enamel on the outside, or carbon steel. I prefer a single, long handle (Northern style) on the wok to the two small “ear” handles that you see on my Cantonese wok, but as you can see in most of the illustrations on this blog, I haven’t let the two handles on my wok slow me down any!
Nonstick is right out, as far as I am concerned, as is heavy, thick-bottomed cast iron. I have had both types of woks and disliked them both intensely. I used nonstick woks for years as a personal chef because they cleaned up easily, but the food was never exemplary; there was not enough of the “wok hay” present to really make my stir-fries sing. Now that I have gotten used to making great stir-fried food in my thin cast iron, I could never go back, nor would I ever counsel anyone else to use a nonstick wok.
As for the thick cast iron woks–for the reasons cited by Gordon above–they suck. Leave Le Creuset to their French Ovens and skillets–they do those beautifully, and get a wok made in China. Please.
As for the fragility of the Cantonese cast iron woks–I believe that this reputation is undeserved.
I have had mine for about four years now, and it has survived being used at least three times a week in all that time. It has survived being shipped across country and moved by really rough moving guys. I do not treat it gently. I scrub the hell out of it after each use under cool to hot running water when it is directly off the heat of the stove, and I have banged it around pretty mercilessly in the cast iron sink, on the cast iron stove and on the stone countertops.
It has not shattered yet.
Compared to carbon steel the thin cast iron may be fragile in a general sense, but in my experience, it just isn’t that fragile. The enamel on the outside toughens it up considerably, and I guess that unless it is dropped from a considerable height on a tile or stone floor, it will be okay.
Gordon also wondered about what sorts of utensils to use with flat bottomed woks:
“I have read a few times that flat bottom woks should be avoided because food sticks and burns in the corners and the metal spatula also catches in the corners resulting in the patina being scratched off. Therefore would I be better off using a wooden implement or plastic spatula (as used for non-stick pans) with a flat bottomed wok?”
Food really doesn’t stick and burn any more at the edges of a flat bottomed wok than it does in the edges of a regular pan. If one leaves a food item too long without moving it on the bottom of a round bottomed wok, it will burn; the same is true with a flat bottomed wok.
I only use metal wok shovels in my flat bottomed woks and have had no problem with scraping off patina. If one uses them at very high heat like I do, one cannot use plastic anyway, as it would melt. You can get bamboo wok shovels that look like the metal ones, but they are hard to find–they work pretty well as an alternative, but really, I haven’t had that much of a problem with losing patina. But then, I cook so much that the patina on my woks is probably building up so fast that it doesn’t get a chance to get worn away. But really, I think that some people overstate the fragility of a wok’s patina.
Woks are much tougher than people let on; I guess that there is a considerable amount of mystique surrounding them because they are very different to work with at first, but really, a design that doesn’t change for thousands of years doesn’t change because it works! And if it didn’t work well–well, we wouldn’t be having this conversation.
But one could say that flat bottomed woks are different, since they represent a considerable change in the traditional form of the wok, and a very recent one at that.
That is true, but it is also a natural evolutionary adaptation to a changing environment. Urban-dwelling Chinese and Chinese-Americans by and large do not have traditional wood or gas wok stoves that are built to suit the unique round bottom of the wok. Because many of these people are now using flat-topped electric stoves, a demand for woks made to work well on those cooktops arose and has been fulfilled by the modern flat-bottomed wok.
It is a compromise between ancient form and modern function, and in my opinion, it functions very well.
Gordon–thank you very much for emailing me, and I hope I have helped you on your quest for wok hay.
Happy wokking!
Asian Ways With American Winter Greens, Part I
There is no better dish to eat in the cold, dead, dreary days of winter than greens.

At least, I think so.
For one thing, they are filled with vitamins, minerals and iron, and they are among the freshest of foods at this time of year, being as cold and snow do not really hamper their growth. In fact, I grew up with the experience that kale and collards never really taste as good until they have had a nice heavy frost on their leaves; for whatever reason, this brought sweetness to them. Perhaps the frost causes some sort of metabolic change in the plant which converts some of the starches in the leaves into sugars; the sweet flavor then balances the inherent bitterness of the greens.
I love all greens, but I primarily grew up with kale and turnip greens. Collards, and mustard greens I learned to love later, in college, when African American friends in the dorms would bring tubs of cooked greens home as care packages from their mammas and grandmas. I shared lentil soup from my Mom with them, and received greens in return, and we were all beautifully nourished together.
It sure beat the glop they served us in the cafeterias.
Now that I have been cooking Asian foods for some time, I have found that as much as I love the traditional Southern ways of cooking greens with onions, smoked pork products, hot peppers and vinegar, I have discovered other, better ways to cook greens that are just as tasty and lower in fat. These recipes are great for those post holiday meals when it is good to cut back on the fat after all the rich food feasting that goes on in November and December.
This recipe uses standard American-style mustard greens. This brilliant peridot-colored green comes with curly leaves and thick stems. They look rather akin to the curly leaf lettuces that are so popular now, but have a crisper, more sturdy texture. Their flavor, however, is nothing like mild leaf lettuce; instead, mustard greens have a pleasant, peppery pungency that one would expect from a plant which also produces mustard seeds.
There are many different Asian versions of mustard greens, but the plain old American ones are easier to find and taste just as good.
Younger, smaller leaves are more tender, but the older leaves are spicier in flavor. They are great stir-fried with scallion, garlic and fermented black beans, which is how I had them many years ago when I worked in a Chinese restaurant. The chef was certain that neither Heather nor I, two American waitresses would like the dish, but he sent it over to us during lunch anyway. What he didn’t know is that the two of us had grown up eating greens every winter. She took the first bite and said, “Mmm. Tastes like grass.”
I took a bite, and smiled. “Very green. Wonderful.”
June, the waitress from Beijing, took a bite and scrunched up her face. “Oooh. Tastes like grass. Ick.”
She then pushed the platter away and went back to eating her twice cooked pork, much to the amusement of the chef’s wife, who had said as she put the dish on the table, “This is very Chinese. You probably won’t like it, being American, but Huy wants you to try it.”
Mei and Huy both laughed when Heather and I shrugged our shoulders, and dug into the platter. “More for us! Too bad for you, June!”
I used similar seasonings in this version, but instead of stir frying the greens, I steamed them. This cuts down on the oil in the dish, and preserves the lovely brilliant color of the leaves. It is simple and quick and would make a good side dish to go with Hunan Beef with Cumin.

Steamed Mustard Greens with Scallions, Garlic and Black Beans
Ingredients:
1 pound mustard greens
1/4 cup chicken broth or stock (or use vegetable broth)
1 tablespoon light soy sauce
1 1/2 tablespoons fermented black beans
3 scallions light green and white parts only, sliced thinly on the biase
2 garlic cloves, thinly sliced
1 tablespoon peanut oil
1/8 teaspoon sesame oil
1-2 tablespoons Chianking black vinegar (or use balsamic vinegar)
Method:
First, clean the mustard greens. Take them out of their bundle, and cut off the very bottom of the stems, discarding any large tough stems as you go. Also discard any yellowed, sad looking leaves.
Rinse them under running water and set them on the counter. Rinse out your sink, stop up the drain and dump the greens into the basin. Run cold water over them until they are covered, then swish them around over and over until they are clean. (Mustard greens like to grow in sandy soil, and they are nice and curly-leaved so they trap particles of sand that can make eating them a gritty experience if you are not careful with cleaning them. So, be obsessive. Your teeth with thank you for it.) Lift them out of the sink, drain the water out, rinse the sink and repeat the rinsing, soaking and swishing process at least one more time. If your greens are really dirty, do it at least twice more. Remember, gritty greens are NOT fun to eat.
When you have finished cleaning them, drain them in a colander.
Start water boiling in a pot that will fit a bamboo steamer. Find a bowl that will fit in the steamer with at least 1/2″ clearance around the edges of the steamer that will fit the greens. (Or, if you lack a steamer, you can improvise by taking the top and bottom out of a tuna can and washing it out thoroughly. Set this in the bottom of a pot, put boiling water into the pot and then set the bowl down on top of the can to keep the water out of the bowl. Then, instead of putting the lid on the steamer, put it on the pot, over the bowl.)
Put the greens in the bowl, pour the stock and soy sauce over them, and sprinkle them with the black beans. Bring the water to a boil, cover the steamer and steam for ten minutes.
Just before the ten minutes is up, heat the peanut oil in a heavy bottomed frying pan and stir in the scallions and garlic until they sizzle and turn slightly golden.
When the greens are steamed, carefully remove the lid, and using two towels, pull the bowl out of the steamer. Pour the sizzling scallions and garlic over, then drizzle with the sesame oil and vinegar. Serve immediately with a stir fried dish and steamed rice.
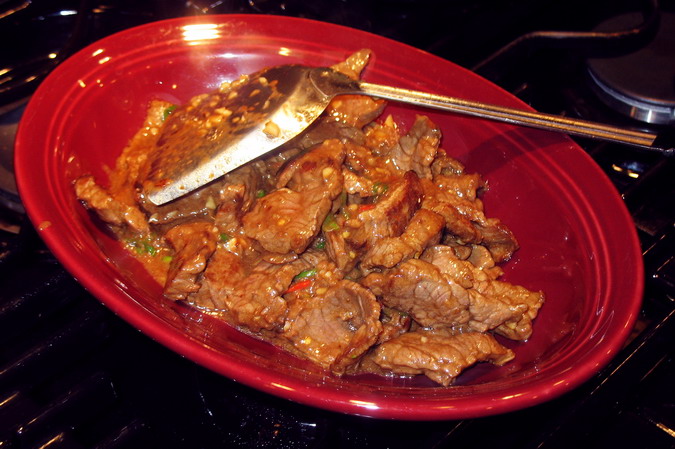
From Revolutionary Chinese Cookbook: Beef With Cumin
Cumin is one of my favorite spices; however, it is not a flavor one overwhelmingly associates with Chinese food. Rather, it is better known as an ingredient in Indian curries, Mexican braises and Mediterranean stews, so I was intrigued to see this recipe when I first got my hands on my copy of Revolutionary Chinese Cookbook.
Not surprisingly, beef with cumin is a specialty of the Muslim minority in China, and it is likely that cumin was brought to China along the silk road by spice traders from the Middle East and India.
The ingredient list is short and simple for this dish, and although Dunlop notes that one could use prime cuts of steak such as tenderloin to make it, she uses lesser cuts such as round and chuck, because cutting them thinly, on the bias against the grain, makes them nearly as tender as a more naturally tender cut of beef. I used a piece of top round to great effect here, in large part because that is what I had in my freezer. Left partially frozen and cut nearly paper thin with a very sharp knife, top round is just as wonderfully tender as a porterhouse steak, but with a deep beefy flavor typical of the tougher, more well-exercised muscles.At this point, I use top round for nearly all of my beef stir fries.
I do have to admit that I changed the cooking method. Dunlop uses the “velveting” method of cooking here; it is a method much employed by restaurants to cook meats to a slippery-tender result, but which I find messy, wasteful and extremely time consuming when done in the home. In short, it is a technique wherein the meat is marinated in a mixture that includes corn or potato starch and sometimes egg white. Then, it is “oil-blanched” in a vat of deep-frying oil for a very short time until it is partially cooked. Then, the oil is discarded or strained and saved, and the meat is stir fried until it is finished cooking, along with all of the other ingredients of the dish.
For a family dinner, I see no overwhelming reason to bother with the velveting technique. It results in the use of too much oil, time and energy for the result, which while it is good–is not -that- good! Not good enough to offset all of the work, mess, waste and nutritional impact.
So, instead, I followed my own usual method for stir frying meat, and found that the results were more than satisfactory; they were superb. In transcribing the recipe, I used my own techniques instead of copying out Dunlop’s.
The meat was tender and flavorful, and fragrant with the musky scent of cumin, which was beautifully enhanced by the umami of the soy sauces. Garlic, scallion and sesame oil rounded out the flavors while the bright taste of fresh red chiles really sent the dish over the top.
The stir fry went together quickly and easily and went beautifully well with a dish of gai lan and sweet red bell peppers simply stir fried and flavored with ginger and fermented black beans.
This is another dish destined to be seen on our table frequently.
Beef With Cumin
Ingredients:
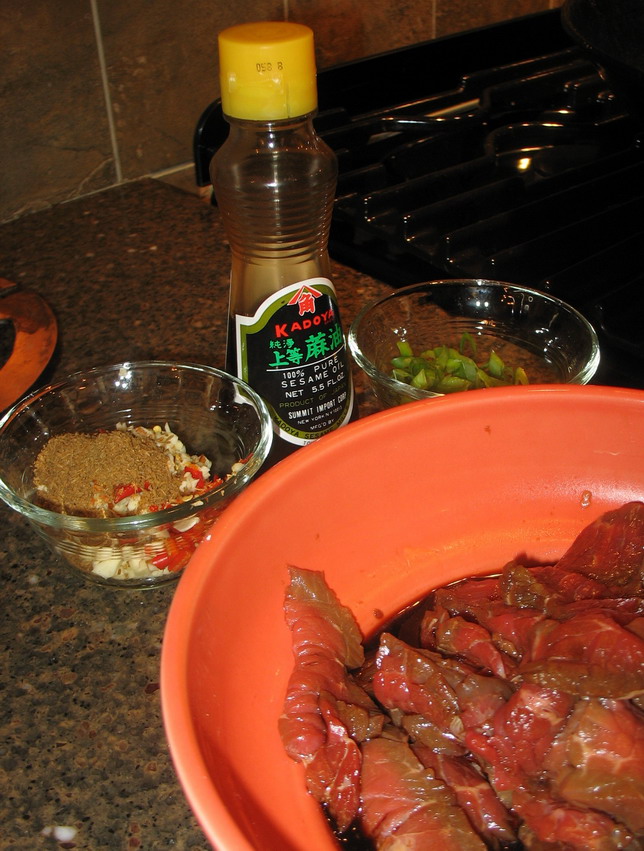
1 pound trimmed beef top round steak, cut against the grain on the bias about 1/8-1/4″ thick
1 1/2 tablespoons Shao Hsing wine
1 teaspoon light soy sauce
1 1/2 teaspoon dark soy sauce
1 tablespoon cornstarch
3 tablespoons peanut oil
2 teaspoons fresh ginger, peeled and minced
1 tablespoon finely chopped fresh garlic
2 fresh red chiles, (seeded if you like) minced
2-4 teaspoons dried chile flakes
2 teaspoons ground cumin
1-3 tablespoons Shao Hsing wine as needed
2 scallions, green parts only, finely sliced on the bias
1 teaspoon sesame oil
Method:
Toss the beef in the wine, soy sauces and cornstarch until it is well coated with the mixture. Allow to marinate at room temperature for at least twenty minutes.
Heat wok on high heat until a thin thread of smoke rises from it. Add peanut oil and heat for another thirty seconds or so. Add beef, reserving any remaining liquid marinade in the bowl. Spread beef out into a single layer over the bottom of the wok and allow to sit undisturbed for at least a minute so it can sear. When you smell it browning and the top edges begin to turn greyish brown, then begin stir frying vigorously.
While stirring, sprinkle meat with ginger, garlic, chiles, chile flakes, and cumin. Continue stir frying just until all of the red color is gone from the meat, adding a bit of Shao Hsing wine as needed to deglaze any browned bits from the bottom or sides of the wok. Add any liquid marinade and stir fry just until the liquid thickens and clings to the meat.
Sprinkle with scallion tops, and drizzle with sesame oil. Remove from heat, give a few more stirs and then serve on a heated platter with plain steamed rice and a vegetable dish.
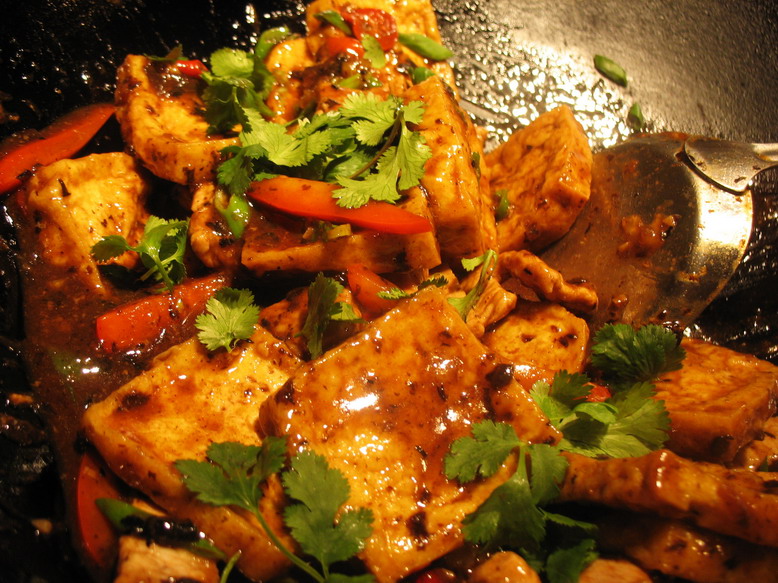
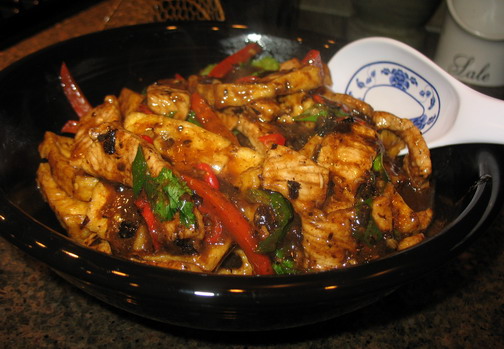
From Revolutionary Chinese Cookbook: Peng’s Home-Style Bean Curd
This is actually the second recipe I cooked from Revolutionary Chinese Cookbook, but I am presenting it first because so far, it is my favorite. It is a simple dish, though it does require the extra step of deep-frying the tofu. However, the results are so very worth the extra time, trouble and mess that I suggest that everyone ignore their instincts to skip it and pan fry the tofu instead, jump headlong in, use the oil and to heck with it. Even with the extra step of deep frying, the recipe isn’t that difficult, and only a little more messy than it would be otherwise.
Secondly–I must suggest a few alternatives for vegetarians and Muslims here, as the recipe is typical of country Chinese cooking wherein a small amount of pork is added to a tofu dish to add flavor and a contrast in texture. Dunlop suggests that vegetarians simply omit the pork and use vegetable broth; I think that instead of doing that, vegetarians would be better off replacing the pork with dried rehydrated Chinese black mushrooms (shiitake) and using the soaking liquid in place of the chicken stock. The mushrooms would add richness and their slippery, unctuous mouthfeel would contrast beautifully with the chewy, craggy deep fried tofu.
Muslims can go with the vegetarian option, or they could substitute some top round beef for the pork. Or lamb flank steak would work equally well, and give a more distinctive flavor to the dish than the beef would.
The main flavoring of this recipe, as one can guess from the photograph above are chiles and fermented black beans. I was amazed at the amount of black beans used in this dish, not because I didn’t think it would taste good, but because I was happy to see evidence that someone in China uses black beans with the same heavy-handed abandon that I do! I learned to use fermented black beans from Cantonese recipes, and I had been feeling somewhat like an infidel for always using more black beans than most Cantonese recipes stipulated, but I simply loved the flavor so much, I just couldn’t help myself. And I had found that I adored how they tasted in combination with chile peppers, both fresh and processed, and would find myself slipping those into classic Cantonese recipes such as Beef with Gai Lan, even though those dishes were never meant to be spicy.
Maybe, in looking through the recipes in this book, I realized that I was meant to be cooking Hunan dishes, not Cantonese, all these years!
I also want to note that I added two ingredients to the dish that are not original to either of the original recipes by Peng or Dunlop: I added red sweet bell peppers and cilantro. The reason is quite simple; I wasn’t making a second dish of vegetables, so I wanted to throw in a bit more of a vegetable element to this dish to round it out. (In short, I was lazy.) If you want to use them, add one sliced bell pepper with the tofu just before simmering, and throw in a good handful or two of cilantro leaves at the very end, just before giving a final stir.
In writing out this recipe, I will also note that I followed my own method of marinating the meat and stir frying, so the order of operations and the way in which the ingredients are written out are different than Dunlop’s method; however, the essence of the recipe is the same and will give the same basic result. (No, I really cannot follow any recipe completely as written anymore. I think that everyone knows that by now, but it doesn’t hurt to reiterate it.)
Oh, and one more thing. Who is Peng?
He is Peng Chang-kuei, one of the most famous of all Hunanese chefs. He fled mainland China at the end of the civil war and has lived mostly in Taiwan since that time. Peng started making the dish in the 1960’s or 70’s as his own lunch in his restaurant in Taiwan, as a reminder of the peasant tastes of his home province. He never meant to serve such a plain and humble dish in his restaurant, however, when he would eat lunch in the dining room, customers inevitably asked what the chef was having, then requested that they, too, have the same dish. It ended up being one of the most favored dishes among his customers.
As for Peng–he is also the originator of another very famous Hunanese dish.
But, you should read that story yourself in the book.
For now have a taste of his home style bean curd.
Peng’s Home-Style Bean Curd
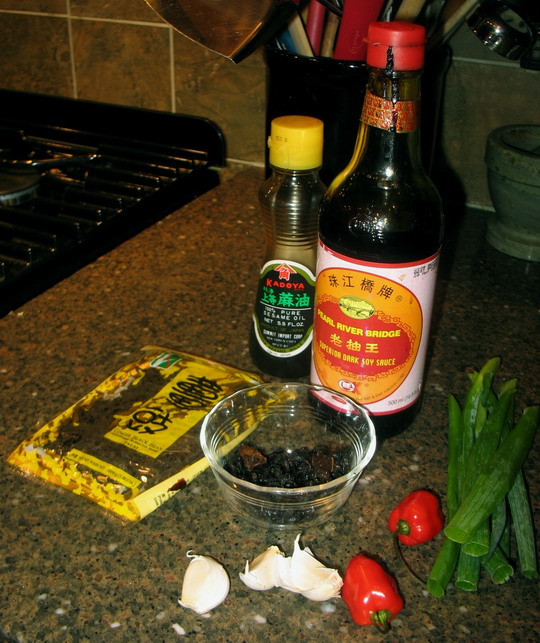
Ingredients:
3 ounces boneless pork loin, thinly sliced
1 teaspoon Shao Hsing wine
1 teaspoon cornstarch
16 ounces extra firm bean curd, drained
1 cup peanut oil for deep frying
2 fresh red chiles (I used serrano chiles) cut thinly on the bias
1 tablespoon fresh finely minced garlic (about 2 cloves)
3 tablespoons fermented black beans, rinsed (I never rinse mine, btw)
1 cup chicken stock or broth
1/4 teaspoon dark soy sauce
1 tablespoon cornstarch mixed with 1 tablespoon cold water or chicken stock
3 scallions, green parts only, cut on the bias into very thin slices
1/2 teaspoon sesame oil
2 teaspoons chile oil (optional–I didn’t use it)
Method:
Toss the sliced pork with the wine and cornstarch, and allow to marinate while you are preparing the tofu.
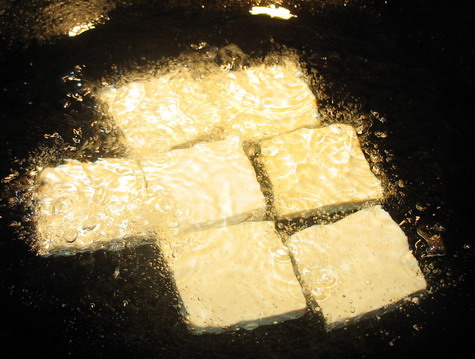
Cut the tofu into squares about 1/2 inch thick.
Heat the peanut oil in your wok until it reaches about 350-400 degrees F. (To test it, you can stick a bamboo chopstick into the oil. If tiny bubbles form at the end of the chopstick and dance up to the surface immediately, it is hot enough to start frying the tofu.) When the oil is hot enough, carefully slide 1/3 of the tofu slices down the side of the wok into the oil; this keeps the oil from splashing up and hitting your skin. The raw tofu will sink to the bottom. As it cooks, it will begin to slowly ascend to the top of the oil where it will bob and float, slowly turning pale gold with a bubbly, crusty exterior.

When the tofu is uniformly pale golden, remove from the oil with a skimmer and drain on paper towels. Repeat with the other two thirds of the tofu. Do not overcrowd the wok; if you do so, you will end up cooling the oil and this will result in oil-soaked tofu.
Pour off the oil, reserving about 3 tablespoons. Clean the wok, reheat it over high heat until it smokes and add the reserved peanut oil. Add the garlic, chiles and black beans and stir fry until very fragrant, about forty seconds to a minute. Add pork, settle it into a single layer and allow to brown on one side undisturbed–about one minute or so. When it is brown on the bottom and turning white at the edges, start stir frying until there is no pink left on the pork.
Pour in the stock and the soy sauce, then slip in the fried tofu. Bring to a boil, then reduce heat to low to simmer and braise the bean curd for several minutes to allow the flavors to penetrate its craggy surface. Add cornstarch mixture and stir until the sauce thickens. Stir in the scallion slices and the sesame oil and chile oil if you are using it.
Serve with steamed rice.

Categories:
- Admin (rss) (55)
- Blogs and Blogging (rss) (81)
- Book Reviews: Cookbooks (rss) (43)
- Book Reviews: Non-Cookbook Food Books (rss) (38)
- Cats and Cat Blogging (rss) (47)
- Chinese Cooking Lessons (rss) (32)
- Culinary School Stories (rss) (18)
- Dairy Pruducts: Cultured and Barbaric (rss) (4)
- Documentary Filmmaking (rss) (1)
- Essays, Rants and Reflections (rss) (260)
- Fighting Hunger (rss) (12)
- Food and Kids (rss) (45)
- Food in the News (rss) (126)
- Food Media (rss) (98)
- Food Preservation (rss) (18)
- Food Safety (rss) (45)
- Gardening (rss) (30)
- Herbs and Herb Blogging (rss) (20)
- Holidays (rss) (50)
- Kat Blogging (rss) (22)
- Kitchen Science (rss) (36)
- Leftover Makeover (rss) (8)
- Life, the Universe and Everything (rss) (131)
- Local and Sustainable (rss) (227)
- Local Athens Food and Foodies (rss) (42)
- Meatless Mondays (rss) (32)
- Menu For Hope (rss) (5)
- Nutrition, Diet and Health (rss) (84)
- On The Farm (rss) (8)
- Recipes: Almost Vegetarian, Vegetarian and Vegan (rss) (294)
- Recipes: American Regional (rss) (37)
- Recipes: Appalachian Hillbilly (rss) (33)
- Recipes: Bread, Pasta, Grains (rss) (95)
- Recipes: Canning and Preserving (rss) (8)
- Recipes: Chinese (rss) (123)
- Recipes: Comfort Food (rss) (120)
- Recipes: Cookies (rss) (16)
- Recipes: Desserts (rss) (48)
- Recipes: French (rss) (25)
- Recipes: Fruits and Vegetables (rss) (302)
- Recipes: Greek, North African and Middle Eastern (rss) (31)
- Recipes: Indian (rss) (137)
- Recipes: Italian (rss) (42)
- Recipes: Japanese (rss) (7)
- Recipes: Jewish (rss) (4)
- Recipes: Korean (rss) (6)
- Recipes: Meat, Poultry and Fish (rss) (220)
- Recipes: Mexican/Native American/ Latin American/Caribb (rss) (27)
- Recipes: Original (rss) (108)
- Recipes: Thai (rss) (27)
- Recipes: Tofu (rss) (17)
- Recipes: US Regional (rss) (16)
- Recipes: Vietnamese (rss) (8)
- Restaurant Stories (rss) (28)
- Sewing, Quilting, Arts and Crafts (rss) (16)
- Simple Chinese Recipes (rss) (30)
- Slow Food and Heritage Foods (rss) (10)
- Spice Blogging (rss) (44)
- The Chinese Cookbook Project (rss) (14)
- The Chinese Pantry (rss) (39)
- The Documentary (rss) (2)
- The Kitchen Saga (rss) (17)
- The Locavore's Bookshelf (rss) (15)
- The Unsung Adventures of The Culinary Nerd (rss) (6)
- Tools and Toys (rss) (35)
- Uncategorized (rss) (10)
- With a Side of Politics (rss) (48)
Archives:
- August 2012 (9)
- July 2012 (12)
- September 2011 (3)
- August 2011 (7)
- July 2011 (8)
- June 2011 (16)
- May 2011 (17)
- April 2011 (11)
- December 2010 (9)
- November 2010 (5)
- February 2010 (1)
- December 2009 (5)
- November 2009 (7)
- October 2009 (10)
- September 2009 (16)
- August 2009 (14)
- July 2009 (14)
- June 2009 (7)
- May 2009 (17)
- April 2009 (10)
- March 2009 (25)
- February 2009 (13)
- January 2009 (10)
- December 2008 (5)
- November 2008 (5)
- October 2008 (6)
- September 2008 (13)
- August 2008 (8)
- July 2008 (11)
- June 2008 (18)
- May 2008 (13)
- April 2008 (14)
- March 2008 (16)
- February 2008 (17)
- January 2008 (19)
- December 2007 (25)
- November 2007 (18)
- October 2007 (24)
- September 2007 (16)
- August 2007 (15)
- July 2007 (15)
- June 2007 (10)
- May 2007 (14)
- April 2007 (16)
- March 2007 (17)
- February 2007 (20)
- January 2007 (13)
- November 2006 (1)
- October 2006 (8)
- September 2006 (14)
- August 2006 (25)
- July 2006 (30)
- June 2006 (28)
- May 2006 (34)
- April 2006 (29)
- March 2006 (24)
- February 2006 (30)
- January 2006 (38)
- December 2005 (40)
- November 2005 (37)
- October 2005 (32)
- September 2005 (25)
- August 2005 (30)
- July 2005 (28)
- June 2005 (21)
- May 2005 (8)
- April 2005 (22)
- March 2005 (17)
- February 2005 (29)
- January 2005 (10)
Search Site:
Links:
- Lily’s Wai Sek Hong
- 101 Cookbooks
- A cat in the kitchen
- A Veggie Venture
- Accidental Hedonist
- Cha Xiu Bao
- chez pim
- Chocolate & Zucchini
- Chopstick Cinema
- Chowhound.com
- Chubby Hubby
- Cook sister!
- Cooking with Amy
- da*xiang
- Eat Local Challenge
- Eating Liberally
- Ecocentric
- Eggbeater
- Epicurious
- Farmgirl Fare
- Fatfree Vegan
- Foodgoat
- ForkandBottle.com
- Green Olive Tree
- Hooked on Heat
- Jaden’s Steamy Kitchen
- Kalyn’s Kitchen
- Lucullian delights
- Mahanandi
- Matt Bites
- MeatHenge
- mmm-yoso!!!
- New York Times – Dining & Wine
- Pizza Goon
- Rasa Malaysia
- Ruhlman
- Sailu's Kitchen
- Serious Eats
- SF Gate: Food & Dining
- Simply Recipes
- Soul Fusion Kitchen
- Tastespotting
- The Amateur Gourmet
- The Cleaner Plate Club
- The Food Section
- The Grub Report
- thecookscottage
- U.S. Food Policy
- Wandering Chopsticks
- Washington Post Food and Dining
- Wasted Food
Meta:

Powered by WordPress. Graphics by Zak Kramer.
Design update by Daniel Trout.
Entries and comments feeds.