Meatless Monday: Cook Local, Eat Global
I don’t know if anyone has noticed, but there is a new tagline for Tigers & Strawberries, right up there at the top of the page, under the title. It says, in somewhat sketchy grammar, “Cook local, eat global.” Obviously, it’s a take on the classic saying, “Think globally, act locally,” which I have always thought was a very sensible philosophy one could easily apply to the practicalities of daily life, but it’s been a bit inverted hasn’t it?
It’s a rather odd thing to be a locavore who touts the delights of locally grown and produced foods and who also happens to be a chef who specializes in cooking foods from nations far removed from her Appalachian roots. Especially when these cuisines generally require ingredients, such as soy sauces, rice and coconut meat, which are quite simply not local to, nor are likely to become local to Appalachia any time soon. I mean, I know we have global warming, but I am not thinking that we are likely to start growing rice and coconut trees in Athens anytime soon.
But stick with me here, because there is meaning to be had in the phrase, “Cook local, eat global,” if one digs hard and long enough. (I just know that the grammar police are going to tear down my door in the middle of the night and beat me to death with dictionaries over the construction of the tagline, but I don’t care. It like the way it sounds.)
That meaning is this–I am not a hard-line, fundamentalist locavore. I never have been and never will be, and I don’t think it is necessary to be one in order to live a good and ethical life where you eat well, support your local economy and make the world a better place in which to live. I’m not a fundamentalist because I have found in my forty-five years on this planet, that is is nearly impossible to change the way humans do anything, much less eat, by getting all moral about it and telling them all the reasons its good for them to do it. It just doesn’t work. It’s proselytizing at its absolutely worst form which can turn into berating your audience into changing their point of view. It risks alienating people, boring them and infuriating them all the same time.
And believe me, alienated, bored and infuriated people are not more likely to change anything about themselves–they are much more apt to dig in their heels and refuse to do anything but the exact opposite of what you are trying to get them to do, if for no other reason than to spite the clueless messenger who, with every good intention in the world, has tried to do a good thing and has made an absolute boor (and bore) of herself in the process.
So, what does that phrase up there under my blog title mean?
It means this–you -can- cook using primarily local ingredients–vegetables, fruits, meats, dairy products and if you are lucky, grain and legume staples–and still eat like a citizen of the world. By using local ingredients for the bulk of your diet, or even, frankly for half of your diet, and combining them with ingredients from elsewhere such as spices, sauces, condiments, some grains and exotic fruits and vegetables that simply will not grow in your climate, you are still making a difference in the world, and a delicious one at that.
Especially when you seek out spices, grains, and condiments from elsewhere which are produced in fair-trade cooperatives which ensure that farmers from across the world are paid a fair price for their products which enables them to make a decent living for themselves and their families. Supporting not only local farmers, but farmers in Thailand or Peru or Mexico is thinking globally and acting locally on a grand scale, a scale that recognizes the common thread of humanity that ties each and every one of us in the world together.
Besides–combining locally sourced ingredients with internationally sourced ones leads to creativity in the kitchen, which is always a good thing.
For example–let’s take a look at Shagbark’s whole spelt berries.
I happen to really like the flavor and texture of spelt berries, but I didn’t really know that about myself until I bought some of Shagbark’s and cooked them up to use as a replacement for the wild rice in my typical Thanksgiving day dressing which features many native American foods. Spelt isn’t native to the US in the same way that wild rice is, but it was grown right here in Athens county, instead of up in Minnesota, so I wanted to give it a shot and see what it was like.
The flavor of spelt is deep, dark and rather rich. It’s chewier than wild rice, and has more character in every way, and it added a great deal of goodness to my dressing recipe. Spelt, which is a more ancient and some would say, “primitive”: form of wheat, also has more fiber than whole wheat, more protein than wheat, and is higher in B vitamins than wheat. It’s bloody well good for you, but even more importantly is that it tastes nutty and brown and autumnal and good.
So, now that I know I like spelt, I resolved to come up with some other ways to use it.
I decided to give it a shot in an Indian-style pillau, or pilaf, as it is called in the Mediterranean countries. Rice is nearly always used in Indian pillaus, and usually in pilafs as well, but I wanted to see what would happen if I hauled off and cooked up spelt the same exact way I would rice. Don’t get me wrong, I adore rice and always will, but it isn’t exactly going to be growing in my backyard any time soon.
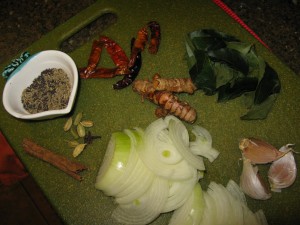
Besides–the South Indian style spices I had in mind couldn’t help but taste divine with the deep, rich flavor of spelt berries. I planned on using onions, cinnamon, cardamom, cloves, mustard seed, cumin, dried chilies, fresh turmeric, fresh curry leaves, and garlic, all cooked together in ghee for a tarka. A tarka is a mixture of seasonings cooked in oil or ghee until they are browned and fragrant. When it is finished cooking, the tarka is stirred into a pillau, dal or curry at the end of the dish’s cooking time, and the lid is clapped on to trap the fragrance of the spiced ghee, only to be removed just as the dish is served.
As for cooking the spelt itself, it was simple–I just sauteed one cup of the berries in a tablespoon of ghee in a pot, added four cups of vegetable broth, about a teaspoon of freshly grated turmeric root, and salted it lightly, and brought everything to a boil. The lid went on the pot, the heat was turned down so that the spelt simmered, and I cooked it, stirring now and again for two hours–basically until the spelt berries were tender, but still chewy.
All of the liquid is not absorbed with this cooking method, so before adding the tarka, the excess broth has to be drained off. I saved mine and put it into the freezer for use in a soup or stew later, as it not only has a lot of flavor in it, it has some of the water-soluble vitamins from the spelt that shouldn’t be wasted.
So, how did it end up tasting?
I thought it was delicious–nutty, spicy, fragrant, chewy and just plain old downright good. Paired with a bowl of masoor-moong dal with mushrooms and greens, it was highly nutritious Indian style meal made with primarily local ingredients that was soul-satisfying and VERY filling. And it was very warm, too, which is very important on these long cold winter nights.
Indian-Style Spelt Pillau
Ingredients:
1 cup spelt berries
1 tablespoon vegetable oil or ghee
4 cups vegetable stock
1 teaspoon freshly grated turmeric root (or 1/2 teaspoon dried powdered turmeric root)
1/2 teaspoon salt
3 tablespoons ghee
1 large onion, thinly sliced
1 teaspoon salt
1 3″ long cinnamon stick
5 green cardamom pods
4 whole cloves
5 dried Indian chilies
1 1/2 teaspoons black mustard seeds
1 1/2 teaspoons cumin seeds
1 1/2 teaspoons grated fresh turmeric root (I teaspoon dried if you cannot find the fresh)
12-18 fresh curry leaves
3 cloves garlic, peeled and minced
Method:
In a medium sized pot, saute the spelt berries in the one tablespoon of ghee or oil. After a minute or so, add the broth, turmeric and salt, bring to a boil, put a lid on the pot and then turn the heat down so the berries simmer, and cook, stirring now and again, for two hours, or until the spelt is tender, but still chewy.
After the spelt has cooked for one and a half hours, start making the tarka:
Melt the ghee in the bottom of a heavy-bottomed skillet. Add the onion slices and sprinkle well with the salt. Cook, stirring constantly, until the onions are a light golden color. Add the cinnamon, cardamom, cloves, and chilies, and cook, stirring until the onions are a deep golden color. At this point, add the mustard and cumin seeds, as well as the turmeric root, curry leaves and garlic, and cook, stirring until the onions are a deep reddish brown, the garlic is golden, the leaves are a deep green speckled with browned spots and the mustard seeds have sizzled and popped. Remove the tarka from the heat–it should be ready just as the spelt is done.
Drain the spelt, and reserve the cooking liquid for a later use. Return the spelt to the pot it was cooked in, and pop it onto the fire again, and stir, cooking briefly to remove any excess liquid that is clinging to the grains. Then, scrape the tarka into the pot, stir it thoroughly into the spelt and put the lid tightly back on the pot, remove it from the heat and leave it closed until you serve it.
Serve with a dal of some sort, and enjoy.
Note: If you cannot get fresh turmeric root which is easily found in most Indian markets that have a good produce section, go ahead and use the dried. It is still good and good for you, but it lacks the sharp, medicinal, somewhat flowery scent and flavor of the fresh root. The roots should be firm when you buy them, and they are easily peeled with either a vegetable peeler, or the edge of a regular tea spoon. I use a fine microplane grater to grate mine. You might also want to note that turmeric is used as a dye in India and other Southeast Asian countries, so if you don’t want your fingertips stained yellow like mine are in the pictures above, wear gloves when preparing the fresh roots! (Fear not if you don’t have gloves, but want to try the fresh turmeric flavor. The stain wears off your hands in a day or so, especially if you scrub your hands vigorously!)
Locavore Love Cornsticks
Here is the first promised cornbread recipe featuring Shagbark’s stone ground corn and spelt flours. Might I suggest making it to go with the Shagbark turtle beans recipe I posted previously–that’s what we had for dinner last night and it was a hit with Kat, Zak and Brittney, not to mention, myself.
To give you a feeling for how good these beans and cornbread recipes are, consider the fact that Zak, when I met him liked neither beans nor cornbread. I gradually converted him to the wisdom of complimentary vegetable proteins as a delightful meal option over the years, but normally, under no circumstances would he eat the same beans and grain dishes within two weeks. However, when I proposed making the Shagbark turtle beans and cornsticks again, he grinned and nodded avidly. I even was able to pry Kat from the snowy playground at her preschool by telling her what was waiting for her at the dinner table when we got home.
THAT is the mark of good food.
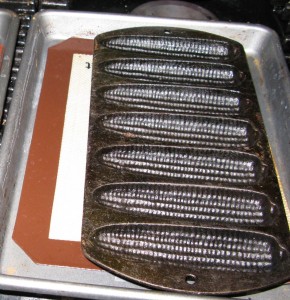
So, anyway, here are a few quick notes and tips about making this recipe. You -can- make this recipe in a regular baking pan or even a preheated cast iron skillet, but I prefer making it in my cast iron cornsticks pans. They are available from Lodge in their preseasoned Lodge Logic line. You can also get antique versions from garage sales, antique stores and thrift stores, or if you are lucky, you can inherit one or two from a grandmother or great aunt.
So, if you are going to use the cornstick pans, make sure they are well seasoned–that’s what makes the Lodge Logic so nice, by the way–you don’t have to play with seasoning them–and make sure to preheat them in your oven. This ensures a nice crispy crusty exterior.
Now, for the tip–you can put the pans directly on your oven racks. HOWEVER, if your racks are like mine, the wires like to grab onto the bottoms of the cornstick pans because the oblong corn shapes just seem to want to fit perfectly into the grooves of the racks. This is somewhat of a pain in the tuckus, as the pans are hard enough to get into and out of the oven for two reasons–one–they are heavy and two–they don’t have convenient hand holds for you to grab onto. Add these little issues to the fact that your oven rack seems to want to hold onto the pans and you may find yourself burning a hand and then cursing me roundly for talking you into making cornsticks in the first place.
Fear not! I have a solution to that problem. As you can see, you can set the cast iron pans into a regular sheet pan upon which you have set a silicone mat. The mat keeps the cast iron from skating around on top of the sheet pan, which is no fun, and if anything more dangerous than trying to wrest it from the clutches of your wire rack!
Another tip for you–filling the pan. First, spray the pan with canola oil spray. Yes, it is non-stick, but the oil makes every little corn-kernel shaped indentation come clean without argument. And believe me, you don’t want to argue with your cornstick pans.
You -can- use a ladle to fill your pans, but I personally prefer to scrape my batter into a four-cup measuring cup and use that to pour the exact amount you need into each indentation. I almost always overfill the pans if I use a ladle, but it never happens with the measuring cup method. Overfilled pans can become a mess, since the batter will run out of one side of the pan onto the bottom of your oven and burn, though if you use my sheet pan and silicone mat method, the extra batter will be caught there and will not burn, but bake into little crispy nuggets that are not very pretty, but still taste good. They make good puppy snacks if you have a dog who insists on helping you in the kitchen. (Cats, however, are not impressed by cornbread nuggets.)
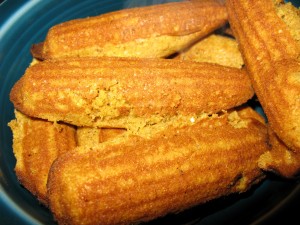
Now that we have discussed the mechanics of cornstick making, let’s talk about how they taste made with really fresh corn flour and spelt flour. They bake up really beautifully, and the spelt flour, having a bit less gluten than wheat flour, gives the cornsticks a tender quality that is very cake-like and delicate. The crust still crisps up nicely, but the interior is very light and almost fluffy, which is part of why Kat and Zak like them so much.
I added spices to the recipe, which perfectly complimented the natural flavors of the flours, and for the fat, I used melted butter. If you wish, you could also use melted lard or bacon drippings, or if you are a vegan, you could use a neutral flavored vegetable oil like corn, canola or sunflower oil. (Please don’t use olive oil–I did that once with cornbread and it tasted weird. I am sure that if I experimented, I could make it work, but that one experience has made me shy away from the olive oil when it comes to baking with cornmeal.)
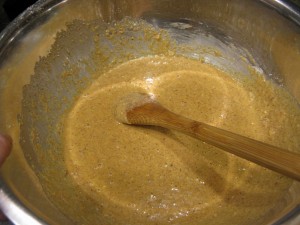
One more observation–the spelt flour in this recipe tinges the batter a sort of brownish yellow instead of the clear bright yellow you might be used to if you make cornbread with white flours. The finished product turns out to be a lovely golden brown color that no one seemed to mind as they scarfed them down with great glee.
Locavore Love Cornsticks
Ingredients:
1 cup stoneground yellow cornmeal (if you can get Shagbark’s, I urge you to give it a try!)
1 1/4 cup whole grain spelt flour, again from Shagbark, if you can get it.
1/2 cup raw sugar
2 teaspoon. baking powder
1/4 teaspoon cinnamon
1/4 teaspoon ground cardamom
dried ground chipotle to taste (start with 1/8 teaspoon)
2 eggs, well beaten (these came from High Bottom Farm in Guysville, Ohio)
1/4 cup wildflower honey (locally sourced, preferably–I use Cantrell’s from here in Athens County)
1/4 cup melted butter or lard or vegetable oil (for this, I used melted butter from Hartzler’s Dairy of Wooster, Ohio)
1 1/4 cups milk (From Snowville Creamery, of course!)
1 teaspoon vanilla extract (optional–but it tastes really good with the spices)
2 cast iron cornstick pans
canola oil spray
Method:
Preheat oven to 450 degrees F. Put clean, dry cornstick pans in to preheat for ten minutes or so.
Mix together dry ingredients in a large bowl.
In a separate bowl or in a large measuring cup, stir together liquid ingredients, including the egg.
When your oven is preheated and the cornstick pans are hot, stir the liquid ingredients into the dry ingredients to make a thick, fragrant batter. Scrape the batter into a large measuring cup with a spout, or if you are brave, break out a ladle.
Take out your cornstick pans, and spray them lightly with canola oil. Do not skip this step if you want your cornsticks to come out whole.
Using the measuring cup or ladle, pour batter into the cornstick pans almost up to the rims of the corn-shaped depressions. The pans should sizzle–this is making a crisp crust on your cornsticks.
Put them into the oven and bake for about 8-10 minutes, or until your cornsticks are puffy and browned.
Remove from oven and with a thin spatula or table knife, flip the sticks out of the pan, and wrap them in a towel to keep warm. If you have any batter left, reheat a pan, spray it and repeat the process until all batter is used up.
This will make around 21 cornsticks, which is enough for 4-6 people, usually.
Note: If you don’t have cornstick pans, you should, but I understand if you don’t. This is also good baked in a cast iron skillet–follow the same procedure with preheating it to make a nice crispy crust, and spray it lightly with canola oil. Pour in all the batter, and bake between 20-30 minutes until brown on top and a broomstraw inserted into the middle comes out clean. Or, instead of a cast iron skillet, you can use an 8 or 9 inch square baking pan. Just don’t preheat that–just spray it, scrape in the batter and bake it for about 20-30 minutes.
What Do You Do When Your Turkey Is Too Big?
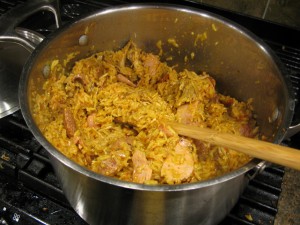
Well, if you live at my house and you were blessed with a turkey too big for the number of guests at your Thanksgiving dinner, you strip what extra meat you want from the bird, pop the rest in a pot, make stock and then…make jambalaya. (I grew up in a household where we used turkey leavings to make turkey rice soup on the Sunday after Thanksgiving. Must be part of why I make jambalaya–because turkey and rice are imprinted as perfect partners in my brain…..)
Now, I’ve written about jambalaya before, and while the recipe I presented previously is a perfectly good rendition of the dish–this one is spectacular. There are several notable differences between this jambalaya recipe and my previous one, and they are as follows:
1. This recipe uses a freshly made stock from a turkey carcass, a ham bone and some leftover smoked barbecue rib bones from Kiser’s BBQ Shack here in town, instead of a simple chicken stock. This results in a richer, more fully-flavored jambalaya.
2. Instead of finely dicing the aromatics and vegetables, I pureed them, which is something hardly anyone I know of does. But I have found that the jambalaya made this way is more deeply flavored, in large part because the tiny pieces of vegetables cling to each piece of rice and turn each grain into a little flavor bomb that explodes on your tongue. Good stuff, right there.
3. I used way more herbs and spices, including Spanish smoked paprika (pimenton), cayenne pepper, Aleppo pepper and tarragon, in this version, which added another several layer of flavor and aroma to this recipe.
So, first of all, let’s talk about the turkey stock.
I’m not going to go into a full description of how to make stock here, because I already wrote that post a while back–like about four years ago. So, for a long, drawn out and involved treatise on the general method of making stock (in four part harmony with full orchestration), go here.
Now that you’ve read the background information, let’s go back to talking about turkey leftovers and turkey stock.
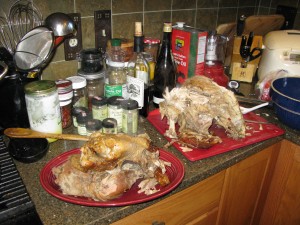
First, pick off all the meat you want to use, and peel off most of the skin. Leave some of the skin on, though, because that nice roasty color and flavor that is in the skin will get into your stock and make it really, really tasty. Trust me on this. You want all the browned meat flavor you can get in your stock.
Stock made this way, from a carcass of a roasted bird, is technically called “fond brun” in French kitchens–brown stock. It gets its color from the roasted bones it is made out of. And–you can turn any stock you want to make brown even if you are only using uncooked bones–to do that, just roast those bones with some carrots, onions and celery in a hot oven until they brown and smell meaty and good. Then continue onward and make your stock as written. I personally think it is a waste to make beef stock without browning the bones at least a little, but that is another post for another time.
Okay, back to making the turkey stock. After you peel off as much of the skin as you want to, and remove as much visible fat as you would like, crack the carcass apart so it will fit more nicely into the stockpot. Whole turkey skeletons don’t usually fit into stockpots well, so I usually hack off the legs and thighs, twist off the wings and if I have a cleaver that will go through the backbone and breastbone, hack through the main body. Then, the pieces go into the stockpot without any argument. (Who argues with a woman with a cleaver, anyway?)
Into the pot also goes the usual whole carrots, celery and onions (if, like some people, you put these vegetables in the bottom of your roasting pan to make the drippings taste nice, save those suckers and use them in your stock!) and in my case, a couple of garlic cloves. Herbs go in as well–fresh or dried thyme, rosemary, sage, bay leaves and tarragon, as well as some spices: a dash of cayenne, a teaspoon or so of Spanish smoked paprika, and a tablespoon of Aleppo pepper. In addition to all of this, when I know I am making jambalaya with my stock, in goes a whole chile pepper or two–in this case a couple of green serranos.
Then, I usually add what drippings I have saved from the bottom of the pan–because I don’t usually use all of them for the gravy–as well as any leftover gravy that hasn’t been eaten. If you didn’t simmer all of the goodness out of the turkey neck on Thanksgiving day, toss that in, too. (Do you get the idea that I save everything? There’s a good reason for this–I do.) Then, a ham bone or ham hock, and if you happen to have some smoked pork ribs, those can go in, too. But, if not, the ham bone or hock will do just fine.
Why do I put pork into my turkey stock?
I have found over the years, that I prefer the flavor of a mixed pork and poultry stock better than I like just plain poultry stocks. I got the taste for such stocks from eating lots of really good Chinese soups and sauces made with such mixed stocks. There is something fuller and more delightful about a mixed pork and chicken or turkey stock, than one made with the bird bones alone that I find adds a mysterious, amazing touch to any dish cooked with the stock.
That said, if you don’t eat piggies for whatever reason, then, leave off with the pork bones and don’t worry over it. It will all turn out okay.
Then, the bones, meat, vegetables and other stock stuff is all covered with cold water to which about a cup of sherry and a cup of dry red wine are added. Why both? Why not? Both sherry and wine really make the stock taste good, so if you have them on hand, go for it!
Now-most of the time, you add some salt to the stockpot just before you start simmering it–but let me caution you–if you brined your bird, don’t even go there. Don’t ever add salt to the stock until it is done and you have tasted it. You run the risk of making your stock too salty and that is just a hideous crime and a shame because you waste all your nice stock and all the effort you put into making it.
Then, you bring your pot to a simmer, turn the heat down and simmer it for as long as you can stand it. With a turkey stock made from a roasted carcass with plenty of meat left on it and some good smoked pork bones, you can make a deep, dark stock in about three to five hours of simmering. But, if you want, you can always simmer it longer.
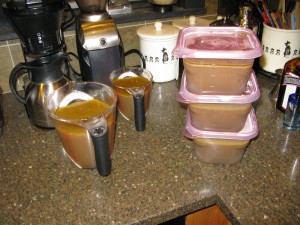
After your stock has cooked as long as you want it, follow the general stock making instructions here to remove the remaining meat from the bones, and strain the stock.
For this jambalaya, you will need six cups (1 1/2 quarts) of stock. I ended up making about five quarts of stock, which is great, because I could freeze what I wasn’t going to use now for later soup-making adventures. I also ended up picking off an extra quart of meat which I also packed up (with some broth to keep it happy and moist) and popped in the freezer, with the intention of some mole poblano enchiladas appearing on my table later this winter. This extra quart of meat came after the quart and a half of shredded chunks and bits of turkey I stripped from the bones for the jambalaya. So, from this harvest from one bird, you can guess that it was way bigger than necessary….but then, really, what is necessary? It isn’t like any of it is going to waste….
After you have picked your meat and strained your stock, you are left with bones and skin. Give the skin to your pets, but not the bones. That said, I have found that chucking the bones into the woods makes the crows, raccoons and possums very happy, but some folks might frown on that, so you’d best just throw them away.
Now that we’ve gone over all of that, we can start making the jambalaya!
This recipe makes enough to feed six to twelve people. I say six to twelve, because it depends on the people. If you have folks who don’t eat a lot, like elderly grandmothers and little toddlers, then you can definitely stretch the jambalaya out to feed more of them. If you only have big burly lumberjack sorts, you might have to stop at six. If you have normal folks who just really like jambalaya, this recipe will probably serve eight.
This said, please note that in order to feed more people with a pot of jambalaya, you can always add more meat. More of the same, or more of different sorts of meat–for example, this recipe has the leftover dark and white meat from a turkey, plus about a half pound of really good local ham and a pound of local andouille sausage. (Okay, the truth is this–you can make this jambalaya with just turkey meat. But, see, I think that is sad. That turkey might just be lonely in that pot all by himself. So, please, toss in at least a bit of ham and sausage to you, know, just keep that bird company.)
But, if you have other stuff around, like, oh, a venison roast, preferably with a bone in it, toss that in the stockpot, then shred the meat off of it. Or, add some seafood (though you have to understand that I will be eternally jealous of you, as I have developed an allergy to shellfish), or some chicken, or some duck–you get the picture.
You can also add more rice and stock to the recipe. That’s usually cheaper than adding meat, but leftovers are only ennobled by being chucked into the jambalaya pot and leftovers are cheap, being as they are left over from a meal already paid for and eaten. But still, if you want to add more rice and stock–the ratio you must remember is 2:1–two parts stock to one part long grain (I use jasmine, because that is what lives in my pantry) rice. Don’t get that backwards, please. It will make a scorched, stinky mess and you might get mad at me. So, I reiterate: the ratio is 2:1 stock to rice.
Okay, now we are ready to make jambalaya!
Laissez les bon temps rouler!
After Thanksgiving Turkey Jambalaya
Ingredients:
1 really large red bell pepper, seeded, with the stalk removed, and cut into chunks
1 really large yellow onion, peeled and cut into chunks
3 big stalks of celery, strings removed and cut into chunks
2-5 serrano chiles, stalks removed, and seeded if you like
1 head of garlic, peeled (that is head, not clove. One clove is that one piece of garlic you take out of the head of garlic–I want you to use the whole darned head here.)
4 tablespoons olive oil
1 tablespoon Aleppo pepper flakes
1/2 tablespoon Spanish smoked paprika
1/2 teaspoon cayenne pepper
1 teaspoon ground turmeric
3 tablespoons fresh rosemary, minced (or 1 teaspoon dried, powdered)
3 tablespoons fresh thyme leaves, or 2 teaspoons dried
3 fresh sage leaves, minced (or 1/2 teaspoon dried, rubbed sage)
1 tablespoon fresh tarragon leaves, minced–or 2 teaspoons dried
1 pound andouille or other smoked sausage, cut in half longways, then into diagonal slices
1/2 pound ham, diced
3 cups jasmine or other long grained rice
6 cups strained (and salted to taste) turkey stock
2 pounds (about a quart and a half) shredded dark and light meat turkey, preferably that has been simmered in the stockpot (it makes it more moist to use it after you have made the stock)
salt to taste
minced fresh parsley and scallion tops for garnish
Method:
In a food processor, puree the pepper, onion, celery, chiles and garlic. You will end up with a frothy, very liquidy, fragrant red mixture. Good. That’s what you want it to look like.
Heat your olive oil over high flame in the bottom of a heavy-bottomed stock-pot–I use a ten quart pot for making jambalaya–and when it shimmers, add the puree. It will sputter, spray and make all sorts of noises, but dive in bravely and stir, stir, stir, the whole time it cooks. Turn down the heat to medium and cook, stirring. You will notice that there is a lot of steam and bubbling–that is what you want. The water is simmering right out of your vegetable mixture. When the mixture has reduced by about half, you will notice it has gotten thicker, but is still sort of juicy. At this point in the cooking is when you add the herbs and spices.
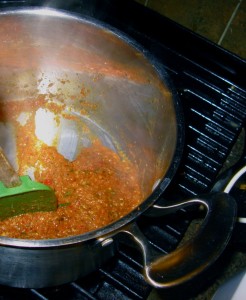
Continue cooking until it mostly stops sputtering and whispering at you, and stir carefully. The mixture will be much thicker and you will note that it has started taking on a bit of a darker, more golden-brownish tinge. That’s because most of the water is gone and everything is starting to brown a bit.
At the point where your spoon leaves a definite trail that shows the bottom of the pot, (see photo above) and when that trail does not instantly disappear–add the sausage and ham. After it browns lightly for a minute or two, add the rice, all at once. Then, you stir it completely to coat each grain of rice with the oil and vegetable mixture. You keep cooking, and stirring until the rice has a shiny, somewhat translucent tinge to it and you can smell a nutty fragrance coming from it.
That’s when the stock gets poured in all at once. Stir to make sure that the rice is all covered and mixed into the stock, bring the heat up onto high again, and bring it to a boil. Then, clap a lid on the pot, and turn the heat down to low and leave the pot alone. No, really, I mean it.
Now you start timing it–sort of. Here’s where the recipe gets a little variable, because I don’t know how fresh your rice is, nor how low your stove goes. The rice will cook in between 10 for very fresh rice with an electric stove that doesn’t cool down very fast to 20-25 minutes for a gas stove and average rice. Most of the time for me, the jambalaya cooks in about 20 minutes or so. So, what you do, is simmer the pot for ten minutes. Check the rice at that time–most of the time, what you will see is half-cooked rice just covered with about an inch or so of rapidly disappearing stock. If that is the case, spread your turkey over the top and clap the lid over the top and let it cook, under supervision (in other words, check on it now and again) for another ten minutes. At that point your stock should be absorbed, your turkey should be steamed and lovely and all should be tasty. If the rice is still a little underdone, sprinkle in about 1/4-1/2 cup more stock or water over the rice, stir it well and close the lid and let it cook another five minutes. After that, it will be done.
If, when you check the rice after the first ten minutes, it is tender and done, then stir in your turkey and continue cooking for about five more minutes, stirring constantly to keep it from burning to the bottom of the pot, so as to heat up the turkey nicely.
At this point, taste for salt and correct the seasoning. Sprinkle with the parsley and scallion tops and serve with a smile.
(Mostly) Local Autumn Salad with Honey Dijon Vinaigrette
(Are we still doing “Meatless Monday?” I’ve been out of the loop for so long, I have no idea. Just in case, here is a meatless salad for y’all to enjoy.)
I think there must be something a bit backwards in the way that I am wired.
Most people eat more salads in the summer time. You know, when its generally considered to be salad season, when you can get all the fresh vegetables you could ever want and it’s too hot to eat anything else but something light and crisp and common as corn in a cratch?
Not me. It isn’t that I don’t eat salads in the summer–I do, but I also eat stuff that I don’t really consider a salad, like slices of tomatoes lightly sprinkled with salt and maybe some roughly chopped basil. Or cucumber and onion slices soaked in vinegar and ice water. I guess most people would think of those as salads, but I guess I’m weird. I just think of them more as vegetable side dishes.
But salads–for whatever reason, as soon as it gets cooler out and the days are shorter and the evenings are darker, I crave salads fiercely. Maybe its because vegetables are not as prevalent as they are in the summer months that I suddenly crave them. Maybe its because most of the autumn vegetables are generally cooked and I suddenly want something crunchy. But for whatever reason, starting in the autumn, I all but lust after crisp green leaves and crunchy vegetables and juicy fruits, all tossed together with a dressing that binds the separate bits into a gregarious whole.
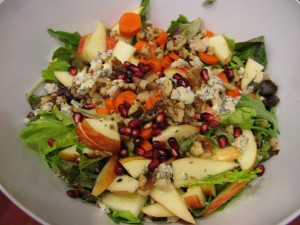
Such a day was today, so I set out to make a salad for myself and my guests. And it ended up to be a mostly local salad.
I say mostly local, because pomegranates are not exactly a big crop in Ohio. On the other hand, they are an absolutely divine seasonal fruit, so I eat them gleefully all through the late fall, early winter season when they are at the peak of juicy perfection. And, the walnuts aren’t local–ideally, I would use black walnuts, harvested in Athens county (maybe even from my front yard!) but I was fresh out of them this evening, so California English Walnuts it was!
The rest of the salad ingredients, however, came from our county, or the Appalachian region. The salad greens mix is from Green Edge Gardens here in Athens, the carrots are from Shade River Farms, also in Athens, and the Gala apple is from Gillogly Orchard, in Albany.
And the delicious, washed rind blue cheese is from Kenny’s Farmhouse Cheeses, an artisan cheesemaker out of Austin, Kentucky. I picked it up at The Village Bakery on a whim, because every cheese I have bought there have been exemplary, and because I thought it would taste amazing with the apples and pomegranates I already had in my refrigerator!
The raw milk blue cheese is very strong–absolutely amazingly delicious–but peppery and pungent. Of course, I had to taste it after cracking open the lovely blue wax coating, and was surprised by the sharp aroma tingling in my nostrils! The taste is rich and full, and so heady that it would be easy to overpower a fruit-heavy salad with it. So, even though I am a cheeseaholic of the highest order, I was careful and sprinkled it over the salad very sparingly.
The salad dressing is very simple–an olive oil and apple cider vinegar (from another local orchard, Shew’s) based vinaigrette flavored with dijon mustard, local honey (Cantrell’s), salt, Aleppo pepper flakes and some of the last of the fresh tarragon from my herb garden. The honey’s fragrant sweetness balanced by the tang of the mustard really ties the salad together–from the very crisp verdant greens to the tart apple, the wonderfully funky cheese and the earthy crunch of the walnuts.
I suppose one could make this a main dish salad by adding some sort of meat, but I personally think it wouldn’t taste right with meat. I prefer it the way it is–a greens and fruit based salad kissed by cheese and nuts–that conveys the richness of autumn.
Autumn Salad with Honey Dijon Vinaigrette
Ingredients:
6 cups (loosely measured) crisp salad greens, rinsed and fully drained
1 Gala or Honeycrisp apple, cut into small chunks (leave the skin on–it adds color and texture)
1/2 cup lightly crushed English or black walnuts
2 medium sized carrots, peeled and cut into 1/4″ thick coins
1/4 cup pomegranate seeds
1/4 cup strong blue cheese (or, if you use a creamier, less pungent variety, use 1/3 cup), crumbled into very small pieces
1/2 cup good olive oil
1/8 cup apple cider vinegar
1 heaping tablespoon dijon mustard (the smooth kind, not the grainy)
3 tablespoons (or to taste) wildflower or clover honey
Aleppo pepper flakes to taste (I used about 1/4 teaspoon)
1 teaspoon fresh tarragon leaves, roughly chopped
salt to taste (I used about 1/8 teaspoon)
Method:
Tear the salad greens into bite-sized pieces. Yeah, you can cut them, but I like to tear them. It just seems so much more personal, and besides, I like the sounds they make as they get ripped apart. (That sounds more violent than I mean it, though. I just like the tearing sound.)
Put them into a bowl, and then sprinkle the chunks of apple over them.
Lightly toast the nuts in a heavy cast iron skillet over medium heat on the stove. Once they start to warm up, stir or toss them constantly to keep them from burning on the bottom. Toast them until they smell roasty and brown and good, just like the smell of woodsmoke and dried leaves in the October woods, and then dump them onto a plate to cool.
Sprinkle the carrot coins, cooled nuts, pomegranate seeds and the crumbles of cheese over the salad.
Make the vinaigrette: you can either put all the ingredients into a measuring cup or bowl and whisk them, or you can do what I do because I’m lazy. Put them all in a small jar (but not one that is so small that the ingredients fill it–you need to have empty space in the jar so there is room to agitate the ingredients properly) screw the lid on tightly and shake like the dickens. I just put on some happy dancing music and go to town with the jar! It sure isn’t very chefly of me, but it is fun, so who cares!
When you are ready to serve the salad, drizzle the dressing over it and toss it well.
Weekend Cat Blogging: Two New Kitties….
So, during my nearly year-long vacation from writing, our house was blessed with the arrival of two cats. And when I say arrival, I mean it–we didn’t plan to add two cats to our household–far from it. But two stray cats had other ideas.
The first to show up was the fellow you see in the first picture: Po. (Kat named him after Po, the title character in the movie, “Kung Fu Panda.” And while he is grey and white instead of black and white–the fluffy cat’s personality certainly fits his name.)
And when I say show up–that is exactly what he did. Our deck was redone this spring to make it safe for Kat–the original railings would have let a toddler fall through very easily–and so we spent most of our time outside. Kat and I were playing out there one evening, while Delia, one of our favorite cats watched from a window and meowed at us, and I had the thought, “I wish we had a cat who could come out on the deck with us, but all of ours would try to run off.”
Not ten minutes later, a grey and white fluffy cat came sauntering down the hill, climbed the steps to our second story deck and proceeded to be loving and charming. Zak came out and there was this fluffy cat purring while Kat hugged him.
At first we were adamant: no new cats. So, when we went inside, Mr. Fluffy (which was the name Kat wanted to give him when she first saw him) stayed outside. But, he settled down on our porch and stayed the night. He wasn’t there when we got up in the morning, so Zak and I thought we had dodged a bullet.
However, when I went to take out the trash that night, a fuzzy blur dashed down the hill and shot into our garage. When I came back for more trash, a very fluffy cat started winding himself around and through my ankles, purring like a dove cooing.
And he refused to leave the garage. So, we set up a bed, gave him food and water and brought a cat littler box to the garage, and resolved to call the vet the next day.
After being vetted, Po became a new member of the household and he has settled in nicely. He does have adolescent male cat problems–in that he is very active and likes to chase the other cats and bedevils them at every opportunity, but usually, he is so good-natured about it that the other cats don’t much care. Except for Grimmy who hates him, but she mostly keeps to herself, and when Po tries to get her to play, we shoot him with water pistols.
Now Po is fully integrated into our family. He likes to help with everything I do–as you can see, he even wants to help me work with my quilting machine! Not that having him sit on the fabric is much help! He also loves to sit on my ironing board or cutting table, and has been known to jump up on my sewing table and try to “help” me there–usually by trying to steal the thread spool from the machine while it is running!
Not a month after Po had settled himself comfortably as a member of our family, another cat appeared. I had gone out one night to make a grocery run, and as I was unlocking one of our cars, I heard a tiny, sad-sounding mew. Looking down, I saw a very small orange kitten under our other car. I set down my purse and called to the kitten–and eventually, she trusted me enough to come out. She was so thin, and dirty, it was obvious that she had been on the streets for a while, but she was so friendly, I knew she couldn’t be truly feral.
I also saw that she was pregnant.
So, I went inside and got some leftover beef from dinner and brought it out to feed her, and she gobbled it down voraciously. I called Zak out and he shook his head–no way could we take another cat–we just brought Po in.
So, I bedded her down in our walled garden, where there was water and shelter, and I put more food out for her.
When I got up the next morning, she was gone.
And I looked for her every day, but for a week, she never came back.
Seven days later, Zak and I were on our way outside when she showed up on our porch again, thinner than ever, and even more loving.
Zak petted her and watched me feed her by hand, and saw how hungry she was, and how sweet she was and he relented. Into the garage she went until she was vetted, and pronounced healthy. She came to live inside with us after a day–she was litter trained and tiny–but the vet said she was an adult. And she was pregnant, so we had her spayed and had the kittens aborted–because she was so starved, the poor things were probably starved as well, and she was so small, we thought she would have problems with delivery. And besides, we’d have to find homes for them.
We ended up naming her Jane after the protagonist from the Jane and the Dragon books by Martin Baynton, . These books tell the story of a young red-haired girl who decides that instead of being a lady in waiting, she would study to become a knight. In the course of her journey, she makes friends with a dragon, and many adventures ensue.
Jane is a great name for our littlest cat–she has turned out to be alert, playful, fierce and very interested in EVERYTHING! She is a lot of fun, and is very, very cute–and is also a great and brave spider killer–she has caught and killed several very large creepy-looking spiders, and brought them to me so I could dispose of them. What a good kitty!
I am just hoping that no other cats appear on our doorstep, though. We have plenty.
Powered by WordPress. Graphics by Zak Kramer.
Design update by Daniel Trout.
Entries and comments feeds.


