Cook Local, Eat Global
Shagbark’s Black Turtle Beans

Black turtle beans, when very fresh, have a sweet flavor.
I don’t know how many readers remember a post I wrote in July 2008 entitled, “How Local Can You Realistically Go?” It was a post about the fact that it is very difficult in most areas of the United States to buy and consume locally produced staple foods such as grains and beans, and how two people here in Athens had set out to do something about it.
Visionaries Brandon Jaeger and Michelle Ajamian started out small, using a grant from the USDA’s Sustainable Agriculture Research and Education (SARE) project to research the feasibility of growing staple grains in southeastern Ohio. They started with such crops as amaranth and azuki beans, but later, added black turtle beans, heirloom corn, quinoa and spelt to their agricultural trials.
The couple formed THE APPALACHIAN STAPLE FOODS COLLABORATIVE and have created partnerships with Community Food Initiatives, Rural Action and ACEnet here in Athens in order to create a local food system that includes staple grains, beans and hopefully, in the future, oil seeds crops.

This year, they also created The Shagbark Seed and Mill Company, in order to distribute their locally grown and processed staple products here in our region. They are selling their whole kernel heirloom corn, split and whole black turtle beans, whole spelt berries, and freshly stone ground corn and spelt flours at the Athens Farmer’s Market as well as at local outlets such as The Village Bakery, Fluff and The Farmacy.
Having used most of their products recently, I am happy to report that they are all of very high quality–flavorful and very fresh. The spelt flour makes delicious pancakes (look for a recipe for them in the near future), the corn flour makes lovely cornbread, and the spelt berries cook up chewy and delicious and this year, replaced the wild rice I have been using for years in my Thanksgiving Four Directions Dressing. And the spelt was much tastier than the wild rice and will be used from now on.
But my favorite of their products so far are Shagbark’s black turtle beans. Dried beans that were grown locally and harvested this year have a fuller, sweeter flavor than the ones which have been sitting on a shelf in a grocery store or warehouse for who knows how many umpteen years. They also cook slightly faster–not much faster–and I found that the variety that they grew had slightly firmer skins than I was used to, which means that even when they are fully cooked, they have a tiny bit of chew to them. The insides are creamy and soft, but because the skins are slightly tougher than I am used to in black beans, they never turn into mush!
I cooked them in a very simple way–with the Appalachian staple of a ham hock, along with various aromatics and seasonings–and they turned out divine. Simply and utterly divine. Kat and Zak fell in love with them, and both of them ate a huge amount of them the night before Thanksgiving.
So, here, I offer my recipe for black turtle beans–you don’t have to use Shagbark’s beans to make this dish, but if you can get them, I urge you to try them and see if I am not right about their superior flavor and texture to the usual grocery store dried beans.
Shagbark’s Black Turtle Beans
Ingredients:
3 tablespoons olive oil
1 medium onion, diced
1 tablespoon dried diced red bell pepper (I use Penzey’s, but you could also use frozen diced red bell peppers here)
2 bay leaves
1 ham hock
3 cloves garlic, peeled and minced
1 teaspoon dried thyme
1/2 teaspoon dried ground rosemary
1 teaspoon ground cumin
1 1/2 quarts vegetable broth
1 pound black turtle beans, picked over and rinsed
salt and pepper to taste
minced cilantro for garnish
Method:
Heat olive oil in a heavy-bottomed pot or pressure cooker. Saute onions, peppers and bay leaves until onions are dark golden in color. Add ham hock, garlic and dried thyme and continue cooking, stirring often, until the onions are reddish brown, the ham hock has taken on color and everything is fragrant. Add the rest of the spices, the vegetable broth and the beans.
Bring the beans to a boil, and if using a regular pot, turn down and simmer for two hours or so, stirring as needed, until they are tender. If using a pressure cooker, lock the lid on the cooker, bring pressure up to full, ease the fire under the beans to low, and cook for about twenty minutes. Quick release the pressure and make sure the beans are done. If they are still a tiny bit underdone, just simmer with the cooker open for about ten minutes, or until the beans tenderize completely.
Add salt and pepper to taste and garnish the beans with a sprinkle of cilantro just before serving.
Grateful
Hello, everyone.
I’m back again. I couldn’t stay away. Writing and cooking, cooking and writing, sewing, writing and loving are just too much a part of my life for me to stay away from blogging forever.
I am here, back in my cyberspace kitchen, ready to share again.
And I am grateful.
I am grateful for all of the emails, comments and other communications from my readers I have received over the past year or so, wishing me well, giving encouragement, support, advice, understanding and love. I cannot begin to tell you all how much your words have meant to me. They have been a balm to soothe a wounded heart, and have made me smile on the darkest of days.
Over the past year, whenever I felt truly down on myself or even humanity in general (like whenever I read the news!) I could go to my last post and read the comments and feel instantly better. Or, I would open my inbox and there would be another email from a reader telling me I was missed and loved and it was hoped that I am my family are well.
I don’t think that I can ever thank all of you enough. I guess, in return, I will just have to write another year or so’s worth of recipes for everyone!
I am also grateful for the love and support of my family. I am so grateful for my two beautiful daughters who grow more wonderful every day. Kat is in preschool and is learning to read and even has started learning elementary addition and subtraction; Morganna has a high B average in college and works the saute station at one of the two fine dining restaurants here in town.
I am grateful for my husband Zak, who has gone back to college to finish an elementary education degree he started years ago, and was interrupted by a lengthy family crisis. I am grateful for his patience over the past year and his enduring faith and love. He has grown a lot, too–he plays music out now, not just in his studio–and he has been raising money for a local food charity with his music.
I am grateful for my brother, Dan, who not only has been an unwavering personal friend and support, but he also redesigned this blog and managed to update my software, all while he was going through the process of starting his own business and moving into a new home with his fiancee.
I am grateful to my Aunt Judy, whose words of wisdom and kindness have kept me sane and helped me along my path toward healing.
Besides all of this–I am grateful for the world itself. Grateful for being able to write again, to be able to cook, read, think and dream again. I am grateful for the sun and the rain, for the grass underfoot and the trees overhead. I am grateful for the birds in my garden, and the flying squirrels in my windowsill. (Yes, we have flying squirrels in our house….they sure are cute wee buggers.)
I am grateful for everything. Whereas this time last year, I was a bundle of anxiety and pain, now, I am peaceful, calm and happy. Truly happy.
I am truly blessed.
I want to end this post with something that a high school friend I just found on Facebook said the other day. Carlos, who sang in our school choir with me all through middle and high school said this–and it spoke directly to my heart:
Remember this, as you are blessed in various areas of your life and your the life of your ministry, you are called to be a blessing to others.
So, here I am, hoping to be a blessing to others through my words and my recipes, as I have been blessed with so much over the past year.
It’s time to share the love.
Happy Thanksgiving to you all.
The Last Post
Hello to all of my readers.
First–I want to thank all of you not only for sending emails and posting comments of concern here after I dropped off the face of the Internet again. You all have and still do mean a great deal to me–having so many friendly readers and a community of folks who post incisive, interesting comments that spark discussion is like having a huge extended family that spans the globe. The joy I have taken from writing with you–because I do think of this blog as a collaborative effort–you ask questions, start discussions, suggest topics–has been a huge part of my life for over five years, and I will never, ever forget it. The love I have felt from all of you has buoyed me up on many a dark day or even darker night when despair has threatened to cast a pall that even the sun cannot lift.
But, the truth is this–I cannot write Tigers & Strawberries anymore.
Not because i don’t love my readers, and not because I don’t love food.
It’s because of this–I am tired of lying. Or, rather, I am tired of not telling the whole truth. The truth should not be a burden, it should be a lodestar to our lives, but in my case, it had become something of which I was ashamed, so I avoided it.
The simple truth is this–the way I have portrayed my childhood and experiences on this blog, while true, only show a part of the experiences that make up my existence. Yes, my grandparents had a farm, and yes, I grew up learning all of the food-growing and preparing skills that people commonly learned in the 19th and early 20th centuries. Yes, I loved my grandparents and they loved me. Yes, the story about my father and the cow is 100 percent true, and yes, I went to culinary school and was a caterer, and was a chef and all of that. Everything I have written here is true.
But, I ignored the other half of my truth. I ignored the fact that I grew up in an extremely dysfunctional family situation which continued until my mid-twenties, one which continued to affect my life deeply until a few months ago when I started intensive therapy to deal with all of the rage, fear and horror I had repressed that had to do with this background.
Having a really good therapist listen to the other side of things, to the darkness that lay hidden in my heart and mind which poisoned my very body with ill-health and which threatened my life, cracked open the walls I had built around myself, and made me look objectively at how I had molded myself and contorted my true personality in order to not only repress that truth, but also to conform to what my family, and later, everyone else, expected of me.
When light poured through the cracks in the wall and illuminated my understanding of my past, present and future, I realized that I didn’t really know myself anymore. I had been so busy crafting a personality of perfection, a woman who was in strict control of her emotions, whose childhood and early adulthood had been scrubbed of all unpleasantness (it isn’t that I forgot the unpleasantness, I simply ignored it and never spoke of it to anyone) that I lost sight of the genuine person who I had been trying to protect behind that carefully crafted facade.
Unfortunately, I am now trying to figure out who and what I am! And because so much of Tigers & Strawberries is tied up with that image of a farm girl who had a nearly idyllic life in the country, I find I cannot keep writing here.
And, frankly, I’m kind of tired of taking pictures of every dinner I make! Sometimes, I just want to cook and eat, and that is okay.
But, truly–I do miss you all. And I want to keep writing, but I just cannot keep writing only about food. I just can’t right now.
So, it is time to stop writing here and start writing somewhere else.
I will keep T&S up and active here so folks can still get the recipes, and post comments asking questions. I will still monitor the site for questions and answer them when I see them. I still want folks to be able to use this site as a great cooking resource, because the truth is, I am proud of what i have created here and I don’t want it to disappear.
I am going to start a new blog, probably on Blogger, which is not my first choice of venue, but which is convenient. It will be a much more general blog, though, you know me, there will be recipes and pictures of food! We can’t get around that! But the topics I write about will range from ruminations of fiction writing, news on various projects I am working on (yes, including books, hopefully), my adventures with fabric, news on how the Kat is growing and tales of the adventures of various members of my household. There will probably also be tales that are from the darker, sadder part of my life, because, well, that truth deserves to be told. There is no way to appreciate light if we ignore the darkness.
So, I will post one more time here to give a link to the new blog, which is likely to be called, “Summoning the Muse,” because that is what I am trying to do. I am trying to find my inner self, the one who is full of inspiration and courage, the one who has kept me alive all of these years. She’s been waiting a very long time to get out and see the sun, and I think she deserves a chance to stretch her wings and tell her tale for a bit.
Thank you all again. I can never, ever articulate how much all of you have meant to me. I hope that some of you at least follow my new adventures in the new blog, but I understand very much that many of you only really want to read about cooking. For those of you, I wish you all a fond and loving farewell.
For the others–thanks for coming along with me into uncharted territory.
I appreciate the company,
Happy Generic Winter Holiday: Cherry Chocolate Chip Cookies

Last week, while I was taking a bath and Kat was assisting by throwing rubber duckies into the tub on top of me, I decided to attempt to distract her by telling her that we were going to start making cookies this week for the holidays.
And she said my favorite word in the English language. (No, not “chocolate.”)
She stopped, poised in mid-throw, ducky hovering over her head like a bloated blue hummingbird and said, “Why?”
I nearly wept with joy. It was the first time she had asked one of us “why?” about anything! And it was about cookies!
I grinned and said, “Well, making cookies is a tradition at Christmastime. I’ve been baking cookies every Christmas for thirty years, and I hope to be doing it for another thirty.”
“But why, Mommy?”
Why, indeed.
I perked right up, and happily watched as the wee blue ducky, long forgotten, was dropped on the bathmat where it would lurk, waiting to trip me up as I got out of the tub. Putting on my best “Mommy has a minor in history voice” I answered, “All over the world, at this time of year, when the nights get longer and longer and longer and darker and darker, people celebrate the return of the light, as the days slowly start to lengthen and the nights become shorter again. All over the world, people have holidays that celebrate the light, and on those holidays we give gifts, we feast and we make sweets like cookies, to rejoice in teh return of the sun, and the light of hope and love in our hearts.”
It sounded good, and Kat nodded sagely.
I finished and she piped up with, “But what do cookies have to do with light?”
Ah, she thought she got me with that one, but no! I had a ready answer, and it is even historically accurate.
“Well,” I said as I started draining the tub, for the ablutions were completed, the last five minutes of them blissfully duck-free, “long ago before there were refrigerators and grocery stores, people had to grow all of their food and store it for the winter. And sometimes, if the winter was really cold, or the harvest had been bad or if the snows lasted longer than usual, people would start running out of food near the end of winter. So, in the beginning of winter, when there was still plenty of food stored up, people would make and eat fattening foods like cookies and roast meats and cheeses so they could fatten themselves up to live through the winter. That way, if they ran short of food, they had a bit of fat on them to keep them strong until springtime. And the feasting just happened to coincide with the return of the sunlight, so the holiday tradition of making cookies was born.”
So there we are. That’s why we make cookies at Christmas.
Now, as to why I make cookies at Christmas, that is another story. I make them every year, because since I was fourteen years old, that was my holiday job. I did the baking. I made bread, cakes and especially cookies. I wasn’t really allowed to cook anything else in my mother’s kitchen, but since she didn’t much care for baking, and I did it so well, she turned the duty over to me, and I just kept on with it, happily becoming along the way somewhat of a cookie expert.
The first recipes I used were the family ones, handed down from great-grandmothers, a couple of them even coming all the way from Germany. And, of course, I used the Toll House Cookie recipe on the back of the pouch of Nestle’s semi-sweet chocolate chips. I insisted on using real butter in all of my baking–my Mom liked to use margarine, but I was having none of that. All of the recipes called for butter, and butter is what I used–who was I to argue with my long-dead great grandmothers? You don’t mess with the ancestors, man–they can come back to haunt you. I also insisted on real chocolate chips, and real vanilla extract too. Mom grumbled, but bought the ingredients I specified, and when she tasted the results, she stopped grumbling.
Over the years, I started experimenting, and worked out new recipes, some of which were based on the old family favorites, like my Aphrodite Cakes, which is based on my great-grandmother’s German sugar cookies. Others were based on ideas I had, like what would a cookie with Sichuan peppercorns in it taste like? Would lavender be good in shortbread? What about chilies in a brownie? Why can’t I put toffee chips and cinnamon bits and espresso powder and just use brown sugar in chocolate chip cookies? If Irish Cream is good with cream cheese in brownies, what happens if you add raspberry preserves and Chambord?
That is the cool thing about cookies. They are easy to play with. You can add ingredients, subtract them, change them, modify them by chilling or melting them, and you can almost always, if you have a bit of knowledge about baking, come up with something that will taste amazing. Cakes–they are much trickier, and I would not play as fast and loose with cake recipes as I do with cookies. Pies–well, I play with fillings all the time, but I stick pretty close to the general ideas when it comes to the crust. I will add ingredients and change proportions a little, but not like I do with cookies. Pie crust is too fragile to mess with very much, and cake–it is just finicky.
But cookies are forgiving. They are easy and they are fast and they are fun. So, I love playing around in the kitchen every year and coming up with new and tasty additions to the holiday sweets repertoire.
This year, I wanted to do something new with a chocolate chip cookie.
But I didn’t want to overload it like I did with the Coyote Chip Cookies. Granted, they are lovely, and I like them a great deal, but Zak is not fond of them, and I wanted to make a chocolate chip cookie that both he and I could enjoy together.
What flavors go with chocolate?
Coffee. Been there, done that.
Nuts? Eh–I have to be careful with that, Zak can be weird about nuts. He likes some of them and not others.
Something was niggling at the back of my brain, trying to get my attention and suddenly, I remembered–Zak had just said the other day at the grocery store when we were buying candy canes that he doesn’t know a thing about those because he doesn’t really like peppermint candy, but chocolate covered cherries–those he used to be able to eat by the box.
And what is his favorite (non-Jeni’s) ice cream? Cherry Garcia.
Ah ha! Cherry chocolate chip cookies!
Why had I not thought of it before? What exactly is wrong with me? Dried sour cherries added to the usual Toll House style cookie, with milk chocolate instead of semi-sweet, since Zak prefers the former, and some almonds to help boost the flavor of the cherries and add a bit of crisp texture to the chewy fruit and cookies–perfect!
Yeah, I was right. The tart cherries are chewy and tangy, and you can taste the cherry flavor very well in the golden cookie, and it pairs beautifully with the rich, sweet milk chocolate. Almonds pair perfectly with both chocolate and cherries, and they added some crunch and the whole thing is just soul-satisfying.
He ate three for breakfast this morning. Brittney, who came to take care of Kat while we were in Columbus for my therapy appointment and for Generic Winter Holiday shopping, had one and declared it “Amazing.”
There are a few caveats: one, use Mariani brand dried cherries if you can find them. They are plump, chewy and delightfully tart. You don’t want to use sweet cherries in this–you want to use sour red cherries. Mariani are the best I have come across for baking–they do not dry out and do not require plumping before baking. So, seek them out. Two–toast your almonds before you put them in the cookie dough–it brings out the flavor in them. And three–you can use half semi-sweet chocolate chips and half milk, but I think milk chocolate is better, because it is a better foil for the tart sour cherries than the lightly bitter semi-sweet would be.
It is my new favorite, and here it is–one of my gifts to you this holiday season. Go bake a batch and celebrate the return of the light with a little bit of dietary fat and sugar!

Cherry Chocolate Chip Cookies
Ingredients:
2 1/4 cups all purpose flour (or 1 1/4 cups all purpose flour and 1 cup white whole wheat flour)
1 teaspoon salt
1 teaspoon baking soda
1 cup cold butter
3/4 cup sugar
3/4 cup light brown sugar, packed
1 1/2 teaspoons vanilla extract
1/2 teaspoon almond extract (optional)
2 large eggs
12 ounce package milk chocolate chips
6 ounce packaged Mariani dried sour cherries
1 cup sliced almonds, toasted
Method:
Preheat oven to 375 degrees F.
Stir flour, salt and baking soda together in a bowl and set aside.
With a mixure, cream together the cold butter and sugars, until well blended and fluffy. add the extracts and eggs, and beat well until mixture is smooth. Add flour mixture in thirds, and mix until well blended. add chocolate chips, cherries and almonds, and stir until combined.
Drop by rounded tablespoonsful onto not greased baking sheets (I line mine with silicone liners) and bake for 9-11 minutes, or until golden brown, but still seeming to be lightly underdone in the center. Remove from oven and allow to cool two minutes on the baking sheet, then transfer to a rack. Allow to cool until the cookie is still warm to the touch, but is firm and not hot. Place into a container with a tight-fitting lid and seal them up and allow them to cool the rest of the way. (This guarantees a chewy texture to the cookie.)
Makes about three and a half dozen cookies.
Meatless Monday: Saag Paneer
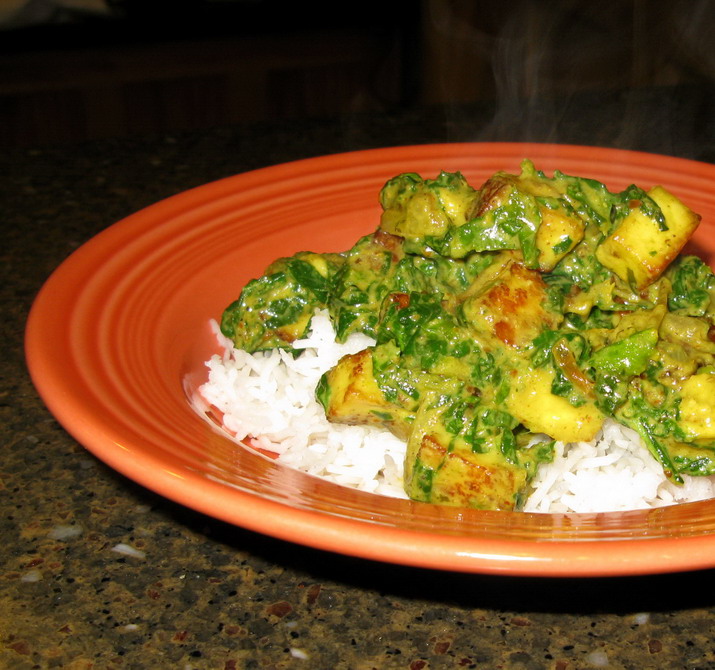
Saag paneer is a traditional Punjabi recipe for a mixture of mustard greens and spinach, cooked together with spices in a creamy sauce that is dotted with cubes of fried paneer. It is by turns, tingly, velvety, and tender-chewy, with a lovely flavor from the combination of spicy mustard greens and smooth, mild spinach.
Truly, saag paneer is one of my favorite northern Indian specialties; I like it even better than rogan gosht or mattar paneer. This is probably because I have such a passion for greens–spinach was a favorite food when I was a small child and I adored both mustard greens and kale. Collards and turnip greens were also eaten often in the winter months during my childhood, and I loved them all, which is a great thing, because all dark green leafies have a hefty dose of vitamins, minerals, antioxidants and phytochemicals.
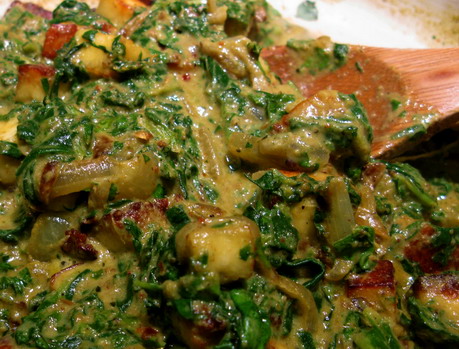
When I make saag paneer, I do not feel constrained by the rule that it should contain only mustard greens and spinach; I like all of the greens so much that I cannot restrain myself from adding them into the mixture. Besides, most restaurants make “saag paneer” using only spinach–which really should be called “palak paneer.” “Palak” is the word for spinach–and saag paneer made this way is too mild for my taste. Nothing wrong with it, really, its just not as robust and satisfying as proper saag paneer. Also, most restaurants puree the spinach in saag paneer, until they have essentially made a very smooth, thick sauce for the fried paneer cubes. That is fine, but I like my greens to have more texture, so I roughly chop mine, and let the cooking wilt them to a soft silky texture that still has a toothsome quality.
This particular batch of saag paneer included fresh local spinach, local turnip greens standing in for mustard greens, (they are in the same family, after all) local arugula, fresh methi greens and collards. To boost the fragrance of the methi, I added soaked dried methi greens to the masala paste before grinding it.

I also cook them for less time than most restaurants–my saag paneer is quite brilliantly verdant–filled with the goodness of lightly cooked mixed greens. This retains more of the vitamins and minerals that make greens so good for us, as well as making the color of the dish more appealing. (Again, there is nothing wrong with the flavor of restaurant saag paneer with its overcooked, pureed greens–I will never turn it down when it is presented before me–but I like mine better.)
In order to make great saag paneer, the greens re important, but so is the cheese. Make your own, or get the best quality store bought paneer you can–fresh, not frozen. Frozen paneer can get mealy in texture and is not good.
The best store bought paneer I have ever found is Nanak brand. It is creamy with a sweet, milky flavor that is a great foil for the lightly bitter greens in this dish. When pan fried, the outside crisps to a nice golden brown crust, and the interior is chewy and creamy without being rubbery or crumbly. (Some brands of paneer taste like old pencil erasers–ick.)
To pan fry paneer for curries, I cut it into 1/2 inch cubes. I start by slicing 1/2 inch thick pieces across the length of the block of cheese. Then, stacking three of these slices together, I cut them in half longitudinally, then cut those pieces into three cubes–you got it, approximately 1/2 inches each. Lots of recipes call for 1 inch cubes of cheese, but I like the smaller cubes better. More crispy crust to chewy cheese ratio, and I think they look prettier in the dish that way.
Pan-frying paneer is simple, and is one of the few times I still use a nonstick skillet.

I pour a couple of tablespoons of canola or peanut oil into the nonstick skillet and heat it until it shimmers over medium high heat. Then, I scatter a handful of paneer cubes over the bottom of the pan, and let them brown on the bottom. Then, using a spatula, I turn the cubes and let them brown on all sides. Be careful not to overcrowd the pan–it makes it easier to turn the cheese cubes if the pan isn’t crowded, and of course, it keeps the oil from cooling too much. Cooled oil will seep into the cheese and make it heavy and greasy.
Once the cheese is brown on all sides, remove it from the pan to drain on a pile of paper towels. If you want, sprinkle some with salt and have a great snack while its still hot!
One thing I have to warn you about–frying paneer can be a messy business, as the cheese sputters and pops, sending oil droplets spattering over the stovetop, the countertop and your arms. Wear long sleeves and an apron to protect yourself from the shower of hot oil, and keep your face well away, especially when you turn the cubes with the spatula. Taking a hit in the face with hot oil, which I have had happen more than once, is not fun.
Once the cubes are all fried, you can let them cool down and store them in the fridge for later use or just set them aside until you have the rest of the curry ready. The cheese hardens up as it cools, but have no fear–once you put it into the curry, it will soften right up and as it warms, it will become like little sponges, soaking up the sauce and flavors, taking on a chewy texture that is a delightful contrast to the soft greens.
Saag Paneer
Ingredients:
2 1/2 tablespoons canola oil or ghee
1 1/2 cups thinly sliced red onions
1 teaspoon salt
1/2 teaspoon mustard seeds
1/2 teaspoon cumin seeds
1 tablespoon dried methi leaves, soaked in 3 tablespoons hot water
1″ chunk fresh ginger, peeled and cut into slices
4 large cloves garlic, peeled and sliced
1″ long piece fresh turmeric root, peeled and sliced (or 1/4 teaspoon ground dried turmeric)
1-3 green thai chilies, stemmed
1 1/2 tablespoons coriander seeds
1 teaspoon cumin seeds
1/2 teaspoon fennel seeds
1/4 teaspoon fenugreek seeds
1/4 teaspoon black peppercorns
1 tablespoon Aleppo pepper flakes
7 cups mixed fresh greens, including at least mustard greens and spinach, large veins and stems removed and roughly chopped
1/4-1/2 cup water
1/2 cup Greek yogurt
1/2 cup cream
8 ounces paneer, cut into 1/2 inch cubes and pan fried until golden brown, then drained and cooled
salt to taste
Method:
Heat the oil or ghee in a heavy bottomed, deep skillet or pot over medium high heat and add onions when the oil shimmers. Sprinlkle with salt and cook, stirring as needed, until the onions are a nice medium golden brown. Add the mustard and cumin seeds. Grind together the next few ingredients, from the dried methi leaves to the Aleppo pepper flakes, into a yellowish green paste, using some of the soaking liquid from the methi as needed to make a smooth paste.
When the mustard seeds sputter and pop, add the spice paste, and cook, stirring, until everything is fragrant and the onions are a reddish brown. Add the greens all at once, and stir in the water, starting with the smaller amount. Cook, stirring until the greens deepen in color and wilt. Once the greens are wilted, stir in the yogurt and cream. Bring to a simmer, and add the paneer, and cook, stirring, until the cheese is heated through and spongy–about five to ten minutes.
Add salt to taste and serve with naan or roti or steamed basmati rice.

Categories:
- Admin (rss) (55)
- Blogs and Blogging (rss) (81)
- Book Reviews: Cookbooks (rss) (43)
- Book Reviews: Non-Cookbook Food Books (rss) (38)
- Cats and Cat Blogging (rss) (47)
- Chinese Cooking Lessons (rss) (32)
- Culinary School Stories (rss) (18)
- Dairy Pruducts: Cultured and Barbaric (rss) (4)
- Documentary Filmmaking (rss) (1)
- Essays, Rants and Reflections (rss) (260)
- Fighting Hunger (rss) (12)
- Food and Kids (rss) (45)
- Food in the News (rss) (126)
- Food Media (rss) (98)
- Food Preservation (rss) (18)
- Food Safety (rss) (45)
- Gardening (rss) (30)
- Herbs and Herb Blogging (rss) (20)
- Holidays (rss) (50)
- Kat Blogging (rss) (22)
- Kitchen Science (rss) (36)
- Leftover Makeover (rss) (8)
- Life, the Universe and Everything (rss) (131)
- Local and Sustainable (rss) (227)
- Local Athens Food and Foodies (rss) (42)
- Meatless Mondays (rss) (32)
- Menu For Hope (rss) (5)
- Nutrition, Diet and Health (rss) (84)
- On The Farm (rss) (8)
- Recipes: Almost Vegetarian, Vegetarian and Vegan (rss) (294)
- Recipes: American Regional (rss) (37)
- Recipes: Appalachian Hillbilly (rss) (33)
- Recipes: Bread, Pasta, Grains (rss) (95)
- Recipes: Canning and Preserving (rss) (8)
- Recipes: Chinese (rss) (123)
- Recipes: Comfort Food (rss) (120)
- Recipes: Cookies (rss) (16)
- Recipes: Desserts (rss) (48)
- Recipes: French (rss) (25)
- Recipes: Fruits and Vegetables (rss) (302)
- Recipes: Greek, North African and Middle Eastern (rss) (31)
- Recipes: Indian (rss) (137)
- Recipes: Italian (rss) (42)
- Recipes: Japanese (rss) (7)
- Recipes: Jewish (rss) (4)
- Recipes: Korean (rss) (6)
- Recipes: Meat, Poultry and Fish (rss) (220)
- Recipes: Mexican/Native American/ Latin American/Caribb (rss) (27)
- Recipes: Original (rss) (108)
- Recipes: Thai (rss) (27)
- Recipes: Tofu (rss) (17)
- Recipes: US Regional (rss) (16)
- Recipes: Vietnamese (rss) (8)
- Restaurant Stories (rss) (28)
- Sewing, Quilting, Arts and Crafts (rss) (16)
- Simple Chinese Recipes (rss) (30)
- Slow Food and Heritage Foods (rss) (10)
- Spice Blogging (rss) (44)
- The Chinese Cookbook Project (rss) (14)
- The Chinese Pantry (rss) (39)
- The Documentary (rss) (2)
- The Kitchen Saga (rss) (17)
- The Locavore's Bookshelf (rss) (15)
- The Unsung Adventures of The Culinary Nerd (rss) (6)
- Tools and Toys (rss) (35)
- Uncategorized (rss) (10)
- With a Side of Politics (rss) (48)
Archives:
- August 2012 (9)
- July 2012 (12)
- September 2011 (3)
- August 2011 (7)
- July 2011 (8)
- June 2011 (16)
- May 2011 (17)
- April 2011 (11)
- December 2010 (9)
- November 2010 (5)
- February 2010 (1)
- December 2009 (5)
- November 2009 (7)
- October 2009 (10)
- September 2009 (16)
- August 2009 (14)
- July 2009 (14)
- June 2009 (7)
- May 2009 (17)
- April 2009 (10)
- March 2009 (25)
- February 2009 (13)
- January 2009 (10)
- December 2008 (5)
- November 2008 (5)
- October 2008 (6)
- September 2008 (13)
- August 2008 (8)
- July 2008 (11)
- June 2008 (18)
- May 2008 (13)
- April 2008 (14)
- March 2008 (16)
- February 2008 (17)
- January 2008 (19)
- December 2007 (25)
- November 2007 (18)
- October 2007 (24)
- September 2007 (16)
- August 2007 (15)
- July 2007 (15)
- June 2007 (10)
- May 2007 (14)
- April 2007 (16)
- March 2007 (17)
- February 2007 (20)
- January 2007 (13)
- November 2006 (1)
- October 2006 (8)
- September 2006 (14)
- August 2006 (25)
- July 2006 (30)
- June 2006 (28)
- May 2006 (34)
- April 2006 (29)
- March 2006 (24)
- February 2006 (30)
- January 2006 (38)
- December 2005 (40)
- November 2005 (37)
- October 2005 (32)
- September 2005 (25)
- August 2005 (30)
- July 2005 (28)
- June 2005 (21)
- May 2005 (8)
- April 2005 (22)
- March 2005 (17)
- February 2005 (29)
- January 2005 (10)
Search Site:
Links:
- Lily’s Wai Sek Hong
- 101 Cookbooks
- A cat in the kitchen
- A Veggie Venture
- Accidental Hedonist
- Cha Xiu Bao
- chez pim
- Chocolate & Zucchini
- Chopstick Cinema
- Chowhound.com
- Chubby Hubby
- Cook sister!
- Cooking with Amy
- da*xiang
- Eat Local Challenge
- Eating Liberally
- Ecocentric
- Eggbeater
- Epicurious
- Farmgirl Fare
- Fatfree Vegan
- Foodgoat
- ForkandBottle.com
- Green Olive Tree
- Hooked on Heat
- Jaden’s Steamy Kitchen
- Kalyn’s Kitchen
- Lucullian delights
- Mahanandi
- Matt Bites
- MeatHenge
- mmm-yoso!!!
- New York Times – Dining & Wine
- Pizza Goon
- Rasa Malaysia
- Ruhlman
- Sailu's Kitchen
- Serious Eats
- SF Gate: Food & Dining
- Simply Recipes
- Soul Fusion Kitchen
- Tastespotting
- The Amateur Gourmet
- The Cleaner Plate Club
- The Food Section
- The Grub Report
- thecookscottage
- U.S. Food Policy
- Wandering Chopsticks
- Washington Post Food and Dining
- Wasted Food
Meta:

Powered by WordPress. Graphics by Zak Kramer.
Design update by Daniel Trout.
Entries and comments feeds.