Cook Local, Eat Global
The Recession, Foodstamps and Politics

The recession is deepening, and as more and more people lose their jobs, demand for social services, especially food stamps, is rising.
All across the country, families, including those with small children and infants, are going hungry.
And the stimulus package, which every Republican in the House of Representatives, refused to vote for, allocates 30 percent of its total spending on expanding programs that directly help the unemployed, the hungry and families in need.
Bill O’Reilly claims that this spending will not help the United States Economy recover.
In the January 28th edition of The O’Reilly Factor, O’Reilly claimed, “”increased food stamps have nothing to do with stimulating the economy.” Earlier on his radio show, he said similarly that increasing food stamp benefits would do absolutely nothing to stimulate the economy.
That is so easy for a well-fed and well-paid employed pundit to say, especially since he doesn’t bother to check in with experts in the field of economics to see if his opinions might hold some validity.
Because the fact is, he is not just obnoxious and hateful in this opinion, and uncaring toward the plight of his fellow Americans, he is just plain WRONG.
Economists such as Douglas W. Elmendorf, who is the director of the bi-partisan Congressional Budget Office, stated in testimony before Congress on January 27th–the day before Bill O’Reilly once again stuck his big, fat, well-fed foot in his mouth–Transfers to persons (for example, unemployment insurance and nutrition assistance) would also have a significant impact on GDP. Because a large amount of such spending can occur quickly, transfers would have a significant impact on GDP by early 2010. Transfers also include refundable tax credits, which have an impact similar to that of a temporary tax cut.”
So, uh, who are you going to believe? O’Reilly, or a real, live economic expert?
If you don’t want to listen to one economist, how about listening to two–including a bona fide fiscal conservative?
Mark Zandi of Moody’s Economy.Com told Congressional leaders that the fastest and most cost-effective form of government spending to jumpstart the economy was “extending unemployment insurance benefits, expanding the food stamp program and increasing aid to hard-pressed state and local governments.â€
So, what gives with the Republican claims that foodstamp programs don’t stimulate the economy?
I mean, think about it–if people are using food stamps, they are buying FOOD. And if they are buying food using food stamps, then whatever other money they have can be spent on OTHER GOODS. I mean, mind you I am quoting two leading economists in the US who have come to these conclusions, but the truth is it doesn’t take a degree to figure that out.
If people are buying food and other goods, that creates more demand for goods, which stimulates the economy by putting people to work. Supermarkets, purveyors of other consumer goods, trucking companies, wholesalers, farmers, and factories all then have a reason to retain and pay employees–because their is a demand for their goods and services.
So, why exactly do Republicans object to food stamps?
I’m not really sure.
Sewing And Craft Projects Part Two: The Totoro Apron

This second installment of my weekly posts on my sewing, quilting and crafts projects features the Totoro apron that I made for Kat for Christmas, which she wants to wear all the time.
It was really easy to make–the apron itself took me only a couple of hours to cut and sew together. It is called The Four Corner’s Apron and you can get the kid’s sized version here. Or, you could look for the pattern at your local quilt or fabric shop. The pattern is really easy to use and the apron comes together quickly and easily–I have now made three of these aprons–two adult sized and one tiny one for Kat, and they were all easy and all took really well to embellishment.

I can’t say enough good things about the patterns from Vanilla House Designs–the instructions are simply and clearly written–which is a rarity in the world of sewing patterns. And this particular design makes a beautiful apron that looks good in whatever fabrics you choose to use and which takes really well to all sorts of embellishment as you can see here.
For Kat’s apron, I used two reproduction fabrics from the 1930’s that also had an Asian look to them. I wanted them to also have the feel of nature about them, so I picked the flowery field and the butterflies flying over a pattern of tiny blossoms. The reds, blues, yellows, greens and purples of the prints also are very cheery and cute for Kat, who likes all sorts of brilliant colors in her clothing.

The little white Totoro, also known as the Chibi (or tiny) Totoro, was drawn by Zak on his computer using Painter 6. He then sized it and printed it out for me. I traced his drawing with a transfer pencil, then ironed the design onto a piece of white flannel. I then hand-embroidered the eyes on it, then cut it out and using fusible web interfacing, ironed it onto the finished apron. Then, I made black satin stitches all the way around the Totoro to secure the edges with my machine. Then, I cut two cute little feet from pink felt and tacked them on with nearly invisible stitches by hand.

The soot sprites or Makkuro Kurosuke, as they are called in Japanese, I appliqued by hand. These were made three-dimensional by cutting circles of fabric roughly twice the size that I wanted the finished sprites, which were then hand-sewn into what are called “yo yos.” These little round flat rosettes were very popular in the 1930’s for quilt-making–they were sewn together into blankets and quilts. Now you can make them easily using these Clover yo-yo makers, and they are gaining popularity as trims for clothing purses, accessories and home decor items.
I made them out of black hand-dyed material to give them a dimensional look, and then cut and sewed together felt oblongs in black and white for their googly eyes. Then I placed them on the apron for the cutest effect. My favorite ones are the one I placed so it is peeking out of the pocket, and the one I stitched to the end of one of the apron ties. (That one is made from two yo-yos, one with eyes for the front and a plain one for the back!)

Kat loves the apron! After she opened it on Christmas morning, she put it on and would not take it off! She pretty much wore it most of the day over her sleepers, and then over the set of clothes she changed into after her nap. I loved making it so much–and as Morganna and Brittany said, it looks exactly like something that Mei, the little girl in the movie, “My Neighbor Totoro,” would wear.
I think it is one of my favorite aprons I have made yet, and it was truly fun to create.
I am thinking of making one in greens and browns with acrorns and Totoros for myself.
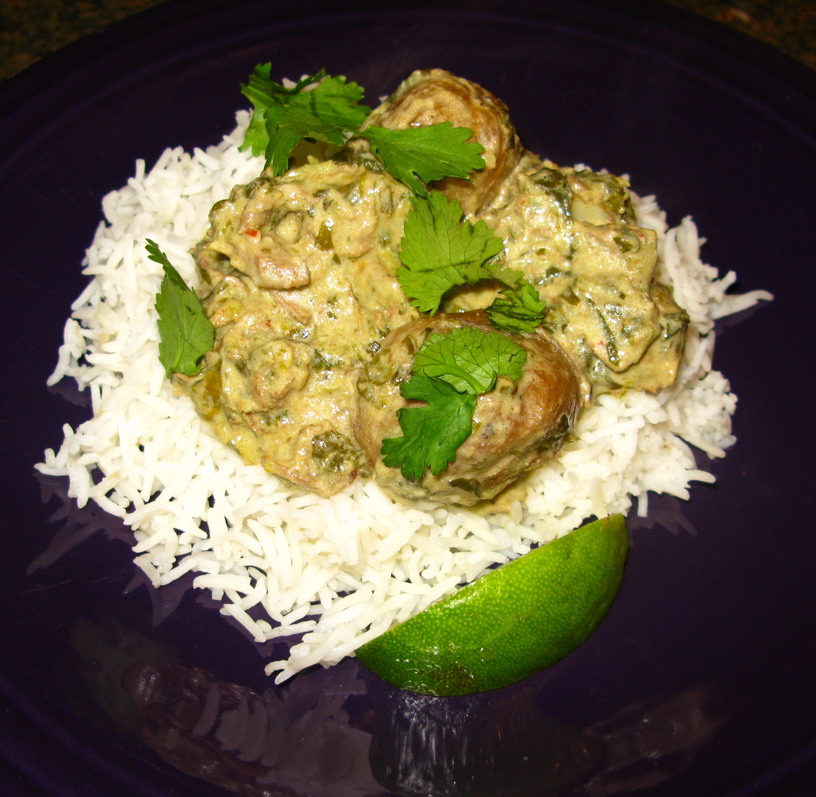
Dahi Malai Methi Gosht: Creamy Lamb Curry With Yogurt and Fenugreek Greens
When the first really bad storm of this winter hit Athens, I decided we needed something to really warm us up.
So, for the two days we sat in the house while snow, freezing rain, ice, then snow again fell over our quiet little corner of Southeastern Ohio, I stirred up pot after pot of curry.
This is one of the tastiest of the bunch, and once again, the original recipe came from Raghavan Iyer’s 660 Curries.
I am beginning to worry that people will think I have turned into a Raghavan groupie, what with me presenting all of these recipes inspired by his book, but the thing is, if I get stumped on what to have for dinner, I just have to flip through, and within a few pages I always come across something that sounds appealing, and I usually even have the ingredients for it on hand.
So, that is why I just keep delving into his book. I’ve come up with winners every time, so there is no reason to stop. (Except that I have some more Indian cookbooks here to review, so I should start cooking from them, too…and I will, have no fear.)
This curry is perfect for a blustery cold winter evening. It is especially good for dinner after a day of scraping ice from cars and shoveling snow from the driveway, because after all of that work, you need something hearty to warm you from the inside out.
This is not a low fat dish, but it is a good one–and it is quite nourishing. The fenugreek greens are full of vitamins A and C, with a good bit of iron, the baby potatoes I added to the dish have lots of vitamins and fiber in them, and the yogurt is just plain old good for you. The onions, ginger and garlic have antibiotic properties, and the chilies have a lot of vitamin C in them.
The cream–well–it is just there to tie everything together, I guess, in a rich, velvety sauce. I guess you could leave it out if you want to.
You could add spinach to this dish if you wanted, or kale, but I liked it just fine with the methi greens alone. I added more of them to the dish than Iyer used, and instead of using just dried methi or frozen, as he called for, I used both. I like the concentrated flavor that comes from the dried greens, and the texture and color that comes from the frozen ones.
I also added some dried, freshly ground spices to the dish–cumin, coriander, a bit of black cardamom and fenugreek seeds, and at the end, I added another dollop of yogurt, which I think improved the texture and color of the sauce.
And I garnished it with fresh cilantro leaves and lime wedges, adding both flavor and color.
This is perfect with steamed basmati rice and with sauteed broccoli with panch phoron.
Creamy Lamb Curry with Yogurt and Fenugreek Greens
Ingredients:
1 1/2 teaspoons salt (kosher salt is best)
1/4 teaspoon turmeric
1 teaspoon cumin seeds
2 teaspoons coriander seeds
1/2 teaspoon fenugreek seeds
1 black cardamom pod
8 large cloves garlic
1 small red onion, chopped roughly
3-6 fresh green thai chilies, stemmed
1″ cube fresh ginger, sliced
1/2 cup strained Greek style yogurt (I use Fage brand whole milk yogurt)
1 pound boneless leg of lamb, trimmed of excess fat and silverskin and cut into 1″ cubes
1 pound whole baby new potatoes, scrubbed, and boiled until nearly done, then drained and cut into halves
2 tablespoons ghee
1 medium red onion, peeled and thinly sliced
2 cups frozen (or fresh) fenugreek leaves
1/4 cup dry fenugreek greens, soaked in warm water for 15 minutes, then drained, with excess water squeezed out
1/4 cup heavy cream
1/2 cup strained Greek style yogurt
1 cup cilantro leaves for garnish
lime wedges for garnish
Method:
Put the first 10 ingredients into a spice grinder, food chopper or blender, and grind into a paste. Stir into the first measure of yogurt to make a thick, deliciously scented marinade. Toss the lamb with the yogurt mixture in a bowl and allow it to sit for at least twenty minutes. You can also cover it and put it in the fridge to marinate overnight if you want.
Heat the ghee in a heavy-bottomed pot or pressure cooker. Add the sliced onion and cook, stirring, until the onion is deep reddish brown. Add the lamb, and cook, stirring, until it browns lightly. Add the frozen or fresh fenugreek greens and the dried, along with one cup of water. If using a pressure cooker, bring to a boil, clap the lid on it and bring to full pressure. Turn the heat down to low and cook for twelve minutes. If using a regular pot, bring to a boil, turn the heat down and simmer for twenty-five to thirty-five minutes or until the lamb is tender.
If using a pressure cooker, release pressure and open cooker. Add potatoes. Turn heat up to high and bring back to a boil. Boil away excess water, until the sauce is quite thick and clinging to the meat.
If using a regular pot, add potatoes and check and see how thick or thin the sauce is. If it is too thin, turn heat up to high, bring to a boil and cook off the excess water. If it is thick, add a bit of water and simmer to finish cooking potatoes.
When potatoes are finished cooking, and the excessive water is boiled off, add the cream and the second measure of yogurt and stir to combine. Simmer for a couple of minutes to heat through, and then serve over plain steamed basmati rice, and garnish with generous handsful of cilantro leaves and some lime wedges.
Note: If you wanted to make a vegetarian version of this, substitute pan-fried paneer cheese for the lamb. That is it. Paneer would taste FANTASTIC with this greens-laden sauce and the potatoes.
In fact, I may have to make it that way next week so I can use up the rest of my paneer.
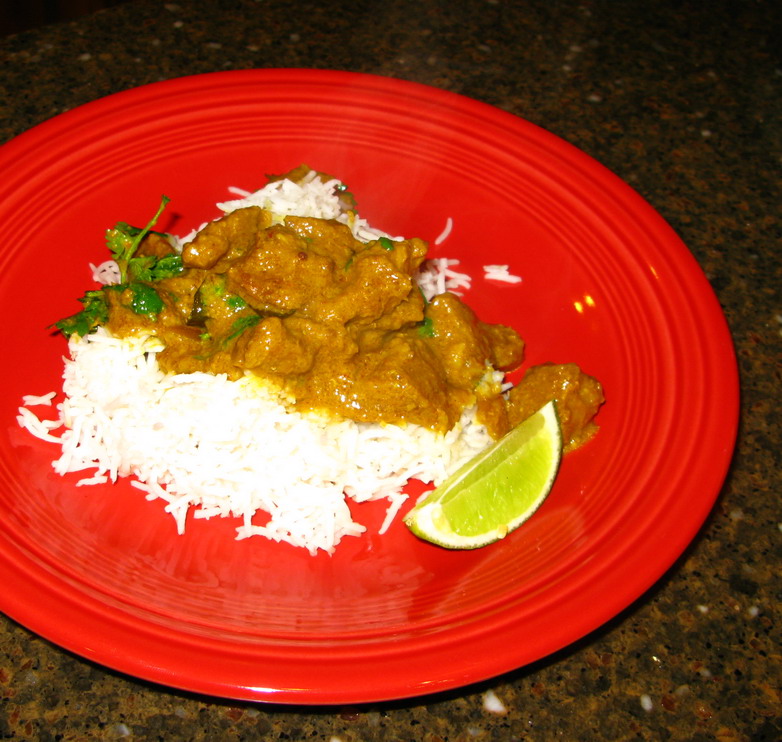
Lamb With Curry Leaves, Lime Pickle and Yogurt
This curry was inspired by a recipe I found in Raghavan Iyer’s book, 660 Curries. His version is simpler than mine–the seasonings were only mango pickles and garlic paste, and he used a little less yogurt than I did, but it sounded so tasty, I just had to take the basic idea and run rampant with it.
(I am always running rampant with some idea or another, whether it is in the kitchen or the sewing room. I can never just leave well enough alone.)
The first changes I made are obvious–I added curry leaves and switched out the mango pickle for lime pickle and relish. The pickle switch actually came first–while I like Indian mango pickle quite fine, I LOVE me some lime pickle. Mango pickle I can nibble. Lime pickle I can devour. So, out with the mango, in with the lime. And after the lime came into the picture I decided that curry leaves would go nicely with it–I like the slightly musky, earthy curry leaves with the lightly bitter, tangy flavor of lime. So, those were the first changes.
I also added a few spices to the garlic, which like Iyer, I ground into a paste. Cumin seeds and coriander seeds joined Aleppo pepper flakes (standing in for Kashmiri chili flakes, which I am fresh out of) in the Sumeet grinder with the garlic. My thoughts behind these additions are that the main spice in lime pickle is fenugreek, which, while I adore it, has a slightly bitter edge to it. So, the earthy richness of the cumin seed and the citrus tang of the coriander seed would counterbalance the fenugreek while highlighting the lime, and the mild chili would add sweetness and just a touch of heat.
Finally, I added turmeric for the color and its lightly astringent flavor, not to mention its health benefits.
And I used a bit more yogurt than Iyer did because, well–I really like yogurt.
I also cooked my curry in my ever-present pressure cooker, though really, it cooks up almost as quickly in a regular pot. Iyer gives about twenty five minutes as the length of time it takes for the lamb to cook through, while mine cooked in about twelve in the pressure cooker.
How did it taste?
Well, Britanny and I LOVED it and she said I should make it again. And again. And some more after that.
I felt much the same way–I really, really liked it–which is not surprising since I adore lime pickle so much.
Zak was not too sure about it. He said it had too much bitterness to it–and it is true that I like bitter flavors much more than he does. And he is right–since lime pickle is made from limes, skin and all–there is a bitter edge to it. And the main spice in the pickles is fenugreek–which is also somewhat bitter. Once I added the curry leaves, which Zak doesn’t like in the first place, I may have tipped the flavor balance too far towards bitter for his tastebuds.
I will have to try making it again and see if I can tweak it around so he will like it. Maybe add an acidic component at the end like lime juice to help counteract the bitterness.
But no, I am not going to add sugar–that just sounds completely unappealing to me.
Lamb With Curry Leaves, Lime Pickle and Yogurt
Ingredients:
2 tablespoons ghee, butter or canola oil
10 fresh or frozen curry leaves
1 pound lamb leg meat, fat well-trimmed and cut into 1″ cubes
3 tablespoons garlic paste (about six large cloves, peeled and ground into a paste)
1 1/2 teaspoons cumin seed, ground finely
2 1/2 teaspoons coriander seed, ground finely
2 teaspoons Aleppo or Kashmiri chili flakes
1 teaspoon ground turmeric
1/3 cup Indian lime pickle or relish, finely chopped (I used Patak’s brand)
1/2 cup water
1 1/2 cups Greek style or regular whole milk yogurt, strained
1 cup chopped fresh cilantro leaves
finely diced red onion for garnish
fresh lime wedges for garnish
Method:
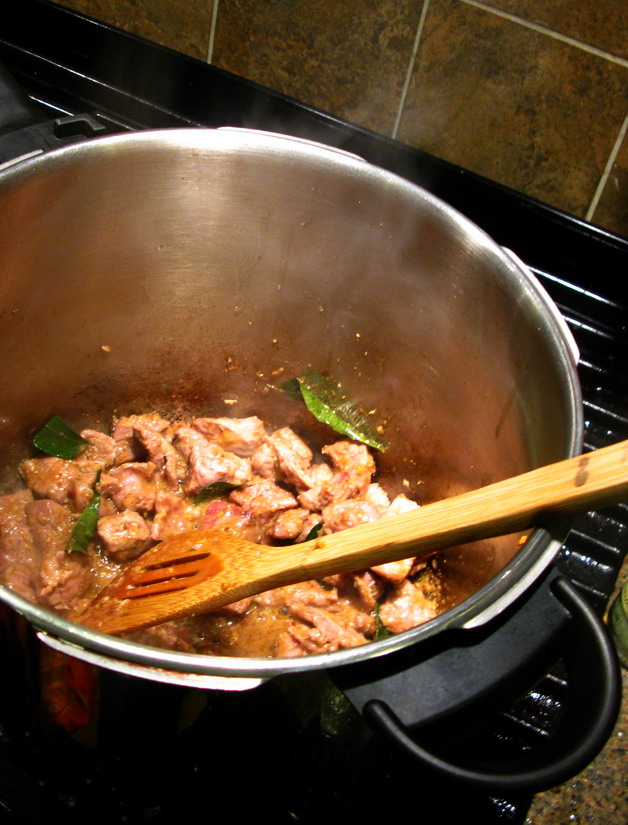
Heat ghee, butter or canola oil in a pressure cooker or heavy bottomed pot on medium heat. Add the curry leaves, and stir for thirty seconds. Add the lamb, and cook, stirring, until the meat juices start pouring out and the meat begins to brown. Add the garlic paste, and the spices and continue cooking until there is barely any pink left on the meat.
Add the lime pickle bits and the yogurt and stir to combine. Stir in water.
Bring to a boil, put lid on pressure cooker, lock it down and bring to high pressure. Turn down heat to low and cook for twelve minutes. Release pressure and open lid. (If you have no pressure cooker, bring curry to a boil in your pot, then turn down heat nad simmer for about twenty five minutes, stirring as needed.)
Turn heat back on under the pressure cooker, and with the lid off, simmer off most of the liquid in the sauce. There should be a little bit of very thick sauce clinging to the meat and barely covering the bottom of the pot.
Stir in the the cilantro leaves, and serve over steamed basmati rice with a sprinkling of red onion on top, with lime wedges on the side for garnish.
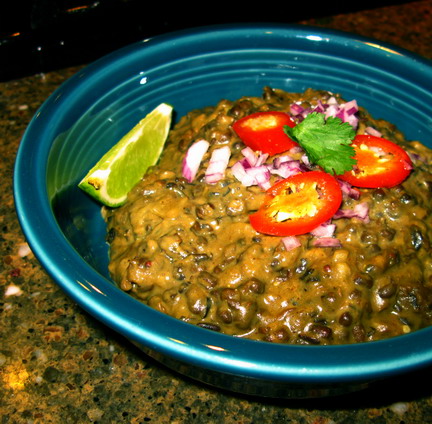
Kali Dal Makhani
This recipe comes to you by request of my dear friend Heather, who, when she visited this weekend past, said to me, “Please publish your kali dal recipe. I have tried everyone else’s recipe and none of them taste as good as yours.”
So, Heather, this one is for you.
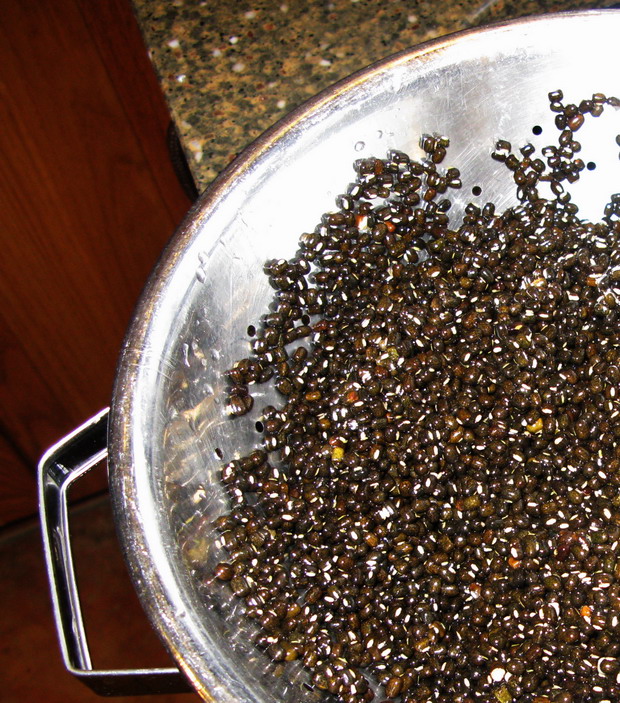
There are about a bazillion different ways to make kali dal as there are households in Northern India. There are versions that contain only whole black (also known as urad dal or black gram) lentils, versions with whole black lentils and red kidney beans, versions with whole and split black lentils, versions with whole and split black lentils and red kidney beans. and probably about fifteen other versions of kali dal besides.
My version contains whole urad dal and split, but unskinned urad. I like the texture that this creates in the finished dish–the whole lentils stay separate and unto themselves while the split ones break down and thicken the sauce a bit, giving it a velvety mouthfeel. The whole lentils have a wonderful, toothsome texture–they don’t ever really fall apart like most lentils will do, but I must warn you–they take forever to cook.
Those wee critters are tough-skinned and loath to soften, even after being soaked overnight. Even if you soak them, be prepared to simmer the troublesome beasties for at least four hours on the back burner of your stove. (Or, put them in your slow cooker and run off to work and leave them for eight hours. That should work, too.)
The way I manage it is to cook the lentils in a pressure cooker for about forty-five minutes or so. I don’t bother soaking them at all, and they still turn out perfect, though if your lentils are a bit old, they might require about ten or fifteen more minutes under high pressure to get them done.
They also soak up an inordinate amount of liquid for being such tiny legumes.
Now that I have told you how much trouble they are, you must be wondering why on earth anyone would bother to cook them at all?
Well, for one thing, they have a lot of protein and fiber, and they taste wonderful. They are earthy, delicious and satisfying, and make a bowl of steamed basmati rice sing, though in truth, they are just as comfortable being scooped up in a folded roti, poori or naan.
So that’s why I, and a whole bunch of folks in India cook kali dal, even if it does seem to take a lifetime to get the lentils to soften.
Now, if you know anything about Indian food, you may have noticed the word “makhani” in the title of this post, and you will be thinking that it translates to “black lentils with butter.”
And you are absolutely right to think so–you win a cookie.
But what the name of the dish leaves out is that there is also heavy cream and in some versions, yogurt, stirred into the lentils.
So, while the lentils are low in calories by themselves, be forewarned that this milk-fat rich delight (which should perhaps be renamed “black lentils cooked with an entire dairy case”) is not to be eaten every day, unless you are really trying to gain weight or you are a ballet dancer and can burn off those calories with a lot of intensive entrechat or something.
One more great thing about this dish, before I give you the recipe–it freezes beautifully. So, if you live by yourself and you are not a ballet dancer who is going to work all of that butter off in an afternoon of rehearsal, and you don’t have a small army of friends and relations to assist you in eating all of your dal, then you can put it up in individual plastic containers and freeze it. Just thaw out a package overnight in the fridge and when you come home from work, you can pop some rice in the rice cooker and toss your kali dal into the microwave and have yourself a trouble-free meal.
Kali Dal Makhani
Ingredients:
1 cup of whole urad dal, picked over and rinsed well, then drained (If you want and are more organized than me, you can soak these overnight.)
1/3 cup split, but not skinned urad, picked over and well rinsed then drained (You can also soak these overnight if you want.)
6 1/2 cups water
2 pinches asafoetida
1 teaspoon fresh ginger, grated finely
3 tablespoons ghee or butter (Although ghee is superior, I will forgive you if you choose to use butter instead. But please, I beg of you, no margarine.)
1 1/2 cups thinly sliced yellow onions
pinch salt
2 teaspoons black mustard seeds
2 teaspoons cumin seeds
5 cloves garlic, peeled and thinly sliced
1 teaspoon fresh ginger finely minced
1-5 fresh Thai chilies, thinly sliced–or you can use any other fresh chilies you like
1/2-3/4 cup heavy cream
1/4-1/2 cup Greek style or plain yogurt that has been strained (optional)
salt to taste
finely diced red onion for garnish
thinly sliced fresh red chilies for garnish
fresh cilantro leaves for garnish
lime wedges for garnish
Method:
Okay, if you soaked your lentils, drain them, rinse them and put them into a pressure cooker. If you didn’t soak them, then after rinsing and draining them, put them in the pressure cooker. Add the water, the asafoetida and the first measure of grated ginger.
Bring to a boil and put the lid on the pot, lock it, and bring it up to full pressure. Turn down the heat and cook for at least forty-five minutes if your lentils are unsoaked, for thirty if they were soaked. (If you are sans pressure cooker, then put the lentils into a large pot, add the water, asafoetida and ginger, bring to a boil, clap a lid on it and turn the heat down so that the lentils barely simmer. Cook forever, okay, for about four hours, stirring now and again, and adding water if necessary, until the lentils soften up and are edible. If you have a slow cooker, adapt this recipe to however it works and email me and let me know how it turned out, since I have never cooked this in a crockpot, so I cannot say what it would be like, though I am pretty certain it would work fine.)
Once the forty-five minute mark is reached, release the pressure and open the cooker. Test the lentils. If they are done, meaning soft enough to eat (though be warned that the skins are thick and so even though the lentils are done, they will retain some amount of “chewiness”), then proceed to the next step. If not, bring them back to a boil, put on the lid, bring the cooker up to full pressure, turn the heat down and cook for another ten to fifteen minutes, or until the lentils are done.
Once the lentils are cooked, you will probably need to simmer off some excess water. If the liquid seems quite thin after a good stirring, then put the pressure cooker back on the heat, uncovered and bring it to a boil. Turn down the heat and simmer away as much water as you like. I like my kali dal makhani to be pretty darned thick, so I cook almost all of the water away, but other people like it to be soupier. Both ways are tasty, so it is all up to the individual cook’s preference.
While the water is being simmered away, make the tarka: heat the ghee or butter in a heavy-bottomed skillet one medium high heat. Add the onions and a pinch of salt, and cook, stirring, until the onions are a medium golden brown. Add the mustard and cumin seeds, along with the garlic, ginger and chilies, and continue cooking and stirring until the onions are a deep reddish brown, the mustard seeds have started to pop like popcorn, and the garlic slices are turning a deep gold.
Immediately add the contents of the skillet to the dal, and stir it in well. Stir in the cream and yogurt if you are using it, and taste for salt. Correct the seasoning as needed.
Just before serving, sprinkle with the garnishes, and serve with bread or steamed basmati rice.

Categories:
- Admin (rss) (55)
- Blogs and Blogging (rss) (81)
- Book Reviews: Cookbooks (rss) (43)
- Book Reviews: Non-Cookbook Food Books (rss) (38)
- Cats and Cat Blogging (rss) (47)
- Chinese Cooking Lessons (rss) (32)
- Culinary School Stories (rss) (18)
- Dairy Pruducts: Cultured and Barbaric (rss) (4)
- Documentary Filmmaking (rss) (1)
- Essays, Rants and Reflections (rss) (260)
- Fighting Hunger (rss) (12)
- Food and Kids (rss) (45)
- Food in the News (rss) (126)
- Food Media (rss) (98)
- Food Preservation (rss) (18)
- Food Safety (rss) (45)
- Gardening (rss) (30)
- Herbs and Herb Blogging (rss) (20)
- Holidays (rss) (50)
- Kat Blogging (rss) (22)
- Kitchen Science (rss) (36)
- Leftover Makeover (rss) (8)
- Life, the Universe and Everything (rss) (131)
- Local and Sustainable (rss) (227)
- Local Athens Food and Foodies (rss) (42)
- Meatless Mondays (rss) (32)
- Menu For Hope (rss) (5)
- Nutrition, Diet and Health (rss) (84)
- On The Farm (rss) (8)
- Recipes: Almost Vegetarian, Vegetarian and Vegan (rss) (294)
- Recipes: American Regional (rss) (37)
- Recipes: Appalachian Hillbilly (rss) (33)
- Recipes: Bread, Pasta, Grains (rss) (95)
- Recipes: Canning and Preserving (rss) (8)
- Recipes: Chinese (rss) (123)
- Recipes: Comfort Food (rss) (120)
- Recipes: Cookies (rss) (16)
- Recipes: Desserts (rss) (48)
- Recipes: French (rss) (25)
- Recipes: Fruits and Vegetables (rss) (302)
- Recipes: Greek, North African and Middle Eastern (rss) (31)
- Recipes: Indian (rss) (137)
- Recipes: Italian (rss) (42)
- Recipes: Japanese (rss) (7)
- Recipes: Jewish (rss) (4)
- Recipes: Korean (rss) (6)
- Recipes: Meat, Poultry and Fish (rss) (220)
- Recipes: Mexican/Native American/ Latin American/Caribb (rss) (27)
- Recipes: Original (rss) (108)
- Recipes: Thai (rss) (27)
- Recipes: Tofu (rss) (17)
- Recipes: US Regional (rss) (16)
- Recipes: Vietnamese (rss) (8)
- Restaurant Stories (rss) (28)
- Sewing, Quilting, Arts and Crafts (rss) (16)
- Simple Chinese Recipes (rss) (30)
- Slow Food and Heritage Foods (rss) (10)
- Spice Blogging (rss) (44)
- The Chinese Cookbook Project (rss) (14)
- The Chinese Pantry (rss) (39)
- The Documentary (rss) (2)
- The Kitchen Saga (rss) (17)
- The Locavore's Bookshelf (rss) (15)
- The Unsung Adventures of The Culinary Nerd (rss) (6)
- Tools and Toys (rss) (35)
- Uncategorized (rss) (10)
- With a Side of Politics (rss) (48)
Archives:
- August 2012 (9)
- July 2012 (12)
- September 2011 (3)
- August 2011 (7)
- July 2011 (8)
- June 2011 (16)
- May 2011 (17)
- April 2011 (11)
- December 2010 (9)
- November 2010 (5)
- February 2010 (1)
- December 2009 (5)
- November 2009 (7)
- October 2009 (10)
- September 2009 (16)
- August 2009 (14)
- July 2009 (14)
- June 2009 (7)
- May 2009 (17)
- April 2009 (10)
- March 2009 (25)
- February 2009 (13)
- January 2009 (10)
- December 2008 (5)
- November 2008 (5)
- October 2008 (6)
- September 2008 (13)
- August 2008 (8)
- July 2008 (11)
- June 2008 (18)
- May 2008 (13)
- April 2008 (14)
- March 2008 (16)
- February 2008 (17)
- January 2008 (19)
- December 2007 (25)
- November 2007 (18)
- October 2007 (24)
- September 2007 (16)
- August 2007 (15)
- July 2007 (15)
- June 2007 (10)
- May 2007 (14)
- April 2007 (16)
- March 2007 (17)
- February 2007 (20)
- January 2007 (13)
- November 2006 (1)
- October 2006 (8)
- September 2006 (14)
- August 2006 (25)
- July 2006 (30)
- June 2006 (28)
- May 2006 (34)
- April 2006 (29)
- March 2006 (24)
- February 2006 (30)
- January 2006 (38)
- December 2005 (40)
- November 2005 (37)
- October 2005 (32)
- September 2005 (25)
- August 2005 (30)
- July 2005 (28)
- June 2005 (21)
- May 2005 (8)
- April 2005 (22)
- March 2005 (17)
- February 2005 (29)
- January 2005 (10)
Search Site:
Links:
- Lily’s Wai Sek Hong
- 101 Cookbooks
- A cat in the kitchen
- A Veggie Venture
- Accidental Hedonist
- Cha Xiu Bao
- chez pim
- Chocolate & Zucchini
- Chopstick Cinema
- Chowhound.com
- Chubby Hubby
- Cook sister!
- Cooking with Amy
- da*xiang
- Eat Local Challenge
- Eating Liberally
- Ecocentric
- Eggbeater
- Epicurious
- Farmgirl Fare
- Fatfree Vegan
- Foodgoat
- ForkandBottle.com
- Green Olive Tree
- Hooked on Heat
- Jaden’s Steamy Kitchen
- Kalyn’s Kitchen
- Lucullian delights
- Mahanandi
- Matt Bites
- MeatHenge
- mmm-yoso!!!
- New York Times – Dining & Wine
- Pizza Goon
- Rasa Malaysia
- Ruhlman
- Sailu's Kitchen
- Serious Eats
- SF Gate: Food & Dining
- Simply Recipes
- Soul Fusion Kitchen
- Tastespotting
- The Amateur Gourmet
- The Cleaner Plate Club
- The Food Section
- The Grub Report
- thecookscottage
- U.S. Food Policy
- Wandering Chopsticks
- Washington Post Food and Dining
- Wasted Food
Meta:

Powered by WordPress. Graphics by Zak Kramer.
Design update by Daniel Trout.
Entries and comments feeds.