Cook Local, Eat Global
Time Off For Quilting
So here’s the deal: Restaurant Salaam is closed for the week of Ohio University’s spring break so we can do renovations, cleaning, maintenance and have a bit of rest. This is pretty standard practice here in Athens–lots of restaurants close either for the entire break or part of it, so that employees can spruce the place up, and have a vacation themselves.
It is pretty nice.
There are some possible changes coming at Salaam, but I can’t talk about them now, exciting as they are. (I really, really want to blab, but I will restrain myself! It’s hard, though.)
So, instead, I will show you what I finished last night.
And no, you can’t eat it. (Well, I reckon you could, but I doubt it would taste very nice, and ithe chewing would be a little hard on the jaws.

This wallhanging, which I have titled, “Stargazers,” is a patchwork pieced out of cotton flannel. The backing is also flannel–the same fabric as the binding and the golden triangles in the “Ohio Star” block in the center.
I finished the top of the hanging five years ago, and have waited this long to finally layer it with its backing and the cotton batting and machine quilt it. It represents the first of my quilts to be finished from beginning to end completely by myself.
The reason there was such a lag between finishing the top and the quilting was in part because right after I finished this quilt top and started another, I had a miscarriage. The quilt I started right after this was a baby quilt for the baby who wouldn’t be born. Because of that sad circumstance, for years, I eschewed quilt making even though I really had enjoyed it. The association between sewing and the grief of losing a baby was too strong, and it took years for me to work my way past it.
The other reason I took forever to get around to quilting it is because I was scared I would mess it up! I finally decided to get over myself and just do it, so here it is.
It is funny, the lag time between making the top and finishing it is so great that it is almost like having a history of my piecing and sewing skills. If you look closely, you can see how inaccurate my piecing was in the beginning. This was in part, inexperience, and in part, the fact that the machine I was using didn’t have a presser foot that helped me sew an accurate 1/4″ seam. All patchwork patterns allow for exact 1/4″ seams, so when they are off, the entire quilt gets out of whack. Now I know ways to ensure that, and I have a great newer machine that works much better than the old one, so my piecing is much more accurate.

I also discovered during piecing and especially during the quilting process, that flannel is a pain in the rear end to work with. I hated it. Well, no, I love the feel and look of it, but I hated working with it–intensely. It creeps, stretches, fills the machine with linty-fuzzy-icks which make it jam, it is thick and dulls the needle quickly and it is generally behaves in an unruly and persnickety fashion. So, I had to nurse the machine through the last bits of quilting by cleaning it often and petting it and generally being sweet to it.
There is a close-up of one of the cats–you can see how it is pieced together.
My Mom’s favorite cat in my childhood was a Siamese named Missy, and she still holds a fondness for them, so that is why I chose this design. I picked the Ohio Star in the center because I live in Ohio, and it is one of my favorite star patterns–stars are my favorite patchwork patterns of all time. The colors were chosen to match Mom and Dad’s living room which is heavy on blues and burgundies, and to match the generally “country” style decor of their house.
So there it is–“Stargazers.”
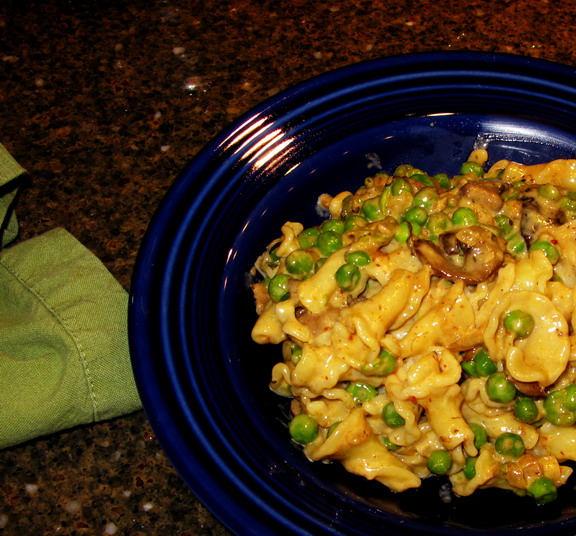
Another Use For Caramelized Onions: Heather’s Pasta With Mushrooms and Peas
Deeply caramelized onions are not just good for Indian food: in my opinion, they improve nearly any recipe from any cuisine. I used to use browned onions as the basis for a sauce/gravy for meatloaf with Jamaican jerk spices that I made for my Pakistani personal chef clients, and they loed the sweetness and savor they brought to the meal. In fact, I tend to use them whenever I make any kind of gravy, or as the basis of braising liquid or a pan sauce.
They are particularly good with any sort of cream-based pasta sauce as they bring depth and color to the finished dish, and they keep the dreaded “blands” away, especially when used in a vegetarian sauce.
Last weekend, Morganna wanted me to make Pasta with Prosciutto and Peas for Tom, who hadn’t had it yet. There was only one problem with that idea–Heather was coming to eat with us, too, and she is Muslim. And while the rest of the family may be of the opinion that prosciutto is of divine origin, the Koran disagrees on that point. Morganna shrugged her shoulders and said, “Make a vegetarian version of the sauce for Heather.”
That was easy enough. I had fresh shiitake and baby portabellas in the fridge, and it wasn’t really that much more trouble to make two pans of sauce, one large and one small.
So, I was lucky enough to get off work and go home early–about forty-five minutes before the restaurant closed. I ran home and started prepping for two pasta sauces, one with peas and mushrooms and one with peas and prosciutto. (When Morganna told Galen, one of the other cooks, that I had gone home to make dinner for seven people after working a busy Friday night in the kitchen, he said, “That’s crazy. That’s the kind of crazy I like, but that’s still crazy.”)
For the record, two pasta sauces are not much harder to make than one. It just requires a bit of timing and the ability to multi-task.
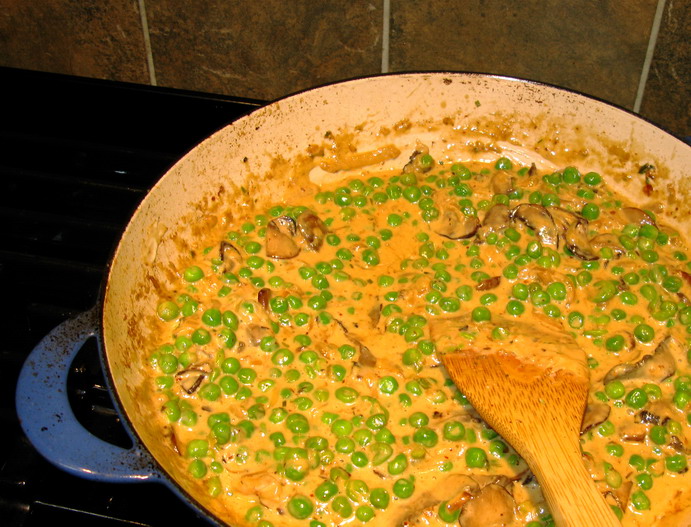
For the mushroom version of the dish, I browned the onions even more than I did for the prosciutto version, until they were lightly crispy on the edges. This added more flavor and a nice, deep color to the dish. The mushrooms took on the flavors of the onions and were sauteed until they were lightly crisped on the edges as well, adding another layer of flavor to the dish. I used one dried shiitake in the dish, and used a mixture of the soaking water and sherry to deglaze the pan, scraping like mad to get every crisped, browned bit of onion and mushroom into the sauce.
Then, in went the cream to reduce, and it was a matter of stirring now and again and waiting. Once the sauce was nearly the thickness I wanted it to be–enough to coat the back of the spoon, in went the thawed frozen peas for a few minutes of simmering, and a bit of freshly shredded Parmesan cheese. Then the pasta was tossed in and a bit more salt and freshly ground black pepper was added.
The result?
Fantastic flavor from a vegetarian pasta sauce.
Flavor that was just as good as the original, sacrilegious, pork-infested sauce. In fact, on certain days, I think I would like the mushroom version even better, because the darker onions mixed with the richness of the mushrooms really made the sauce special.
It was well worth what little trouble it was to make it. Heather was happy, the rest of the family was happy, everyone had something great to eat and I was happy to have a new pasta sauce option for the coming summer months when about all I want to eat is pasta and vegetables. (Unless it is rice and vegetables–I like that, too.)
Heather’s Pasta With Mushrooms and Peas
Ingredients:
3 tablespoons butter or olive oil (I used olive oil)
2 1/2 cups thinly sliced yellow onions
1 teaspoon salt
1 teaspoon Aleppo pepper (optional–or use any red pepper flakes to taste)
3 baby portabella mushrooms, thinly sliced
3 fresh shiitakes, thinly sliced
1 dried shiitake mushroom, rehydrated in boiling water, squeezed out, stem removed and cap thinly sliced (keep the soaking water)
1 1/2 tablespoons minced fresh garlic
1/4 cup dry sherry
1 1/4 cup heavy cream
2 cups frozen peas, thawed (I just take the bag out of the freezer while I do prep and let it sit on the counter and they thaw right out)
1/4 cup shredded Parmesan
salt and freshly ground black pepper to taste
al dente pasta (I like the campanelle shape for this sauce–it grabs the peas and mushrooms and holds the sauce)
1/2 cup minced fresh flat-leafed parsley (optional)
Method:
Heat the butter or olive oil in a heavy-bottomed skillet or pan. Add the onions, sprinkle them with salt and cook, stirring, until they turn a deep golden color. Add the Aleppo pepper or other chili pepper flakes, and the mushrooms, and cook, stirring. When the onions are half-cooked and are nearly finished letting off their liquid, add the garlic and cook stirring, until they onions are a deep mahogany brown and lightly crisp and the mushrooms are cooked and slightly crisped on the edges. The garlic should be golden and fragrant.
Deglaze the pan with the sherry and the mushroom soaking water–leave the last bit of the water in the soaking bowl, as there is always grit and dirt that sank to the bottom of the bowl and you don’t want that in your sauce. Scrape up all the browned bits, and allow the alcohol to cook off, then add the cream, and cook, stirring, until the cream will coat the back of a spoon.
Add the peas and Parmesan, and cook until the peas are hot and brilliant green, and the cheese has melted and incorporated into the sauce. Add salt and freshly ground pepper to taste, add the al dente pasta to the pan, remove from the heat, and stir and toss to coat the pasta thoroughly. Stir in parsley if you are using it and serve immediately in warmed bowls.
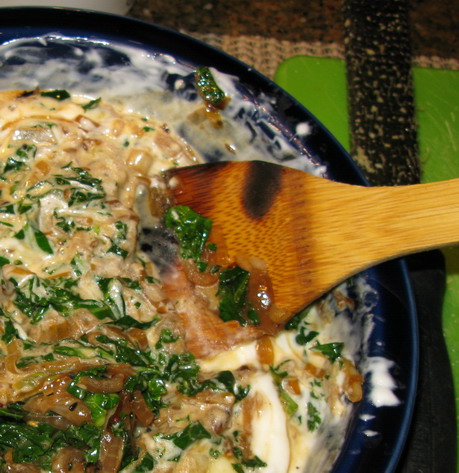
Raita With Browned Onions and Greens

Here is another recipe using browned onions that is not a curry, which I made the other night.
Raita is one of my favorite Indian dishes: yogurt-based, and served cold, it can be considered a salad, a relish, a side dish, a soothing breakfast, or a simple meal on its own with rice or bread, and dal. It is cooling, and is great for the digestion. Yogurt is good for children and elderly people whose digestion may not be as strong, but really, it is good for anyone. The lactobacillus which ferments the milk and turns it into yogurt is a bacteria which is beneficial to our digestive system, and so it makes sense that eating yogurt will help our innards do their jobs more efficiently.
Most Americans are most familiar with raita made from raw cucumbers, tomatoes and perhaps raw onions, or maybe with shredded cooked potatoes and shredded raw carrots. There are many other types of raita, however, I when I made this one, I thought to myself that I had seen a recipe for one (perhaps it was in Yamuna Devi’s excellent vegetarian cookbooks, Lord Krishna’s Cuisine) that included cooked winter greens, onions, and whole mustard and cumin seeds tempered in ghee.
Since I had the browned onions, and in my refrigerator was a combination of kale and collards, I thought I would saute those along with cumin and mustard toasted in ghee, and add them all to yogurt.

This combination is particularly tasty, as the browned onions bring out the sweetness inherent in the greens, and the spices compliment the deeper, darker bitter flavors of the greens without making them overpowering. It is a delicious and delectable balance that is brought together by the creamy nature of the yogurt, but before the raita is made, you have to work with the yogurt to make it perfectly smooth and silky.

When you first take yogurt out of its carton or the vessel in which it was made, it is lumpy and curd-like. You need to whisk it thoroughly to break up the lumps. Eventually, after a minute or two of fast whisking, the yogurt will smooth out into a creamy thick liquid that will be the perfect medium for your greens and onion raita.
This was great with the pillau and grilled chicken for dinner, but I have to admit that I like it by itself, straight out of the fridge for breakfast!
Raita With Browned Onions and Greens
Ingredients:
3 tablespoons canola oil or ghee
2 cups thinly sliced onions
1 tablespoon cumin seeds
1 tablespoon mustard seeds
3 cups mixed winter greens, washed and dried, big veins removed and cut into thin strips
1 teaspoon salt, or to taste
2 cups full fat yogurt
Method:
In a heavy-bottomed wide, deep frying pan, heat the oil or ghee. Add the onions, and following the instructions here, brown them thoroughly. When they are nearly done, sprinkle the cumin and mustard seeds into the pan, and add the greens. When the mustard seeds pop and the greens wilt and turn bright green, sprinkle them with salt and stir well. Remove from heat.
Whisk the yogurt until perfectly smooth, then stir the contents of the pan into the yogurt, mixing well. Taste for salt and correct if necessary, then cover tightly and put into the fridge to chill for at least an hour before you eat it.
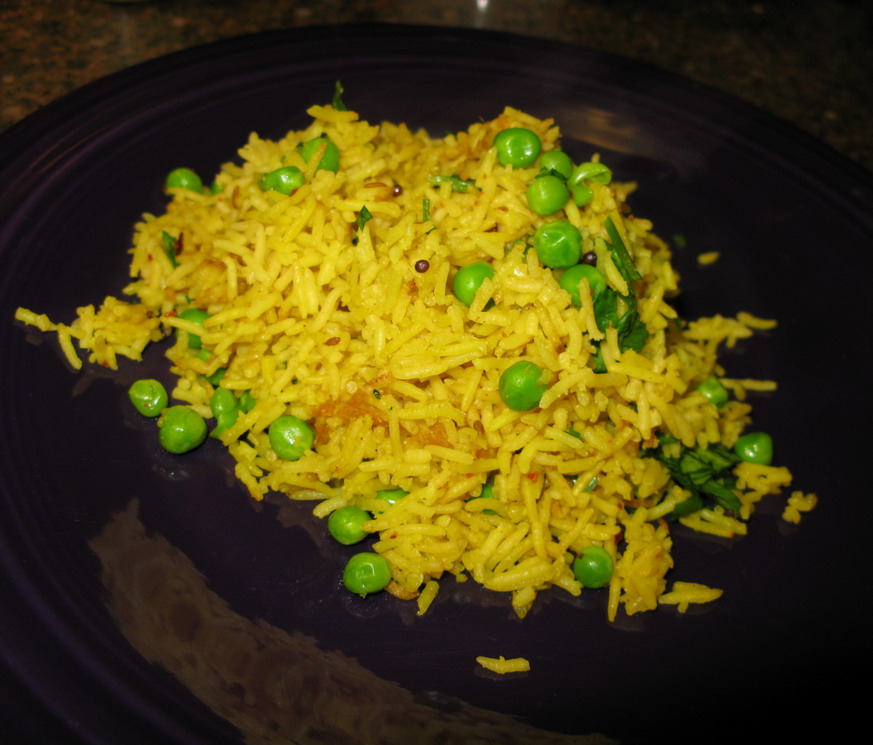
What Can We Do With Those Browned Onions? Make Springtime Rice Pilau
So now that you know how to brown onions, what do you do with them?
Are they only good for making curries?
Well, of course not!
They are good for making any number of Indian dishes, and, as an extra added bonus, they make nearly any other dish from any other cuisine taste even better than they started out.
But I wanted to present a couple of Indian dishes other than curries that I made with some of the deeply caramelized onions I made for the previous post, just to show how versatile this technique can be.
The pillau I made last night with these onions is gorgeous in color, and ravishing in scent, and it just says “springtime” to me. Which is good–I needed to be reminded it really is spring, at least according to the calendar, because snow was pouring from the sky while I was cooking dinner. (It didn’t stick, though, thankfully.) So while it was blustery and cold outside, in the kitchen, with some simple ingredients: rice, frozen peas, caramelized onions, garlic, ginger and a few selected spices, I was creating a palette of the colors and flavors of spring.
This is an easy dish, but I made it in the rice cooker, so that is how I am giving instructions. If you don’t have a rice cooker–well, you are on your own. I have used a rice cooker for so long (seven years now) that I have literally forgotten how to cook rice on the stovetop. It is sad but true, however, I am in good company. Lots of my Chinese, Korean, Indian and Pakistani friends are in the same boat–they have no clue how to make rice without a rice cooker. (And to think I used to tease them for their lack of stovetop rice cooking knowledge! I guess that kitchen karma has come around and kicked me in the seat of my pants!)
This is an easy, delicious vegan pilau, which can be the basis of a great meal. Serve it with a vegetarian curry like mattar paneer or baigan bartha for a delicious vegetarian meal. Or, you can serve it with a grilled chicken dish, (like Sindhi Elaichi Murgh) or seafood curry for a meal for omnivores.
When the asparagus comes in season, I want to make this with pencil-thin asparagus tips along with the peas. I think that would be absolutely perfect.
Springtime Rice Pilau
Ingredients:
1/2 tablespoon canola oil
1 cup of yellow onions caramelized according to the instructions here
2 teaspoons cumin seeds
1 1/2 teaspoons mustard seeds
1 1/2 teaspoons turmeric
1 teaspoon salt
1/2 teaspoon garam masala–homemade or store bought (for store bought garam masala, I like Penzey’s blend.)
chili pepper flakes to taste–optional
1 tablespoon garlic, ground into a paste
1 tablespoon fresh ginger, ground into a paste
2 cups basmati rice
3 cups water
1-1 1/2 cups frozen peas, thawed
1 cup cilantro leaves, roughly chopped
Method:
In the same pan in which you made the onions, and after you have removed them from the pan, add the oil. Allow it to heat up on medium heat. Add cumin seeds and mustard seeds, and cook, stirring constantly, until the mustard seeds pop and the cumin seeds become darker brown and fragrant. Add turmeric, garam masala, chili flakes, if using, garlic and ginger, and cook, stirring, for one minute more.
Scrape contents of the pan into the bottom of the cooking bowl of a rice cooker. Add the onions, and stir to combine. Put the pan back on the heat, and add the rice, and cook, stirring, until it is coated with the oil that is left in the pan. Scrape the rice into the cooking bowl of the rice cooker, and add water. Stir well to combine the spices with the rice, and to get the turmeric to dissolve.
Close lid and turn cooker on proper cook setting. When rice is five minutes from being done, stir in the thawed peas, close the cooker back up and let it finish its cooking cycle.
When the rice is finished, stir in the cilantro, and serve immediately.
Cutting and Browning Onions For Proper Flavor In Indian Food
I had a reader ask me last week how I manage to cut my onions thin enough so they brown easily and completely for the proper Indian flavor. I tried to explain it completely with words, but I thought that it would be much easier to do an in-depth post with photographs to explain not only the process of cutting, but also browning the onions. I have found over years of teaching Indian cookery that many American cooks will stop cooking the onions much sooner than they should–they fear burning the onions so much that they will not cook them long enough.
So, when I teach Indian cookery in a classroom situation, I always emphasize the process I am showing here, and have the students all watch and participate in each step.
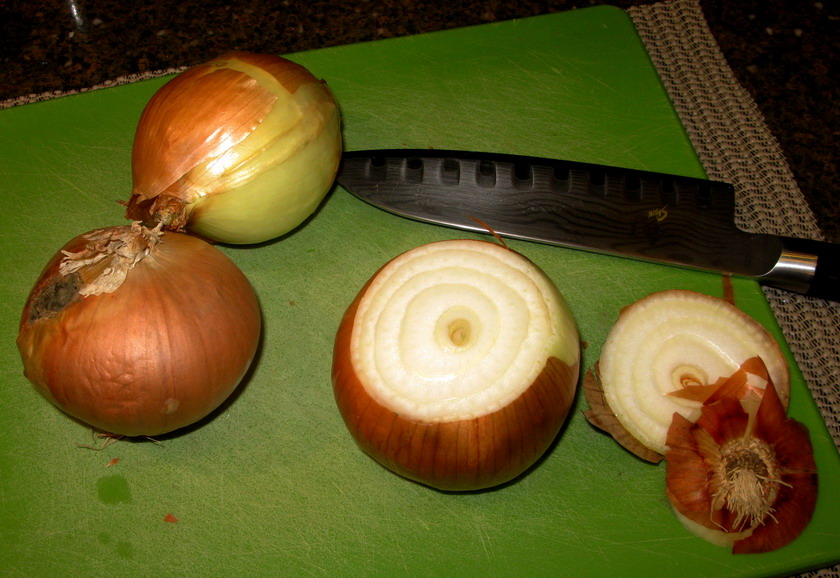
As you see from the photograph above, everything starts with cutting off both the root and top of the onions off.
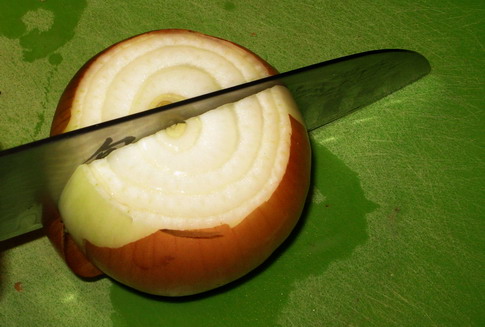
Then, set the onion on one of the flat ends formed when the root or stem is cut off, and cut straight through the center of the onion.
Peel off the first layer of the onion along with the onion skin, and discard it.
Then set the onion halves down on the large flat cut side. It will be very stable this way.
I use the sharpest knife I have to cut onions, and I like to use one with a hollow-ground edge, because the tiny divets created by this grind helps keep the very thin slices from sticking to the knife blade. Some people like to use smaller, short-bladed knives for slicing onions, but I prefer my seven-inch long santoku knife–that is a Japanese knife that is usually used for precision cutting vegetables, tofu, fruits, mushrooms, and boneless meats.
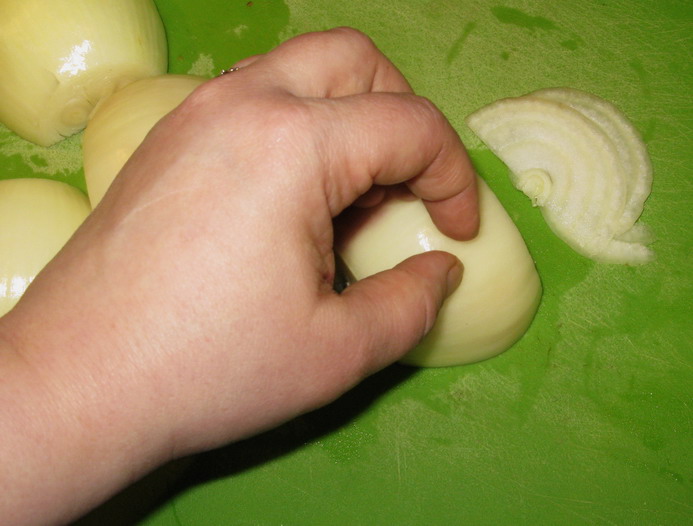
To hold the onion, tuck your fingertips under your knuckles as shown, and starting slowly, cut a very thin slice off the end of the onion. Cutting in the proper way, you will see each slice made of thin half-rings of onion. I find that if you saw back and forth slowly with the part of the blade closest to the handle, for the first part of the cut, you can stabilize the onion, and then continue the cut by pushing forward with the knife, then drawing the knife toward you while pushing down. This is called a “draw cut” and it is the easiest, and safest way to get a thin slice of a firm vegetable like an onion. With practice, you can make paper-thin slices of onion that you can see through with this method.
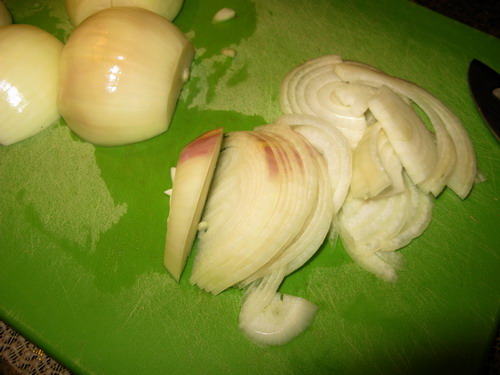
Continue cutting in this way as far as you can safely do so. The last half-inch or so of the onion is impossible to safely keep steady upright on the cutting board, so you lay it down flat. This way, it is steadier on the board, and you can cut it into very thin slices as well.
It doesn’t matter at all that these final slices will be in a different shape than the first slices, because the onions will cook down completely, and the shapes will be unrecognizable. So, do not worry overmuch with the shape of these last slices, just try to make them the same basic thickness as your first slices.
Continue cutting until you have the amount of onions you need for the recipe you are working on.

Before we continue on to the process of cooking the onions, I want to talk a bit about choosing onions for Indian cookery. Unless some other onion is specified in the recipe, plain old yellow onions are the best choice for Indan food. Why is this?
It has to do with the fact that they have the least amount of water in them of any other type of onion you can find in the typical American supermarket. Low moisture content is perfect for browning onions quickly and evenly, because the first step of the caramelizing process is to rid the onions of excessive water. This step also takes the longest time to accomplish. (I have been told by my friends from India, Pakistan and Bangladesh that the onions in the US are much waterier than the ones in their country, and so they take longer to cook down to a proper deep brown color and flavor.)
Whatever you do, resist the urge to use Vidalia, Walla Walla or Maui sweet onions, because these have even more liquid in them than the standard grocery store varieties. Save these to use as raw relishes or in uncooked chutneys and as garnishes for seekh kebab or grilled chicken where their sweet flavor and crisp, juicy texture will shine.
Now we come to the type of pan to use.
Whatever you do, don’t use a pan with a nonstick surface. Nonstick coatings interfere with the proper development of the darkened sugar residue that coats the bottom of the pan while the onions cook. You want the sugar from the onions that is leeched out of them with the water which boils off as the onions cook, to stick to the pan and turn brown. So, whatever you do, don’t use nonstick pans for your Indian food.
Secondly, use a heavy-bottomed pan which heats evenly. Thin-bottomed pans will heat up quickly, but they also tend to form hot spots on their bottom surfaces, which will lead to the sugars not only sticking, but burning. And this can happen within a matter of seconds.
My favorite pans to use for cooking onions this way are the enameled cast iron braising pans from Le Creuset. But, if you don’t have any such pans and can’t afford to get one, invest in a plain old Lodge cast iron skillet and cook in that. Not only will you make luscious caramelized onions and Indian food with authentic,deep flavor, you will also be adding iron to your food. Besides, such a pan will last several lifetimes of curry-making–you can pass it down to your grandkids, along with the secret for making perfectly browned onions.
The cooking medium you use for browning your onions is up to you, but I prefer to cook mine in ghee, butter or canola oil, depending upon the recipe, my mood and what is in the pantry at the moment. Just be certain to use a little bit more oil than you think you need, because while you want the sugars left behind by the evaporating water to stick to the pan and brown, you don’t want the onions themselves to stick and burn.
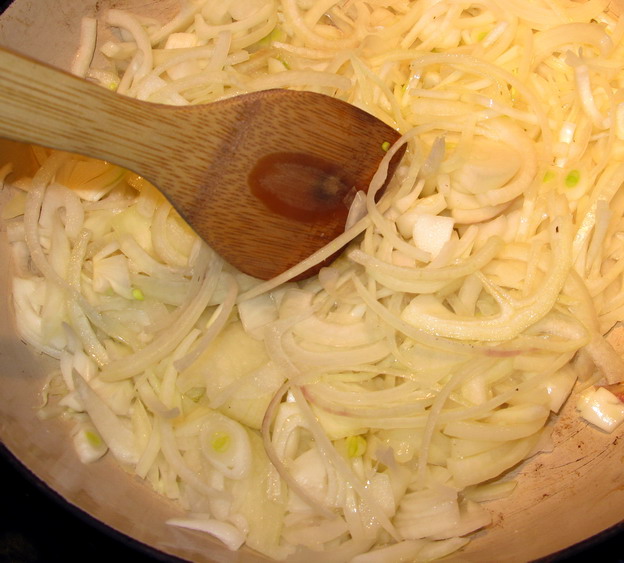
Heat the pan with the ghee, butter or oil, over medium heat until it is quite warm. Add the onions, and spread them out into an even layer covering the bottom of the pan with a flat-edged scraping tool, like a spatula. I like my bamboo spatulas for this job–they are inexpensive, sturdy, beautiful and durable–I throw them in the dishwasher, and they last for years. Try doing that with a hardwood utensil, and you will regret it!
Then, sprinkle the onions with a teaspoon or two of salt. Sprinkle it evenly over the top of the onions, and then give them a nice rough stir. This not only distributes the salt, but it also breaks up the onion slices–you don’t want them sticking together, but instead you want theindividual bits to separate, thus exposing the maximum surface area to the hot pan and oil as possible.
The salt not only seasons the onions, but also helps draw the water out of their tissues more quickly. You -can- do without it if you are dedicated to a low salt diet, though the process will take a little bit longer.
After you have stirred the onions the first time, leave them undisturbed for a few minutes, or just until some onions along the edges of the pan show a hint of color and you can smell the onions beginning to brown. At this point, stir the onions, and keep stirring. Stir, and stir, and stir, until you feel like your arm is going to fall off and your mind is going to go numb from boredom. And then, stir some more, because this is the key to getting the onions to release their water quickly and evenly, and it is essential to cooking your onions without burning them.
(Here is where I am going to make a confession. I have been cooking onions to a deep brown for so long, I usually do it without stirring them constantly. I can stir them, then go off and cut some other ingredient or parboil something or peel something, then go back and stir just in the nick of time, then walk away, and come back, just before they burn. This is because I can listen to the sounds of the onions cooking and smell the depth of browning without looking. This has taken me years of practice, and I do not suggest that beginners try to do my “Zen method” of onion cooking until they have gotten really good at the “Stir Until Your arm Falls Off” method. I will say that developing the senses necessary to do the Zen method of onion browning does allow for much more multi-tasking in the kitchen, which is invaluable, especially at work.)
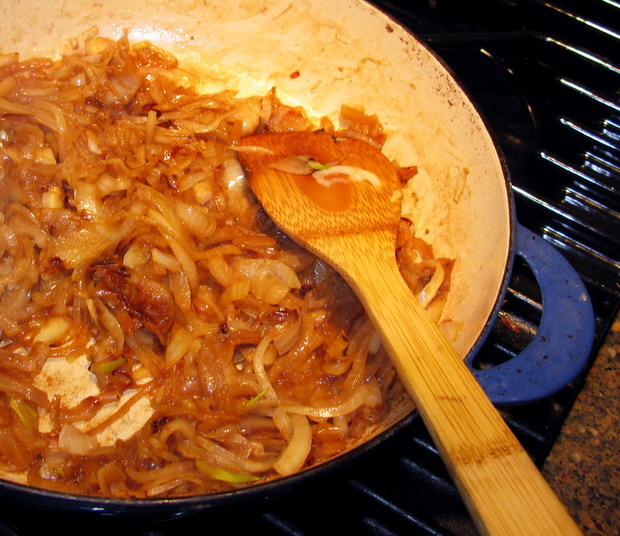
What you will see happeniing is your onions will go limp first. They wilt. Then, you will see juices bubbling out of them, and they start to turn translucent. Then, they turn golden, and this is where a lot of Americans want to stop cooking and call the onions done. Nope, Kemo Sabe, you are not even halfway finished. Keep cooking those onions, and you will see them start to turn to a nice, rich, good-smelling medium brown color that looks an awful lot like the photograph you see here.

See all of that reddish brown stuff stuck to the bottom of the pan, particularly in the lower-right hand corner of the photo? Well, those are those sugars I was talking about. What you want to do is get them off the bottom of the pan and integrated back into your onions, because that layer of browned sugars is filled with flavor. And, color.
There are two ways to get those sugars off the pan and back into your onions. One is the logical but sometimes more difficult method, and the other is the completely counter-intuitive but easier method.
The first, slightly more difficult way is to use the remaining liquid in onions themselves, to “deglaze” your pan. That means you gather up all of your onions, and slide them forcefully over the browned areas of the pan, scraping at the browned bits with your scraper/spatula. Sometimes, this works great, and the onions will pick up the color of the sugars, and the pan will scrape almost perfectly clean with a minimum of effort. Other times, the sugars will stick stubbornly, and all that will happen is you will get a sore wrist from all of that scraping;.
Which leads us to the counter-intuitive method. Add a little bit of water to the pan, and deglaze it like normal, by scraping up the browned bits, which dissolve into the water, and then, as the water is boiled away, is transferred to the onions.
I know you think I am nuts–didn’t I just say that the point was to remove as much water from the onions as possible? So why add more water?
What I have found is that in some cases, adding a tiny bit of water–about a quarter cup or so–to a pan of onions at the point where the onions have just started to turn reddish brown, and the sugars are clinging stubbornly to the bottom of the pan and are starting to edge toward bitter black rather than savory brown, adding water actually helps cook the onions faster. Too much stuff stuck to the bottom of the pan keeps the onions from continuing to cook, as it makes a buffer to the heat–dissolving that into water keeps the pan hotter, and helps the onions cook. And, for whatever reason, once dissolved from the pan bottom, the onions will cling to the onions as this added water evaporates, instead of once again sticking to the pan. Why this happens, I cannot say, but it does.
Whichever method you use to get those sugars off the pan and back onto your onions, do it, and keep stirring, until your onions are finally cooked down to an almost jam-like consistency, and are a rich, mahogany color–reddish brown. The color I wish my hair was naturally.
So, there we are. Deeply browned, caramelized onions. Why are they so damned great and what do you do with them once you have them?
First of all–they taste amazingly good, and without them, most Indian dishes that are supposed to contain onions, taste sort of weak and shallow. Browned onions are the bottom note, the basis of a curry, the starting point. They are the foundation, and without them, a curry can just seem one-dimensional. They add sweetness and an indefinable “brown taste,” and they completely lack any harshness. They also add color to many curries–a nice dark, reddish brown that is appealing to the eye, as well as to the tongue.
After they are cooked, you can leave them as they are, or grind them up into a puree. It depends on what texture you want your sauce to have–if you don’t mind it being somewhat chunky, leave the onions alone, but if you want it to be velvety smooth with no discernible lumps, puree the onions before adding them back to the pan with other aromatics, such as garlic and ginger, and spices.
So that is it. A primer on how to cut and cook onions properly for delectable Indian food.

Categories:
- Admin (rss) (55)
- Blogs and Blogging (rss) (81)
- Book Reviews: Cookbooks (rss) (43)
- Book Reviews: Non-Cookbook Food Books (rss) (38)
- Cats and Cat Blogging (rss) (47)
- Chinese Cooking Lessons (rss) (32)
- Culinary School Stories (rss) (18)
- Dairy Pruducts: Cultured and Barbaric (rss) (4)
- Documentary Filmmaking (rss) (1)
- Essays, Rants and Reflections (rss) (260)
- Fighting Hunger (rss) (12)
- Food and Kids (rss) (45)
- Food in the News (rss) (126)
- Food Media (rss) (98)
- Food Preservation (rss) (18)
- Food Safety (rss) (45)
- Gardening (rss) (30)
- Herbs and Herb Blogging (rss) (20)
- Holidays (rss) (50)
- Kat Blogging (rss) (22)
- Kitchen Science (rss) (36)
- Leftover Makeover (rss) (8)
- Life, the Universe and Everything (rss) (131)
- Local and Sustainable (rss) (227)
- Local Athens Food and Foodies (rss) (42)
- Meatless Mondays (rss) (32)
- Menu For Hope (rss) (5)
- Nutrition, Diet and Health (rss) (84)
- On The Farm (rss) (8)
- Recipes: Almost Vegetarian, Vegetarian and Vegan (rss) (294)
- Recipes: American Regional (rss) (37)
- Recipes: Appalachian Hillbilly (rss) (33)
- Recipes: Bread, Pasta, Grains (rss) (95)
- Recipes: Canning and Preserving (rss) (8)
- Recipes: Chinese (rss) (123)
- Recipes: Comfort Food (rss) (120)
- Recipes: Cookies (rss) (16)
- Recipes: Desserts (rss) (48)
- Recipes: French (rss) (25)
- Recipes: Fruits and Vegetables (rss) (302)
- Recipes: Greek, North African and Middle Eastern (rss) (31)
- Recipes: Indian (rss) (137)
- Recipes: Italian (rss) (42)
- Recipes: Japanese (rss) (7)
- Recipes: Jewish (rss) (4)
- Recipes: Korean (rss) (6)
- Recipes: Meat, Poultry and Fish (rss) (220)
- Recipes: Mexican/Native American/ Latin American/Caribb (rss) (27)
- Recipes: Original (rss) (108)
- Recipes: Thai (rss) (27)
- Recipes: Tofu (rss) (17)
- Recipes: US Regional (rss) (16)
- Recipes: Vietnamese (rss) (8)
- Restaurant Stories (rss) (28)
- Sewing, Quilting, Arts and Crafts (rss) (16)
- Simple Chinese Recipes (rss) (30)
- Slow Food and Heritage Foods (rss) (10)
- Spice Blogging (rss) (44)
- The Chinese Cookbook Project (rss) (14)
- The Chinese Pantry (rss) (39)
- The Documentary (rss) (2)
- The Kitchen Saga (rss) (17)
- The Locavore's Bookshelf (rss) (15)
- The Unsung Adventures of The Culinary Nerd (rss) (6)
- Tools and Toys (rss) (35)
- Uncategorized (rss) (10)
- With a Side of Politics (rss) (48)
Archives:
- August 2012 (9)
- July 2012 (12)
- September 2011 (3)
- August 2011 (7)
- July 2011 (8)
- June 2011 (16)
- May 2011 (17)
- April 2011 (11)
- December 2010 (9)
- November 2010 (5)
- February 2010 (1)
- December 2009 (5)
- November 2009 (7)
- October 2009 (10)
- September 2009 (16)
- August 2009 (14)
- July 2009 (14)
- June 2009 (7)
- May 2009 (17)
- April 2009 (10)
- March 2009 (25)
- February 2009 (13)
- January 2009 (10)
- December 2008 (5)
- November 2008 (5)
- October 2008 (6)
- September 2008 (13)
- August 2008 (8)
- July 2008 (11)
- June 2008 (18)
- May 2008 (13)
- April 2008 (14)
- March 2008 (16)
- February 2008 (17)
- January 2008 (19)
- December 2007 (25)
- November 2007 (18)
- October 2007 (24)
- September 2007 (16)
- August 2007 (15)
- July 2007 (15)
- June 2007 (10)
- May 2007 (14)
- April 2007 (16)
- March 2007 (17)
- February 2007 (20)
- January 2007 (13)
- November 2006 (1)
- October 2006 (8)
- September 2006 (14)
- August 2006 (25)
- July 2006 (30)
- June 2006 (28)
- May 2006 (34)
- April 2006 (29)
- March 2006 (24)
- February 2006 (30)
- January 2006 (38)
- December 2005 (40)
- November 2005 (37)
- October 2005 (32)
- September 2005 (25)
- August 2005 (30)
- July 2005 (28)
- June 2005 (21)
- May 2005 (8)
- April 2005 (22)
- March 2005 (17)
- February 2005 (29)
- January 2005 (10)
Search Site:
Links:
- Lily’s Wai Sek Hong
- 101 Cookbooks
- A cat in the kitchen
- A Veggie Venture
- Accidental Hedonist
- Cha Xiu Bao
- chez pim
- Chocolate & Zucchini
- Chopstick Cinema
- Chowhound.com
- Chubby Hubby
- Cook sister!
- Cooking with Amy
- da*xiang
- Eat Local Challenge
- Eating Liberally
- Ecocentric
- Eggbeater
- Epicurious
- Farmgirl Fare
- Fatfree Vegan
- Foodgoat
- ForkandBottle.com
- Green Olive Tree
- Hooked on Heat
- Jaden’s Steamy Kitchen
- Kalyn’s Kitchen
- Lucullian delights
- Mahanandi
- Matt Bites
- MeatHenge
- mmm-yoso!!!
- New York Times – Dining & Wine
- Pizza Goon
- Rasa Malaysia
- Ruhlman
- Sailu's Kitchen
- Serious Eats
- SF Gate: Food & Dining
- Simply Recipes
- Soul Fusion Kitchen
- Tastespotting
- The Amateur Gourmet
- The Cleaner Plate Club
- The Food Section
- The Grub Report
- thecookscottage
- U.S. Food Policy
- Wandering Chopsticks
- Washington Post Food and Dining
- Wasted Food
Meta:

Powered by WordPress. Graphics by Zak Kramer.
Design update by Daniel Trout.
Entries and comments feeds.