Cook Local, Eat Global
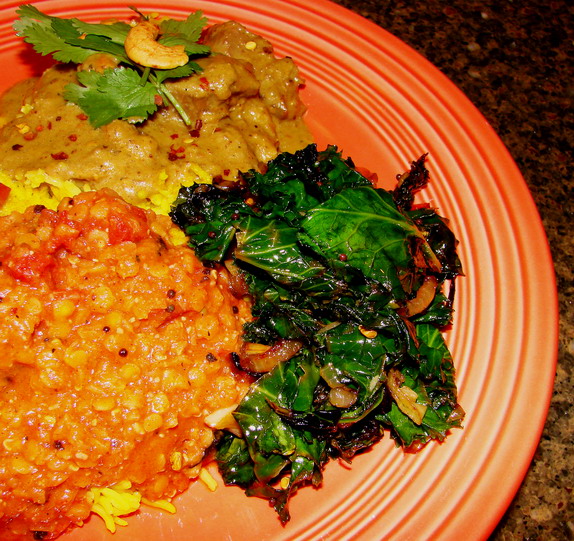
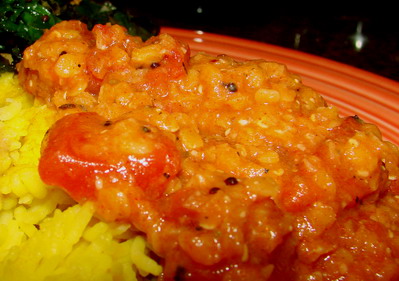
From India’s Vegetarian Cooking: Smoky Lentils With Tomato
When I reviewed Monisha Bharadwaj’s excellent book India’s Vegetarian Cooking: A Regional Guide, I wanted to be certain to try a recipe from each of the broad geographic areas covered in the book. So, I presented recipes from the north, the east and the west, and now, it comes time to present one from the south.
As with the other recipes I cooked from her book, I am very pleased with the way it turned out, though, in truth, her cooking instructions are a little more vague than I tend to like. When I have presented the recipes here, I have given more specific methods to guide new cooks along easily. However, I do not think that my small criticism should deter any cook from reading and cooking from this book. So far, none of the four dishes I have cooked from it have been less than delicious–and as far as I am concerned, that is what matters most when I evaluate a cookbook.
This recipe, also called tomato kholombo, is from the coastal southern state of Goa, and it is very easy to do. It is a little more involved than the other recipes I presented due to the fact that it requires more spices, all to be toasted and ground before the lentils and tomatoes are cooked together, but it is still worth it to try. All of the ingredients are easily found at any Indian grocery, and if one decides to jump into cooking a great deal of Indian food on a regular basis as I have, then these ingredients are good pantry staples.
I did alter this recipe somewhat, as is my wont. First of all, I did not use fresh tomatoes, as it is not the season for them, and I refuse to eat those plastic-like flavorless abominations that masquerade as tomatoes in the produce section of the grocery store. Instead, I used a can of Muir Glen Organic Fire Roasted Diced tomatoes to excellent effect. The fire-roasted ones boosted the already smoky flavor from the toasted spices that really tasted good. Good enough that when I make this again in the summer with real, fresh tomatoes, I may roast them on the grill before putting them into the lentils.
Secondly, I replaced the black peppercorns in the spice mixture, called kholombo powder, with two black cardamom seeds. As regular readers know, I have developed an unfortunate allergy to black pepper, which has calmed down somewhat now that I am no longer pregnant. However, I still try to avoid significant amounts of black pepper in my food. I used black cardamom instead specifically because it has a very deep smoky flavor of its own, which I rightly surmised would add to the musky, smokiness of the dish.
And finally, I added a teaspoon of paprika to the lentils to give them a better color. The photograph in the book showed them as a deep red, probably from all of the fresh tomatoes. The canned tomatoes weren’t quite as pretty, so I decided to use some paprika for coloring–which is a common practice in the cookery of northern India. But I didn’t use just any paprika, but instead, used smoked Spanish paprika–which once more, boosted the smoky flavor, spiralling it over the top.
I definitely consider the paprika to be an optional ingredient, and I suggest that everyone else use the black peppercorns in the kholombo powder, but I think that in every season but the summer and fall, when fresh tomatoes are in full swing, the canned tomatoes are the best option.
So, how did it turn out?
Sour, from the tamarind, spicy from the kholombo, musky from the curry leaves, tangy from the tomatoes, creamy from the lentils, and smoky from all sorts of different ingredients. It was delicious, and may become a favorite version of dal in this house, replacing my many variants of masoor and mung dal tarka mixtures that I make as the default house dal recipe. (Well, not completely replacing it. I think that Morganna may stage a mutiny if I were to do such a thing as replace her beloved dal tarka utterly. But I am emboldened to start cooking many different versions of dal now that I previously had ignored in favor of my beloved standby dish.)
At any rate–here are the recipes both for the kolombo powder and the lentils. Please let me know if you try and enjoy them.
And be assured that over the summer when every sort of vegetable is coming in fresh and local, that I will be returning to the recipes in this book and trying many more of them–I am enthralled with the differences in the regional cooking styles of India, especially when it comes to vegetable, dairy and grain recipes.
Tomato Kholombo
Ingredients for Kholombo Powder:
1 tablespoon sunflower or canola oil
2 tablespoons split gram lentils (channa dal)
2 teaspoons coriander seeds
8 curry leaves
2 teaspoons cumin seeds
4 cloves
1 teaspoon black peppercorns (I used 2 whole black cardamom seeds here)
3/4″ stick of cinnamon
3 tablespoons dried, shredded (unsweetened!) coconut
Method:
Heat the oil in a heavy frying pan and fry the channa dal until they darken slightly. Reduce the heat ad add all of the rest of the ingredients except the coconut, and fry for another minute. Add the coconut and continue frying, stirring until the coconut has turned brown and everything smells rich and good.
Remove pan from heat, scrape the contents of it into a plate and allow it to cool. Grind to a powder in a blender or spice grinder, and store in an airtight jar in a cool, dark place. Use within three months.
Ingredients for Tomato Kholombo:
1 cup masoor dal (split red lentils), picked over, rinsed and drained
2 cups water
salt to taste
1 teaspoon tamarind concentrate, diluted in 4 teaspoons water
1 14 ounce can Muir Glen Fire Roasted Diced Tomatoes
1 teaspoon kholombo powder
2 tablespoons sunflower or canola oil
1/2 teaspoon black mustard seeds
4 dried red chilies seeded (optional–I didn’t seed mine) and crumbled
pinch asafoetida
12 curry leaves
1 teaspoon paprika or Spanish smoked paprika (optional)
Method:
Put lentils and water into a heavy-bottomed saucepan. Bring to a boil, turn down heat and simmer until lentils are just softened, but not completely broken down into a puree–about thirty minutes. Salt to taste.
Add tamarind, tomatoes and kholombo powder and simmer for about five minutes.
Heat the oil in a small frying pan, and add the mustard seeds. Cook, stirring continually. After they begin to pop like popcorn, add the chilies, asafoetida and curry leaves. Continue cooking, stirring, for about a minute or so, until everything is very, very fragrant and sizzling. Pour into the lentils, stir and add the paprika, if using. Serve with a rice dish of some sort.
These lentils are good the first day when they are made, but are even better when heated up a day or so later.
Vegan Dry-Fried String Beans With Fresh Shiitake Mushrooms
Back when I was a personal chef, a couple of my clients were vegans.
This presented a challenge to me which I welcomed; it allowed me to work at learning how to make vegan versions of common recipes such as lasagne with bechamel sauce, cream of mushroom soup and spaghetti with “meat” balls. However, my favorite recipes I cooked for these folks were the Chinese, Vietnamese and Japanese dishes which were, if not vegan to start out with, easily adapted to become vegan with no loss of flavor or texture.
I used to make a stir-fried dish which was similar in idea to these dry fried green beans, but completely different in execution, flavor and texture. I used to blanch the beans, and then stir fry a mixture of garlic, ginger and scallion in peanut oil. Then, I would add sliced up tempeh, and fresh shiitake mushrooms, with a pinch of sugar, a shake of soy sauce and a tiny bit of black vinegar. Then, I would add the beans, and finish the stir fry off with sesame oil and cilantro.
They adored it. I would have liked it better without the tempeh–the flavor of the mold that is used to make it always bothered me. I am allergic to several types of molds, so I suspect that was what was in play with my intense dislike for that meatless protein product. (Spiced dry tofu, on the other hand would have been killer in that dish–in fact–I may have to make some of that for myself soon, now that I am reminded of it.)
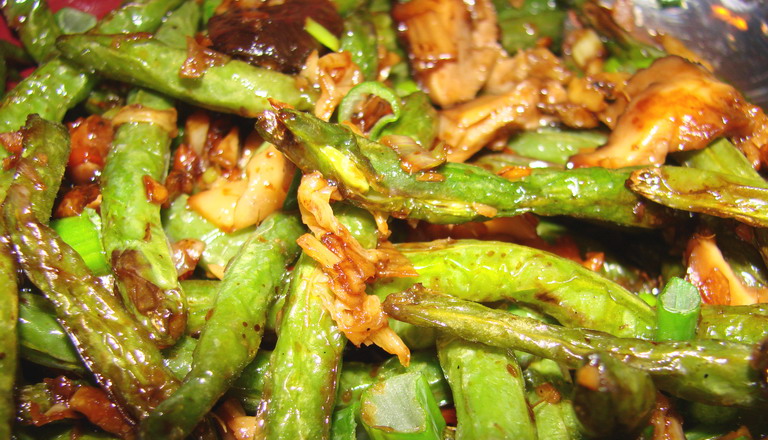
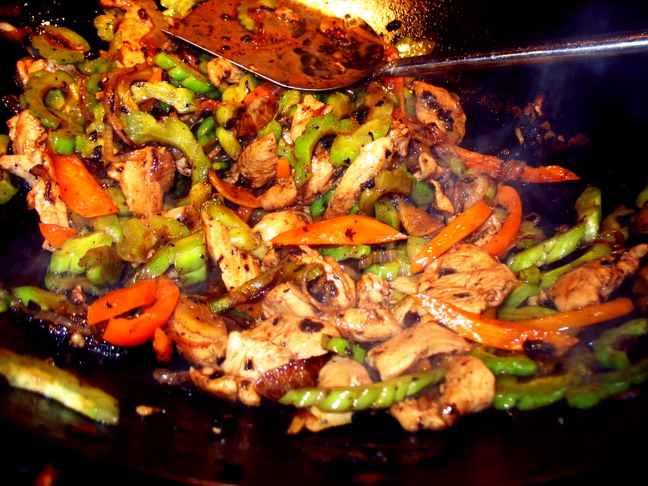
I wish I had been hip to th secret of dry fried beans back then. I think that they would have loved the way I made this variant on the more typical Sichuan Dry Fried Beans. I kept the chile peppers and the Sichuan preserved vegetable, but left out the dried shrimp and the minced pork. I could have used rehydrated dried black (shiitake) mushrooms for this dish, but I had some gorgeous and succulent fresh, locally grown shiitake on hand, and used them instead. They were delicious, and their firm meatiness contrasted beautifully with the chewy texture of the beans, while the muskiness of the mushrooms were a perfect foil to the sweet green pods.
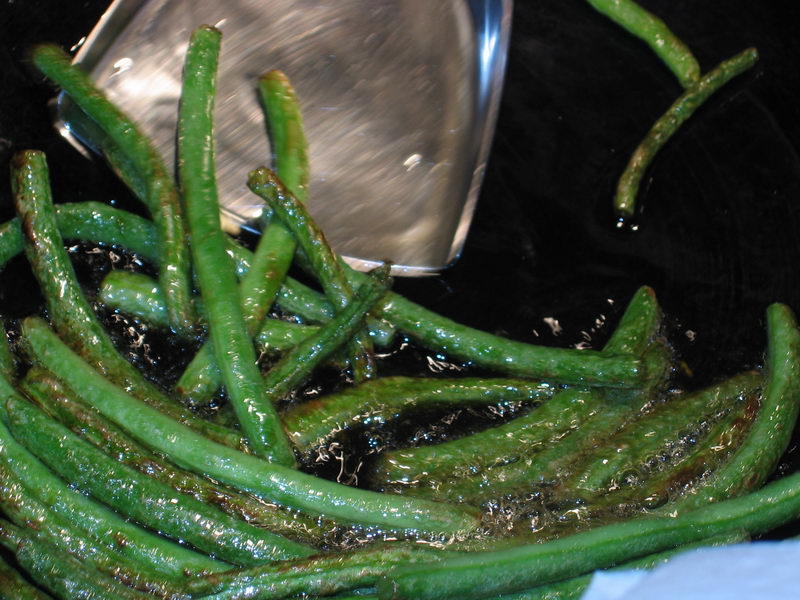
This is a simple dish to cook; it just takes a bit of extra time. In a Chinese restaurant, the beans, in order to save time, would be deep fried; here I use the more time-consuming, but more traditional technique of dry frying. Dry-frying uses less oil, and results in a better flavor than deep frying the beans; dry fried, they attain a delicious roasted flavor that is at once smoky and sweet. Much of the moisture in the beans is driven off by the longer cooking time dry frying necessitates, which concentrates the sugars in the beans, giving them a much more intense flavor. With the deep fried beans, this is not quite the case; the texture is the same–wrinkled on the outside and chewy on the inside, but the flavor isn’t nearly as good.
And, besides–deep frying makes the beans more fattening than they need to be!
I can’t wait until summer gets here and I can dry fry the sweet new local beans; but until then, I am thinking of trying this technique out on asparagus.
As soon as the asparagus is ready, I’ll cook a version of this dish with it, and let everyone know how it turned out.
Vegan Dry-Fried String Beans With Fresh Shiitake Mushrooms
Ingredients:
2 tablespoons peanut oil
3/4 pound green beans, stringed, with ends snapped off, rinsed and dried
3 scallions, white and light green parts only, minced
3 cloves fresh garlic, peeled and minced
1″ cube fresh ginger, peeled and minced
1 or 2 fresh Thai bird chiles, minced
3 tablespoons Sichuan preserved vegetable (radish), rinsed and minced
6-8 fresh shiitake mushrooms, stems removed and sliced into 1/4″ wide strips
2 tablespoons Shao Hsing wine
1 tablespoon dark soy sauce
1/4 teaspoon raw or brown sugar
2-3 drops sesame oil
3 scallions, dark green parts only, cut diagonally into 1″ long pieces
Method:
Heat wok on medium high heat until it smokes. Add peanut oil, and heat until it is nearly smoking.
Drop in green beans–make sure they are perfectly dry–otherwise very hot oil will sputter and splash, possibly on you! Stir and fry until the beans dry out, shrivel slightly and begin to char to a dark brown in spots. Remove when they are quite wrinkled and somewhat charred, and drain well on paper towels.
Crank heat up to high and add all minced seasonings. Stir and fry thirty seconds until very fragrant. Add mushrooms, and stir well. Allow mushrooms to cook for about a minute, then add wine, and cook until most of it is boiled away. Then, put beans back into wok. Stir and fry for ten seconds to blend, then add soy sauce and sugar, then continue stir frying for about thirty seconds.
Remove from heat, stir in sesame oil and scallion tops.
Serve immediately with plenty of steamed rice.
The Best Laid Plans of Moms and Babes….
Yeah, I have been lax at posting for the past several days.
All is well. Kat just had a spot of the tummy issues, and so has not slept much at night.
Which means Mom hasn’t slept much at night.
And there has been a seemingly endless round of medications, vet visits, and cleanups from various critter or child effluvia for the past four or five days.
And so, it makes me tired.
And here, I had several big posts worked out for this week…..
But, I will get to them.
Someday soon.
Until then, look for a post later today on a Chinese recipe that doesn’t qualify for my Simple Chinese Recipes series, but is yet tasty and good, and yet another way to cook Kale in a tasty Indian style.
I’m off to write–finally!
Is Chinese Food Unhealthy?
According to a new study from the Center for Science in the Public Interest, food served in Chinese restaurants has unacceptable levels of fat and sodium for the average American diner who is trying to follow a healthy diet. This report has hit the Associated Press and has traveled all over the press and the net over the past few days, so it seems inevitable that I should stand up and say -something- since much of what I write about revolves around Chinese food.
What can I say about this report other than, “Well, duh!”
Chinese restaurant cooking has never been particularly healthy, and unless there is consumer demand for it to change, it will not ever be healthy.
Why is this?
In part it has to do with the tastes of the average American diner which tends toward liking overly sweet, overly salty sauces and dishes that include deep fried nuggets of meat drowned in said sauces. These dishes are also often served with fried rice which includes another unhealthy dollop of fat and salt in the form of lots of cooking oil (to keep the rice from sticking) and thick soy sauce, which gives the rice its characteristic and expected savory brown color. In this sense, the typical Chinese-American restaurateur is giving the public what it wants and expects: lots of fat, salt, sugar and starch on a plate.
The other reason, one which is not mentioned in most reports of this study, is that the way in which Chinese restaurant chefs typically cook is not how Chinese home cooks cook. Thus, even dishes that are supposedly “stir-fried” are going to contain more oil and fat in a restaurant than when they are cooked at home. Stir-frying and dry-frying are two techniques that typically require very little oil, and when cooked at home, dishes made in this way are generally extremely flavorful, and healthy.
However, it isn’t just deep-fried dishes that need to be avoided in Chinese restaurants–one has to be aware that in most Chinese restaurants, even stir-fried or dry-fried dishes are not necessarily cooked with a minimum of oil.
Most Chinese restaurant chefs cook at much higher heats than home cooks can muster, and because they are dealing in volume and speed is of the essence, and they want to create food that has a splendid flavor and texture, they often resort to the technique of “oil-blanching” all meats in deep, boiling oil, before pouring out most of the oil and continuing with a my typical stir-fry. However, even though they pour off “most” of the oil, there is still a good deal more than the typical 2-5 tablespoons of oil that is used in home-based stir frying–there is often twice as much oil (or more) as would be found in a typical home cooked stir fry.
Dry-fried foods such as Sichuan crispy beef or green beans are also deep-fried in boiling oil rather than the low-oil technique that home cooks use. Why is this? Well, proper dry frying can take up to twenty minutes, whereas the same dishes can be executed in a restaurant by using deep frying oil in about three minutes. It is a matter of time, but of course, the restaurant patron ends up with extremely oily food that they believe to be healthier than it actually is.
Why oil blanch foods for stir frying? It is simple: it saves time in a restaurant kitchen, and it produces very tender meats if it is done quickly. (The longer you deep fry an unbattered piece of meat, the drier and chewier it becomes–as in the cause of Sichuan dry fried beef. A briefer dip in oil as in oil blanching results in a deliciously tender, juicy piece of meat because it cooks instantly.)
So, while the Center of Science in the Public Interest is right to warn diners away from the breaded, deep-fried dishes in American Chinese restaurants, they really should make mention of the fact that the stir-fried dishes really aren’t as healthy as most Americans expect them to be, because they still contain more oil than is necessary for a real stir fried dish.
This is no surprise to most Chinese-Americans, by the way. The tradition of Chinese restaurant food has always been that it is richer and heavier than food cooked and eaten at home. Most Chinese Americans are under no illusions about Chinese restaurant meals being healthy, and if they eat out in them often, many will make the request that the food be cooked “in very little oil.”
Also, many Chinese restaurants have two different menus–they have the usual one that caters to American tastes, and then they have one that is geared more toward the traditional tastes of the Chinese and Chinese-American clientele. The dishes on the latter menu, tend to include many more braised, steamed and traditionally stir-fried dishes which use much less oil.
In my experience, I have never been refused when I have asked for the Chinese menu, nor have I had trouble ordering fantastic food from one that was by far, much more healthy and tasty than the usual fare. In addition, I have never had a problem asking the waiter to tell the cook to use very little oil in a stir fry or to use a light hand with the soy sauce.
If you are polite and friendly, most folks at Chinese restaurants are quite willing to customize their foods to your request.
However, if you are looking for the healthiest, tastiest Chinese food available–do what I do, and make it yourself.
That way, you know exactly what went into it, how it was cooked and you can ensure that you are making the best possible dinner for you and your family.
So, yeah, Chinese restaurant food is generally not too good for you.
But Chinese home food is not only healthy, but delicious.
So, break out the wok and steamer and cook up some great food!
Baby Food Fun

I never really made baby food for Morganna when she was little.
I had been raised on formula and jarred baby foods, and while I mostly breastfed Morganna, I didn’t really deviate from the idea that the baby food in jars was more nutritionally suitable for a baby than anything I could whip up in a kitchen. Other than the over-ripe mashed banana that was her first solid meal, Morganna seldom tasted anything other than the jarred Gerber purees for her first year and a half.
Why exactly did this happen? Why did I believe that baby food in jars was superior to home-cooked food mashed or ground into a puree?
In large part, it had to do with the culture I was surrounded by in my youth. At the age of twenty-four, and surrounded by my own parents, and husband’s parents who all opined that baby food was the only fit food for babies, I believed them. Everyone else was using it, after all, even though it was expensive, so maybe I was wrong to think I could save money by buying fresh fruits and vegetables and cooking them myself, then mashing them.
I mean, I knew that canned vegetables had fewer vitamins than frozen or fresh, and I reasoned that jarred baby foods would be comparable to canned, but when I made mention of this, my parents were quite disapproving. No, no, I had been fed jarred food, and I turned out fine, so what was I worrying about, exactly? And the few times I did feed Morganna mashed up table food, I was given stern lectures from family members about the unsutability of such food for delicate baby stomachs.
The only relative who was supportive of such ideas was my Dad’s mother, Gram. She said that she used jarred food sometimes, but that it was too expensive most of the time, so she just mashed up fresh fruits and vegetables that she cooked for everyone else and fed that to her babies, and they turned out perfectly well. Besides, she pointed out–have you ever -tasted- baby food? Disgusting.
She was right. Most of it was pretty nasty. I don’t like canned peas anyway, so you can imagine what I thought of jarred pureed peas. Mmmm. Olive drab stinky mush. My favorite.
No wonder Morganna spit them out every time I tried to feed them to her.
This time around, I am making my own baby foods for Kat, and they are simple. They really are.
Her very first vegetable was sweet potato, and cooking it was beyond easy.
I heated up the oven to 400 degrees F. I washed the outside of a large locally grown sweet potato I had in my pantry. I oiled the skin lightly with canola oil, pricked a few holes in the skin with the tines of a fork and stuck it in the oven.
I let it bake until it was completely softened–about an hour or so.
When it was done, I let it cool until it was easily handled, cut it in half, and squeezed the soft flesh from the skins. Then, with a fork, I simply mashed it into a thick puree. I added a tiny bit of water, and a pinch of salt to enhance the flavor, and then packed it into special baby food freezing trays with tightly fitting lids. (You can use ice-cube trays, but I liked these, because they are super sturdy and the lid keeps me from having to use plastic wrap to keep the purees from being freezer burned. Reusable is always better than disposable.) Then, the trays were set into the freezer, and when the sweet potato was frozen into little orange cubes, I popped them out of the tray into a freezer bag, labeled and dated it and voila! Baby food.
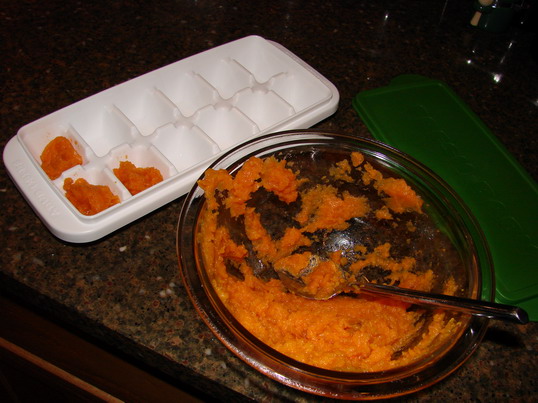
It took me about fifteen minutes, total, in a few separate chunks of time. That was it. And what was the result? Nutritious, local, organic baby food that was way cheaper and with more vitamins and minerals than is found in the jarred stuff.
I now also have a bag of pureed organic peas. For those, I used frozen organic peas, steamed, and then ground up in batches in my Sumeet. (I figure that if the Sumeet can puree dried lentils and spices, and goes through chilies and fresh ginger like butter, it can puree peas. Boy, was I right!) Then, like the sweet potatoes, they were portioned out into the ice-cube trays and frozen.
Plenty of fiber, vitamins and even more importantly to Kat–flavor. The pea puree I made is brilliant emerald green, while the stuff from the jar, while it is also organic, is about the color of, well, something that usually gets blown into tissues. And the taste difference is out of this world. Mine tastes real food, and the store-bought stuff tastes like canned glop.
Kat adores the peas and sweet potatoes, and gets very excited when Zak starts feeding them to her. She grabs the spoon as he is holding it and guides it to her own mouth, while cooing and cackling. She loves them. There is no struggle trying to get her to eat them, in large part I think because they taste so good.
So, for all of those Moms and Dads out there, or those planning on being parents, here are a few ideas on making baby food. (For an easy to read chart on which foods to introduce when, look here.)
First, start with local organic vegetables and fruits if possible.Local is important for freshness–the fresher the vegetable or fruit, the more vitamins it contains. Organic is important because babies are very sensitive to pesticide residues. Choose nutrient dense fruits and vegetables which have a low likelihood of causing allergic reactions. (Nutrient dense foods are those which have a high nutritional value per calorie.) For a list of nutrient-dense fruits, click here. For vegetables, click here.
Second, cook thoroughly, by roasting, baking or steaming, preferably. (You do not have to cook bananas or avocados–and no, they are not local to Ohio, but I can still get them grown organically and they are very nutrient dense fruits.) Lots of Moms who make their own baby foods suggest that you boil vegetables. Don’t do it–you lose nutrients into the water. Cooking methods in which no water or minimal water touches the food are best because you retain any water-soluble vitamins that way. If you use organic apples and pears, you can cook them with their skins on thus retaining the vitamins which are close to the skin. The same goes for root vegetables like beets and sweet potatoes. You can remove the skin after cooking. (You can season the food or not as you see fit. I use cardamom in Kat’s oatmeal and she loves it. I also add tiny pinches of salt to her vegetables, and will probably start adding fresh mint to the peas and garlic any turnips, spinach, lentils and beans I cook for her in the future. She loves the smell and taste of fresh ginger already, so I may add it to carrots and sweet potatoes, and when I introduce apples, a pinch may go into them, too.)
Thirdly, mash or puree the fruit or vegetable with some sort of implement. Some foods can be mashed with a manual potato masher or fork–like bananas, sweet potatoes, potatoes and avocados. Food processors are very useful for this task–I use my Sumeet, but one could also use a stick blender, or a Cuisinart. Traditional jar blenders don’t work quite so well, at least not in my experience. You can also use a manual food mill–the good thing about a food mill is that you don’t have to peel fruits and vegetables before putting them in–the mill leaves the skins behind, while just grinding up the flesh. Pretty cool gadgets, food mills.
Then, spoon the pureed food into ice cube trays, cover tightly with plastic wrap (or get the trays with covers like I have) and put in your freezer. When the food is frozen, pop out of the trays and into ziplock freezer bags, label and date them. That is it.
To serve them, just thaw out a cube or two in the fridge, and warm gently by placing the serving bowl into a bowl of hot water.
It has been a joy cooking for and with Kat. She loves sitting in her swing in the kitchen while I cook. She watches everything I do, and when I peel and cut up fruits and vegetables, or grind spices, I always bring them over to her so she can smell them. While I was preparing her supper of sweet potatoes, peas, oatmeal and pears last night, she sat on Zak’s lap and he taught her how to stir using a tiny pot and one of my silicone mixing spatulas. She was really cute holding the spatula in both hands, then chewing on it after she swirled it around in the tiny Revereware saucepan that used to belong to my Gram.
I can’t wait until she can help cook for real!

Categories:
- Admin (rss) (55)
- Blogs and Blogging (rss) (81)
- Book Reviews: Cookbooks (rss) (43)
- Book Reviews: Non-Cookbook Food Books (rss) (38)
- Cats and Cat Blogging (rss) (47)
- Chinese Cooking Lessons (rss) (32)
- Culinary School Stories (rss) (18)
- Dairy Pruducts: Cultured and Barbaric (rss) (4)
- Documentary Filmmaking (rss) (1)
- Essays, Rants and Reflections (rss) (260)
- Fighting Hunger (rss) (12)
- Food and Kids (rss) (45)
- Food in the News (rss) (126)
- Food Media (rss) (98)
- Food Preservation (rss) (18)
- Food Safety (rss) (45)
- Gardening (rss) (30)
- Herbs and Herb Blogging (rss) (20)
- Holidays (rss) (50)
- Kat Blogging (rss) (22)
- Kitchen Science (rss) (36)
- Leftover Makeover (rss) (8)
- Life, the Universe and Everything (rss) (131)
- Local and Sustainable (rss) (227)
- Local Athens Food and Foodies (rss) (42)
- Meatless Mondays (rss) (32)
- Menu For Hope (rss) (5)
- Nutrition, Diet and Health (rss) (84)
- On The Farm (rss) (8)
- Recipes: Almost Vegetarian, Vegetarian and Vegan (rss) (294)
- Recipes: American Regional (rss) (37)
- Recipes: Appalachian Hillbilly (rss) (33)
- Recipes: Bread, Pasta, Grains (rss) (95)
- Recipes: Canning and Preserving (rss) (8)
- Recipes: Chinese (rss) (123)
- Recipes: Comfort Food (rss) (120)
- Recipes: Cookies (rss) (16)
- Recipes: Desserts (rss) (48)
- Recipes: French (rss) (25)
- Recipes: Fruits and Vegetables (rss) (302)
- Recipes: Greek, North African and Middle Eastern (rss) (31)
- Recipes: Indian (rss) (137)
- Recipes: Italian (rss) (42)
- Recipes: Japanese (rss) (7)
- Recipes: Jewish (rss) (4)
- Recipes: Korean (rss) (6)
- Recipes: Meat, Poultry and Fish (rss) (220)
- Recipes: Mexican/Native American/ Latin American/Caribb (rss) (27)
- Recipes: Original (rss) (108)
- Recipes: Thai (rss) (27)
- Recipes: Tofu (rss) (17)
- Recipes: US Regional (rss) (16)
- Recipes: Vietnamese (rss) (8)
- Restaurant Stories (rss) (28)
- Sewing, Quilting, Arts and Crafts (rss) (16)
- Simple Chinese Recipes (rss) (30)
- Slow Food and Heritage Foods (rss) (10)
- Spice Blogging (rss) (44)
- The Chinese Cookbook Project (rss) (14)
- The Chinese Pantry (rss) (39)
- The Documentary (rss) (2)
- The Kitchen Saga (rss) (17)
- The Locavore's Bookshelf (rss) (15)
- The Unsung Adventures of The Culinary Nerd (rss) (6)
- Tools and Toys (rss) (35)
- Uncategorized (rss) (10)
- With a Side of Politics (rss) (48)
Archives:
- August 2012 (9)
- July 2012 (12)
- September 2011 (3)
- August 2011 (7)
- July 2011 (8)
- June 2011 (16)
- May 2011 (17)
- April 2011 (11)
- December 2010 (9)
- November 2010 (5)
- February 2010 (1)
- December 2009 (5)
- November 2009 (7)
- October 2009 (10)
- September 2009 (16)
- August 2009 (14)
- July 2009 (14)
- June 2009 (7)
- May 2009 (17)
- April 2009 (10)
- March 2009 (25)
- February 2009 (13)
- January 2009 (10)
- December 2008 (5)
- November 2008 (5)
- October 2008 (6)
- September 2008 (13)
- August 2008 (8)
- July 2008 (11)
- June 2008 (18)
- May 2008 (13)
- April 2008 (14)
- March 2008 (16)
- February 2008 (17)
- January 2008 (19)
- December 2007 (25)
- November 2007 (18)
- October 2007 (24)
- September 2007 (16)
- August 2007 (15)
- July 2007 (15)
- June 2007 (10)
- May 2007 (14)
- April 2007 (16)
- March 2007 (17)
- February 2007 (20)
- January 2007 (13)
- November 2006 (1)
- October 2006 (8)
- September 2006 (14)
- August 2006 (25)
- July 2006 (30)
- June 2006 (28)
- May 2006 (34)
- April 2006 (29)
- March 2006 (24)
- February 2006 (30)
- January 2006 (38)
- December 2005 (40)
- November 2005 (37)
- October 2005 (32)
- September 2005 (25)
- August 2005 (30)
- July 2005 (28)
- June 2005 (21)
- May 2005 (8)
- April 2005 (22)
- March 2005 (17)
- February 2005 (29)
- January 2005 (10)
Search Site:
Links:
- Lily’s Wai Sek Hong
- 101 Cookbooks
- A cat in the kitchen
- A Veggie Venture
- Accidental Hedonist
- Cha Xiu Bao
- chez pim
- Chocolate & Zucchini
- Chopstick Cinema
- Chowhound.com
- Chubby Hubby
- Cook sister!
- Cooking with Amy
- da*xiang
- Eat Local Challenge
- Eating Liberally
- Ecocentric
- Eggbeater
- Epicurious
- Farmgirl Fare
- Fatfree Vegan
- Foodgoat
- ForkandBottle.com
- Green Olive Tree
- Hooked on Heat
- Jaden’s Steamy Kitchen
- Kalyn’s Kitchen
- Lucullian delights
- Mahanandi
- Matt Bites
- MeatHenge
- mmm-yoso!!!
- New York Times – Dining & Wine
- Pizza Goon
- Rasa Malaysia
- Ruhlman
- Sailu's Kitchen
- Serious Eats
- SF Gate: Food & Dining
- Simply Recipes
- Soul Fusion Kitchen
- Tastespotting
- The Amateur Gourmet
- The Cleaner Plate Club
- The Food Section
- The Grub Report
- thecookscottage
- U.S. Food Policy
- Wandering Chopsticks
- Washington Post Food and Dining
- Wasted Food
Meta:

Powered by WordPress. Graphics by Zak Kramer.
Design update by Daniel Trout.
Entries and comments feeds.