Cook Local, Eat Global
Stir Fry Technique II: Ten Steps to Better Chicken From a Wok
I never expected the huge response I got to my first post in this series: Stir-Fry Technique: Ten Steps to Better Wok Cookery, but I suppose I should not have been surprised. I have known for a long time that most Chinese cookbooks do not go far enough in explaining technique, particularly, when it comes to adapting wok cooking to American stoves. The exceptions are Grace Young’s two books, Wisdom of the Chinese Kitchen and Breath of a Wok, both of which are excellent volumes for either the beginning or intermediate student of Chinese cooking.
When readers started giving me feedback, however, I realized that I had only touched the surface of the subject, and so, a series of posts is born, all of them heavily illustrated with photographs. While the first post is a general overview that I suggest everyone read, the following ones are going to deal very specifically with the basic techniques in the context of different ingredients.
This post, as noted above, will deal with chicken.
Chicken is apparently very difficult to stir fry, and part of the problem lies in the chicken itself. For one thing, most chicken available in the grocery store meat counters is processed more than it needs to be. It is always previously-frozen, and often, it has been injected with water, which renders the meat very soft, mushy, and full of fluid. When the chicken hits a hot surface, water often bubbles out of the meat, and lowers the heat of the pan. When one is cooking in a wok, this can be catastrophic, as the entire point of stir-frying is to cook the food as quickly as possible, on as high heat as possible, with as little oil and added liquids as possible.
The result of chicken which weeps liquid is often dried out, overcooked meat (this comes about from having to cook the chicken longer, because the temperature of the wok is decreased by the release of water), and an insipid, diluted sauce, which simply does not compare with the flavors the local Chinese restaurant is able to create.
So, here are a few general rules about cooking chicken in a wok that will help counteract the tendency for it to become overcooked, tough and flavorless.
Rule 1: Choose your chicken wisely. For general cooking purposes, most grocery store chicken is okay. For stir-frying, you want chicken that is as minimally processed as possible. That means, you want meat that has not been injected with water if at all possible. How to manage this? Well, I will tell you that I always use locally raised, free-range, organic birds for my stir fries, and not only does the meat taste better in and of itself, it is -never- injected with water during processing. Try picking up a chicken breast from a small local producer sometime, and feel the difference in the texture of the meat. Even if it has been frozen, the flesh does not feel slimy, mushy or squishy. It is always silky and firm. This chicken will produce a superior stir-fry, not only because it will not weep water as soon as it hits the wok, but also because it will have a better texture when you bite into it. You may also notice that it tastes better. More chickeny, as it were.
Rule 2: Cut your chicken properly. This means you really do need to pay attention to how uniformly you slice the meat. It is said that Confucius so valued properly cut up food, that he would refuse to eat a dish that had food cut in a jumble of sizes and shapes. This is not simple food snobbery, this is recongizing that in the high heat generated within a wok, if your food is not cut in similar sizes and shapes, some will be overdone, and some may be underdone, and very little of it will taste good. So, practice cutting your chicken into small sized pieces, and work at it until you can manage it well. (Partially frozen chicken is easier to cut than completely thawed chicken, however, make certain it is completely thawed before you start stir-frying, lest you have partially underdone food!) I suggest for most people stir-frying on American stove, that they cut most chicken bits to be no thicker than 1/2″,.and the length at about 1 1/2-2″, with the width at about 1/2″. If you cut your chicken thicker than 1/2″ you will likely dry the outer edges of it before the inside is completely cooked, unless you employ a secondary technique, and stir fry the outside, and then add liquid to “braise” the inside until it is done. Then, you let most of the liquid boil away and continue stir frying.
Rule 3: Do not crowd your wok. The quickest way to ruin a stir fry is to lower the heat on your wok by overcrowding it with cold meat. I have no idea how large your wok is, so when I tell you to cook all of the chicken at once, you may have to improvise. If your wok is smaller than mine, and frankly, most people’s are, then you will need to cook your chicken in batches. (Now you see the value of buying as large a wok as your stove can efficiently heat.) That is fine, and it is easily done. What you do is split your chicken into however many batches you think your wok will necessitate, and also split up the aromatics into an equal number of batches. Then, all you do, is follow the recipe up to cooking the chicken. You do batch one, then scrape out the wok into a clean bowl, then do batch two, and do the same, and so on. Then, either add your chicken back into the wok and cook your vegetables, or cook your vegetables, add the chicken and finish out the dish. Experiment–only you know how big your wok is and how hot your stove is. Wok cookery requires flexibility and creativity–so exercise those abilities in your kitchen and use my recipes–and anyone’s, for that matter–only as guidelines.
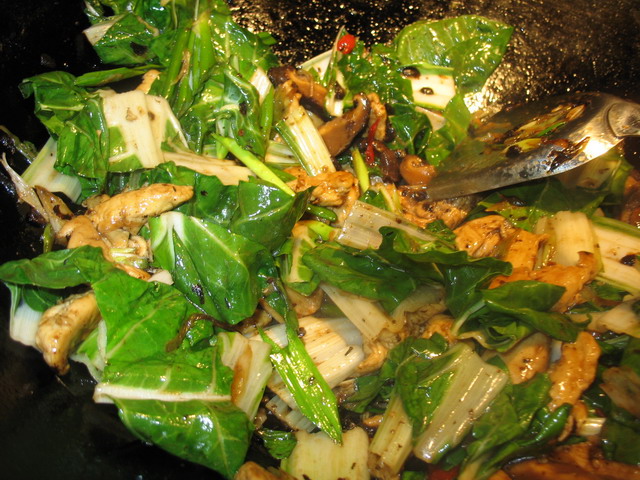
Now, we come to the recipe that I am using to teach “Barbara’s Ten Steps to Better Chicken From a Wok”: Stir Fried Chicken with Chard, Fermented Black Beans and Chile.
I made up this recipe in order to accomplish several goals. One, I wanted to show how to stir-fry chicken with only a few other ingredients so the focus would be on the chicken, while still illustrating how to cook it with vegetables without overcooking the chicken or undercooking the vegetables. Two, I wanted to use as many local ingredients in this dish as possible in keeping with the May Eat Local Challenge, which is why I am using scallions instead of onions, green garlic instead of garlic, and chard instead of gai lan or bok choi, neither of which are in season here in Athens yet. (In using chard in place of bok choi, however, I have noticed that it does not contain as much water in its tissues as the latter, and so when it is added to the wok, it does not release as much excess liquid as bok choi. It also has more flavor–it is very earthy, and went beautifully with the dried shiitake mushrooms.) And finally, three–I wanted to show how to cook chicken with both a resilient vegetable like mushrooms, and a more fragile vegetable, like greens, to illustrated the principle of timing when cooking in a wok.
Stir Fried Chicken with Chard, Fermented Black Beans and Chile
Ingredients:
1 whole boneless, skinless chicken breast, trimmed of tendons and cut into pieces 1 1/2-2″ long, 1/2″ wide and about 1/4″ thick
1 tablespoon Shao Hsing wine or dry sherry
1 tablespoon premium light soy sauce
2 tablespoons cornstarch
4 tablespoons peanut oil (more or less, depending on the size of your wok)
4 scallions, white and light green parts cut thinly on the bias, dark green parts cut on the bias into 1″ lengths–keep them separate
4 green garlic, white and light green parts cut exactly like the scallions, and the dark green tops cut into 1″ lengths on the bias, and also kept separate
3 cayenne peppers, cut thinly on the bias (to taste–you can also use ones that are frozen whole from the summer before as I did.)
2 1/2 tablespoons salted, fermented black beans, lightly crushed (mash a bit with the back of a spoon)
1/2 teaspoon raw sugar
4 dried Chinese black mushroom (shiitake), soaked in 3/4 cup very hot water–reserve soaking liquid
1 tablespoon Shao Hsing wine or dry sherry
1 1/2 tablespoon premium light soy sauce
3/4 pound chard, washed and cut into 1 1/2″wide pieces, stems and leaves both.
1/2 teaspoon toasted sesame oil
Step one: Cut your ingredients into equivalent-sized and shaped pieces.
As I noted above, the purpose in cutting ingredients into similar sized and shaped pieces is not only aesthetic, but serves the purpose of allowing the food to cook evenly and quickly in the extremely high heat of the wok. If, for example, you cut your chicken into a jumble of different sized pieces, not only will the dish not look very good–likely, it will not taste very good either, as some will be done just right, while others will be overdone and others will be underdone. So, that is the general reason why Chinese cooks cut foods destined for the wok into small, similarly sized and shaped pieces.
But how is it done?
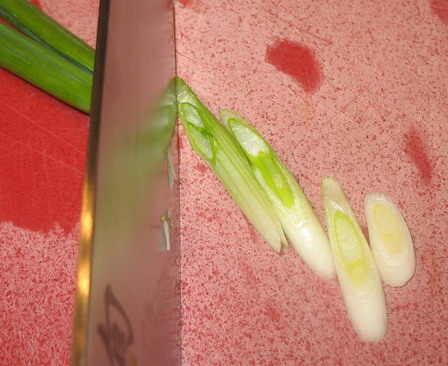
Let us look at the scallions first. I call for them to be cut thinly, on the bias. If you look at the photograph, you can see that I hold the knife at an extreme angle to the scallion, and slice it about 1/4″ thick. This results in a long, flat, ovoid slice, which not only looks nice with the long, narrow pieces of chicken and mushroom, but also serves a very practical purpose: it has more surface area exposed to the hot oil and wok than a typical round slice does. This means that can release more flavor into the oil as it cooks. The green garlic and chile are cut in exactly the same way, and since they are all going to go into the wok at the same time in this recipe, they are all put together in the same bowl, along with the fermented black beans.
The mushrooms are another matter. They need to be rehydrated, so soak them in very hot water as directed for at least ten minutes. If they are still somewhat crunchy after this time, then stick them in the microwave for about forty-five seconds on high. This heats the water and almost instantly rehydrates the mushrooms. After you take them from the microwave, let them cool off a bit before you remove them from the water. If you do not let them cool off from the microwave, you will burn your fingers.
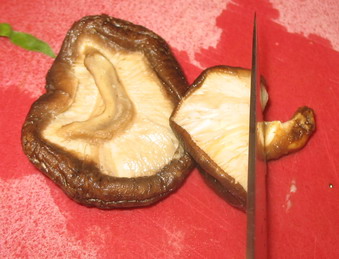
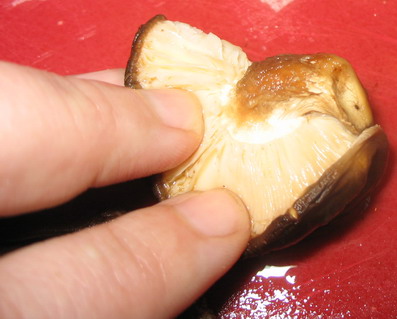
Squeeze out as much water as you can, back into the bowl. Then, in order to remove the stems, fold each mushroom in half with the stem to the outside. Press each down on the cutting board with the stem exposed and carefully with a sharp knife, cut off the stem as close to the cap as possible. The stems can be saved and used in soup stocks, though they are too hard and chewy to eat. Pour most of the mushroom soaking water into a clean bowl, leaving the dregs, with the bits of grit and dirt in it behind in the first bowl, and reserve the clean liquid.
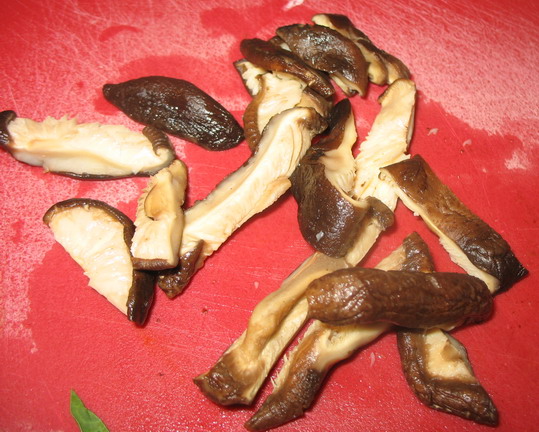
Then it is a simple matter of cutting the caps into four slices apiece.
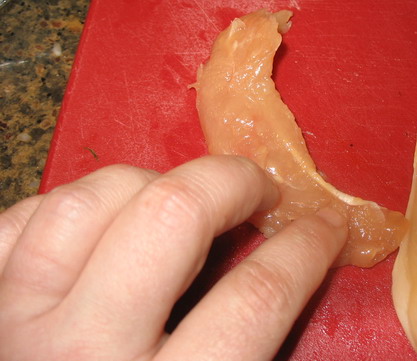
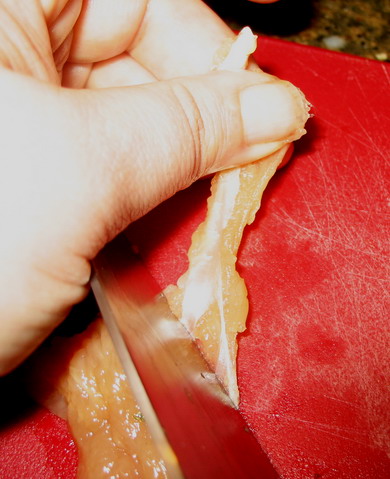
For the chicken, it is imperative that you trim away any tendons, excess fat or odd bits of membrane that you find. Every chicken breast half has what is called by grocery stores, “chicken tenders or tenderloins.” This little flap of chicken is very tender indeed, but it also has a thick, chewy tendon that runs the length of it. The flap of meat is found on the underside of the chicken breast. Pull it out and cut it off, and then using your off hand, grasp the exposed bit of tendon at the top of the chicken tender. Using the edge of your knife blade, scrap the flesh away from the tendon, pulling the blade gently down the length of the white, tough piece of ligament. After it is removed, then you can cut the tender into pieces as described in the recipe.
For the rest of the breast, I think it is simplest to cut across the width of each breast half (If the breast is not already cut into halves, go ahead and do it yourself) into slices and then trim the pieces into size. Remember, each piece does not have to be -exactly- alike and perfectly the same size, but they need to be roughly the same size and shape. Do not get hung up on either making each bit perfect or doing it quickly. Practice working steadily and you will pick up speed as you have experience.
As for the chard–it is so simple to trim off the very bottom of the stems and then cut each stem/leaf combination into 1 1/2″ wide ribbons crosswise, that I didn’t take a picture of the process!
Step two: Marinate your chicken in a mixture that includes cornstarch.
As I noted in the original post, the cornstarch serves several purposes. One, it thickens the marinade, helping it cling tightly to the chicken. Two, it browns when it comes into contact with the wok, which not only helps the chicken brown, but also develops the elusive flavor of “wok hay.” Finally, three, it thickens the sauce that you will create by deglazing the wok with soy sauce, wine and the mushroom water.
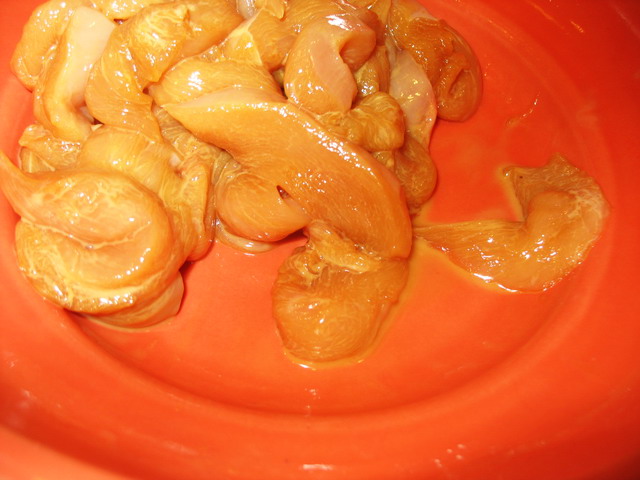
A properly proportioned marinade should cling so tightly to the meat that there is no liquid left in the bowl, as shown in the illustration. If yours is looser, then add a pinch or two more cornstarch until it sticks to the meat. Mixing it all together is a simple proposition of squishing the cornstarch and marinade liquids together with the chicken until the chicken is all coated and slippery. After that, you simply let it sit for about twenty minutes or so.
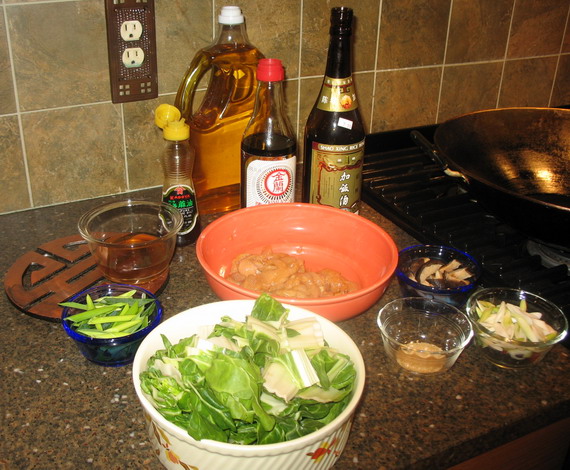
Step Three: Have all ingredients ready and lined up beside the wok, before you heat the wok.
This is known in French as “mise en place,” and it means, “everything in its place.” Without doing this, stir-frying can be a harrowing, messy experience, so, before you set your wok on the fire, please, have your ingredients lined up, in the order that you will use them, next to the wok where you can grab them easily. You can see a good example of this in the very first illustration to this post, way up at the beginning.
Step Four: Heat your wok until it begins to smoke, then add the oil and heat it until it nearly smokes.
You have to get your wok as close to the heat as possible; this necessitates looking at your stove and buying a wok to suit it. If you have an electric stove, a flat bottomed wok is necessary. If you have a gas stove, like I do, you can use either a flat bottomed or a round bottomed wok on a wok stand; either one will work, but you must get your wok as close to the heat as you can and as hot as possible, so use the highest heat setting your stove will go to.
Unfortunately, I could not get a photograph of the white smoke that wafts up in a ribbon from a properly heated wok. It is an extremely difficult, ephemeral moment in time to capture on camera. However, I must reiterate, that you only perform this step if you have a carbon steel or cast iron wok. If your wok is nonstick, do not do this–you will ruin your nonstick surface and possibly breathe nasty chemical fumes. So, don’t go there.
However, if you have a well-seasoned carbon steel or cast iron wok, this is an essential step. When you put your wok on the heat naked, sans oil, and allow it to heat up, it opens the pores in the steel or iron, allowing the wok to “breathe.” When this happens, a thread of smoke will wisp up from the bottom of the wok and the scent of the wok seasoning will come with it. This scent is the basis of what the Cantonese call “wok hay,” or the breath of the wok. In my own inelegant way, I always used to call it “wok smell,” which doesn’t sound as poetic, but it is the same thing. It is the basis of what makes Chinese restaurant food taste so darned good, and which we are trying to capture at home. It will only take a few seconds for the oil to heat up; when it is ready, you will be able to see the surface of it “shimmer” with convection currents.
Step Five: Add your aromatic ingredients, in the order specified in the recipe and cook for a minute or two until they are fragrant and cooked to the point specified in the recipe.
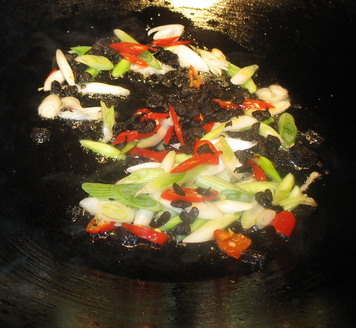
With this recipe, all of the aromatics go in at once; I wrote it this way in order to simplify things. However, for this recipe, the aromatics are stir-fried for only about a minute. They should not be allowed to take on color at all while they cook alone. They will brown plenty while the rest of the ingredients cook. When you are ready for the next step, which is putting the chicken into the wok, simply scrape the aromatics up along the sides of the wok which are cooler than the bottom.
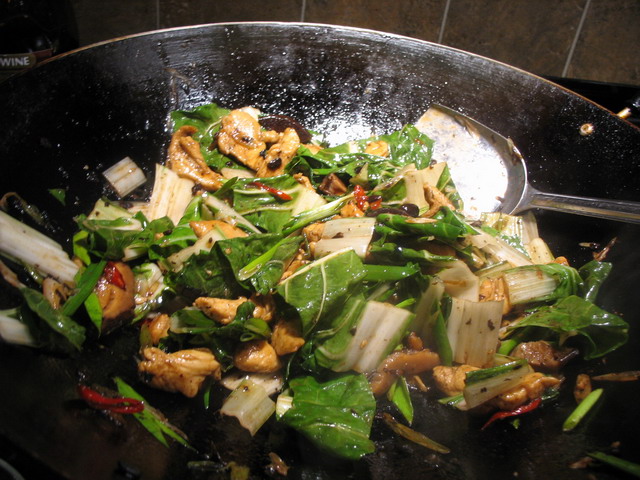
Step Six: Add the chicken, settle it into a single layer in the bottom of the wok and leave it there for about a minute or so to begin to brown deeply on the surface touching the wok.
This step is where most of the wok hay that you are going to have in your dish will build. And, it is probably one of the hardest things to will yourself to do.
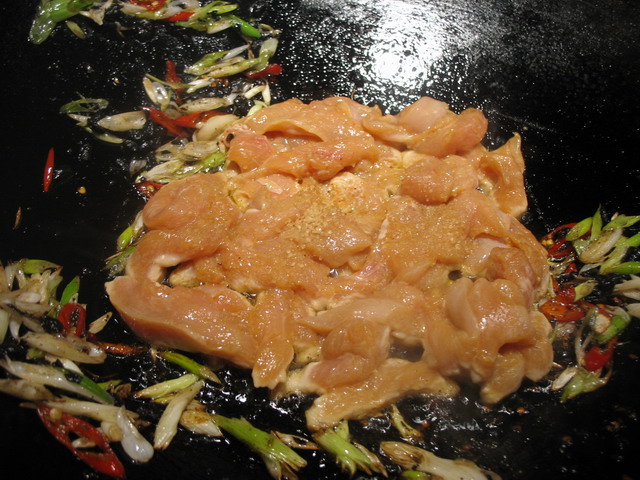
As you can see in the accompanying photograph, the aromatics get scooted up the sides of the wok where they stay warm, but are not in direct contact with the very hot bottom of the wok. Then the chicken is added, and spread into as close to a single layer as can be managed–this is where knowing how much your wok will hold is important. Do not overcrowd the wok at this point, because you will cool it down and water will pour out of the chicken, and there will be no wok hay. (If there is any liquid left in the bowl from the marinade, reserve it. Do not put it in at this time!) Once you have it in a single layer, for this recipe you sprinkle the sugar on top of it, and then leave the chicken alone for about a minute to two minutes so that it can brown nicely on the bottom.
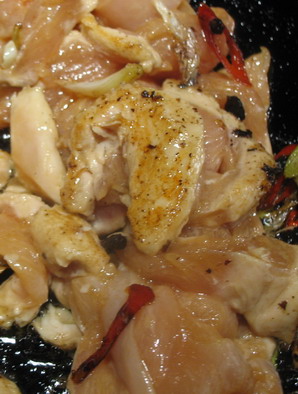
You will be able to smell this happening, but you can also with chicken see the edges on the side that is facing you begin to turn from pink to white. Be patient, and don’t start stirring right away. I know this is difficult. Once you smell the chicken browning and you see that the edges of some pieces are turning white, flip one piece near the center over with the corner of your wok spatula, and if you see a nice pattern of golden to reddish browning on it, start stirring, scraping the aromatics back into the wok proper to mix with the chicken. Throw in the mushroom slices and stir fry as normally until the chicken is cooked about 2/3 of the way–this means that about 2/3 of the chicken meat should be browned or white, and the remaining 1/3 pink.
You will notice that some of the cornstarch from the marinade has stuck to the bottom of the wok and is browning. Do not worry. This is going to be a good thing, as it will help make your sauce very full of flavor.
Step Seven: Add soy sauce, wine or some combination of the two to the wok and deglaze the cornstarch marinade, and toss the meat to season it.

Here is where the sauce starts cooking. Add the second amounts of soy sauce and wine, (and any remaining liquid marinade from the chicke bowl) and stir it around the wok, scraping up the bits of browned cornstarch so that the hot liquid can dissolve it. Then, stir in the meat and mushrooms, so that they all become well seasoned. This is the basis for your sauce, right here. It will look like very little sauce, it is true, however, the flavor will be full, bright and very, very filled with the natural flavors of the ingredients, particularly your aromatics. There is one remaining big step to making the sauce which will add to the bulk of it, so do not fear that you will have a “dry” dish. You won’t. This way of sauce making is typical of most Chinese homestyle cooking, and the results are delicious every time.
Step Eight: Add vegetables, in the order of how long they will take to cook, and stir fry.
Okay, in this case, we have already added the mushrooms–and in general–you can add your mushrooms earlier than any other vegetables. I like to add them to cook with the meat or tofu, because they all trade flavors back and forth the longer you cook them together. The chicken is lent some of the umami of the mushrooms, and vice versa. In fact, the longer you cook Chinese black mushrooms, the better.
So, that means you need to add your chard or other greens.
The goal in adding greens is to get them to wilt a little bit, but not turn into mush. The easiest way to accomplish this is to add them near the very end of the chicken being cooked, when there is just a touch of pink visible on the meat, and stir well for about thirty seconds and then go on to the very next step.
Which, is what we are going to do.
Step Nine: Add broth, any other sauce ingredients such as oyster sauce, hoisin or vinegar, stir fry until sauce thickens and clings to the pieces of food in the wok.
This is where the mushroom water comes in. Add half of it to the wok, stirring like mad to combine it with the rest of the sauce, and to let it help wilt the chard. If the chard does not cook sufficiently in thirty seconds, add the rest of the mushroom juice and stir some more. After a final minute of cooking, total, the chard should wilt just enough to mix well with the other ingredients (it should look like you only have half of the chard that went into the wok in the first place) and the sauce should all be thick and clinging tightly to the chicken, mushrooms and chard.
Take the wok off the heat.
Step Ten: Add garnishes, and any last minute flavoring items like spices or sesame oil, put into a warmed serving plate and serve.
First, toss into the wok the reserved scallion and green garlic tops, and give them a good stir to coat them with sauce and get them to wilt a tiny bit. You want them to remain essentially crisp, so thier flavor and texture remain quite fresh, as a contrast to the velvety texture of the wilted chard leaves.
The only thing left to add here is the sesame oil, which you always want to do at the last minute, preferably off heat, because toasted sesame oil burns and turns bitter easily. So, dribble into the wok while stirring and then you are done.
This looks more complicated than it is; in truth, once you start heating up the wok and then start cooking, this stir fry takes about eight minutes from start to finish. Of course, your time may be longer or shorter, depending on your wok and how hot your stove is.
Finally, before I go, here are a couple more hints to help you make stir-frying less stressful and more fun.
First of all, read each recipe through several times, and once you have your mise en place set up, read through the recipe again and make sure you have everything together, in the order in which it will go into the wok.
Secondly, keep your cool, and go at your own pace. If you have a one-handled wok and work on an electric stove, remember, you can always move the wok off the heat if the process seems to be going too fast for you. Then, take a breath, catch up and then when you need more heat, put the wok back on the heat. No sweat necessary.
If you have a gas stove, you can always turn down the heat a little bit to slow the process down. Sometimes, you cannot keep up, and so it is better to slow down than to risk burning an entire wokful of dinner. Once you have more experience stir-frying, you can pick up the pace and soon have food flying as fast as Martin Yan. But to begin with, take it slow and breathe deeply.
That is about all I can say on the subject of stir-frying chicken in one post, so, until next time, class is dismissed!
Rustic Italian Sausage, Potato and Kale Soup
I have to admit that this recipe came about because I was copying the flavors of a soup that they have at The Olive Garden. (Though, mine is better.)

Don’t get me wrong–I generally dislike The Olive Garden, and find most of their foods to be quasi-Italian at best, and downright crap at worst. But, the one thing I like to eat there, and will eat if I am forced to go there by circumstance (a friend really wants to go, in other words) I can order the endless bowls of this soup and be happy. They call it, “Zuppa Toscana,” though, not knowing if this soup has diddly to do with Tuscany, I call it, “Rustic Italian Sausage, Potato and Kale Soup.”
It is a great peasant dish, full of flavor and nicely filling without being overly heavy. As we had it the other night, served with a fresh mixed greens salad and a full-bodied whole-wheat bread, it is a really good supper that bridges the seasons of winter and spring.
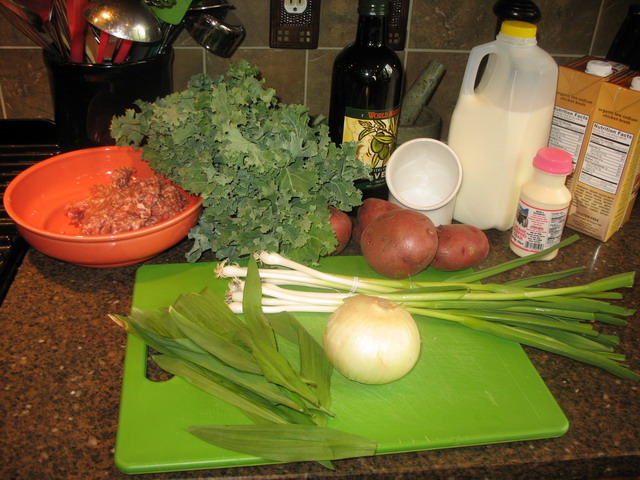
The farmer’s market here in Athens, Ohio, is still filled with cool weather greens that many associate with fall and winter, such as kale, collards and chard. A few folks have potatoes that have been kept in a root cellar all winter, along with squash, turnips and beets. These wintery vegetables are starting to give way, however, to harbingers of spring: ramps, and green garlic, for example.
Ramps, are a foraged wild member of the leek, onion and garlic family, and they are plentiful here in the hills and valleys of Athens county. They grow all through the Applachian mountain range, from Georgia all the way up to Canada, and they bring a sometimes biting, sometimes sweet savor of garlic to everything they are cooked in. (You can see the greens in the photo above–they look like little verdant spearheads.)
Green garlic is the new shoots of hardneck garlic, and can be eaten completely, from the tiny white bulbs at the bottom to the last of the kelly green leaves. More delicately scented than ramps, green garlic looks like scallions, but has the sweet, seductive flavor of garlic at its finest.
When I picked up bundles of green garlic and a handful of ramp leaves at one end of the market, and then fell in love with the tender blue-green, curly, lacy bunches of kale at the other end, I knew what I had to make. My soup.
So, some potatoes were aquired, and off home we frolicked, with every intention of making soup in my thoughts.
There was only one wee problem.
I had no Italian sausage.
But it was only a small problem, as I -did- have ground pork in the freezer, and herbs and spices in my cabinet. Certain that I could make a perfectly good Italian sausage through the application of salt, herbs and spices to the ground meat, I pulled it out to thaw, and started rinsing greens.
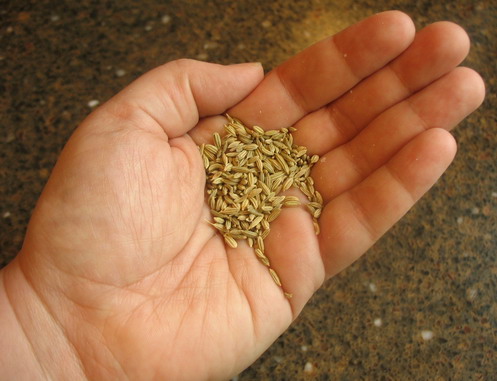
Italian sausage is simple to make: the main flavorings are fennel seed, salt, a mixture of rosemary, thyme, oregano, and basil, and some optional red pepper flakes. Most people also add black pepper, but considering my newly found sensitivity to the spice, I prudently left it out of the recipe.
Out of the tablespoon and a half of fennel seed I added to the pound of ground pork, I ground one tablespoon of it finely, and simply cracked and left partially whole, the other half tablespoon, to give the sausage texture. I added about a teaspoon of oregano, two teaspoons of basil, 1/2 teaspoon of rosemary and 1/2 teaspoon of thyme, along with about two teaspoons of salt. The amount of red pepper flakes I added might have been more than most would use, but I like spicy sausage, so I added a full tablespoon of medium-hot pepper flakes. This also helped make up for the lack of black pepper in the entire dish.

Putting the sausage together was simplicity itself; there is no need for casing as I would have taken whatever sausage I bought out of the casings to cook it anyway. I simply squished the spices into the meat with my fingers, blending it together until it was very well mixed.
The rest of the cooking was simple, and the results were quite flavorful. The only non-local ingredients were the dried herbs (though some were from my garden last year), spices, olive oil, an onion, flour, and the chicken broth. The potatoes, green garlic, pork, kale, ramps, milk and cream all came from Ohio, with most of it coming from within 100 miles of Athens.
The greens in the salad we ate were from Athens, and the flowers used to garnish it came from my own porchboxes. The bread was an Italian olive oil loaf from the local food outlet, “The Village Bakery, ” which rests down at the foot of the hill on top of which our house perches.
It made a wonderful lighly filling dinner, though I have to admit, that it is even better after having rested for a day in the refrigerator, and has made an excellent lunch, sans bread and salad.

Rustic Italian Sausage, Potato and Kale Soup
Ingredients:
2 tablespoons olive oil
1 medium sized onion, quartered and thinly sliced
1 pound bulk Italian sausage, or sausages removed from their casings
8 stalks of green garlic, bulbs and light green parts thinly sliced, darker tops reserved
1 teaspoon dried thyme
1/8 teaspoon dried powdered rosemary
1 teaspoon dried oregano
2 teaspoons red pepper flakes
3/4 cup dry white wine or sherry
2 quarts chicken broth or stock
4 medium potatoes, cut into quarters lengthwise, then sliced into 1/4 inch slices
1/2 cup milk
1/2 pint heavy cream
2 tablespoons olive oil (optional)
2 tablespoons flour (optional)
1/2 pound kale leaves and thin stems, cut into ribbons about 1/2 inch wide
ramp leaves cut into 1/4 inch ribbons
reserved green garlic tops, sliced thinly
salt (and black pepper, if you can) to taste
Method:
Heat first amount of olive oil in a heavy bottomed soup pot until hot. Add onions and sausage, and cook, stirring to break up sausage and to keep onions from burning. Cook until sausage is browned and the onions are a deep golden-reddish color.
Add the green garlic slices, and herbs and stir, cooking until they become quite fragrant: about 2 minutes.
Add wine or sherry and cook off alcohol, stirring.
Add broth when the alcohol is cooked out of the wine. Add the potatoes and the milk.
When potatoes are tender, add cream.
If you would like a thicker soup, in a separate heavy bottomed frying pan, heat second quantity of olive oil. When it is hot, add flour and stir until it forms a paste. Cook, stirring on medium heat for three minutes. Add half of this roux to the boiling soup, and stir until it thickens. If it is still not as thick as you want, add the rest of the roux and stir until it thickens.
Add the ribbons of kale, ramps and green garlic tops, and cook, stirring, until greens wilt. Season to taste with salt and pepper and serve hot.
Welcome to The May Eat Local Challenge!

Ah, look at that pretty salad, with greens grown in Athens county, and edible flowers–they are violas–from my own porchboxes!
Admittedly, the cheese is chevre from Vermont, which Bry brought over to share (waste not, want not!), and the dressing is made from Italian balsamic vinegar and olive oil, though it is sweetened with Athens county honey.
I hear that there is a goat cheese producer somewhere near Akron, but I have not found confirmation of that yet. If anyone knows of them, leave a comment or an email to set me on the right trail. I can get Ohio-made Amish cheeses and other artisanal cheeses, but chevre is one of my favorites, so that is something I am seeking out. (There are plenty of goat herds here in Athens, but no one sells the milk or any cheeses at the farmer’s market. If I could get my hands on some of the milk, I would make my very own cheese, but thus far, no luck.)
Anyway, welcome to the May Eat Local Challenge, brought to you by the Locavores, and Jen of Life Begins at Thirty!
This year, there are a few new features to the challenge; rather than Jen trying to keep up with everyone’s adventures on her personal blog, she started a group-written blog that is all about the Eat Local Challenge, and which will feature posts and articles from all over the net on topics related to eating local, through the month of May, and beyond. I will be contributing to this blog, as well as writing up my usual posts here, so stay tuned!
Also, as I mentioned before, there is an online book discussion group starting up where people can get together and read books on the issues of sustainability and eating locally, and then discuss them in an open forum. I will be co-moderating this group with Jeanne from World on a Plate, and the first book we are going to be looking at is the hot-off-the-presses title from Michael Pollan, The Omnivore’s Dilemma: A Natural History of Four Meals. I am reading it currently, and it well-written and thought-provoking.
After Pollan’s book, we hope to take on fiction and nonfiction both, with emphasis on books relating to food and politics.
If you are interested in joining the discussion group, sign up here via Yahoogroups.
And if you want to read the first chapter of Pollan’s book, look here.
As for me–this week at Tigers & Strawberries, look for my first eating local recipe for Rustic Italian Sausage, Potato and Kale Soup seasoned with green garlic and ramps, a book review and the long-promised continuation of my popular post, Stir Fry Technique: Ten Steps to Better Wok Cookery. This first continuation in a series of two or three posts, will focus on stir frying chicken, with a slant towards eating locally. And–by popular demand–every step will be illustrated with (hopefully) lovely photographs! (The second in the series will be the long-promised step-by-step guide to stir-frying tofu–using locally made tofu!)
And who knows–in the midst of it all, there will be other recipes, some essays, discussions of foraging in the wild, and probably a picture or two of our local felines, whom we do not plan to eat anytime in the near future.
Is It a Salsa or a Chutney or a Relish: Mango-Pineapple Salsa
When Indira of Mahanandi announced a new food blog event: “Jhiva for Ingredients,” I knew I would have to participate, even though the ingredient she chose, mangoes, would not fit in with my May Eat Local Challenge. However, I bent the rules a little, as I am posting this recipe featuring mangoes, pineapple, and limes, which I made a month ago. So–I am not eating mangoes this month (even though, technically, they fall under my exception of “anything that does not and will not ever grow in Ohio, such as coffee, tea, chocolate, spices and other tropical food plants”), but I am going to take this opportunity to talk about them.

My Grandma loved mangoes. They were her favorite fruit, and when she and Grandpa took off on vacation, leaving the farm in Uncle John’s capable hands, they’d drive slowly down the US coast, camping along the way in their van, and eventually, stopping in Florida. There, they would visit with Grandma’s sisters, Aunt Blanche, Aunt Thelma and Aunt Mary-Elizabeth, fish, and feast on tropical fruits.
Grandma, who baked delicious pies, cakes, and cookies, was a diabetic. She never ate a bit of the sweets she made for the rest of us, but she loved her fruit. And she would very carefully balance her diet so that she could be allowed to indulge in her passion for strawberries, blackberries and cherries when they were in season. But as much as she loved those fruits that she grew in her garden, she loved citrus fruits, especially grapefruit, and the non-citrus, but still tropical, mango even more.
When they drove back home to West Virginia, their van would be laden with cases of tropical fruits: pink grapefruits (those were always the first ones I would dive for), oranges and tangerines, and, especially for Grandma, a box of mangoes.
She never cooked with them, or baked with them; she only ate them out of hand. She’d grab a wad of paper towels, a knife and a mango and head for the back porch, even if it was cold outside, to have her feast. Grandma would peel her mango carefully, and even though she told me not to eat the rind, I enjoyed chewing on it a bit, to release the pine-woods fragrance and flavor of it. I didn’t let her catch me at it, though, because she told me that it was poisonous. (I don’t know if that is true or not–but I will say, that while I chewed on it for the flavor, I never actually ingested any of it to find out.)
Then, she would cut off slices of the flesh and eat it, laughing as juice ran down her arms, her chin and into her lap. That was what the paper towels were for; she’d mop herself up after every bite in the beginning, but would give up after a bite or two, and just get messy. She’d slip me a sliver or two as I sat patiently beside her.
I remember how those mangoes tasted: rich and ripe, filled with honied juice and a heady flavor that was unlike any other fruit in the world. Grandpa would liken them to bananas mixed with peaches and cantelope melons, but I never thought he was right. There was nothing that tasted like them, nothing. They were sweet, like the scent of honeysuckle in high summer, and they were smoother and butterier than a peach. They were so good, I always thought that people who said that the fruit Eve tempted Adam with was an apple were dead wrong.
It had to have been a mango.
I can never peel or cut up a mango without thinking of Grandma and her laughter as she whittled the golden flesh from the big seed, and how she used to lick her fingers after throwing the seed away, and would make motions to lick up her arm, where the juice had travelled in sticky rivulets. She looked like a cat grooming herself and she never failed to make me laugh in scandalized delight, especially when Grandpa scolded her with, “Dean! What kind of manners are you teaching that child?”
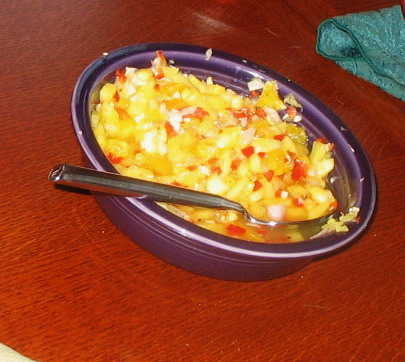
For Jhiva for Mangoes, I present a side dish that is equally delicious with Mexican food, Indian food or Carribean food: Mango-Pineapple Salsa. I first made it to go with a jerked pork fusion dish I made at Zak’s parents’ home in Florida for their anniversary dinner years ago, and it became an instant hit. In that context, and when I serve it with Mexican food, it is certainly a salsa.
However, I made it as a salsa to go with Veracruz Grilled Fish for my Pakistani personal chef clients, and they begged me to make “that delicious mango chutney” again every week. Their favorite use for it: on top of red bell peppers that I had stuffed with a mixture of kheema sookh and almond-raisin rice pillau, and baked. They loved those peppers, and would never tire of them, or the cold mango-pineapple chutney that I made to go with them, almost every week.
So, you can call it a salsa, a chutney or a relish–it doesn’t really matter one way or another. What matters is that it is a delicious, flexible little side dish to serve cool next to hot and spicy entrees as a palate-cleanser and a fruity, sweet, sour, and spicy foil for the spicier main dish.
Mango-Pineapple Salsa
Ingredients:
3 ripe mangoes, peeled and cut into fairly small dice
1/2 of a fresh pineapple, cleaned, cored and cut into a dice of the same size as the mangoes
1 small purple onion or shallot, cut into a very fine dice
2 cloves garlic, minced
1/2 medium red bell pepper, cleaned, cored and cut into a very fine dice
chile pepper to taste, minced (You can use whatever chile you like, depending on how hot you want it. I used 1 red jalapeno in this version)
zest (minced or in strips) and juice of one small lime
salt to taste
fresh cilantro leaves to taste, roughly chopped
Method:
Take 1/4 of the mango pieces and puree them in a food processor or blender. Add the remaining ingredients up to the chile pepper and the lime zest, and mix together until well combined. Add lime juice and salt to taste–I like the final flavor to be a balance of sweet, salty, hot and sour.
If you like, add fresh cilantro leaves, chopped roughly to finish the dish.
Chill for at least several hours before use, or preferably for a day. Can be made about three days ahead of time and kept refrigerated.
(Note: there is no cilantro in the version pictured above, because Briyan, who was going to be eating the salsa, chutney, relish or whatever you want to call it, cannot abide cilantro.)
Preparing For the May Eat Local Challenge
Are you ready to eat local?
Or, if not, are you ready to hear about my family and I eating local?
Because, in two days, it will be May, and we will be taking part of in the Locavore’s May Eat Local Challenge, and so all month, you will be treated to recipes using local ingredients, reviews of books related to eating local foods, sustainable agriculture, and similar topics, profiles of local Ohio farmers, food producers and area restaurants that utilize local food, and stories of my continuing quest to find local foods to fill out our diets. Look for provocative essays, and a few laughs here and there, too. Once I get going, it is hard to shut me up.
There are more exciting things to come, including an Eat Local blog and an Eat Local book group–so stay tuned here for more announcements, and as I get the information, I will post it right here, same bat time, same bat channel.
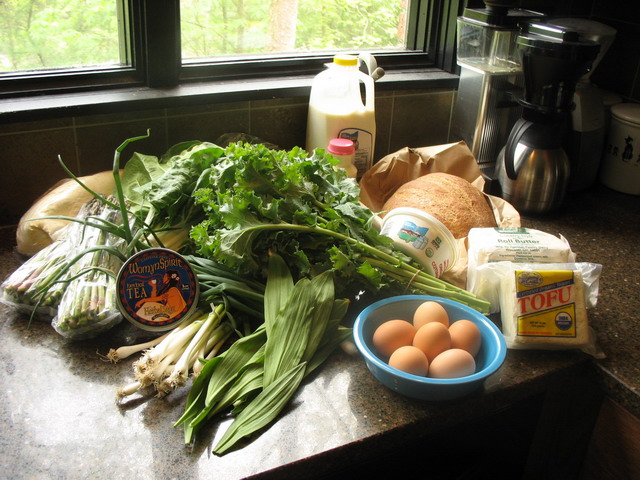
As you can see from the above photograph, I have been busy shopping locally. Last year, during August’s Eat Local Challenge, you might remember me bemoaning the lack of local dairy products. Well! In the past eight months, quite a few things have changed in out corner of Ohio, and now even the local Kroger’s store carries milk from an organic Ohio family farm. Milk, cream and cottage cheese, all produced in Ohio, fresh and good tasting, is now to be found here in Athens.
In addition, I can buy butter in two-pound rolls produced at another Ohio family farm in Wooster Ohio.
And, of course, last year I found locally produced tofu–technicially it is made in West Virginia, but less than 100 miles away -and- it is made from organic soybeans grown just a few miles away from us in Ohio. On top of it all–it is some of the best damned tofu I have ever eaten anywhere!
If you look carefully, you will notice some cornmeal in the back–it is ground from corn grown here in Ohio on a steam-powered gristmill based here in Ohio. That was a gift to us from our friend Bry who had it as a trade from the mill-owner. I suspect Bry did a spot of blacksmithing, and got way more cornmeal than he needed in trade, so he shared with us. That cornmeal is delicious–wholegrain, stoneground cornmeal has the full flavor of corn and is filled with minerals and fiber. Great stuff.
I am still going to try to get ahold of some of the locally grown and ground wheat flour–I know where the farmer is–New Albany, Ohio, but he won’t ship. I guess I may just have to take a trip sometime soon and see if I can bring some back with us. We’ll see what happens this month on the flour front.
As for all the vegetables you see in that picture–stay tuned and hear about how I cook them up into locally centered dinners in the next week. Then, next Saturday, we will go to the Farmer’s Market and see what’s new and different and the whole cycle will start again.

I do try to eat locally anyway, but I love the chance that the Locavore’s Challenge brings to me as a blogger, because it gives me a chance to show how much local food I can find even in a small town like Athens–and I hope that encourages everyone to look around where they live and see what they, too, can find. It isn’t just the Bay Area locavores who get to eat delicious, nutritious meals when they vow to eat locally!
My own rules for the challenge will be the same as last year; I am claiming the same exemptions as before. There is no sense in depriving myself of spices, (except for black pepper, sniff), coffee, tea and soy sauce, just because they are not made in Ohio. The goal of the challenge is not negative–it is not about deprivation. It is positive–it is about what you -can- eat, and being creative with what you find. It is about trying to look at food in a new light.
So, come along with Zak, Morganna, the cats and I as we have yet another local food adventure–because really–no matter what we do in this household–it always ends up to be an adventure.

Categories:
- Admin (rss) (55)
- Blogs and Blogging (rss) (81)
- Book Reviews: Cookbooks (rss) (43)
- Book Reviews: Non-Cookbook Food Books (rss) (38)
- Cats and Cat Blogging (rss) (47)
- Chinese Cooking Lessons (rss) (32)
- Culinary School Stories (rss) (18)
- Dairy Pruducts: Cultured and Barbaric (rss) (4)
- Documentary Filmmaking (rss) (1)
- Essays, Rants and Reflections (rss) (260)
- Fighting Hunger (rss) (12)
- Food and Kids (rss) (45)
- Food in the News (rss) (126)
- Food Media (rss) (98)
- Food Preservation (rss) (18)
- Food Safety (rss) (45)
- Gardening (rss) (30)
- Herbs and Herb Blogging (rss) (20)
- Holidays (rss) (50)
- Kat Blogging (rss) (22)
- Kitchen Science (rss) (36)
- Leftover Makeover (rss) (8)
- Life, the Universe and Everything (rss) (131)
- Local and Sustainable (rss) (227)
- Local Athens Food and Foodies (rss) (42)
- Meatless Mondays (rss) (32)
- Menu For Hope (rss) (5)
- Nutrition, Diet and Health (rss) (84)
- On The Farm (rss) (8)
- Recipes: Almost Vegetarian, Vegetarian and Vegan (rss) (294)
- Recipes: American Regional (rss) (37)
- Recipes: Appalachian Hillbilly (rss) (33)
- Recipes: Bread, Pasta, Grains (rss) (95)
- Recipes: Canning and Preserving (rss) (8)
- Recipes: Chinese (rss) (123)
- Recipes: Comfort Food (rss) (120)
- Recipes: Cookies (rss) (16)
- Recipes: Desserts (rss) (48)
- Recipes: French (rss) (25)
- Recipes: Fruits and Vegetables (rss) (302)
- Recipes: Greek, North African and Middle Eastern (rss) (31)
- Recipes: Indian (rss) (137)
- Recipes: Italian (rss) (42)
- Recipes: Japanese (rss) (7)
- Recipes: Jewish (rss) (4)
- Recipes: Korean (rss) (6)
- Recipes: Meat, Poultry and Fish (rss) (220)
- Recipes: Mexican/Native American/ Latin American/Caribb (rss) (27)
- Recipes: Original (rss) (108)
- Recipes: Thai (rss) (27)
- Recipes: Tofu (rss) (17)
- Recipes: US Regional (rss) (16)
- Recipes: Vietnamese (rss) (8)
- Restaurant Stories (rss) (28)
- Sewing, Quilting, Arts and Crafts (rss) (16)
- Simple Chinese Recipes (rss) (30)
- Slow Food and Heritage Foods (rss) (10)
- Spice Blogging (rss) (44)
- The Chinese Cookbook Project (rss) (14)
- The Chinese Pantry (rss) (39)
- The Documentary (rss) (2)
- The Kitchen Saga (rss) (17)
- The Locavore's Bookshelf (rss) (15)
- The Unsung Adventures of The Culinary Nerd (rss) (6)
- Tools and Toys (rss) (35)
- Uncategorized (rss) (10)
- With a Side of Politics (rss) (48)
Archives:
- August 2012 (9)
- July 2012 (12)
- September 2011 (3)
- August 2011 (7)
- July 2011 (8)
- June 2011 (16)
- May 2011 (17)
- April 2011 (11)
- December 2010 (9)
- November 2010 (5)
- February 2010 (1)
- December 2009 (5)
- November 2009 (7)
- October 2009 (10)
- September 2009 (16)
- August 2009 (14)
- July 2009 (14)
- June 2009 (7)
- May 2009 (17)
- April 2009 (10)
- March 2009 (25)
- February 2009 (13)
- January 2009 (10)
- December 2008 (5)
- November 2008 (5)
- October 2008 (6)
- September 2008 (13)
- August 2008 (8)
- July 2008 (11)
- June 2008 (18)
- May 2008 (13)
- April 2008 (14)
- March 2008 (16)
- February 2008 (17)
- January 2008 (19)
- December 2007 (25)
- November 2007 (18)
- October 2007 (24)
- September 2007 (16)
- August 2007 (15)
- July 2007 (15)
- June 2007 (10)
- May 2007 (14)
- April 2007 (16)
- March 2007 (17)
- February 2007 (20)
- January 2007 (13)
- November 2006 (1)
- October 2006 (8)
- September 2006 (14)
- August 2006 (25)
- July 2006 (30)
- June 2006 (28)
- May 2006 (34)
- April 2006 (29)
- March 2006 (24)
- February 2006 (30)
- January 2006 (38)
- December 2005 (40)
- November 2005 (37)
- October 2005 (32)
- September 2005 (25)
- August 2005 (30)
- July 2005 (28)
- June 2005 (21)
- May 2005 (8)
- April 2005 (22)
- March 2005 (17)
- February 2005 (29)
- January 2005 (10)
Search Site:
Links:
- Lily’s Wai Sek Hong
- 101 Cookbooks
- A cat in the kitchen
- A Veggie Venture
- Accidental Hedonist
- Cha Xiu Bao
- chez pim
- Chocolate & Zucchini
- Chopstick Cinema
- Chowhound.com
- Chubby Hubby
- Cook sister!
- Cooking with Amy
- da*xiang
- Eat Local Challenge
- Eating Liberally
- Ecocentric
- Eggbeater
- Epicurious
- Farmgirl Fare
- Fatfree Vegan
- Foodgoat
- ForkandBottle.com
- Green Olive Tree
- Hooked on Heat
- Jaden’s Steamy Kitchen
- Kalyn’s Kitchen
- Lucullian delights
- Mahanandi
- Matt Bites
- MeatHenge
- mmm-yoso!!!
- New York Times – Dining & Wine
- Pizza Goon
- Rasa Malaysia
- Ruhlman
- Sailu's Kitchen
- Serious Eats
- SF Gate: Food & Dining
- Simply Recipes
- Soul Fusion Kitchen
- Tastespotting
- The Amateur Gourmet
- The Cleaner Plate Club
- The Food Section
- The Grub Report
- thecookscottage
- U.S. Food Policy
- Wandering Chopsticks
- Washington Post Food and Dining
- Wasted Food
Meta:

Powered by WordPress. Graphics by Zak Kramer.
Design update by Daniel Trout.
Entries and comments feeds.