Cook Local, Eat Global
How Many Berries Can You Stuff Into A Batch Of Muffins?
It’s like the Zen question–“What is the sound of one hand clapping?”
How many berries can you cram into a batch of muffins before they turn into either a gloppy mess or they fall apart entirely?
I ask these questions, not only because I they are interesting exercises in kitchen science, but because I really like very fruity muffins. This is not a new preference with me–I am the famed creator of “Purple Muffins” which everyone, even avowed muffin-haters (how can you hate a muffin–I mean really?) have liked. The creation of Purple Muffins was an accident–I had an overabundance of wild blackberries one day and put them into a batch of muffins along with some other berries I had bought at the Farmer’s Market and discovered as I stirred the fruit into the batter that wild blackberries are extremely fragile. They break apart at the slightest provocation and spread their inky-purple colored selves all through whatever they are being stirred into.
Which, in this case was muffin batter. And thus, the batter was tinted a vivid hue of reddish violet, a color which surprisingly stayed brilliant all through the baking process. It was a little weird biting into bright purple baked goods, but they really tasted divine, so I guessed it was all fine.
Of course, all of my friends living in Athens thought purple muffins were the coolest thing ever, because not only were they psychedelically colored, they tasted great. So, for every pot luck and summer party, I was begged to make purple muffins. I even baked them for the psychic fairs we held at our book store (yes, Zak and I used to host psychic fairs–we both read Tarot cards, too) and they were always a hit with the metaphysically inclined folk who patronized our shop. (Purple, being the color of aura that indicated a spiritual nature, according to folks who are into such things, is a very popular color among the crystalline company we used to keep, so naturally, anything purple, even muffins, is bound to be if not advanced spiritually, then at least cool and interesting.)
So, I bought a bunch of blackberries, strawberries and raspberries again this weekend at the market and Zak saw them and said, pleadingly, “Make Purple Muffins, please?”
I cannot refuse him when he tips his head like that and gives me the puppy-dog eyes.
So. that is what I set out to do.
But I didn’t want to make either the original Purple Muffin recipe, as I didn’t really want to go digging around for the recipe.
You see, the original recipe is only recorded in one of my journals of those long-ago Athens years when we read Tarot cards and were asked odd questions at the grocery store when we shopped there after midnight such as, “Can you get me any of the works of Paracelsus?” This query from the checkout clerk was answered by. Zak who unblinkingly replied, “Would you be wanting the two volume Waite translation of his hermetic and alchemical writings or the Turner translation of The Archidoxes of Magic?” I mentioned that I wasn’t certain that either of them were still in print, but that we would do what we could to find them. These sorts of conversations only seem to happen in Athens, very often late at night at Krogers. I am sure there is some sort of metaphysical meaning to this. Perhaps the Athens Krogers is located on a ley line or some such.
(I wonder if Paracelsus, alchemist that he was, ever experimented to see how much fruit could be put into muffins without turning them into inedible goo? I somehow doubt it, but it is fun to think about it.)
But, I digress.
Nor did I want to do the ersatz Purple Muffin recipe, which I posted here about four years ago under the title Summer Berry Muffins. There is nothing wrong with that recipe–it is just that they don’t tend to turn out very purple.
So, I decided to experiment.
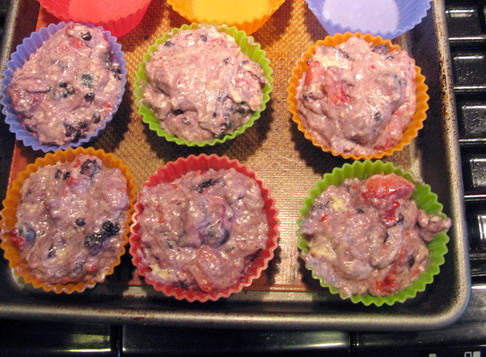
I wanted to see how many fresh berries I could stir into muffin batter before the mixture refused to bake into anything resembling a muffin. I wanted muffins that were more fruit than muffin, with the batter basically just there to hold the berries together. Why?
Because I felt like it, and because it is a fun exercise. And, because there was a high chance for failure, it being a baking recipe that I was going to muck around with in a rather extreme way. Fruit is juicy, and that can radically change the balance of liquid to solid in a baked good and can thus turn something good into something that will not bake up properly at all.
And, I decided to get Kat in on the action, because if I was going to make a mess of myself and my kitchen, I might as well get the kid all sloppy, too. And in truth, we all ended up in the kitchen, with Zak even taking a turn stirring the berries into the batter roughly in order to get as much purple juice as possible to stain the dough.
It turns out that you can get quite a lot of fruit into a muffin while still having it stick together and bake up into muffins. You have to be careful not to cover them tightly after they are cool, because sugar is hygroscopic, meaning that it will cause baked goods to readily take in moisture from the atmosphere and retain it. (This is part of what sugar does in baked goods besides make them sweet–it also acts as a means to keep them from drying out.) When you have sugar from the batter, as well as the added sugar and native juice from the fruit, if you tightly wrap or cover your baked item, it will get soggy.
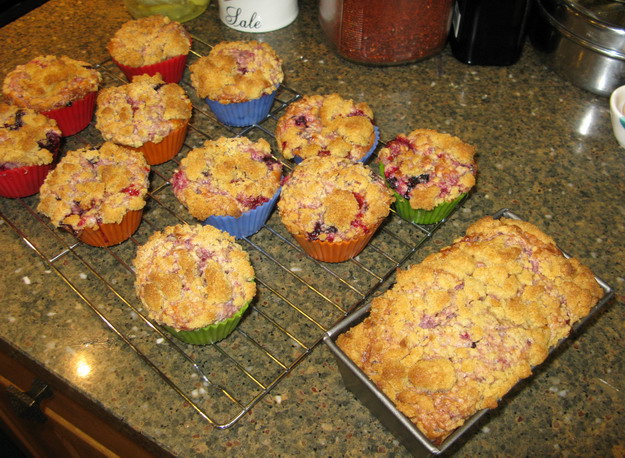
I have found that you can keep these Purple Muffins, Version 2.1 unwrapped and on your counter for at least two days with impunity. You might be able to keep them longer, but I wouldn’t know about that, because they didn’t last two days at my house before being consumed with great glee and gusto by Kat, Zak, Brittney, Dan and myself.
One more thing–in the interest of making these muffins a little bit healthier, I did a couple of things. First, instead of sour cream, I used 2% Greek yogurt. It worked fine. I also substituted most of the all-purpose flour with King Arthur’s white whole wheat flour. This also worked fine–there is no discernible difference between muffins made completely with all-purpose flour and those blended with white whole wheat.
I guess that once you have all of that fruit in there, it doesn’t matter if you use healthier flour–it still all tastes good. Well, that and white whole wheat flour has a very mild flavor.
Of course, I ruined the healthier profile of some of the muffins by adding a layer of streusel topping–that delectable mixture of butter, sugar and flour that makes crispy, crumbly, buttery crumbs on the top of baked goods. I did this at the behest of Kat who loves “crumbs” as she calls it. Next time, I will substitute some rolled oats for some of the flour so I won’t feel so bad about adding more sugar and butter to the muffins than is absolutely necessary.
Purple Muffins. Version 2.1
Ingredients:
1 1/4 cups white whole wheat flour
3/4 cup all-purpose flour
3/4 cup raw or white sugar (raw tastes better)
1 tablespoon baking powder
1/4 teaspoon cardamom
1/8 teaspoon cinnamon
1/2 teaspoon salt
2 teaspoons finely shredded lemon zest
1 large egg
4 tablespoons butter, melted and cooled
1 cup (use a fluid measuring cup) Greek yogurt
1/3 cup milk
1 teaspoon vanilla
2 1/2 cups fresh mixed berries, picked over, rinsed and dried (I used blueberries, quartered strawberries, raspberries and blackberries)
1/4 cup brown sugar
1 tablespoon all-purpose flour
1 tablespoon rolled oats (or you can use 2 tablespoons of the flour and leave out the oats)
2 tablespoons cold butter
Method:
Preheat oven to 350 degrees F.
Mix together flour, sugar, baking powder, salt, spices, and lemon zest in a large bowl.
In a smaller mixing bowl, whisk egg until thick and uniformly yellow. Whisk in butter, and continue beating until completely combined.
Add yogurt, milk, and vanilla to the smaller bowl and whisk into the egg and butter mixture until everything is happily combined.
Dump wet ingredients into the dry ingredient bowl and mix well. Add your berries and mix very well, hopefully crushing some of the berries enough that they stain your batter purple. If they don’t, you can’t rightly call the resulting muffins Purple Muffins, now can you? So beat those suckers in there and make that dough Technicolor. You know you want to.
With your hands, combine the remaining four ingredients by kneading it all together until it becomes a clumpy, crumbly mixture.
Either spray your muffin tins with baking spray or line with paper muffin cups. Or use silicone muffin cups on a baking sheet like I do. Using a large ice cream scoop (the kind with the ratchety thing that scrapes the scoop out of of the scooper), or a spoon, portion out the dough, which will be thick and heavy, into the muffin cups. If you don’t have an ice cream scoop, run out and get one for this recipe–this is the best and easiest way to portion out muffin dough without making a godawful mess.
Sprinkle the tops with a bit of the streusel stuff, then pop your muffins in the oven.
Bake for 10-15 minutes, then turn the pans back to front in order to get them to brown evenly. Bake for another 10-15 minutes, for total of 20-30 minutes. (If you have a convection oven as I do, the baking time will be closer to 20 minutes. For a regular oven, it will be more like 25-30 minutes.)
Remove from oven and cool for a couple of minutes in the pan, then remove from the pan and allow to cool on a rack. These are good warm, but even better after they cool completely–then, they are irresistible, as the flavors have really melded together and the berries are no longer molten nuggets of hot death for your tongue.
Makes 12-14 muffins, depending on how large your muffins are. (If you have little loaf pans like I do and only 12 muffin cups, you can put the leftover dough into a loaf pan and make a wee Purple Berry Bread, but remember–that bread will take longer to bake than the muffins. The mini loaf I baked took about thirty-five to forty minutes total to bake.
Local (And Slow) All the Way: Rabbit And Horticultural Bean Stew
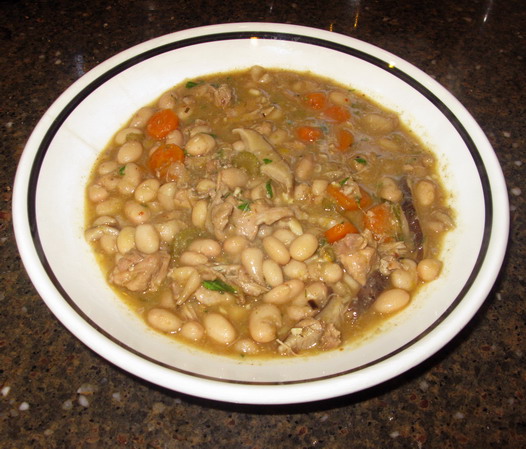
Every ingredient to this particular dish was local: the beans, the onions, garlic, carrots, celery, leeks, mushrooms, rosemary, thyme, sage and oh, yeah, the rabbit.
Oh, wait a minute: the white wine isn’t from Athens, but it is from Ohio, and the salt–well, it is from the ocean, which is not local to Ohio.
At least, not yet. Maybe after the polar ice caps melt. Then we Ohioans might have some ocean-front property, but I doubt it even then. Oceans have been thin on the ground here for a long while–at least since the Devonian Period, if I am remembering my geology correctly.
So, no local sea salt for little old me.
Back to the dish at hand.
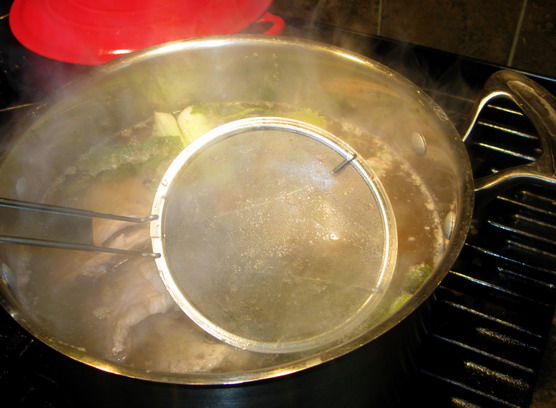
It all starts with the making of rabbit stock.
Which is about the same as making chicken stock, really. You just need rabbit carcasses and bones and bits, some leeks, a carrot or two, a garlic clove, a couple of stalks of celery, a splash of white wine and some herbs. And some salt, and a few peppercorns. Oh, and a secret ingredient. (A dried shiitake mushroom–also known in Asian markets as Chinese black mushrooms. More on that later.)
And lots of pure, cold water. Always start your stocks with cold water–it helps dissolve the gelatin in the bones which makes for a thicker, richer stock that when chilled, will turn into a gel. Melted, a gelled stock has a velvety feel on the tongue that is qualitatively different than the watery feel of canned broths. You just have to feel and taste it for yourself–it is hard to describe the difference.

How To Make Rabbit Stock:
On to rabbit stock–it is just as easy as making any other stock.
I used bones from two rabbits which had most of the meat cut from them to make rabbit stew meat, but one could use full carcasses for this just as easily. Or do like I do with chicken stock and use a whole carcass and then a bunch of bones. Just remember, the more bones you have, the richer your stock will be.
Basically, follow my instructions on how to make chicken stock for making rabbit stock, while noting the differences I mention here.
The biggest difference is that I put garlic in my rabbit stock, when I do not use it in my chicken stock. Why is that? Because I think that garlic really compliments the meat of domestic rabbit perfectly, and one little clove of garlic never ruined anything. Well, maybe it might have ruined a batch of beer or a bowl of cereal, but that is probably about it. I might not chuck that garlic clove into the pot if I was going to use the rabbit stock for some delicate soup or whatnot, but since this was going to be the base of a really hearty and garlicky stew, I didn’t see why I should leave out the garlic.
The second difference is that I leave out onions and just use leeks in my rabbit stock. Why is that? Well, I guess it is because I like the leek flavor better in the rabbit stock. You can use onion if you want–I won’t fuss at you about it.
The third difference is my secret ingredient–that single solitary dried shiitake mushroom.
Why is it there?
To add a layer of depth to the stock–an extra umami kick, if you will.
Besides, you will find that rabbit meat and mushrooms are a classic combination if you peruse European cookbooks for recipes involving leporids and fungi.
Those are the largest differences in the ingredients and making of rabbit stock. I also tend not to simmer the stock as long as I do chicken stock–the bones of domestic rabbits are smaller and more delicate than those of chickens and they seem to give up their goodness much more easily. I tend to simmer my rabbit stock for only about four to six hours as opposed to the marathon six to twelve hours for chicken stock.
Otherwise, the rules are all the same:
Rinse off your carcasses and bones, then put them in a pot with your herbs and vegetables.
Add cold water to cover the ingredients by at least three inches or so. Cold water. Starting with hot water will not speed the process up and you will end up with a cloudy stock that doesn’t have as much dissolved gelatin from the bones in it. So just put the cold water in the pot in the first place and take the time to let it come to a simmer naturally.
Put the pot on the heat and turn it up to high. Watch the pot and when it comes to a boil, immediately turn it down so that is simmers gently and steadily. Do not let it boil again. Ever. (In fact, when it comes to rabbit meat–don’t ever boil it–it toughens it up too much. Always cook rabbit with gentle heat, at a simmer if there is liquid involved.)
Skim the scum that comes to the top during the first part of the cooking. And instead of using a spoon like you see in the photos of the chicken stock post–the link is above so you cannot miss it–use one of these neato keen super fine meshed skimmer thingies you can find at most Asian grocery stores. Just slip that bad boy under the scum, lift and voila–the skank is gone! Rinse it under running water and go skank skimming again. It is so much easier than the spoon method and it is fun, too. And you end up with clearer stock when you are done!
Add about a cup of dry white wine. (I like Riesling with rabbit.)
And–when your stock is done, strain out all the solid bits. If you used a whole carcass, the meat has probably fallen off the bones, but if not, pull off what is left on the bones and set it aside. Discard the bones and the vegetables, but keep the meat.
Salt to taste.
If you are not going to use the stock immediately, cool it quickly and thoroughly and put it into containers in your fridge or your freezer depending on when you foresee using it. It can keep about a week in the fridge, for months in the freezer, just like chicken stock.
Now, if you are going to use the stock immediately to make the stew that this post is actually about, then leave it in the pot and go on with your recipe.
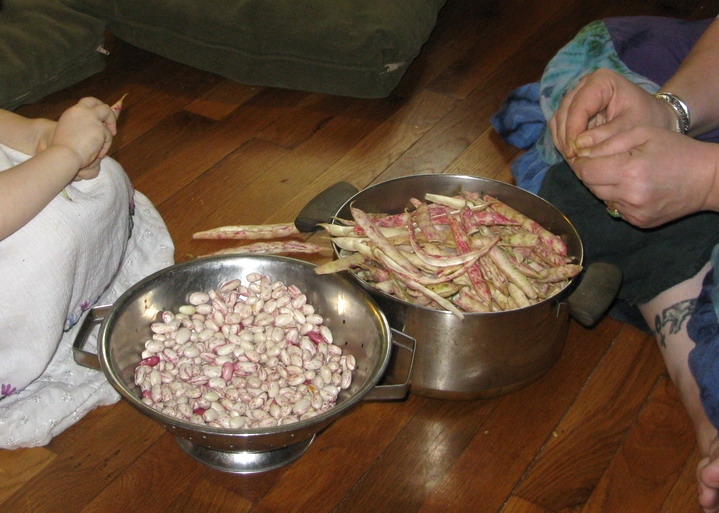
Now, while that stock is simmering, you can do all the stuff you need to do to get the rest of the ingredients ready. You can thaw out any of your boneless rabbit stew meat you might have to use in the stew, shell the beans and cut up the carrots, celery, leeks, onions, garlic, mushrooms and herbs.
Shelling horticultural beans goes faster if you have help, but I find it quite relaxing even if I am by myself. Besides, what’s the hurry? You have to simmer the stock for at least four hours, so why rush on everything else? This is not a quick recipe–but that is okay. Sometimes some of us like slow food, food that takes a long, leisurely route from the kitchen to the table.
Once you have the preparations done–the stock made and any meat from the bones set aside, the beans shelled, the vegetables sliced and the boneless rabbit stew meat–it all comes together quickly enough, and then just goes on the back of the stove to simmer pretty well on its own. Just like stock–this stew doesn’t need your undivided attention–just make sure it is simmering and not boiling, and nothing is sticking to the bottom, and you are golden–no worries.
So yeah, this all-local recipe is slow-going–I did make it on a lazy Sunday after all, with lots of help from a nearly-three-year-old who had great fun assisting me–but it is all good. Not only is it easy to put together, it is fun, and the resulting flavor makes everything worthwhile.
It is by turns rich and complex in flavor, and yet simple and pure. I don’t know how else to describe it. Rabbit has such a clear, pure flavor, and the beans are earthy, and that darkness is accented by the deep flavor of the shiitake. But then the vegetables–the carrots, celery and caramelized onions–add delicious sweetness to the mixture while the sharp scents of the herbs float over everything.
It is really quite an amazing dish–very warming, very satisfying and surprisingly light for all that it is a stew. (I think it seems light because rabbit is nearly fat free.)
And, even if the recipe’s length makes it seem like it must be hard–it isn’t. It is just a good old European-style peasant food, as dreamed up in a kitchen full of the local Appalachian summer bounty. Think of it as Peasant-Hillbilly Fusion. (Might this be a new trend?)
Rabbit and Horticultural Bean Stew
Ingredients:
3 tablespoons olive oil or bacon drippings
1 cup thinly sliced onion
1 teaspoon salt
1 1/2 cups thinly sliced leeks–white and light green bits only
3 tablespoons minced fresh garlic
1 cup thinly sliced celery
1 cup thinly sliced carrots
1/2 cup thinly sliced fresh shiitake mushrooms
1 pound boneless rabbit meat
1 tablespoon each fresh minced rosemary leaves, fresh thyme leaves and minced fresh sage leaves
1 teaspoon smoked Spanish paprika
1 cup dry white wine
1 1/2-2 quarts of rabbit stock (or chicken stock, if you must–or water, if you haven’t anything else)
1 1/2 pounds freshly shelled horticultural beans
the meat from the rabbit stock, if you have any
1 bay leaf
salt and freshly ground pepper to taste
2 tablespoons minced fresh herbs–I used rosemary, thyme, sage and flat-leaf parsley–for garnish
Method:
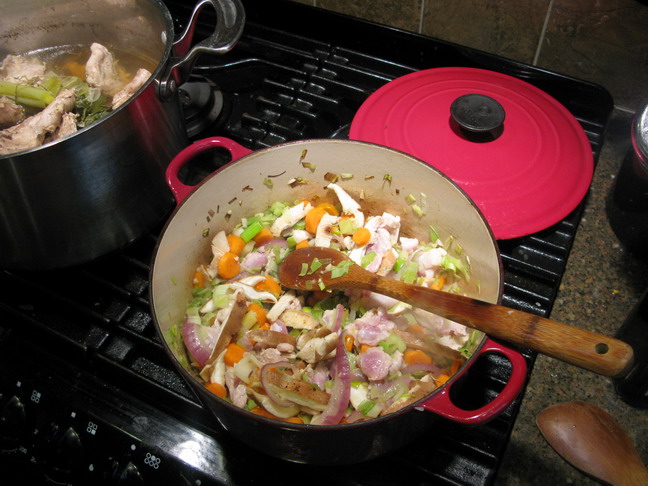
Heat the oil or drippings in the bottom of a large, heavy-bottomed pot on medium high heat.
Add the onions and sprinkle with a teaspoon of salt and cook, stirring, until the onions turn golden. Add the leeks, garlic, celery, carrots and mushrooms, and cook, stirring until the onions are a deep golden brown and the other vegetables have been tinged with brown and everything is smelling wonderful.
Add the boneless rabbit meat, and cook, stirring, until it browns lightly.
Sprinkle in the first measures of fresh herbs and the Spanish paprika. Pour in the wine and deglaze the bottom of the pot, then allow the alcohol to simmer out of the wine.
Add the rabbit stock or whatever other liquid you are using, and stir in the beans. Add the meat from the rabbit stock, if you had any. Throw in the bay leaf.
Bring to a brisk simmer, then turn down the heat to a gentle simmer, cover the pot and cook until the beans and rabbit are both tender.
If the stew liquid isn’t thick enough to your taste, take out about a half cup of beans and mash them thoroughly. Stir them back into the stew and voila–instant thickener! No extra added fat or starch. Beans are like magic that way.
Season to taste with salt and pepper, and garnish with the fresh herbs just before serving.
Meatless Monday: Summer Vegetables+Pasta+Pesto=Dinner
I know that I have written a lot about pesto recently. Long-time readers should know that I will put it on almost any vegetable.
Which, as far as I am concerned, makes pesto a most versatile kitchen ally when you are striving to eat more vegetarian meals.
Basically, the versatility of pesto as a sauce for vegetables and pasta, means that you can pair it with nearly any combination of summer vegetables you happen to have in your possession, taking into account the cooking methods necessitated by each vegetable.

Some vegetables can be sauteed just as they are.
Some vegetables can be sauteed, but need to be blanched first.
And some vegetables can be added to the pasta at the last minute when they are essentially raw.
And that is what this post is about–which vegetables go into which category, along with ideas for various combinations which I and my family find to be most delicious.
Vegetables to Saute Just As They Are
Onions, small summer squashes, bell peppers, hot peppers, mushrooms, chard, kale, broccoli rabe, sugar snap peas, young collard greens, small eggplant.
These are the easiest vegetables to prepare–you just cut them, preferably in analogous shapes that echo the shape of whatever pasta you are using, heat up a bit of olive oil in the pan and start sauteing. If you use onions, they go in first. I like to at least get them golden before anything else goes in. Then, if you are using peppers or mushrooms, in they go next. Then, you can add squashes or eggplants–both cut very thinly. (If you use very small or young eggplants or the elongated Japanese kind, you don’t have to salt them to remove bitter juices before you cook them.) Snap peas would go in next, with the greens, kale, collards, chard and broccoli rabe being cooked for the shortest period of time.
Vegetables to Saute After Blanching
Broccoli, cauliflower, carrots, shelled peas and green beans (even haricot vert are better if they are blanched briefly before sauteing).
These vegetables are great with pesto and pasta, but they need to be softened up a bit by blanching them in boiling water for a minute or two, before you add them to the saute pan. Once again, cut them up into shapes and sizes that are analogous to each other and the pasta shape you have chosen. (You can tell I have cooked a lot of Chinese foods.) Dunk each of them into a pot of boiling water for a minute or two, just until they are softened, and then drain them. You don’t need to shock them in cold water–just drain them and put them into the saute pan with whatever other vegetables you are using–usually near the middle or end of the sauteing process.
The blanching just softens up the tissues of these harder vegetables and makes them more receptive to the process of cooking in the saute pan and makes them more likely to soak up the flavors of the sauce.
Oh, and by the by–I just use the already boiling pasta water pot to blanch my vegetables. Why boil two pots of water for one dish? I just blanch the vegetables first and then, after they are out of the pot and into the pan, I add the pasta.
Vegetables to Be Added At The End
Tomatoes and spinach.
That is a short list, isn’t it?
You can, of course, cook either of these vegetables a bit, but I have found that if you toss raw baby spinach with hot pasta into which are you stirring pesto, it will wilt just perfectly without having to take the chance of overcooking it. As for tomatoes, you can cook them, of course, but I really, really like the flavor and texture of wedges of them added raw to the pasta and then tossed with everything else. The heat of the pasta and other vegetables do indeed cook them a bit, but they still retain their color, fresh flavor and texture, which contrasts nicely with the cooked vegetables and pasta.
How It All Comes Together
So, the cooking method goes something like this:
Start your pasta water boiling.
Cut up your vegetables so they are close to the same shape and size and so they go with your pasta shape.
Put all of the pesto ingredients into your food processor except for the olive oil.
Start sauteing your vegetables–putting the ones that take the longest to cook in first, and blanching and draining the ones which need to be blanched before going into the saute pan. After most of your vegetable cooking is done, add some wine or vegetable broth if you wish, and a bit of cream–as little as a quarter cup will work. (This helps everything to cling to the pasta and adds a bit of moisture to the pesto sauce. The cream also helps the pesto stay green.) Take the saute pan off of the heat. It will stay warm, but you don’t want the vegetables to over-cook.
When your vegetables are nearly done, put the pasta in the boiling water, salt it and start the pesto. Remember to drizzle the olive oil into the feed tube of the food processor while it is whirring about or your pesto will be really pasty and funny-tasting.
When the pasta is done, drain it, and either put it back into the cooking pot, or dump it right into your saute pan. (Which one you do depends entirely on how big your saute pan is. I have big ones, so that is how I do it–if yours is not big enough, put the pasta back into the cooking pot and dump the vegetables on top.) Add either baby spinach or tomatoes if you are using them, and then scoop however much pesto you want into the pot and start tossing and don’t stop until everything is coated in a lovely haze of green sauce.

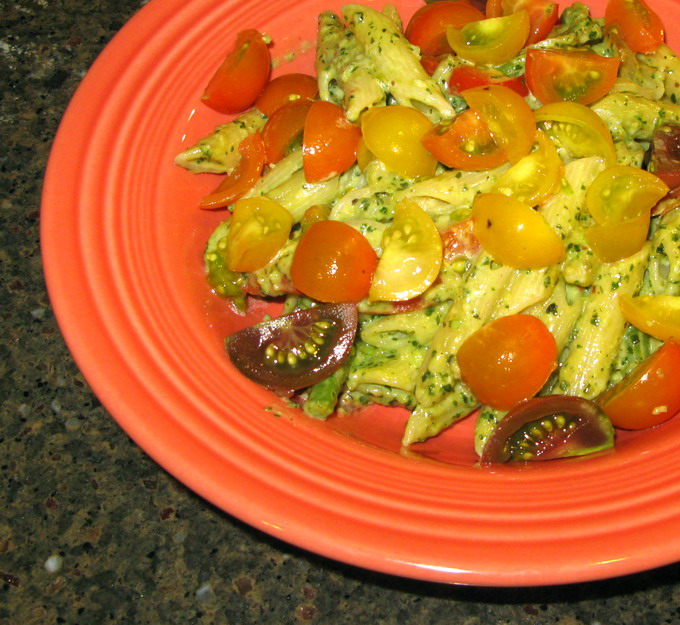
Really Tasty Combinations of Vegetables for Pesto and Pasta
The one pictured here is onions, red bell peppers, haricot vert and cherry tomatoes.
But you could also do:
Onions, baby squashes and tomatoes.
Onions, bell peppers and broccoli.
Onions, mushrooms, and peas (or spinach–yum!).
Onions, broccoli rabe or kale, and mushrooms.
Onions (do you get the idea that I like onions?) bell peppers, spinach and tomatoes.
Onions, cauliflower and spinach.
The possibilities are nearly endless.
And–you could always ditch the pasta and instead use boiled fingerling potatoes along with whatever combination of summer vegetative goodness you can get your hands on.
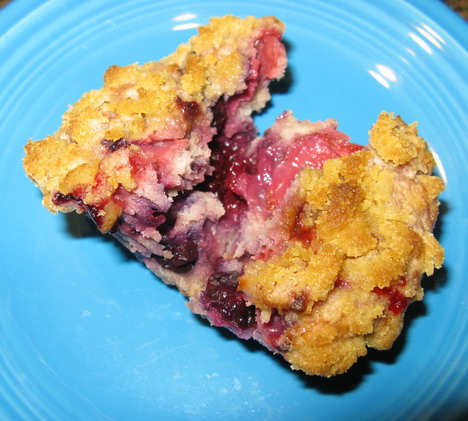
Summer Berry Crisp

This recipe is not an original; I adapted it from a recipe I found on All Recipes a while back and have meant to make it ever since.
But, until last weekend, when I was presented with a stellar combination of summer fruits–the last of the summer’s blueberries, fresh wild blackberries, both golden and red raspberries and an unexpected windfall of everbearing strawberries that were the juiciest, sweetest, reddest fruit imaginable, I hadn’t really thought about baking anything for a while.
But then, faced with five of the best summer fruits, and the fact that this was the last time this particular combination of local berries would be available this year–I decided to mark this event with something special–but also something easy, since it was hot and I was in no way in the mood for arguing with pie crust.
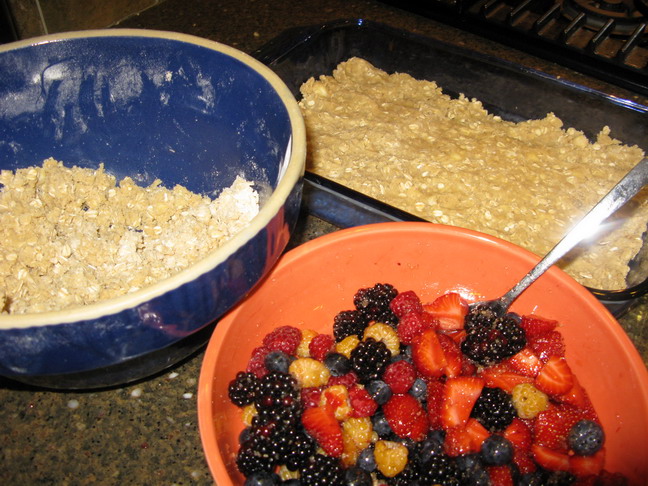
Crisps are the best and tastiest way to bake with summer fruits when you are not in the headspace to deal with making pie crust. The dough is easy to put together–basically you mix together flour, brown sugar, rolled oats and some spices–cinnamon is classic, as is nutmeg or cloves–then cut in butter. The fruit is tossed with some sugar and maybe a bit of spices, and is put into a buttered baking dish, then the crisp crust is just sprinkled on top of the fruit and patted down gently. Then you bake it, and serve it warm out of the oven!
So easy!
Well, this recipe is a bit different in that it calls for half of the dough to be patted into the bottom of the baking dish, over which the fruit is dumped and spread. Then, the other half of the dough is sprinkled and patted over the fruit and the baking goes on as usual.

I was intrigued with this idea, because while I love fruit, and prefer fruity desserts to chocolaty ones any day, I also love the oat crusts of fruit crisps. And this method seemed like it would make for a crisp that was twice as good as your usual one with only the top crust. It sort of combines the best of a pie and a crisp–it has two crusts like my favorite kinds of pies and it is easy and full of oaty goodness.
I did modify the recipe a bit. I used more fruit than was called for in the recipe, in large part because I saw no reason not to, and the amount of fruit compared to the amount of crust seemed a bit parsimonious for my taste. And, there was the fact that I had a huge amount of fresh fruit to use, so why not? Instead of the four and a half cups of fruit, I used about seven cups of it, and since the berries were quite sweet, I used the same amount of sugar called for in the filling for the four cup amount.
I also added rosewater to the fruit, because all berries taste better with it, especially bramblefruits like raspberries and blackberries and strawberries are always made even more delicious with a sprinkle of rose flavor.
I added an extra half cup of oats to the dough because I like them, and used cardamom and a bit of dried ginger as well as the cinnamon to flavor it, and left out the nutmeg. (You know, I do like nutmeg, but I prefer it in savory foods than in sweet. I don’t know why, but that is the case–I feel the same way about allspice.)
Kat helped with this dessert–and if you have an older child, like a nine or ten year old, they could probably make this dish all by themselves, with you only helping to put the pan into the oven and take it out when it is done. It is really that simple.
For a nearly three year old, there was still plenty that Kat could do. She helped stir the sugar and rosewater into the berries for them to macerate. Then, she stirred the flour, brown sugar, spices, and oats together. After I cut the butter into the dough, she (with very clean hands, of course) helped me mush the butter into the mixture very well–a step the original recipe leaves out. I find that it makes a more crunchy, crispy crust if you fully blend the butter into the dry ingredients by massaging it all together.
Besides, Kat and I thought it was a whole lot of fun!
And, of course, Kat helped eat the results of her labor. She loved it–and who wouldn’t, really? Buttery crunchy crust with lots of sweet berries oozing with brilliant magenta, blue and purple juices–it really was heaven in a bowl.
Now, if only I had thought to make vanilla chai ice cream to put on top.
Next year.
But for this year, I can make an everbearing strawberry crisp with vanilla rosewater ice cream.
Or a peach melba crisp (peaches and raspberries) with vanilla chai ice cream.
Don’t those sound wonderful?
Until then, here is the recipe–remember, you can use just about any fruits to make a crisp.
Summer Berry Crisp
Ingredients:
6-7 cups of mixed fresh summer berries, trimmed and sliced as needed
4 tablespoons raw sugar
1 tablespoon rosewater (optional)
2 cups all-purpose flour
2 1/2 cups rolled oats (not instant oatmeal!)
1 1/2 cups packed brown sugar
1 teaspoon cinnamon
1/2 teaspoon ground dried ginger
1 teaspoon ground cardamom
1 1/2 cups cold butter
Method:
Preheat oven to 350 degrees F.
In a large bowl, toss together the berries with sugar and rosewater. Allow to sit and macerate while you prepare the crust.
In another large bowl, stir together flour, oats, brown sugar and spices. Cut in butter until crumbly, then with clean hands massage the dough until it is smoother, but still with crumbly bits.
Press half of the dough into the bottom of a glass 9″X13″ pan. Dump in the berries and spread them about until they cover the bottom crust.
Sprinkle the remaining dough over the berries and lightly press them into the berries with gentle pats of your fingers.
Bake for 30-40 minutes, or until the fruit juice is bubbly and thick and the crust is golden brown. (If you have a convection oven like I do–the baking will take about 25-35 minutes, depending on how golden brown you like the crust of your crisps to be. I baked mine for thirty minutes exactly and it was perfect.)
Serve warm, with or without sweetened whipped cream or ice cream on top.
Teaching and Learning in the Kitchen
Children learn best by doing.
They follow our example in all things, as I remember well from my own childhood.
I have no doubt in my mind that the reason I am a chef today is because I grew up in a family of great cooks, all of whom had no qualms about spending hours a day cooking food for their families to eat. Not only did they have no qualms–they loved doing it. And they did it pretty much every day.
And when I was growing up, where did I spend most of my time?
In the kitchens of my mother, grandmothers, aunts and uncles.
And what did I do there?
I watched a lot.
For whatever reason, I was endlessly fascinated in what went on at the stove and on the table, in the sink and on the counter. I watched from my station on the floor under my Mom’s or Gram’s kitchen tables, as all sorts of fascinating alchemy went on around me–from making noodles and hanging them on a clothesline strung overhead across the kitchen, to canning tomatoes (once while canning tomatoes, my mother accidentally scalded her hand in boiling water and our next door neighbor lady put a grated up potato on it, and wrapped it in a bandage “to pull the heat out”–it worked–Mom’s hand didn’t blister at all) to making fudge to the cooking of countless pots of beans to the rare occasions when Gram stirred up her boiled custard that no one to this day can replicate.
And I played at cooking, too, down under those tables–pots and pans, wooden spoons, plastic bowls and measuring cups that were not in immediate use were given to me, and I would “cook,” stirring and measuring and scooping under the table, out from under the feet of the women passing to and fro as they actually worked, but still close by where they could keep an eye on me and I could happily watch them.
And then, before I knew it, I was old enough to help, in ways large and small.
My little hands were quite nimble, and so I was often put to work shelling peas or stringing beans.
I was also good at picking the strands of silk from between the kernels of corn fresh from its green, fragrant shucks. I could hull strawberries and pick through dried beans and lentils looking for bits of stone or stray sticks or beans that were wizened and crinkled or off-colored and untrustworthy-looking.
Soon enough I was trusted with a vegetable peeler and could tackle piles of carrots. Before that, I remember being given the task of peeling dozens of boiled eggs for deviled eggs or those mountainous batches of potato salads that my mother made every summer for the annual family gatherings with all the cousins, aunts and uncles, all of whom dearly adored her potato salad. (And I still prefer hers to anyone else’s. No one else makes it right.)
I am certain, absolutely certain that if I had not been included in those long hours of food preparation, if I had not helped plant and harvest vegetables, if I had not been intimately involved in tending livestock and preserving the fruits of our labor for the winter–I would not be a food-obsessed chef and food writer today.
I might still be a journalist or something.
Or maybe even a veterinarian. (I even was a pre-vet major for a time. The math classes killed me.)
But certainly, I would not be who I am today.
We are the sum of our experiences, filtered through our own unique personalities, talents and skills which are inborn.
But I am only a sample size of one person. Let’s look at how Morganna has turned out.
Most of her childhood memories of me are tied in some way to food. She remembers picking blackberries in the woods with me when she was about four or five.
She remembers me getting her to eat lamb by telling her it was dinosaur meat.
She remembers her Aunt Nikki making her candied carrots, which she called “Bugs Bunny Candy” and they were the first cooked carrots Morganna would eat.
She remembers being obsessed with garlic at an early age, and carrying heads of it around so she could smell them.
And she remembers, from the time she could stand on a step stool and reach the counter, helping me in the kitchen.
And in truth, she remembers helping her Grammy, my mother, as well.
And where is she now?
She’s a line cook at a fine dining restaurant here in town, and is planning on possibly transferring from OU to Johnson & Wales University to finish her BA as a culinary degree.
(And yes, Mamma is very proud of her. Very proud indeed.)
Now, I am not saying that every child we teach how to cook at home is going to run right out and become a chef.
Far from it.
But what will happen is that every child who learns how to cook also learns how to eat. And what to eat. And how to eat it. And when, and why.
Cooking lessons bring a child a sense of accomplishment and impart important skills that push that child towards self-sufficiency and independence, which, as I recall, is the point of raising a child into adulthood. Knowing how to cook is a skill that will serve any child, as well as that child’s loved ones very well for the rest of their lives. (And it is a marketable skill as well….)
But learning to cook isn’t just about cooking, because cooking isn’t just a chore.
It is a part of our cultures. It is a part of our selves, our families. It is history, it is art, it is science, heck it is even math.
It is part of what makes us human.
For it is theorized that cooking food is what enabled us to evolve these big brains which went on to create art, science, music, literature, history, philosophy and culture. Cooking then, is part of what not only makes us human now–but made us human in the first place.
So, if you teach a child to cook, you are not only introducing him or her to a useful life skill–you are teaching them what it means to be human.
Cooking and sharing food brings love and peace–so when we teach our children to cook, we are also teaching them how to be good, humane, loving human beings.
So, this Sunday, it was Kat’s turn to start learning how to prepare food and be a good little human while she is at it..
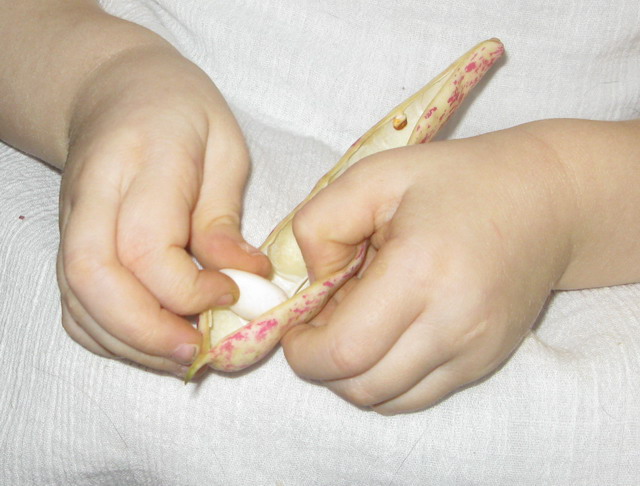
She has helped her Daddy make scrambled eggs for several months now, by guiding his hand as he cracks the egg and sprinkling in the herbs, but Sunday, I gave her her first real task–she sat down on the floor with me and helped shell horticultural beans.
And she worked at it diligently for over forty-five minutes–and was sad that we had no more pods to empty!
I had to open the pods for her–they are leathery and tough, but she would with careful, nimble fingers, pull each bean out and put them in the colander, while tossing the empty pod into the pot I had brought in for them.
She was so absorbed in the work–she commented on the beans, she counted them as they came from the pods, and she noted what color they were as she shelled them. (Horticultural beans can be pure white, white with pink stripes, white with red stripes, solid pink, solid red or red with white stripes. I am fascinated with the genetics involved in such a variable appearance.)
It was wonderfully relaxing to have her working with me, both of us sitting comfortably on the floor as we worked side by side.
I am so proud of her.
And she was and is so proud of herself–and guess what? Because she shelled those beans, even though they were an unfamiliar food, she readily tried them, tasting the broth of the stew they cooked in, and the beans themselves. She loved it. She insisted on stirring the stew with me, so I held her up to the stove and we carefully manipulated the wooden spoon in lazy circles in the pot, sniffing the delicious steam that rose to wreath our faces in the savory scents of herbs, onions, garlic and leeks.
Later, she helped me mix the dough for the berry crisp we made for dessert. She was especially fond of sniffing the cardamom jar, and she helped me pour the rosewater over the macerating berries. I taught her to put a dot of rosewater behind her ears so she could “smell like a flower,” as she said.
I think she is well on her way to learning to love food, the way it smells, feels and tastes.
And her education in how to cook has only just begun–but the photograph above chronicles the exact day and moment it began, at least in a practical, not just theoretical sense.

Categories:
- Admin (rss) (55)
- Blogs and Blogging (rss) (81)
- Book Reviews: Cookbooks (rss) (43)
- Book Reviews: Non-Cookbook Food Books (rss) (38)
- Cats and Cat Blogging (rss) (47)
- Chinese Cooking Lessons (rss) (32)
- Culinary School Stories (rss) (18)
- Dairy Pruducts: Cultured and Barbaric (rss) (4)
- Documentary Filmmaking (rss) (1)
- Essays, Rants and Reflections (rss) (260)
- Fighting Hunger (rss) (12)
- Food and Kids (rss) (45)
- Food in the News (rss) (126)
- Food Media (rss) (98)
- Food Preservation (rss) (18)
- Food Safety (rss) (45)
- Gardening (rss) (30)
- Herbs and Herb Blogging (rss) (20)
- Holidays (rss) (50)
- Kat Blogging (rss) (22)
- Kitchen Science (rss) (36)
- Leftover Makeover (rss) (8)
- Life, the Universe and Everything (rss) (131)
- Local and Sustainable (rss) (227)
- Local Athens Food and Foodies (rss) (42)
- Meatless Mondays (rss) (32)
- Menu For Hope (rss) (5)
- Nutrition, Diet and Health (rss) (84)
- On The Farm (rss) (8)
- Recipes: Almost Vegetarian, Vegetarian and Vegan (rss) (294)
- Recipes: American Regional (rss) (37)
- Recipes: Appalachian Hillbilly (rss) (33)
- Recipes: Bread, Pasta, Grains (rss) (95)
- Recipes: Canning and Preserving (rss) (8)
- Recipes: Chinese (rss) (123)
- Recipes: Comfort Food (rss) (120)
- Recipes: Cookies (rss) (16)
- Recipes: Desserts (rss) (48)
- Recipes: French (rss) (25)
- Recipes: Fruits and Vegetables (rss) (302)
- Recipes: Greek, North African and Middle Eastern (rss) (31)
- Recipes: Indian (rss) (137)
- Recipes: Italian (rss) (42)
- Recipes: Japanese (rss) (7)
- Recipes: Jewish (rss) (4)
- Recipes: Korean (rss) (6)
- Recipes: Meat, Poultry and Fish (rss) (220)
- Recipes: Mexican/Native American/ Latin American/Caribb (rss) (27)
- Recipes: Original (rss) (108)
- Recipes: Thai (rss) (27)
- Recipes: Tofu (rss) (17)
- Recipes: US Regional (rss) (16)
- Recipes: Vietnamese (rss) (8)
- Restaurant Stories (rss) (28)
- Sewing, Quilting, Arts and Crafts (rss) (16)
- Simple Chinese Recipes (rss) (30)
- Slow Food and Heritage Foods (rss) (10)
- Spice Blogging (rss) (44)
- The Chinese Cookbook Project (rss) (14)
- The Chinese Pantry (rss) (39)
- The Documentary (rss) (2)
- The Kitchen Saga (rss) (17)
- The Locavore's Bookshelf (rss) (15)
- The Unsung Adventures of The Culinary Nerd (rss) (6)
- Tools and Toys (rss) (35)
- Uncategorized (rss) (10)
- With a Side of Politics (rss) (48)
Archives:
- August 2012 (9)
- July 2012 (12)
- September 2011 (3)
- August 2011 (7)
- July 2011 (8)
- June 2011 (16)
- May 2011 (17)
- April 2011 (11)
- December 2010 (9)
- November 2010 (5)
- February 2010 (1)
- December 2009 (5)
- November 2009 (7)
- October 2009 (10)
- September 2009 (16)
- August 2009 (14)
- July 2009 (14)
- June 2009 (7)
- May 2009 (17)
- April 2009 (10)
- March 2009 (25)
- February 2009 (13)
- January 2009 (10)
- December 2008 (5)
- November 2008 (5)
- October 2008 (6)
- September 2008 (13)
- August 2008 (8)
- July 2008 (11)
- June 2008 (18)
- May 2008 (13)
- April 2008 (14)
- March 2008 (16)
- February 2008 (17)
- January 2008 (19)
- December 2007 (25)
- November 2007 (18)
- October 2007 (24)
- September 2007 (16)
- August 2007 (15)
- July 2007 (15)
- June 2007 (10)
- May 2007 (14)
- April 2007 (16)
- March 2007 (17)
- February 2007 (20)
- January 2007 (13)
- November 2006 (1)
- October 2006 (8)
- September 2006 (14)
- August 2006 (25)
- July 2006 (30)
- June 2006 (28)
- May 2006 (34)
- April 2006 (29)
- March 2006 (24)
- February 2006 (30)
- January 2006 (38)
- December 2005 (40)
- November 2005 (37)
- October 2005 (32)
- September 2005 (25)
- August 2005 (30)
- July 2005 (28)
- June 2005 (21)
- May 2005 (8)
- April 2005 (22)
- March 2005 (17)
- February 2005 (29)
- January 2005 (10)
Search Site:
Links:
- Lily’s Wai Sek Hong
- 101 Cookbooks
- A cat in the kitchen
- A Veggie Venture
- Accidental Hedonist
- Cha Xiu Bao
- chez pim
- Chocolate & Zucchini
- Chopstick Cinema
- Chowhound.com
- Chubby Hubby
- Cook sister!
- Cooking with Amy
- da*xiang
- Eat Local Challenge
- Eating Liberally
- Ecocentric
- Eggbeater
- Epicurious
- Farmgirl Fare
- Fatfree Vegan
- Foodgoat
- ForkandBottle.com
- Green Olive Tree
- Hooked on Heat
- Jaden’s Steamy Kitchen
- Kalyn’s Kitchen
- Lucullian delights
- Mahanandi
- Matt Bites
- MeatHenge
- mmm-yoso!!!
- New York Times – Dining & Wine
- Pizza Goon
- Rasa Malaysia
- Ruhlman
- Sailu's Kitchen
- Serious Eats
- SF Gate: Food & Dining
- Simply Recipes
- Soul Fusion Kitchen
- Tastespotting
- The Amateur Gourmet
- The Cleaner Plate Club
- The Food Section
- The Grub Report
- thecookscottage
- U.S. Food Policy
- Wandering Chopsticks
- Washington Post Food and Dining
- Wasted Food
Meta:

Powered by WordPress. Graphics by Zak Kramer.
Design update by Daniel Trout.
Entries and comments feeds.