Cook Local, Eat Global
Meatless Monday: Kale and Fingerling Potato Hash
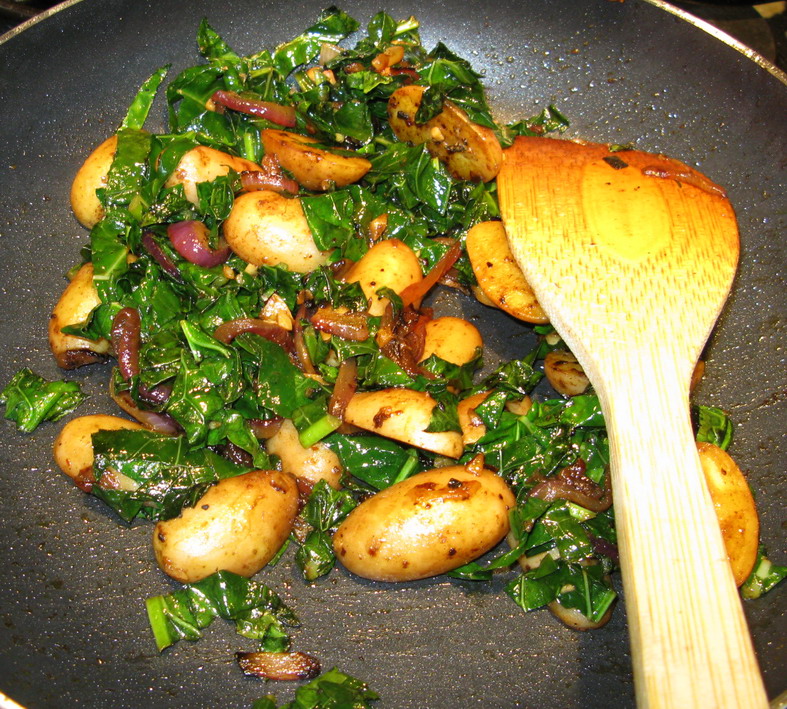
This is a super-simple dish which you could serve with say grilled or broiled stuffed tomatoes or summer squash topped with a bit of grated cheese. Or, really, for a light lunch, you could have it alone.
You can also add sliced shiitake or regular button mushrooms to this to give even more oomph to it. In the fall, I might also add some parboiled parsnip slices–I think that the sweetness of them would go great with the lightly bitter kale.
This dish is so simple, in fact, I am not even going to give you a recipe for it–I am just going to tell you how it goes.
First, pick out how ever many fingerling potatoes you need to feed however many people you are feeding. Scrub them up well and cut them in half or in quarters if they are bigger, and plop them into cold salted water, bring to a boil, then turn down to a simmer and cook until they are soft, but not mushy.
Drain them, pat them dry and set them aside.
While the potatoes cook, you start caramelizing your onions in a good quantity of olive oil. When the onions are a great shade of golden brown, add the potatoes to the pan, cut side down, and brown them as well. Sprinkle however much minced garlic you want over the potatoes and onions, and sprinkle in a little bit of some kind of chili flakes–like Aleppo or just plain old red pepper flakes–over everything.
When the potatoes are browned on the cut side, flip them over and add in however much kale you need for the amount of potatoes you have (this all depends on how many people you are feeding, mind you!) into the pan, along with about a quarter cup to a half cup of vegetable stock. Stir and fry like mad.
When the kale is wilted and the stock is mostly cooked off, add between a teaspoon and tablespoon of balsamic vinegar to the pan, and stir in well, then remove from heat. (The amount of vinegar depends, of course, on the amount of potatoes and kale you have. I bet you are surprised to hear this.)
Salt to taste, and boom–its done.
And it is really, really delicious. This winter, I will do the recipe up again with fresh shiitake mushrooms added to it.
The Flavor of Memory: Lamb And Rice Filled Grape Leaves

On Sunday, I had a powerful desire for rice and lamb stuffed grape leaves–dolmathes, (or dolmades) as they say in Greek, or dolma in Turkish. Actually, dolma is just a general name for stuffed leaves, fruits or vegetables, stuffed grape leaves are more properly called yaprak dolma. And I wanted them home-made, none of those canned ones which are very commonly found in Greek and Middle Eastern grocery stores and restaurants.
Mind you, quite a few brands of the canned dolmathes are not -bad-, but they still cannot hold a candle to the real, honest to God real homemade thing. I wanted excellent dolmathes, stuffed with rice and lamb, like the ones I used to eat either at my Aunt Nancy’s house or at the Greek restaurant in Charleston. (I ate at Best of Crete in Charleston a lot when I was pregnant with Morganna–and the wonderful woman who ran the restaurant with her tall, well-grown adult sons used to slip me extra treats because I was pregnant. And she would never, ever let me drink anything but milk. I could order tea and get milk anyway. At the cheaper tea price, mind you, but she was adamant that I drink the milk so my baby would have strong bones. Morganna has never broken a bone, mind you…though she has tried.)
To me, good dolmathes take me back to happy times in my earlier life. The smell of them simmering on the stovetop make me think of the smells coming out of Mrs. Zakaib’s open kitchen door that drifted across her backyard and down the alley where the neighborhood kids played. She was an interesting lady–most of the kids were scared of her rather stern demeanor, but she was truly nice. She just didn’t put up with nonsense. She also used to harvest leaves from our next-door neighbor’s Concorde grape vines in their backyard–with their permission of course. The vines had been there when they moved in, so they didn’t care if she picked them. I used to help her by climbing up the arbor to get the ones she couldn’t reach because she was so little.
She’d give me honey cookies for my trouble, and I was one of the kids in the neighborhood that she was always nice to, in large part because I was helpful and polite.
While I picked the leaves, she told me all about how to prepare them to use for dolma.
But, it wasn’t Mrs. Zakaib who taught me how to make dolmathes.
It was my Aunt Nancy.
She’s the one who taught me how to roll them up and how to cook them.
She never had fresh leaves to work with; she always used the tightly packed jars of grape leaves in brine that you could get at Greek and Middle Eastern grocery stores, even in Charleston, West Virginia back in the seventies and eighties. She’d buy a big jar of the leaves, and then carefully pull the tightly stacked, wrapped and rolled leaves out of their glass home, draining the brine as she did so. This took patience and not a little effort–those leaves are really, really tight in the jar and it is hard to get them out without tearing them. But she showed me how to use a rubber spatula or table knife to ease down the jar between the glass and the leaves to sort of break the seal from the vacuum packing, and get a little air in there to help slip the leaves out in a single bundle. She would turn the jar upside down after that, and drain the brine, and then with her finger and thumb, get a good hold on the leaf bunch and begin tugging it gently down while shaking the jar downward with the other hand.
Eventually, after a bit of work, the leaves would ease down into her hand with a whispered “pop,” and invariably the last bit of brine would drizzle down the arm holding the leaves. (That’s why you always wear short sleeves when you make grape leaf rolls,” she said to me once, with a grin. “Arms wash easier than shirts.”
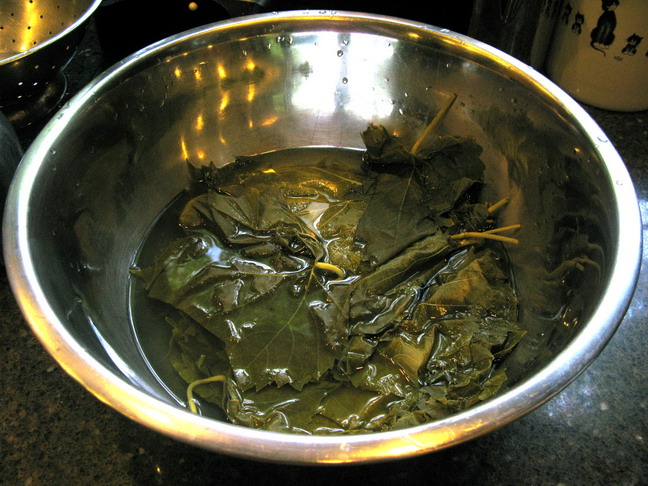
Once out of the jar, the leaves are laid into a deep, wide bowl and then covered with boiling water. This leaches out excess salt and it also helps to loosen the leaves which have been stuck together in the jar so tightly that they really don’t want to do anything but cleave to each other.
But no matter what the leaves think about it, they need to come apart, so they get a boiling water bath.
Once the water is cool enough for your hand to go in, the leaves have usually let go of each other and you can swish them around a bit to loosen them up further. Then, you drain them in a colander and put them back in the bowl, and cover them with cold water and swish around, then drain and then repeat the cold water, swishing and draining dance once again. This removes the excessive salty flavor that the brine imparts, allowing the natural lightly bitter green flavor of the leaves to present itself to the front of the palate.
While the leaves are soaking in the boiling water is when you want to make your stuffing.
Lots of recipes call for cooked meat and rice to be used in the stuffing, but Aunt Nancy said that she didn’t think that those kinds of grape leaf rolls had as much flavor as the ones like she made where the meat and rice are uncooked when they go into the leaves, and then are cooked. When you do it that way, the unique flavor of the leaves permeates the meat and rice, making them fragrant and amazingly delicious. You also end up with more moist rolls that way.
(Now, I did not know this at the time when I was learning to make these dolmathes from Aunt Nancy, but you don’t need to have any meat in the stuffing–you can use rice and lentils instead or rice and pine nuts with currants or golden raisins. In the case of vegetarian stuffings, you use cooked lentils and rice–otherwise the stuffing mixture would not hold together and stuff the leaves very well–it would all fall apart and leak out and make a royal mess in your cooking pot or pan.)
Aunt Nancy used good ground beef and long-grain rice in her stuffing; I prefer ground lamb and basmati rice. Aunt Nancy liked lamb better too, but it was hard to find in West Virginia back then. She seasoned her filling with finely grated onion, a little bit of minced garlic, some tomato paste and some chopped parsley.
I used more seasoning in my stuffing and added pine nuts, but no matter what you use for the stuffing, you roll the leaves up into little packets the same exact way.
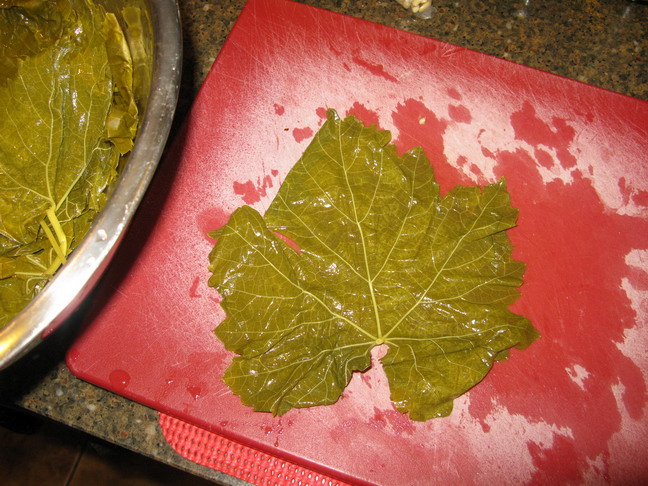
First, you cut the stems off of the leaves and discard them.
Then, you lay the leaf out on a clean work surface with the bottom edge facing your body, and the top jaggedy edges pointing away from you. Before you lay the leaf down, however, notice that the leaf has two sides, the shiny, darker green side and the kind of bumpy, dull-colored and paler green side. You lay the leaf shining side down so that the prettier side will be on the outside of the leaf when you are done. Also, because of the way the veins on the leaves are structured, the leaf will roll up more easily with the bumpy side to the inside and the smooth side to the outside.
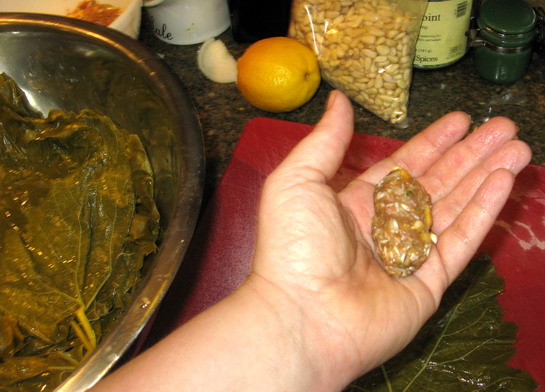
Then you take between a teaspoon and a heaping tablespoon of filling mixture (in the Middle Eastern countries, dolma are made thinner than they are ever made in the US. In the photographs I have seen of dolmas from Arab countries, they are no thicker than a woman’s finger, whereas the ones Aunt Nancy made and I later ate in Greek restaurants here in the US, are always thick and somewhat pudgy-seeming. About the thickness of a not small woman’s thumb.
So the amount of filling you pick up depends on how thin or fat your want your dolmathes to be. I like mine fat, so I grabbed up heaping tablespoonsful of the meat and rice mixture and shaping it in one hand, worked it into a roughly cylindrical shape. Or, if you want, a football shape.
This filling is placed down on the bottom of the leaf, about 1/2″ from the bottom edge.
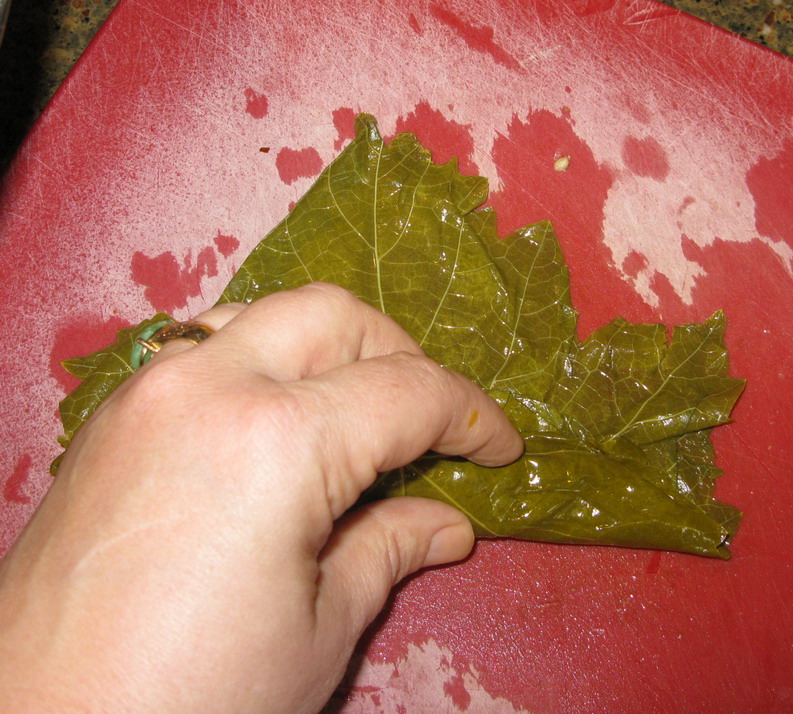
Then you carefully curl the bottom edge of the leaf over the filling and start to roll it up. Give it one and a half rolls, just to tuck the filling “into bed” as Aunt Nancy used to say, then you start folding the sides of the leaf into the center, like you were making a little verdant envelope.
When you fold in the edges, bring them tightly against the filling, and sort of crease the top edge of the leaves where they are folded tightly. You will end up with what looks like a little packet, with an open bit at the top that looks all pointed from being the central, pointy top edge of the leaf.
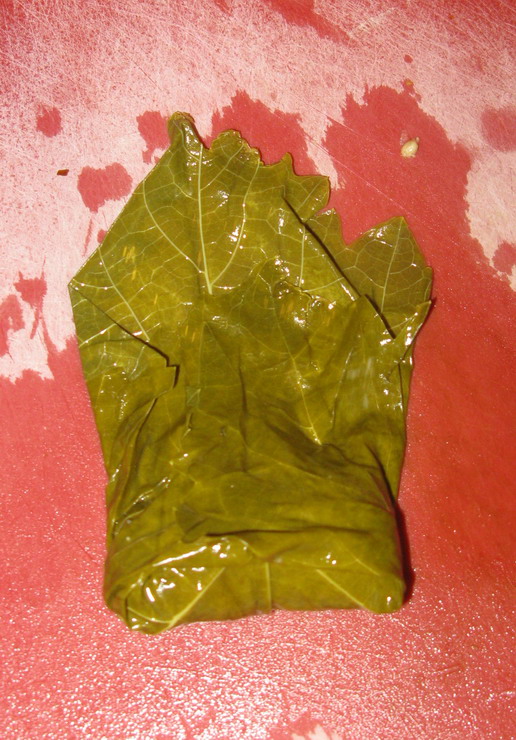
Then, keeping the leaf as tightly tucked as possible, you continue rolling upwards until you have a nicely filled and tucked and rolled up dolmathe. When you set the grape leaf roll down, you will be setting it seam side down so it doesn’t get all uppity in the pot and start unraveling itself as it is simmering. That would just not look good, nor would it taste very good, because you want to taste the leaf and the filling all at once. Otherwise, it is just like eating meatballs cooked with leaves, and if we wanted that, we’d have made meatballs with leaves in the first place and saved ourselves the trouble of all that rolling, tucking and rolling again.
Now let’s talk about the pot you are going to cook your dolmathes in.
First of all, you have to decide if you are going to cook these on the stove, or if you are going to cook them in the oven. Aunt Nancy did hers on the stove, but in culinary school, we did them in the oven, so I know for a fact both ways work equally well. It all depends on how you want to do it. If your oven sucks, then use the stovetop method. If you are afraid you will forget to watch the stove to keep the pot from running out of cooking liquid and burning the grape leaves, well, then by all means cook it in the oven. That is only being sensible!
It doesn’t matter if you simmer on the stove or bake the dolmathes, you prepare the pot or pan the same way.
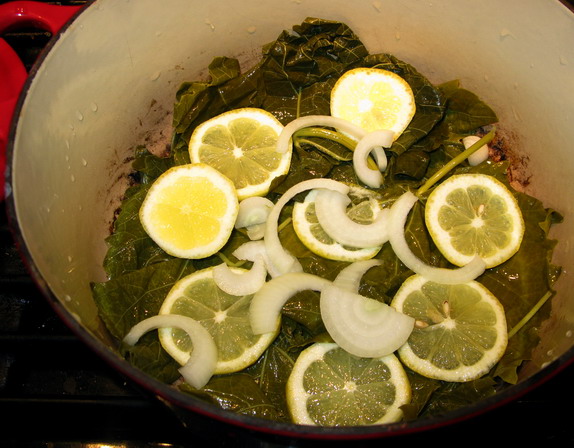
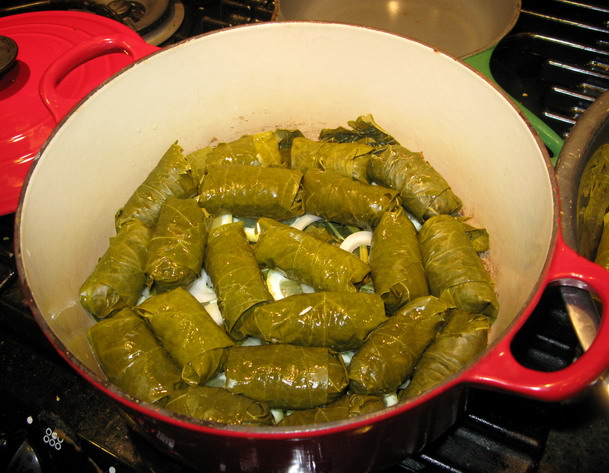
You put a layer of grape leaves–you can use the ones that inevitably get torn in the fight to get them out of the jar–on the bottom of your chosen cooking vessel. This prevents the rolls from burning and sticking to the bottom.
Then, I like to put slices of lemon and onion, and sometimes, slices of fresh garlic cloves in a layer over the leaves. These not only elevate the rolls further, but they also add extra flavor to the cooking liquid, which means it adds extra flavor to the dolmathes themselves, which take on the flavors and aromas of whatever they are cooked with.
It is over these layered leaves and aromatics that you layer your dolmathes, placing them carefully seam side down, in concentric rings around the pot, starting along the outside and working inward.
When a layer is completed, repeat the layering process–cover the dolmathes with a flat layer of grape leaves, then the aromatics of your choice and then the second layer of dolmathes. This can theoretically can go on forever, until you run out of grape leaves, dolmathes or room in your cooking vessel of choice. Stop with a layer of dolmathes, though, so you can add your cooking liquid.
Now, the cooking liquid.
Some people use just water, but I think that is a waste of an opportunity to add more flavor to the dolmathes which take on the flavors of whatever they are cooked in and with.
Others use a can of tomatoes, but I am not one of them. I use tomato paste in my meat filling, so I see no reason to add more tomatoes to the dish.
Aunt Nancy’s secret was to use chicken broth. I used Pacific brand in the aseptic packaging.
Whatever you use, pour it in until it just reaches the bottom of the last layer of dolmathes. Then, add about 1/2 cup freshly squeezed lemon juice.
Then you can cover the rolls with a layer of grape leaves, adding more aromatics if you feel like it.
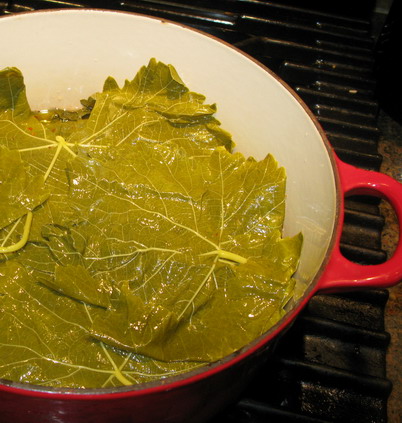
Once you have added the cooking liquid, lay a final layer of grape leaves over the dolmathes and sort of tuck them in around the edges of the pot to seal everything in nicely. Then, put the pot on high heat and bring to a boil. Turn the heat down to low, put a tight-fitting lid (here’s a trick if you have a kind of crappy loose lid on your pot–take a piece of aluminum foil a little bigger than your pot, set it on top of the open pot and put your lid down on top of it–instant tight fitting lid!) on the pot and simmer until the dolmathes are tender–about an hour to an hour and a half. The idea behind sealing the inside of the pot with grape leaves and then putting on the tight fitting lid is that you want to lose very little of the cooking liquid to steam evaporation. You want it all to be in the pot becoming tastier and tastier and bathing those dear little rolls in flavor and moisture.
Because the deal is–you want these dolmathes to be juicy. When you bite into them, they should squirt a tiny bit in your mouth the delectable, rich broth they were cooked in.
When they are done, take them off the heat. If you are not going to serve them right away, leave them sealed up in their pot on the stove until serving time. (This is where a cast iron pot like my Le Creuset Dutch Oven really comes in handy. It retains heat so well, it can keep the dolmathes at serving temperature for over an hour if you leave it tightly closed.)
Aunt Nancy served hers plain, with just a good squeeze of lemon juice and a sprinkle of fresh parsley over them, but she said when she was a kid, her family always had plain yogurt to dip them in.
I like to season yogurt with a bit of lemon zest, fresh parsley, a tiny bit of cumin, smoked paprika, Aleppo pepper and fresh minced garlic and use that as a dipping sauce.
Or, you could use the lemon tahini sauce from my falafel recipe as a dip–this is a fantastic combination of flavors.
At any rate, here is my recipe, based on the flavors I remember first enjoying in my Aunt Nancy’s kitchen, after learning how to wrap these dear little bundles of joy.
Oh, and one more thing–when you take that layer of grape leaves off the top, and between each layer of dolmathes–don’t throw them out! Eat them! They are amazingly good and it is the privilege of the cooks who have been in the kitchen toiling to make delicious dolmathes and who are now setting them on serving platters for their guests to eat the delectable morsels that these gently braised leaves represent. And while you are at it–sip the broth–it is very good for you, especially if you have a bit of a cold or sore throat.
Lamb and Rice Stuffed Grape Leaves
Ingredients:
1 jar grape leaves (use a small jar for this recipe–you will have more than enough grape leaves for it–this makes a small batch)
1 pound ground lamb
1 small onion, finely grated
3 cloves garlic, finely minced
1 tablespoon tomato paste
zest of 1 lemon, finely grated
2 tablespoons fresh parsley, finely minced
2 tablespoons fresh mint, finely minced
1 tablespoon fresh thyme leaves, stems removed
1 tablespoon fresh Greek oregano or basil, finely minced (optional)
1/4 teaspoon salt
pinch ground cinnamon
1 teaspoon Aleppo pepper
1/2 teaspoon Spanish smoked paprika
1/2 cup uncooked basmati rice
1/4 cup toasted pine nuts
2 lemons cut into thin slices
1 onion cut into thin slices
3 cloves garlic cut into thin slices
2-3 cups chicken broth or stock
1/2 cup fresh lemon juice
fresh minced herbs, Aleppo pepper flakes and lemon juice for garnish
Method:
Prepare grape leaves for cooking as outlined in the post above.
Mix together all filling ingredients from ground lamb to Spanish smoked paprika, kneading it well with your (clean!) hands until everything is smoothly mixed together.
Mix in the basmati rice and pine nuts with your hands, kneading until they are well distributed into the filling.
Line bottom of pot with grape leaves, onion, lemon and garlic slices as outlined and illustrated in post above.
Wrap the rolls and place in pot as explained in post above.
Layer grape leaves and aromatics as outlined above, and add broth as explained above.
Add lemon juice and then seal the dolmathes in with a final layer of grape leaves.
Bring to a boil, turn the heat down to as low as it will go and still maintain a simmer, then cover the pot tightly and cook for 1-1 1/2 hours, or until the dolmathes are tender and the rice is done.
This recipe makes between 3 and 4 dozen little dolmathes for appetizers and between 20-24 larger dolmathes to be used as an entree.
Garnish with a sprinkle of fresh herbs, Aleppo pepper and lemon juice and serve with seasoned or plain yogurt or lemon tahini dipping sauce.
Rethinking Rabbit
Saturday while I was browsing the farmer’s market, I was stopped by the manager, and among other things, was asked to talk to a local farmer who has just diversified into raising rabbits in addition to hogs and chickens about possibly working on his behalf to get local chefs to feature his rabbits in their fall menus.
I agreed, and when I stopped by to talk with Rich, he told me that when he first started bringing rabbit meat to the market, he expected that most of the folks who would buy it would be, in his own words, “Hillbillies like me who grew up throwing rocks at rabbits and bringing them home to Mamma to cook for supper.”
Much to his surprise, most of the folks buying his rabbits were more what he called, “Health conscious, upscale folks who go to restaurants and like to cook special foods.”
In other words, folks like myself.
I told him that I would do what I could to promote his rabbits among the local chefs I know, and that I would develop some new dishes showcasing the lean, moist delicious meat just as examples of what can be done with it.
Rich handed me a packaged, cut up rabbit and said, “I look forward to seeing what you can come up with.”
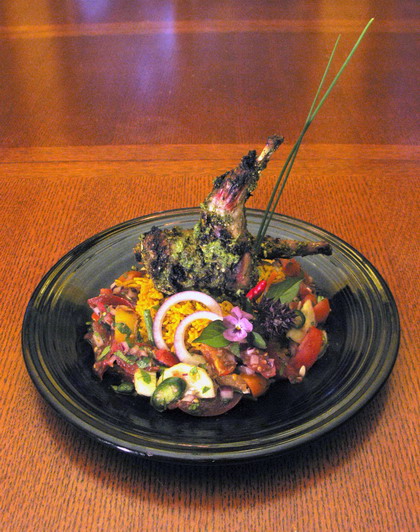
The photograph above represents my first experiment–Green Tandoor Grilled Rabbit with Summer Vegetable Rice Pillau and Cooling Tomato Cucumber Chutney.
It looks pretty good, doesn’t it?
And if the happy sounds made by my taste testers are to be believed, it tasted mighty fine, too. (Kat loved it, too, though I have to admit to telling her it was chicken.)
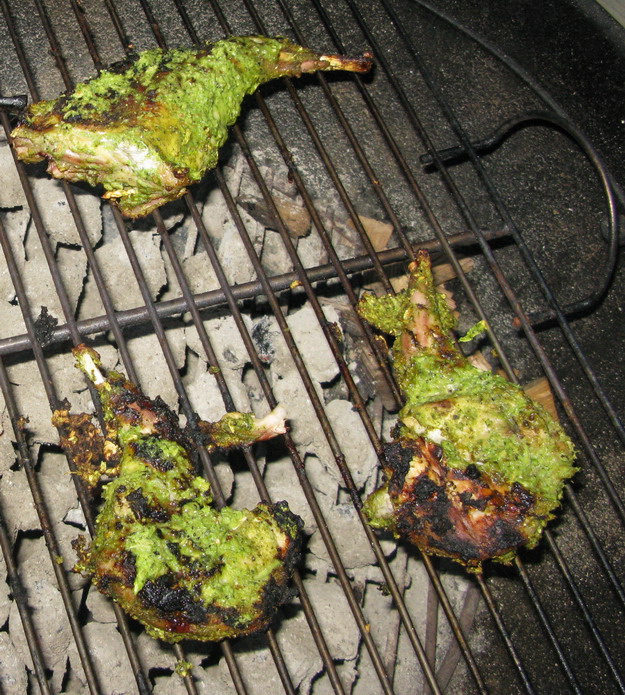
The marinade is a simple mixture of a huge amount of ground cardamom pods and seeds, fennel seeds, a bit of black pepper, coriander seeds, and fresh local serrano chilies, garlic and cilantro leaves and stems mixed with lime zest, lime juice and fresh yogurt. This brilliant green mixture got rubbed into the rabbit meat and left to marinate for about forty-five minutes; I didn’t want to leave it longer as yogurt can tenderize already naturally tender meat to the point of mushiness.
While the meat was left to rest in its bath of yogurty green goodness, I put together the rice pillau and chutney.

Into the rice cooker went basmati rice sauteed in ghee, grated fresh ginger, grated lemon zest, a half teaspoon of ground turmeric and a half teaspoon of garam masala, and of course, water. While the rice cooked on its own, I sauteed thinly sliced red onions, red sweet pepper strips, julienned carrots and bias-sliced bits of haricot vert–those slender, tender delicious summer green beans–in ghee with brown mustard seeds and whole cumin seeds.
These got cooked together until the onion and cumin were browned, the vegetables were browned in spots and the mustard seeds popped. When the rice was done, the vegetables were stirred in along with a pinch of salt and a sprinkling of freshly minced cilantro and Aleppo pepper flakes.
The chutney was made from a mixture of many-colored local fresh tomatoes, cut into thin wedges, as well as a small cucumber cut in half longitudinally and thinly sliced, seasoned with salt, thinly sliced chili pepper, minced cilantro, grated lime zest, a squeezing of lime juice, salt and toasted mustard and cumin seeds.
By the time the rice and chutney were done, the very hot fire Zak made in the grill was ready.
We popped the rabbit hind legs, forelegs and saddle (the breast/back section sans ribs) onto the grill and let them sear on one side before turning them. Zak basted the pieces often with the leftover marinade, and added some soaked hickory chips for an added smoky zing.
I estimate we cooked the bits between fifteen and twenty minutes, but I am not certain because in the middle of cooking, some friends showed up unexpectedly to pick up Kat’s old crib for use with their first baby who is due in spring.
Then, all that was left was to take the rabbit bits off of the fire, and plate up the resulting trio of Indian-inspired dishes.
The rabbit was delicious–moist and tender, the inner juicy flesh contrasting beautifully with the seared, crispy, well-spiced and highly flavored exterior. The rice pillau was also lovely, though it really shone when paired and eaten with the chutney–the tart, crisp and meltingly soft vegetables in the chutney contrasted perfectly with the musky-browned sweetness of the vegetables in the rice pillau
And the array of rainbow colors in the entire compositions was quite lovely.
I can’t wait to take Rich a photograph along with printed out recipes for him to post at his booth.
I’ll be taking other photographs around to area chefs with Rich’s contact information in the next week.
Look for other rabbit recipes in the near future, but for now, here is how to make the trio of pretty dishes you see above.
Green Tandoori Rabbit
Ingredients:
50 green cardamom pods
2 tablespoons coriander seed
1 teaspoon fennel seed
1/4 teaspoon black peppercorns
1-2 large cloves fresh garlic
2 cups tightly packed cilantro leaves
1 green serrano chili, stem removed
zest of two limes, finely grated
1 1/2 teaspoons salt
juice of 1 lime
8 tablespoons yogurt, well-stirred
1 rabbit cut into two hindquarters, two forelegs and one saddle/loin
Method
Grind the dry spices into a powder with a spice or coffee grinder. Add to a grinder, mixie, food processor or bender jar and add the garlic, cilantro leaves, chili and lime zest. Grind into a fine paste. Add the lime juice, salt and yogurt and blend until combined into a creamy pale jade green frothy liquid.
Rub rabbit pieces liberally with as much marinade as the skin will hold. Reserve the rest of the marinade to use for basting while the meat is on the grill. Marinate for about forty-five minutes, but no longer than an hour.
Start a very hot fire on your grill. When the coals are covered with fine gray ash, place the rabbit pieces on the grill and sear well on both sides. Then baste with the reserved marinade and close lid of grill and cook, turning once or twice more, until the rabbit is done. You can tell it is done by piercing with a fork–when the juices run clear it is done. Also the flesh will spring readily back when poked with a finger when it is done–just like chicken.
Summer Vegetable Rice Pillau
Ingredients:
1 tablespoon ghee, butter or canola oil
2 cups basmati rice
1/2 teaspoon ground turmeric
1/2 teaspoon garam masala
1 teaspoon salt
2 tablespoons grated fresh ginger
1 tablespoon finely grated lemon zest
3 cups water
2 tablespoons ghee
1 small red onion, finely sliced
1/4 cup thinly sliced red sweet pepper
1/2 cup julienned carrot
1/2 cup haricot vert, trimmed and sliced into 3/4″ pieces on the bias
1 1/2 tablespoons cumin seeds
2 teaspoons brown or black mustard seeds
salt to taste
minced fresh cilantro for garnish
Method:
Heat ghee or oil in a heavy bottomed skillet. Add rice and cook, stirring until the rice is lightly browned. Dump rice into rice cooker with the turmeric, garam masala, salt, ginger, lemon zest and water and stir well. Close the cooker and turn on, and allow rice to cook all the way.
Wipe out the same skillet to remove any errant rice grains. Add the second measure of ghee and heat, then add the onion slices, and cook, stirring until the onion is transparent and soft. Add the pepper and carrots, and cook, stirring until the onion is browned and the pepper and carrot are soft and browned on the edges. Add the haricot vert, the cumin seeds and the mustard seeds, and cook until the beans deepen in color and soften slightly, the cumin seeds turn nutty brown and the mustard seeds pop.
Turn off heat under vegetables and when the rice is done, stir the vegetables and spices in, along with salt to taste and garnish with minced cilantro.
Fresh Tomato and Cucumber Chutney
Ingredients
2 cups fresh tomatoes of various colors, cored and cut into thin wedges
1 cup cucumber peeled and cut longitudinally, then thinly sliced
1/4 cup finely diced red onion
1 fresh serrano chili, thinly sliced on the diagonal
1 tablespoon finely grated fresh ginger
juice of 1 lime
finely grated zest of 1 lime
1 1/2 teaspoons cumin seeds, toasted in a dry pan over medium heat until they are brown and fragrant
1 teaspoon black mustard seeds toasted in a dry pan over medium heat until they pop like popcorn
salt to taste
2 tablespoons minced fresh cilantro
Method:
Toss all ingredients up to the salt together gently to avoid mashing or deforming the tomato wedges. Salt to taste and then toss again with the cilantro.
Chill before serving.
Did Michael Pollan Stick His Foot In His Mouth?
I have been on a partial media blackout, in an effort to not stay glued to the Internet reading news articles that generally do nothing but upset or disgust me, so I missed Michael Pollan’s most recent New York Times Magazine article titled “Out of the Kitchen and Onto the Couch.”
It was pointed out to me by a regular reader who was so incensed by a statement that Pollan made in the course of his eight page article that she wrote a letter addressed both to the editor of the NY Times and to Pollan himself refuting his claim that “Women with jobs have more money to pay corporations to do their cooking, yet all American women now allow corporations to cook for them when they can.” She pointed out that making sweeping general statements about a group of people of which one is not a part is not only patently insulting, such reasoning is easily falsifiable.
Which she handily does, pointing out that she is a 40-something year old professional woman who works full time and sometimes more than that, but who still manages to take the time to cook completely from scratch, everything including Thai curry pastes and bread, all from whole foods purchased at local farmer’s markets.
So much for that “all American women” statement.
This statement comes after Pollan notes that most Americans no longer cook at home, and while he is careful to note that it wasn’t -just- the fact that most American women work outside the home that caused this decline in home cooking, the fact that Pollan makes this patently sexist statement negates any of his mentions of egalitarian domestic chore sharing before it.
My vigilant reader and I are not the only ones to pick up on the subtle sexist undercurrent of Pollan’s lament of the decline of American cookery; Kate Harding of Salon also noticed it and commented upon it in a blog post yesterday entitled “Michael Pollan Wants You Back in the Kitchen.”
In the course of her commentary, Harding rightly notes Pollan’s misreading of Betty Friedan’s classic work, The Feminine Mystique as “the book that taught millions of American women to regard housework, cooking included, as drudgery, indeed as a form of oppression.”
Friedan’s book, which coincidentally, jumped into the American cultural consciousness at the same time as Julia Child did, did not -teach- American women to regard cooking and other housework as drudgery–it simply recorded and validated feelings that already existed among white, middle-class primarily suburban women regarding housework. Women were already dissatisfied with being housewives without the benefit of Friedan–it is just that she happened to ask them about it and then recorded what she found.
Pointing out pertinent facts such as the intellectual and spiritual malaise of intelligent, educated women who were essentially forced into the role of housewife back in the 1950’s and early 1960’s does not equate with making up these facts.
I find this subtle thread of woman-shaming on Pollan’s part to be disturbing and unfortunate, but what really irked me as I slogged through this eight-page article, was the fact that Pollan’s main source for information regarding how much time Americans, women and men (though, again, he harps on the women more than the men) in the kitchen cooking versus how much time they are spending on the couch watching people cook on cable television shows is that he quotes exactly one source of information on his the statistics that support his thesis.
Who is this source?
One Harry Balzer, a food marketing researcher for the National Eating Trends division of NPD Group. For the past thirty one years, Balzer has studied American eating and cooking habits–two years longer than the National Eating Trends division of NPD has existed.
I don’t really have a problem with Pollan asking Balzer about the cooking and eating habits of Americans–Balzer is indeed an expert. But, I find it rather odd that he would ask someone whose information is skewed in favor of large food corporations. I mean, really, Balzer -is- going to tell Pollan that Americans don’t cook anymore, because that is what he is paid by NPD to say to their food corporation clients. Does this make him a trustworthy, unbiased source of information?
No, not really. Not in my view anyway.
Balzer says that in the future, no one cook except the people in the supermarkets who will do all the cooking for us. No Americans will ever cook again in the next generation because no one is teaching the next generation how to cook anymore.
Pollan agrees, noting that if you look at the programs on The Food Network, very few of them really teach cooking technique like Julia Child did back in the day.
And, he is right. In the daytime, you have shows by Sandra Lee, Rachael Ray and Paula Deen, all three queens of the can-opener and convenience food aisles. And in the evening, the competitive cooking shows like Iron Chef, which make cooking a competition, and shows which feature macho male chefs creating amazing food that no one in their right minds would try to make at home. No effort is made to show basic cooking techniques–the days of Julia Child, Madeline Kamman, Martin Yan and heck, even The Two Fat Ladies are gone. Cooking is now entertainment, not something that one would want to learn. At least, not on TV.
But is television the only mass-media out there that consumers turn to? What about, oh, say, the Internet? You know, that thing you are reading this post on?
And what about food bloggers–you know, like yours truly, and many other amateurs out there in the world, who are cooking, photographing their efforts and writing about them? Some of us food bloggers specifically go out of our ways to teach cooking techniques, and so yeah, there -are- people out there teaching the next generation to cook, thank you very much.
What about the professional food bloggers like Mark Bittman? His blog, “Bitten” is all about teaching simple plain cookery that is accessible to everyone.
And then there is Michael Ruhlman who is, in addition to being a professional author, is also a passionate food blogger. In his response to Pollan’s gloomy article, he notes that there are plenty of bloggers teaching cookery to untold numbers of readers. He states:
Balzer is wrong, of course. Many, many people are cooking. Most of the people reading this, for instance, are committed cooks. As are the gazillions of readers clicking on Simply Recipes and 101Cookbooks looking for honest home cooking.
And both Bittman and Ruhlman have written books teaching the average American how to cook simple dinners using whole foods using techniques that anyone can learn. Ruhlman’s The Elements of Cooking: Translating the Chef’s Craft for Every Kitchen and Ratio: The Simple Codes Behind the Craft of Everyday Cooking and Bittman’s How to Cook Everything and How to Cook Everything Vegetarian: Simple Meatless Recipes for Great Food are all excellent introductions to the art of cookery which anyone who has basic reading comprehension skills and some basic kitchen tools can use to learn to make healthful, delicious meals for themselves and their families.
So, yeah, I stand with Ruhlman and agree that there are plenty of cooks out here teaching other folks how to cook. I know for a fact that my blog has taught a great many readers how to cook, because I get email every week from people telling me so. And I know that there are plenty of other bloggers get the same sort of emails because I hear from them, too.
I mean, let’s think about this a little bit.
If there is no one in America cooking anymore, if there are fewer Americans cooking than ever, if we really have gone that far into the culinary gutter, then why have the number of farmer’s markets in the United States ballooned over the past twenty years? Where is all that food going? I mean, someone is buying it all–otherwise the farmers wouldn’t be making livings from it, right?
Why is Whole Foods such a big corporation? People don’t just buy their prepared foods–they buy the organic produce, the free range eggs and grassfed dairy, the seafood and free-range meat, too. If people weren’t buying these products, they would not be on the shelves.
If no one is cooking anymore, why was “Locavore” the 2007 Oxford word of the year? I mean, if no one was cooking and eating local food, it would not have been useful enough to catch the dictionary publisher’s attention.
And Michael Pollan knows about all of these facts.
So, why is he getting his information from a source who is going to spew the facts that the food corporations pay him to spew?
The only thing I can figure is that Pollan wanted to scare and shame people back into the kitchen. by presenting it as a hopeless situation. It is a sensationalist way to get readers’ attention–gloom and doom sell newspapers after all, but really, I don’t think he is going to get anyone to rush off to the kitchen and bustle among the pots and pans to rustle up dinner that way. No one likes to be shamed, blamed or guilted into doing anything.
I think that Ruhlman’s way, and Bittman’s way, and my letter-writing reader’s way, and heck my way, is going to produce more positive results. By leading by example, by writing about cooking in a positive way, by talking about farmers markets and local food and showing how easy making real food can be, I think that food bloggers and cookbook authors are getting more people into the kitchen than Harry Balzer wants to think about or even imagine.
So, do I think Michael Pollan stuck his foot in his mouth?
Maybe he did a little, though I think that he had the best of intentions in doing so, and I don’t think the condition of foot-in-mouthitis is a fatal case.
I think he believes he will inspire people to return to the kitchen by telling them all the bad things that will happen to America and Americans if we forget how to cook.
Either that, or he wanted to sell more papers for the New York Times by writing gloom and doom predictions.
Whatever Pollan’s reasons for writing his article, I know that I and plenty of other cooks will merrily keep on growing, buying, cooking and eating delicious whole foods, despite what market researchers would like Micheal Pollan and everyone else to believe.
Meatless Monday: Kale and Fresh Tomato Dal
Dal is one of the most perfect vegetarian meals imaginable. Paired with Basmati rice and perhaps yogurt or raita, it is a complete meal, elegant in its simplicity, filled with protein, vitamins, minerals and amazing flavor.
For those who are not acquainted with the beauty which is dal–the word refers in Indian cuisines to any split lentil or bean. It can be split and skinned or just split–in the case of this dish, I used split, skinned brown lentils, which are referred to as masoor dal. Once the dull brown skins are removed from these lentils, they reveal a lovely brilliant orange interior which cooks quickly up to a soft yellow puree.
Dal is most often cooked simply in water, with a few bare seasonings at first–I always use a pinch of hing or asafoetida–a powdered resin from a plant which has the aroma of garlic and onion mixed together and has the effect of lowering the amount of gas that the lentils will produce in the digestive system. I also grate fresh ginger root into the lentils at the very beginning of the cooking process, not just to flavor them, but also because ginger aids in the digestibility of all legumes.
After the lentils are cooked, the main seasoning of dal is cooked in a separate pan.
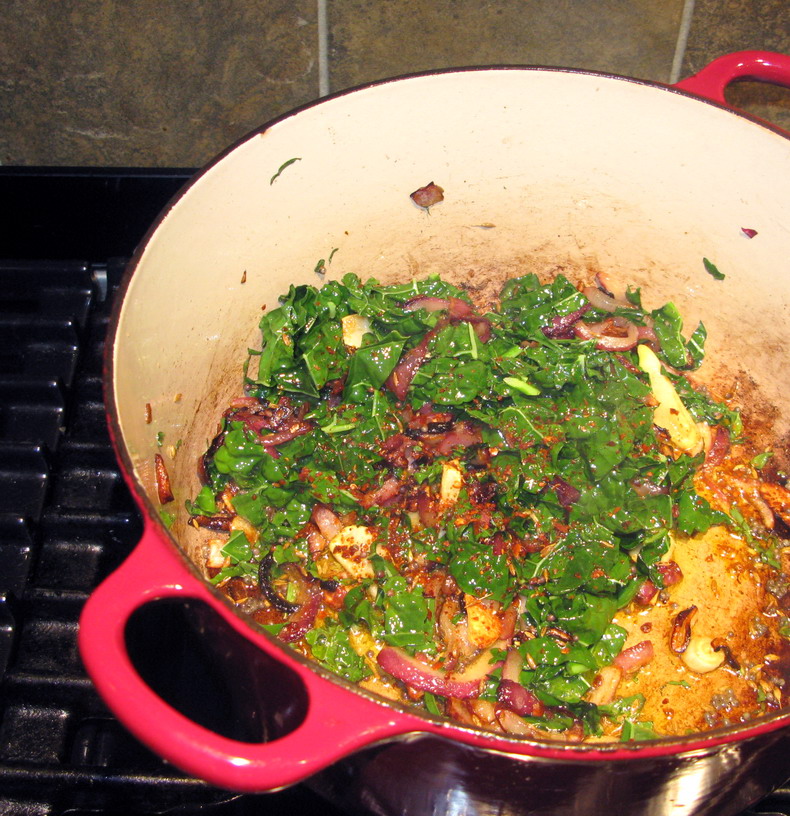
This is technique is called “tarka.”Tarka consists of heated ghee or oil, and a fairly large quantity of thinly sliced onions. These are cooked until they are a dark golden brown, and then garlic is added, perhaps some sliced fresh chili peppers, and spices, usually whole. These are cooked until the onions are a deep reddish brown, the garlic is golden and the spices are brown and toasty and the entire room is filled with the divine aroma of browned onions and cumin. Then the whole thing is poured into the lentils and stirred quickly in. A lid is clapped on the dal, trapping the aromas inside.
Now, in the summertime, I like to add seasonal vegetables to my dal. There are a couple of ways to do this–you can cook them with the lentils, which is perfect for crunchy, long-cooking root vegetables like carrots and potatoes. For vegetables that you want to be kind of crunchy, like fresh green beans, you simply put them in when the lentils are half-cooked. Or, you can put them in at the end of cooking, right before stirring in the tarka; this method is great for soft vegetables like tomatoes which you don’t want to melt right into the dal, so you cook them minimally in this way.
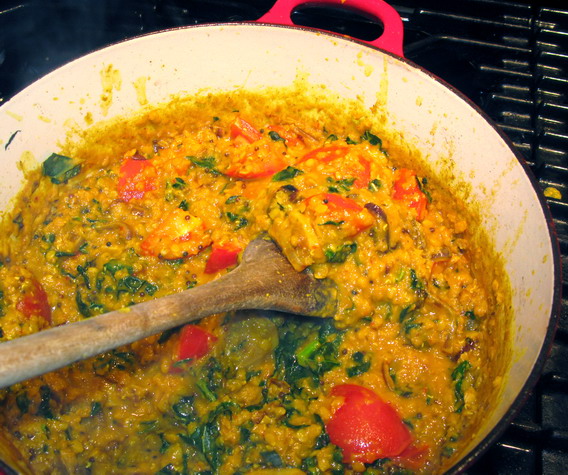
Finally, if you want to get the great browned flavor of the tarka in the vegetables, you can cook them in the tarka. This works perfectly with mushrooms–put them in with the garlic and spices–and works great with hardy greens like kale or collards. With the greens, you cut them into thin ribbons and stir them into the tarka for the last couple of minutes it is cooked–just long enough to cook out some of the water from the leaves, and to lightly brown the edges of them.
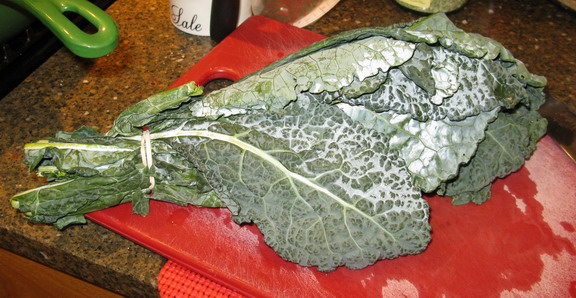
This is my favorite kale–it is an Italian variety called “Lacinato,” but most people call it “Dinosaur Kale,” probably because of its interesting bumpy, lumpy surface texture. Its leaves, in addition to being bumpy, are rounded with a narrow but rounded lance-head shape, and their central veins are not tough or stringy. It is also the sweetest, most flavorful of the varieties of kale, and it is good starting at midsummer to well past the first frost. Whenever I see it, I buy it and cook it in many different ways–in quiches, soups, stews and stir-fries, but this is the first time I used it in a dal.
It will not be the last! When I stirred it into the tarka, and let it cook in the fragrant ghee, it picked up the nutty flavors of the caramelized onions and toasted cumin and mustard seeds, while adding its own note of sweet green flavor.
I served this simply with basmati rice and no chutney or raita, but now is the perfect time to make any number of vegetable-based Indian condiments to go with your dal.
One more thing–you will notice that I didn’t use very much masoor dal in this dish–I wanted the vegetables and the lentils to hold equal weight in this dal–I wanted very much to have the vegetables be bound together with the lentils, not the lentils overwhelming the vegetables. What ended up happening was the lentils were almost like a sauce, bringing everything together into a delicious, smooth and fragrant whole.
If you want, you can use more lentils for a dish that is heavier in lentils than vegetables. That is completely up to you.
Kale and Fresh Tomato Dal
Ingredients:
1 1/2 cups masoor dal, picked over, rinsed and drained
1/4 teaspoon asafoetida or hing
1 teaspoon grated fresh ginger
1 1/2 teaspoons ground turmeric
water to cover lentils by 1 1/2 inches
3 tablespoons ghee, canola oil or butter
2 cups thinly sliced red or yellow onions (red onions look prettier in this dish)
1 teaspoon salt
2 large cloves garlic, peeled and thinly sliced
1 tablespoon Aleppo pepper flakes or thin fresh chili slices to taste
1 tablespoon brown mustard seeds
1 1/2 tablespoons cumin seeds
2 cups thinly sliced lacinato kale leaves
5 small fresh vine ripened tomatoes, cored and cut into six wedges each (about 1 pound)
salt to taste
Method:
Put lentils, asafoetida, ginger, and turmeric in a pot. Add water to cover the lentils by about 1 1/2 inches. Bring to a boil, stir and turn down heat to a simmer, and cook, stirring as needed, until the lentils are tender. Add water as needed to cook them into a medium thick puree.
When lentils are cooked, cover the pot and remove from heat.
When lentils are about halfway cooked–after about ten to fifteen minutes simmering time–heat ghee or canola oil in a heavy frying pan. Add the onions, sprinkle evenly with the salt and cook, stirring, until the onions are a deep golden brown. Add the garlic, the chili flakes or slices and the mustard and cumin seeds, and cook, stirring, until the onions are deep reddish brown, the garlic is golden with browned edges, the cumin is toasted and the mustard seeds have popped. Add the kale leaves, and continue cooking for another couple of minutes, or until the leaves have deepened in color and wilted, with slight browning on the edges.
Open the lentil pot and scrape in the tarka, then toss in the tomatoes and stir everything in together. Taste for salt, and correct seasoning as needed, then clap the lid on the dal to trap in all of the delicious spicy aromas, and keep warm until serving it with rice, chutney and raita.

Categories:
- Admin (rss) (55)
- Blogs and Blogging (rss) (81)
- Book Reviews: Cookbooks (rss) (43)
- Book Reviews: Non-Cookbook Food Books (rss) (38)
- Cats and Cat Blogging (rss) (47)
- Chinese Cooking Lessons (rss) (32)
- Culinary School Stories (rss) (18)
- Dairy Pruducts: Cultured and Barbaric (rss) (4)
- Documentary Filmmaking (rss) (1)
- Essays, Rants and Reflections (rss) (260)
- Fighting Hunger (rss) (12)
- Food and Kids (rss) (45)
- Food in the News (rss) (126)
- Food Media (rss) (98)
- Food Preservation (rss) (18)
- Food Safety (rss) (45)
- Gardening (rss) (30)
- Herbs and Herb Blogging (rss) (20)
- Holidays (rss) (50)
- Kat Blogging (rss) (22)
- Kitchen Science (rss) (36)
- Leftover Makeover (rss) (8)
- Life, the Universe and Everything (rss) (131)
- Local and Sustainable (rss) (227)
- Local Athens Food and Foodies (rss) (42)
- Meatless Mondays (rss) (32)
- Menu For Hope (rss) (5)
- Nutrition, Diet and Health (rss) (84)
- On The Farm (rss) (8)
- Recipes: Almost Vegetarian, Vegetarian and Vegan (rss) (294)
- Recipes: American Regional (rss) (37)
- Recipes: Appalachian Hillbilly (rss) (33)
- Recipes: Bread, Pasta, Grains (rss) (95)
- Recipes: Canning and Preserving (rss) (8)
- Recipes: Chinese (rss) (123)
- Recipes: Comfort Food (rss) (120)
- Recipes: Cookies (rss) (16)
- Recipes: Desserts (rss) (48)
- Recipes: French (rss) (25)
- Recipes: Fruits and Vegetables (rss) (302)
- Recipes: Greek, North African and Middle Eastern (rss) (31)
- Recipes: Indian (rss) (137)
- Recipes: Italian (rss) (42)
- Recipes: Japanese (rss) (7)
- Recipes: Jewish (rss) (4)
- Recipes: Korean (rss) (6)
- Recipes: Meat, Poultry and Fish (rss) (220)
- Recipes: Mexican/Native American/ Latin American/Caribb (rss) (27)
- Recipes: Original (rss) (108)
- Recipes: Thai (rss) (27)
- Recipes: Tofu (rss) (17)
- Recipes: US Regional (rss) (16)
- Recipes: Vietnamese (rss) (8)
- Restaurant Stories (rss) (28)
- Sewing, Quilting, Arts and Crafts (rss) (16)
- Simple Chinese Recipes (rss) (30)
- Slow Food and Heritage Foods (rss) (10)
- Spice Blogging (rss) (44)
- The Chinese Cookbook Project (rss) (14)
- The Chinese Pantry (rss) (39)
- The Documentary (rss) (2)
- The Kitchen Saga (rss) (17)
- The Locavore's Bookshelf (rss) (15)
- The Unsung Adventures of The Culinary Nerd (rss) (6)
- Tools and Toys (rss) (35)
- Uncategorized (rss) (10)
- With a Side of Politics (rss) (48)
Archives:
- August 2012 (9)
- July 2012 (12)
- September 2011 (3)
- August 2011 (7)
- July 2011 (8)
- June 2011 (16)
- May 2011 (17)
- April 2011 (11)
- December 2010 (9)
- November 2010 (5)
- February 2010 (1)
- December 2009 (5)
- November 2009 (7)
- October 2009 (10)
- September 2009 (16)
- August 2009 (14)
- July 2009 (14)
- June 2009 (7)
- May 2009 (17)
- April 2009 (10)
- March 2009 (25)
- February 2009 (13)
- January 2009 (10)
- December 2008 (5)
- November 2008 (5)
- October 2008 (6)
- September 2008 (13)
- August 2008 (8)
- July 2008 (11)
- June 2008 (18)
- May 2008 (13)
- April 2008 (14)
- March 2008 (16)
- February 2008 (17)
- January 2008 (19)
- December 2007 (25)
- November 2007 (18)
- October 2007 (24)
- September 2007 (16)
- August 2007 (15)
- July 2007 (15)
- June 2007 (10)
- May 2007 (14)
- April 2007 (16)
- March 2007 (17)
- February 2007 (20)
- January 2007 (13)
- November 2006 (1)
- October 2006 (8)
- September 2006 (14)
- August 2006 (25)
- July 2006 (30)
- June 2006 (28)
- May 2006 (34)
- April 2006 (29)
- March 2006 (24)
- February 2006 (30)
- January 2006 (38)
- December 2005 (40)
- November 2005 (37)
- October 2005 (32)
- September 2005 (25)
- August 2005 (30)
- July 2005 (28)
- June 2005 (21)
- May 2005 (8)
- April 2005 (22)
- March 2005 (17)
- February 2005 (29)
- January 2005 (10)
Search Site:
Links:
- Lily’s Wai Sek Hong
- 101 Cookbooks
- A cat in the kitchen
- A Veggie Venture
- Accidental Hedonist
- Cha Xiu Bao
- chez pim
- Chocolate & Zucchini
- Chopstick Cinema
- Chowhound.com
- Chubby Hubby
- Cook sister!
- Cooking with Amy
- da*xiang
- Eat Local Challenge
- Eating Liberally
- Ecocentric
- Eggbeater
- Epicurious
- Farmgirl Fare
- Fatfree Vegan
- Foodgoat
- ForkandBottle.com
- Green Olive Tree
- Hooked on Heat
- Jaden’s Steamy Kitchen
- Kalyn’s Kitchen
- Lucullian delights
- Mahanandi
- Matt Bites
- MeatHenge
- mmm-yoso!!!
- New York Times – Dining & Wine
- Pizza Goon
- Rasa Malaysia
- Ruhlman
- Sailu's Kitchen
- Serious Eats
- SF Gate: Food & Dining
- Simply Recipes
- Soul Fusion Kitchen
- Tastespotting
- The Amateur Gourmet
- The Cleaner Plate Club
- The Food Section
- The Grub Report
- thecookscottage
- U.S. Food Policy
- Wandering Chopsticks
- Washington Post Food and Dining
- Wasted Food
Meta:

Powered by WordPress. Graphics by Zak Kramer.
Design update by Daniel Trout.
Entries and comments feeds.