Cook Local, Eat Global
A Royal Curry: Shrimp Empress
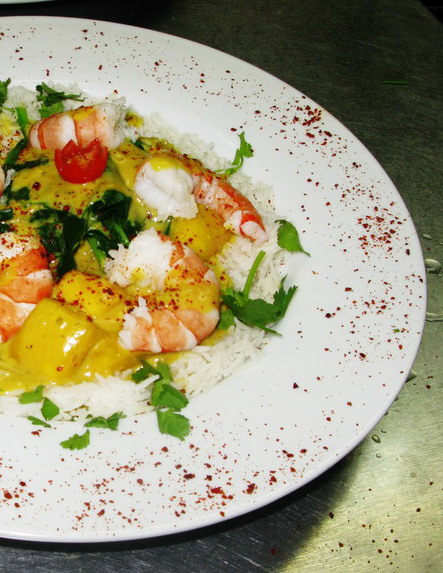
Shrimp Empress is a delicately flavored coconut milk curry of my own invention which I devised as a light yet rich dinner special while I worked as a chef. It is effervescent in flavor, seasoned with mostly sweet spices, but it is rich with the unctuous texture of coconut milk paired with sweet, slippery mango chunks. Barely cooked shrimp with its tender pink flesh is paired with velvety blanched baby spinach, and the tender-crisp snap and translucent pale violet color of red onion slices.
It is a very, very pretty dish, with a balance of fresh, springtime tints: delicate turmeric yellow, verdant cilantro, roseate chilies, gleaming white basmati rice, deep emerald spinach, and sunrise orange mango. The fragrance of it matches the colors perfectly: cardamom, cinnamon, cloves, fennel and black pepper dance together in a joyful chorale of scent, while cilantro, ginger, and lemon juice add a fresh, floral note to the melange of aromas.
In order to preserve the fresh colors and flavors of the baby spinach and shrimp, I cooked them separately from the curry sauce. This means you could make the sauce a day or so before you want to serve it, and keep it in the refrigerator where the aromas and flavors of the spices will meld together, only becoming better for having had time to get to know each other better. If I were going to do that, I would cook the curry sauce without the mango and red onion, and only add those as the curry sauce is heated up for service.
In this way, you could make a splendid and complicated looking dish for a dinner party, and not have to work yourself to death on the entree on the day of the party.
Let me admonish you to get the nicest, freshest-tasting shrimp you can manage in order to make this dish. I would highly suggest you go to a seafood specialist whom you trust and only buy truly fresh shrimp, or ones which are still frozen. Wild-caught shrimp taste better than farmed, so get those if you can afford them. I did this dish with very large shrimp, arranged on top of the curry in a radial spinning wheel formation, but you could also use smaller ones just as effectively. You can use frozen mango for this curry, although I prefer slightly under ripe fresh mango for its superior texture and balanced, lightly-tart, mostly sweet flavor.
Whatever you do, please don’t use canned mango for this curry! It would ruin the effect. If canned mango is all you can find, just leave the mango out.
The world will not end if you have no mango in your curry.
But, it might end if you use canned mango in your curry. (I don’t know whether it will end or not, I am just saying it might. I have never wished to test this hypothesis by putting canned mango in my curry, but if you feel as if you can gamble with the continued existence of all humanity, then by all means dump that canned mango in…you are a braver soul than I.)
Oh, and one more thing–I don’t dare ever make this curry again for myself–it turns out that my allergist is nearly certain that I am allergic to shrimp, and probably clams and most likely other seafood as well.
So, I wanted to share this recipe with the rest of the world, even if I never get to eat it again!
Shrimp Empress
Ingredients:
3 tablespoons canola oil
3 cups yellow onions, peeled and thinly sliced
1 teaspoon salt
3 tablespoons fresh ginger, peeled and minced
1 tablespoon fresh garlic, peeled and minced
2 tablespoons coriander seed, freshly ground
2 1/2 teaspoons cardamom seed, freshly ground
1/2 teaspoon fennel seed, freshly ground
1/2 teaspoon black peppercorns, freshly ground
1/8 teaspoon ground cinnamon
3 whole cloves, freshly ground
2 tablespoons Aleppo or other mild chili flakes
2 teaspoons ground turmeric
1 28 ounce can Mae Ploy coconut milk
1 14 ounce can Chao Koh coconut milk
3-5 whole fresh red Thai chilies (optional)
3 medium ripe mangos, diced into 1/2″ cubes
1 medium-sized red onion, peeled and cut into 1″ squares–cut into 1″ chunks and then separate the onion layers to make squares
juice of one lemon
salt to taste
4 cups fresh baby spinach
2 pounds large fresh shrimp, peeled, with tail shell left on
roughly chopped cilantro for garnish
Method:
Heat canola oil in a heavy-bottomed pot and add sliced onions and sprinkle with the teaspoon salt. Cook, stirring, until the onions are golden brown. Add the ginger and garlic and spices, and continue cooking until the onions are deep golden brown. Add coconut milk, and if you want to use them, the whole, stemmed Thai chilies. Bring to a simmer, and add the mangoes and red onions. Simmer for about ten minutes. Taste curry sauce for salt, add what is necessary, and stir in lemon juice.
Boil water in a large pot while the curry sauce cooks. Drop shrimp in and cook until they are just done–allow them to turn from translucent blueish grey-white to solid white and pink, with red-shelled tails.
Just before serving, drop the spinach into the curry sauce. You can either add the shrimp to the curry sauce or make a mound of rice in the center of a shallow pasta bowl, then ladle curry sauce around it and arrange the shrimp over the rice and sauce.
Garnish with cilantro leaves.
For Cilantro Lovers Only: Gosht Dahnia

This is a lamb curry that should only be made and eaten by lovers of cilantro, because the main flavoring is–I bet you can’t guess this–cilantro.
Oh, to be sure, there is plenty of well-browned onions, garlic and ginger in there, as well as green chilies and dried spices like coriander, cumin, cardamom and a bit of fennel seed, but the first jolt of aroma and flavor in the curry comes from the copious amount of fresh, minced cilantro that is stirred in at the end of the cooking process.
The addition of the cilantro also gives the curry its green coloring–at first glance, it is so green, one might think that it was saag gosht which was gracing their plate, but the overwhelming scent of cilantro should give it all away.
This curry could be made with chicken or paneer, if you wanted–I personally think that the paneer would be delicious cooked this way.
The recipe includes Greek-style whole milk yogurt, (the brand I use is Fage) but you could just as easily use two percent or fat free Greek yogurt instead. If you want, you can add a bit of cream to the dish, but I think that the yogurt makes it creamy enough on its own. If you cannot get Greek style yogurt in your supermarket, you can just strain whatever plain yogurt you use through several layers of cheesecloth overnight to get the same rich texture and flavor.
The yogurt also adds a tantalizing tang to the curry, but I still like to serve it with lime wedges because a fresh burst of lime juice kicks the curry up several notches from really tasty into the stratosphere of heavenly culinary creations.
I got the idea for this curry from several sources–about four different cookbooks, to be precise. What I ended up doing was looking at recipes and writing down flavors, textures and colors that jumped out at me and when I was done, I looked down at what I had jotted in my notebook, and created the curry out of those elements. The first thing I had written down was cilantro, the next was yogurt, then creamy, then green chilies, ginger and fennel seed. I had more lamb than chicken or paneer, so that is what I used for the curry, and the rest is history, as you can see here.
If you decide to use paneer, cut it up into 3/4″ cubes, and pan fry it before adding it to the curry sauce. To do this, heat a heavy-bottomed skillet over medium high heat with canola oil, and add the paneer cubes in a single layer. cook without stirring until the bottom of the cheese is browned, then using a spatula, turn the cheese, and continue cooking until it is browned on all sides. Drain on several layers of paper towels, and sprinkle with salt before adding to the curry sauce (which you make as directed, by siimply leaving out the meat) to cook for about fifteen minutes, which gives plenty of time for the flavors from the sauce to envelope the mild, milky paneer. Then, stir in the cilantro, cook for about a minute more and serve it forth!
I like this with plain steamed basmati rice, but it would be good with turmeric-scented basmati as well.
Gosht Dahnia
Ingredients:
3 tablespoons canola oil
4 cups thinly sliced onions
1 teaspoon salt
3 tablespoons fresh minced garlic
4 tablespoons fresh minced ginger
3-7 thinly sliced green Thai chilies (to taste)
1/2 teaspoon ground turmeric
2 tablespoons freshly ground coriander seed
1 tablespoon freshly ground cumin seed
1 teaspoon freshly ground fennel seed
2 pounds boned lamb leg and shoulder meat mixed, cut into 1″ cubes
1 1/2 cups Greek style whole milk yogurt
1/2 cup water
1 cup Greek style whole milk yogurt
2 cups finely minced cilantro leaves and tender stems
salt to taste
sprigs of cilantro for garnish
lime wedges for garnish
Method:
For this recipe, I used the pressure cooker–in fact, I cook most of my curries that way. But, if you don’t have a pressure cooker, you can cook this curry in a nice heavy-bottomed pot–enameled cast iron is perfect. Just be sure and add a bit more water to the pot, cover it and to cook the lamb until it is fork tender, stirring now and again and adding water as needed. Once the meat is fork tender, uncover the pot and reduce the liquid until it is creamy and thick and clings to the meat cubes. Then, continue the recipe as written.
In a heavy-bottomed skillet, heat the canola oil over medium high heat. Add the onions, sprinkle with the salt and cook, stirring until the onions are deep golden brown. Add the garlic, ginger and chilies and keep cooking, and stirring until the onions are light reddish brown and fragrant. Add the spices and the meat and cook, stirring until the meat is mostly browned on all aides.
Scrape contents of pan into pressure cooker. Add yogurt to pressure cooker, and using the water, deglaze the skillet and scrape up any browned bits. Add water and its browned goodness to the pressure cooker and bring the contents of the cooker to a boil.
Put the lid on, lock down, and bring to full pressure. Turn the heat down to low and cook for twenty minutes on high pressure.
Quick release the pressure and open the lid. Boil off excess water–sauce should be thick and creamy looking, and pale brown in color. When the texture is thick enough to cling to the meat, add the second measure of yogurt, and the cilantro. Stir them in, bring back to a boil and cook for a minute or two to incorporate the cilantro flavor properly. Taste for salt and add what is needed to make the curry sparkle.
Serve with steamed basmati rice and garnish with sprigs of cilantro and lime wedges.
When Your Chili Doesn’t Have To Be Red: Pork and White Bean Chili

Zak and I agree on almost everything. We both love music, we both like bright colors, we both adore movies–the good, the bad and the ugly, we are both science fiction and fantasy geeks, we love dressing up in Renaissance Faire gear, we both like absinthe and we both love cats.
There are some notable disagreements between us.
Zak doesn’t really love dogs, while I do.
I really cannot geek out on guitar amplifiers like Zak can. (My eyes glaze over and everything turns into the sounds adults make in Peanuts TV specials.)
And Zak doesn’t really like chili.
Whoa.
How can that be? I thought everyone loved chili.
I mean, I love chili, and the truth is, I like any redaction of chili so long as it is good. (Sorry, Cincinnati chili neither counts as chili or good in my book–just so you know.) Vegetarian 5 bean chili is great. So is a bowl of traditional Texas Red with no beans as is right and proper. The plain old midwestern hamburger and kidney bean chili with cumin that I grew up eating with saltine crackers crumbled in it is great. I love them all, so long as they are flavorful and well-made.
Chili is a comfort food to me–it was always on the stove on the first cold day of the year, and it was my favorite dinner from the time I was in elementary school through college. It is still one thing that I love that my Mom makes. It is great stuff.
And it was one of the few things the school cafeterias did not screw up, so it was a favored meal at school–and not just by me. We all loved chili day–though oddly, back in the day, we always got cinnamon rolls with chili. It was peculiar, but it tasted great and the cafeteria ladies never messed either one of them up.
I just loves me a bowl of chili, and that is all there is to it.
Zak does not share my love for chili. In fact, for years, he swore he liked no chili, until I made Pork and White Bean Chili and commenced to serve it with fresh Navajo Fry Bread on the side.
Then, he was converted, though to be fair, he treats the chili as more of a condiment that the bread is dipped into than the main part of the meal.
But that’s okay, because he’s eating it, and everyone else around likes it and it is all good.
Now, about this recipe–there are no tomatoes in it, and the beans I use are great northern beans. You can start off with your beans from scratch, and I have done that, but it tastes just fine and dandy made with canned beans.
What it has instead of tomatoes is tomatillos, both fresh and in the form of green salsa. (When I use my home-canned green salsa it rocks, but I have made it using jarred salsa for the store and it turns out just about as tasty. I had to do that today, because I used my last jar of the home made stuff a month ago.) It also has fire-roasted New Mexico Green Chilies, which you obtain in one of three ways: you can make them yourself, you can buy them canned or you can buy them frozen. What I did was use canned this time, but in the past I have used ones that I roasted myself and froze. However, I used the last bit of those three months ago. The chili was still great.

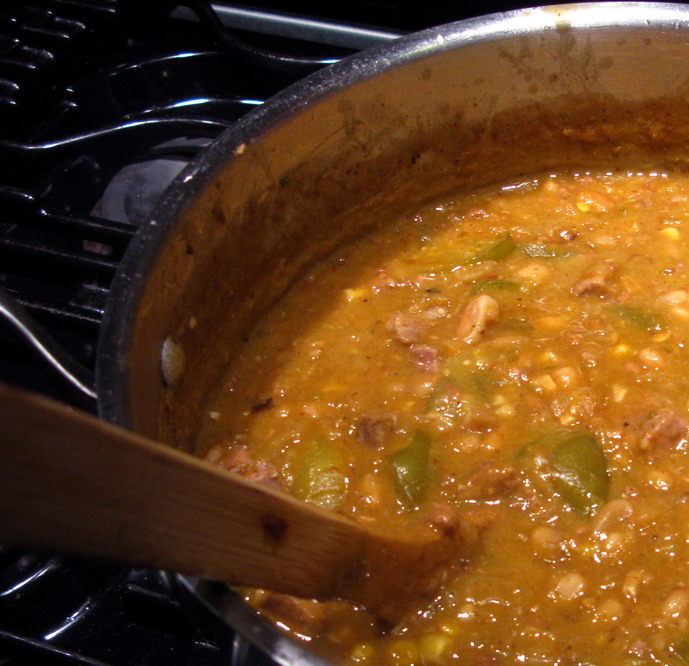
As for the pork, this time around, it had three types of pork in it: bacon and the fat rendered from it, cubed pork shoulder and a pound of home made Mexican-style chorizo sausage.
You could leave one or two of these versions of pig out of this chili, but it wouldn’t be the same. And no–a vegetarian version wouldn’t be right, so I am not even going to go there. This is a meat-eater’s chili. Not that there is anything wrong with great vegetarian chili–I love it–it is just that this is a meaty dish and is meant to be so.
You can garnish this chili with any number of goodies. I like to put out at least sour cream, the bacon, grated sharp cheddar cheese, roughly chopped cilantro leaves, sliced scallions, but you could add all sorts of goodies to the condiment bar. Like, say, fresh jalapeno slices. Or, diced raw red onion. Or diced avocado.
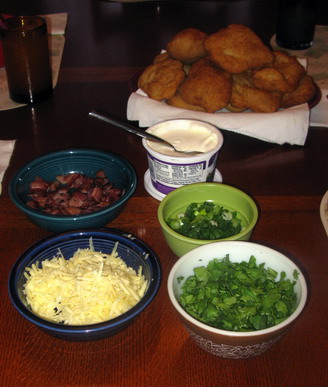
But no matter what tasty and delicious things you put on the table to go on top of your chili, do try to make the fry bread to go with it at least once. It really is splendid with this chili–no matter whether you think of the bread or the chili as the main part of the meal.
This is similar to a traditional dish from New Mexico, called Pork and Green Chili Stew, but it isn’t the same, nor is it meant to be. Yeah, when I came up with it, the real traditional recipe for the stew was in the back of my head, but I wasn’t trying to replicate that southwestern classic. I was just trying to come up with a bowl of chili that both Zak and I could agree upon having for supper.
And I finally succeeded.
His empty bowl from tonight testifies to that.
Pork and White Bean Chili
Ingredients:
1/2 pound good smoked bacon, cut into 1″ wide pieces
3 tablespoons olive oil
4 cups thinly sliced onions
1 pound bulk (not in a casing) Mexican chorizo
2 pounds pork shoulder, trimmed of excess fat and cut into 1″ cubes
1/2 cup lager beer
2 heads fresh garlic, peeled and minced
1 1/2 tablespoons ground cumin
1/4 cup diced fire-roasted New Mexico green chilies
1 tablespoon ground coriander seed
2 tablespoons Aleppo pepper or other mild chili flakes
2 1/2 cups green salsa
5 14 ounce cans great northern beans, undrained
1 1/2 cups frozen corn kernels
salt to taste
1 1/.2 pounds fresh tomatillos, husks removed, cored and cut into quarters
roughly chopped cilantro leaves for garnish
thinly sliced scallions for garnish
shredded extra sharp cheddar cheese for garnish (I used Cabot’s)
sour cream for garnish (If you can’t get locally made sour cream, try Organic Valley. Theirs tastes–oh, it is the best. I could just spoon it out of the carton and eat it, it tastes so good and has such a velvety smooth texture. Great stuff.)
Method:
Heat a heavy-bottomed pot on medium heat. Add the bacon and fry until it is done but still a little chewy. Remove it from the pot and set it aside, leaving the bacon grease behind in the pot. Add the olive oil to the pot and throw in the onions. Cook, stirring, until the onions are a medium reddish brown. Add the chorizo, and with chopping motions of your wooden spoon, brown it along with the onions. (If you can’t get bulk chorizo, then use the stuff in casings–just squeeze it out from the casing before browning it.)
When the sausage is cooked, add in the pork shoulder and cook, stirring until it is brown all over. About halfway through the process–when the pork shoulder is half browned and half pink, add in the garlic, the chilies, the cumin and coriander, and the chili flakes and keep stirring until the meat is browned all the way. Then, deglaze the bottom of the pot with the beer and allow the alcohol to boil off. Add in the salsa, the beans with their juice, and the corn and turn the heat down to low.
Simmer for about two and a half hours, or until the pork shoulder is fork tender, meaning a fork goes into and out of it easily.
Add the fresh tomatillos and salt to taste. The chili is done when the tomatillos are tender, but are still holding together–you don’t want them to cook so much they fall apart.
Garnish as you like and serve it forth–this will easily feed eight to nine hungry adults and a couple of kids.
Retro Placemats and a Couple More Aprons

Here are some photographs of more of my sewing projects.
The first two are half of the set of four place mats I made for my parents for Christmas.
They are both made of 1930’s reproduction fabrics, and the two quilt blocks in each mat were popular during that period. They are called “pinwheel” and “broken plate.” The idea for the appliques came from a book from 1923 which I had as a kid, which was a handbook of how to sew practical and decorative items for young girls, called, “When Sally Sews.” The illustrations in the book included flower and butterfly appliques made from simple shapes, very like the ones I ended up putting on the place mats.

I edged the appliques with hand-done satin stitch and embellished them with stem and outline stitches; the butterflies each have delicate antennae, and the leaves all have veins in them. The bodies of the butterflies are made of pieces of black rickrack.
The mats were so pretty that Dad refuses to eat off of them, and instead they are placed on the kitchen table between meals to make the kitchen brighter and happier looking.
Here is an apron that looks like it was made to match the mats–it was also made from 1930’s reproduction fabrics–25 of them altogether and the design of it is based on a pair of aprons I have from the same period made from old feed sacks, shirting and dressmaker’s cottons.

This apron is like having two aprons in one, however, because I made it reversible. That way you can cook wearing one side and then serve dinner wearing the other side, if you make a spill on the first side.
Note the pretty little flower-shaped button details on the bottom edge. I thought they looked pretty there.
The first side has no pocket, but the second side does–and I embellished it to make up for the second side being so much plainer.

It is weird, I love the apron, but I would never wear it. I look crappy in pink and I am just NOT a pink person.
Needless to say, this apron will be among the first items up for sale when I open my Etsy store. Yes, I am going to be selling aprons soon. And maybe place mats, potholders and maybe even little girl skirts–more on those later.

Now here is an apron I would wear, but I decided to put it up for sale anyway. It is another reversible apron–bistro style this time–just below the knee length and straight. All of the fabrics are Asian in style, and include Japanese and Chinese foods, tea and Japanese good-luck cats, maneki neko. The reverse side is the black with white calligraphy that you see making the waistband and ties–so you can be subtle or stunning depending on your mood.
I’ll have to make another one of these for myself soon, since I collect maneki neko.
 .
.
Here is why I haven’t posted for two days–I was too busy watching Kat while Zak did taxes and rehearsed for a guitar gig, and I was sewing these cute little patchwork skirts for Kat. They are made from five inch squares of fabric, each one different. These are marketed by fabric companies as “charm packs,” and they include a single five inch square of each fabric in a given line. This first skirt is made from parts of two different charm packs from Moda–I split two very similar packs into colorways–blue, turquoise and yellow for one, and pink, green and purple for the other. This skirt is from the first colorway–the pink, green and purple are being made into a sundress for Kat even as I speak, and will be done in a day or so.

This second skirt, which I made yesterday evening, is from a totally different charm pack, this one from Benartex, I believe. I love the brilliant colors of both of the skirts, but I think I like this second one slightly better.
The skirts were simple to make once I figured out what I was doing, and I may end up making more of them to sell on Etsy, along with aprons, place mats, potholders and other kitcheny sorts of items.
That is all for this time–I hope you enjoyed a peek into my sewing room!
Ever Wonder What I Look Like?

Now you know.
A self-portrait, not taken in the kitchen…but in the office instead.

Categories:
- Admin (rss) (55)
- Blogs and Blogging (rss) (81)
- Book Reviews: Cookbooks (rss) (43)
- Book Reviews: Non-Cookbook Food Books (rss) (38)
- Cats and Cat Blogging (rss) (47)
- Chinese Cooking Lessons (rss) (32)
- Culinary School Stories (rss) (18)
- Dairy Pruducts: Cultured and Barbaric (rss) (4)
- Documentary Filmmaking (rss) (1)
- Essays, Rants and Reflections (rss) (260)
- Fighting Hunger (rss) (12)
- Food and Kids (rss) (45)
- Food in the News (rss) (126)
- Food Media (rss) (98)
- Food Preservation (rss) (18)
- Food Safety (rss) (45)
- Gardening (rss) (30)
- Herbs and Herb Blogging (rss) (20)
- Holidays (rss) (50)
- Kat Blogging (rss) (22)
- Kitchen Science (rss) (36)
- Leftover Makeover (rss) (8)
- Life, the Universe and Everything (rss) (131)
- Local and Sustainable (rss) (227)
- Local Athens Food and Foodies (rss) (42)
- Meatless Mondays (rss) (32)
- Menu For Hope (rss) (5)
- Nutrition, Diet and Health (rss) (84)
- On The Farm (rss) (8)
- Recipes: Almost Vegetarian, Vegetarian and Vegan (rss) (294)
- Recipes: American Regional (rss) (37)
- Recipes: Appalachian Hillbilly (rss) (33)
- Recipes: Bread, Pasta, Grains (rss) (95)
- Recipes: Canning and Preserving (rss) (8)
- Recipes: Chinese (rss) (123)
- Recipes: Comfort Food (rss) (120)
- Recipes: Cookies (rss) (16)
- Recipes: Desserts (rss) (48)
- Recipes: French (rss) (25)
- Recipes: Fruits and Vegetables (rss) (302)
- Recipes: Greek, North African and Middle Eastern (rss) (31)
- Recipes: Indian (rss) (137)
- Recipes: Italian (rss) (42)
- Recipes: Japanese (rss) (7)
- Recipes: Jewish (rss) (4)
- Recipes: Korean (rss) (6)
- Recipes: Meat, Poultry and Fish (rss) (220)
- Recipes: Mexican/Native American/ Latin American/Caribb (rss) (27)
- Recipes: Original (rss) (108)
- Recipes: Thai (rss) (27)
- Recipes: Tofu (rss) (17)
- Recipes: US Regional (rss) (16)
- Recipes: Vietnamese (rss) (8)
- Restaurant Stories (rss) (28)
- Sewing, Quilting, Arts and Crafts (rss) (16)
- Simple Chinese Recipes (rss) (30)
- Slow Food and Heritage Foods (rss) (10)
- Spice Blogging (rss) (44)
- The Chinese Cookbook Project (rss) (14)
- The Chinese Pantry (rss) (39)
- The Documentary (rss) (2)
- The Kitchen Saga (rss) (17)
- The Locavore's Bookshelf (rss) (15)
- The Unsung Adventures of The Culinary Nerd (rss) (6)
- Tools and Toys (rss) (35)
- Uncategorized (rss) (10)
- With a Side of Politics (rss) (48)
Archives:
- August 2012 (9)
- July 2012 (12)
- September 2011 (3)
- August 2011 (7)
- July 2011 (8)
- June 2011 (16)
- May 2011 (17)
- April 2011 (11)
- December 2010 (9)
- November 2010 (5)
- February 2010 (1)
- December 2009 (5)
- November 2009 (7)
- October 2009 (10)
- September 2009 (16)
- August 2009 (14)
- July 2009 (14)
- June 2009 (7)
- May 2009 (17)
- April 2009 (10)
- March 2009 (25)
- February 2009 (13)
- January 2009 (10)
- December 2008 (5)
- November 2008 (5)
- October 2008 (6)
- September 2008 (13)
- August 2008 (8)
- July 2008 (11)
- June 2008 (18)
- May 2008 (13)
- April 2008 (14)
- March 2008 (16)
- February 2008 (17)
- January 2008 (19)
- December 2007 (25)
- November 2007 (18)
- October 2007 (24)
- September 2007 (16)
- August 2007 (15)
- July 2007 (15)
- June 2007 (10)
- May 2007 (14)
- April 2007 (16)
- March 2007 (17)
- February 2007 (20)
- January 2007 (13)
- November 2006 (1)
- October 2006 (8)
- September 2006 (14)
- August 2006 (25)
- July 2006 (30)
- June 2006 (28)
- May 2006 (34)
- April 2006 (29)
- March 2006 (24)
- February 2006 (30)
- January 2006 (38)
- December 2005 (40)
- November 2005 (37)
- October 2005 (32)
- September 2005 (25)
- August 2005 (30)
- July 2005 (28)
- June 2005 (21)
- May 2005 (8)
- April 2005 (22)
- March 2005 (17)
- February 2005 (29)
- January 2005 (10)
Search Site:
Links:
- Lily’s Wai Sek Hong
- 101 Cookbooks
- A cat in the kitchen
- A Veggie Venture
- Accidental Hedonist
- Cha Xiu Bao
- chez pim
- Chocolate & Zucchini
- Chopstick Cinema
- Chowhound.com
- Chubby Hubby
- Cook sister!
- Cooking with Amy
- da*xiang
- Eat Local Challenge
- Eating Liberally
- Ecocentric
- Eggbeater
- Epicurious
- Farmgirl Fare
- Fatfree Vegan
- Foodgoat
- ForkandBottle.com
- Green Olive Tree
- Hooked on Heat
- Jaden’s Steamy Kitchen
- Kalyn’s Kitchen
- Lucullian delights
- Mahanandi
- Matt Bites
- MeatHenge
- mmm-yoso!!!
- New York Times – Dining & Wine
- Pizza Goon
- Rasa Malaysia
- Ruhlman
- Sailu's Kitchen
- Serious Eats
- SF Gate: Food & Dining
- Simply Recipes
- Soul Fusion Kitchen
- Tastespotting
- The Amateur Gourmet
- The Cleaner Plate Club
- The Food Section
- The Grub Report
- thecookscottage
- U.S. Food Policy
- Wandering Chopsticks
- Washington Post Food and Dining
- Wasted Food
Meta:

Powered by WordPress. Graphics by Zak Kramer.
Design update by Daniel Trout.
Entries and comments feeds.