Cook Local, Eat Global
Holiday Week Woes
I have a nearly finished post, with just the recipe left to write, that I was working on last Monday, but I never got to post it, because I took Morganna to the doctor, who then sent us to the ER.
She was having severe abdominal pain, and he thought it might be appendicitis–and it still may be that, we just don’t know. We spent the entire day in the ER, then she was released with the theory that it was just a virus, but with no elevated white cell count and no fever, that seemed unlikely. We went to see her doctor again the next day, and he scheduled her for an ultrasound to rule out an ovarian cyst, but of course, since it was Thanksgiving week, the soonest we could get her in was today.
So, Morganna spent the week in pain, and I spent the week in worry. We did have a Thanksgiving meal, but it was pretty quiet. (However, we discovered that Kat really likes turkey. A LOT.)
So, I will be finishing the post today and I’ll let everyone know what is up with Morganna as soon as we know something.
Then, I will catch everyone up on what else has been going on and post some more recipes–I have some really nice ones lined up.
Gotta go take Morganna back to the hospital for her ultrasound. See you later!
Hilarie’s Favorite: Butternut Dal
This is one of those recipes that was a moment’s inspiration. It came about because Hilarie had scored a big load of fresh, locally grown butternut squash at the restaurant, and wanted me to make a dinner special using them.
Now, we had already had butternut squash soup, which I had made a week and a half before, and yeah, it is good, especially with Indian spices and yogurt and some shredded raw Granny Smith apples on top as a garnish, but I wanted to do something different. And yeah, I could come up with another variation on stuffed squash, since every time we make it, people gobble it up as if it is their last chance to eat a meal before the Second Coming and they really want to go on a full stomach.
But I wanted to do something different.
Emboldened by the tasty success of the Pumpkin Masoor Dal, I determined to make a dal with the squash. And while I -knew- that apples and squash go together famously–please note the presence of the Granny Smith Apples as a garnish to the aforementioned soup–I didn’t want to repeat my caramelized onion and apple topping that I did for the pumpkin dal. That would be no fun, you see.
So, I thought to myself–what would be similarly good, seasonal and yet sufficiently different to make this dal stand out? After all, pumpkin and winter squash are pretty similar fruits–they are in the same family–and they have flavors and textures that are analogous.
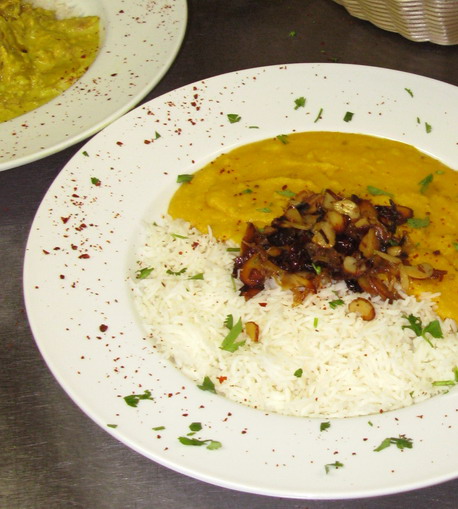
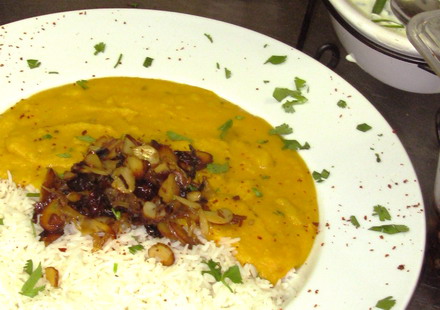
Then, I got it. I would once again not only use caramelized onions in the dal as part of the tarka that flavors it, but I would use them as a garnish as well, and instead of apples, I would use dried cranberries and sliced almonds. The cranberries, like the squash are seasonal native American fruits that just scream “autumn” to cooks and eaters across the country, and the almonds, in addition to tasting great and adding great texture, are used as garnishes and ingredients in many northern Indian curries, so there is culinary cultural precedent.
That is what I like–a true fusion dish–one that is true to both cuisines that make up its pedigree. It respects both the ingredients and techniques of the cuisines that are being brought together, and this brings character and soul to the dish. It isn’t flashy, it isn’t fancy, but it is new, different and yes–delicious.
Now, for all that this dal is similar to the pumpkin masoor dal, it is quite different, because the way I put it together is different. It has a less rustic texture because I blend the lentils and roasted squash flesh together into a velvety golden puree -before- I add the tarka. This means that while the main body of the dal is perfectly smooth and unctuous, there are also bits of caramelized onion, garlic, ginger and whole spices distributed throughout the dish to give the diner a little surprise in every bite.
It is also different in that I use a 1:1 ratio of squash to lentils by volume, which is rather tricky to eyeball, but for the sake of writing the recipe down, I give exact measurements. The pumpkin dal uses more lentils than pumpkin, so the resulting flavor is earthier and less sweet, and it has a definite leguminous taste and texture. I think I like the approach with the butternut recipe better, and it certainly has a more interesting texture and definitely a richer flavor, especially if you do like Hilarie asked me to, and use butter instead of oil and make it vegetarian rather than vegan. (That is not to say a vegan version is bad–it isn’t–it is, in fact, quite good, but I agree with Hil–the butter takes this humble dish over the top.)
But while the dal itself is heaven on a spoon, the topping is a choir of angels for the tastebuds. No, really. The deeply caramelized onions are sweet and soft, while the cranberries are chewy and tangy. They balance each other perfectly, and are a great foil for the toasty, crisp, rich almonds. A sprinkle of mild chili flakes and salt completes the flavor profile and rounds it all out.
But this isn’t just about taste–Butternut Dal is good for you.Served with rice, this dish offers a complete protein, a huge amount of vitamin A from the squash, vitamin C from the cranberries as well as the antibiotic properties inherent to onions, ginger, garlic and chilies. In addition, the turmeric used to boost the color of the dal turns out to be good for your brain, as it seems to help ward of dementia and other age-related brain disorders.
Besides, it is comforting. It is like a warm, lingering hug, or a cuddly soft cat curled up on your lap. Eating it is like slipping on your favorite fuzzy sweater or sinking into a steamy, fragrant bath on a cold night. It is sweet, soft and just–well, it just reminds you of home, Mom and all the good things of life.
For all that it is humble, and made from common ingredients, Hilarie tells me that this dal is her favorite of all the dishes I cook at her restaurant.
I think it is because it has the power to warm her from the inside out and it relaxes her and makes her smile.
And what more can one ask for in a vegetarian dish than that–simple magic.
Butternut Dal
Ingredients:
1 large or two small butternut squashes (you should get about 3 cups of puree once roasted and mashed)
1 tablespoon canola oil
1 1/2 cups red lentils (masoor dal)
1 teaspoon turmeric
4 tablespoons butter (optional)
3 tablespoons canola oil
1 1/2 cups thinly sliced onions
1 teaspoon salt
1 tablespoon Aleppo or other mild chili flakes
3 cloves garlic, minced
1″ cube fresh ginger, peeled and minced
1 1/2 tablespoons cumin seeds
1 1/2 tablespoons mustard seeds
4 tablespoons butter or canola oil
2 cups thinly sliced onions
1/2 teaspoon salt
1 teaspoon Aleppo or other mild chili flakes
1/2 cup dried cranberries
3/4 cup sliced almonds
Method:
Heat oven to 400 degrees F.
Cut squash in half and scoop out seeds and stringy bits from the cavity of the squash. Line a baking sheet with foil and rub it with the one tablespoon of canola oil. Put the squash halves on the sheet cut side down. Dip your hands in the oil on the sheet and rub it on the outside rind of the squash. Place squash in oven and roast until a fork can pierce all the way through the rind and the flesh.
Remove from oven when done and allow to cool in the pan until it is cool to the touch.
While the butternut squash is roasting, place the lentils in a pot and cover with enough water to rise above the top of the lentils by 1/2 inch. Add the turmeric and stir to combine. Bring to a boil and turn down the heat and simmer, stirring as needed until the lentils are fully cooked and fall apart.
The lentils should cook down to a fairly thick, rustic puree–if they are soft but still watery, pour the contents of the pot into a fine mesh strainer and allow the excess water drain away. If it is a thick puree, take it from the heat.
While the lentils cook and the squash roasts, cook the tarka. Heat the three tablespoons of canola oil, and add the first measure of onions. Sprinkle with salt, and cook, stirring, until the onions are golden. Add the chili flakes, and cook stirring until the onions are golden brown, a medium color. Add the garlic, ginger and whole spices and cook, stirring until the onions are dark reddish brown and the spices are toasted. Remove from heat.
Scoop the flesh from the squash, and add it to the pot. If you wish, add the butter, and using an immersion blender, blend the contents of the pot into a velvety smooth puree.
Stir the tarka into the puree and taste. Add salt to taste.
Heat the remaining oil or butter in a deep, heavy bottomed skillet. Add the onions, sprinkle with salt and cook, stirring until the onions are golden. Add the cranberries, chili flakes and almonds and cook, stirring, until the onions are deep reddish brown, the cranberries are slightly caramelized and the almonds are toasted.
Serve the dal with rice and topped with a generous dollop of the caramelized onion, cranberry and almond mixture.
In The Elevator…
Grist, the online environmental magazine, asked a bunch of leaders in the sustainable agriculture and food movement to imagine that they somehow managed to share an elevator with President-Elect Barack Obama. While riding together, each person has one minute of Obama’s undivided attention in which to present their ideas involving food and farming.
What would they say?
In the article, “Going Up, Part 4,” Grist started the ball rolling by asking Michael Pollan, author of the well-received essay, The Farmer in Chief, and then moved on to a plethora of passionate authors, activists, farmers and educators, all of whom had great ideas to pitch to the incoming President.
Of course, this got me to thinking–what would I say?
I think that I might mention that while most Americans live an urban lifestyle that is far removed from the toil and work of producing food, our historical roots are sunk deep into the soil–at one time, most of us were farmers, and not that very long ago–as recent as World War II, many Americans grew some portion of our own food.
In this failing economy, with jobless rates rising higher than in previous decades, with the banking system on shaky footing and fuel prices fluctuating up and down, we may need to return to our agricultural roots, not just because it is good for the environment, but because we will need to in order to survive.
I would suggest that federal support for urban community gardens and farms could help the urban poor produce some of their own fresh food, and perhaps a program of tax credits for suburban and small town families who turn some or all of their yards to food production would encourage the middle class to not only produce some of their own food as well. Educational programs to help non-gardeners learn the skills needed to grow food, such as the current County Extension Agencies could be expanded so that there was more community outreach and involvement, as well as tying the Extension offices to public school Edible Schoolyard programs across the country.
Americans really want to roll up our sleeves and do something to help make our country great again, and these sorts of self-help programs will get people moving in a positive direction again, as well as providing good, fresh food to people who may otherwise have no access to it at all.
Now, for the record, if John McCain had won the election, I would say the same things to him–my thoughts on this issue are not partisan–I’d think like this no matter what.
So now I want to know–what would YOU say?
Because Too Much Is Always Better Than Not Enough: Black Forest Cheesecake
When I found out that Kim, one of the servers at Restaurant Salaam, was going to have a birthday and that she loved cheesecake, I asked her if she would like me to make one for her as a gift.
Her eyes lit up and she nodded avidly.
Dan, the usual recipient of a different cheesecake for each birthday, perked up his ears and listened as I asked Kim a few questions.
Such as, “Do you like cherries?”
And, “I know you like chocolate–what about almonds?”
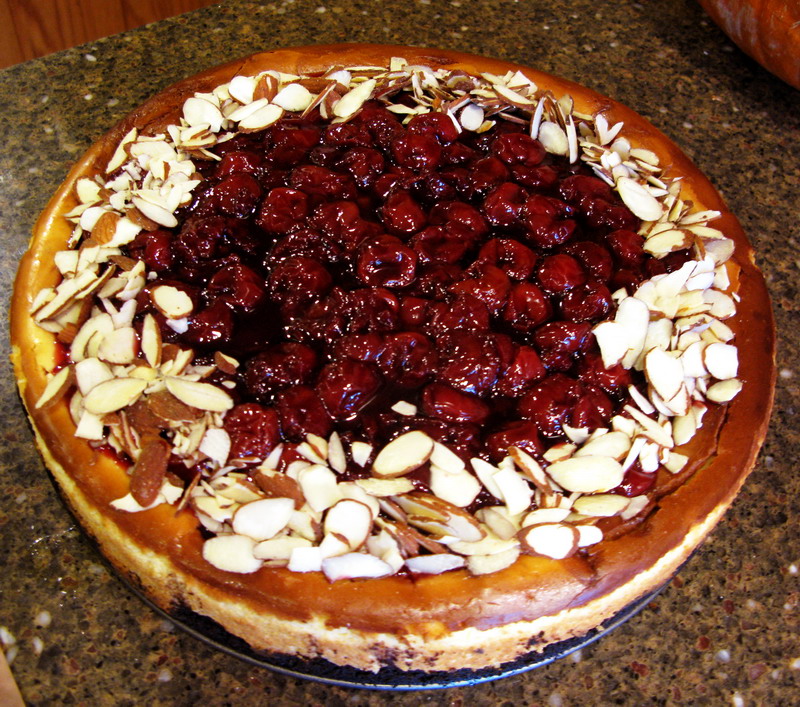
As she answered, I formulated the concept for this cheesecake–it would include almond extract, toasted sliced almonds, vanilla bean paste and a swirl of sour cherry preserves in the cake itself. The crust would be chocolate wafer crumbs flavored with espresso. It would be topped first with ganache–chocolate melted with cream until it is of a pouring consistency–then, with sour cherries enhanced by a pinch of ardamom and vanilla and cooked until they formed a thick sauce. The edges would be garnished with toasted sliced almonds, and I would call it “Black Forest Cheesecake” in honor of the German chocolate-cherry cake which inspired my idea.
Now some of you may be looking at that set of flavors and might think it is just a bit too much.
I will counter your fears with the immortal wisdom of Bob Dobbs:
“Too much is always better than not enough.”
With those words echoing in my mind, I began scribbling my ideas on a menu insert.
Dan hovered over my shoulder as I sat and wrote the recipe out from memory and inspiration and shook his head.
“And you say you’d be a crap pastry chef,” he clucked. “Yet you write out cheesecake recipes off the top of your head.”
“I can only do this with cheesecake,” I answered without looking up. “And that is because I have been making cheesecakes for you for your past five birthdays and for New Year’s Eve for a couple of years now. Thus,” I said, whilst sketching what I thought the cake would look like, “I know my cheesecake recipe by heart. I don’t know any other dessert recipes by heart.”
Morganna had ducked her head out into the dining room for a breath of fresh air and overheard the last exchange of words. “Chai Crene Brulee,” she piped up. “You know that one by heart, too.”
“Two recipes do not a pastry chef make,” I answered, knowing that I was right, because I had been in the presence of real pastry chefs who are such paragons of precise perfection that they make me at my most OCD look like a slacker bum.
At least when it comes to desserts.
But at any rate–two weeks later, on Kim’s birthday, I arrived at the restaurant with a massive, weighty cheesecake that was the result of that hastily scribbled recipe written out between dinner rushes at the restaurant.
And lo and behold–it was, as I had hoped, seductively creamy, rich, decadent and evil, without being too cloying.
The secret to this cheesecake’s success is the contrasts in flavor and texture. The chocolate wafer crust is made darker, deeper and more bitter by the addition of espresso powder. The slight bitter edge imparted by the coffee not only makes the chocolate more chocolaty, it contrasts with the sweetened cream cheese filling. The richness of the ganache is tempered by the sour cherry topping, while the astringent tang of the fruit offsets the smooth chocolate flavor.
I tested my theories on chocolate and sour cherries out on Zak, who as a rule, doesn’t like chocolate. (I know, there is something odd about him, but I think it must be genetic, because his father is also generally apathetic about chocolate as a flavor, and neither of them will react to chocolate in any dessert or confection unless it is exceptional in some way, which makes them perfect test subjects for my new chocolate recipes. I know that if they like it, people who actually love chocolate will swoon.) I dipped one of the cooked sour cherries into the barely cool ganache and popped it into his mouth. After it burst on his tongue into a shower of sparkling fireworks (his words), he told me that I was a wicked woman for making such a thing.
That meant I had done it right.
The crispy sliced toasted almonds add much needed crunch and a delightful surface texture to the dessert, as well as adding their own smooth, earthy sweetness.
So, without further ado, here is the recipe. It is involved and it does take about two days to complete, but a lot of that time is taken up with letting various elements of the cake cool overnight or for some hours in the refrigerator In my opinion, however, the time and effort are well worth it, because you end up with a dessert that can feed sixteen to twenty people depending on how thinly you slice it and how many guests you wish to have falling at your feet a time expressing their undying devotion and gratitude.
Because, really, as Captain Kirk once said, “Too much of anything, Lieutenant, even love, isn’t necessarily a good thing.”
But as my friend Dan has said many times, “There might be such a thing as too much love, but there is never too much cheesecake.”

Black Forest Cheesecake
Ingredients:
1 3/4 cups chocolate wafer crumbs
1 tablespoon instant espresso powder
1 tablespoon sugar
7 tablespoons butter, melted
3 pounds cream cheese, softened
1 1/2 cups raw sugar
1 teaspoon almond extract
2 teaspoons vanilla bean paste
3 whole large eggs
2 egg yolks
1/2 cup sour cherry preserves
1 pound frozen (or canned in syrup or water, drained) sour cherries, thawed
1/2 cup sour cherry preserves
1/4 cup sour cherry concentrate, like Fruit Fast (optional–but it adds a great deal of flavor and color)
1/2 teaspoon almond extract
1/4 cup sugar
2 teaspoons cornstarch dissolved in 1 tablespoon cold water
4 ounces premium dark chocolate
2 1/2 ounces heavy cream
1/2 cup sliced almonds, toasted
Method:
Preheat oven to 375 degrees F.
Place chocolate wafer crumbs, espresso powder and sugar into the bowl of a food processor. (I also use the processor to make the crumbs, by the way, so they are usually already in the bowl.) Start the processor and as it is running, drizzle the melted butter through the feed tube. Allow machine to mix thoroughly until the texture of damp sand is accomplished.
Dump crust ingredients from processor bowl into the center of a non-stick 10 inch springform pan. Pat the crumbs in an even layer on the bottom of the pan and about a third of the way up the sides of the pan. Don’t worry if the top edge is a little ragged. It won’t matter.
Bake in the preheated oven for fifteen minutes (ten if you have a convection oven), then remove from the oven and allow to cool thoroughly. Turn the oven temperature down to 300 degrees and put a pan of water in the bottom of the oven. This creates a moist, steamy environment for the cheesecake to bake in, without having to bake it -in- a water bath.
Beat together the cream cheese and sugar in a heavy-duty mixer until they are thoroughly combined and are fluffy. Add almond extract and vanilla bean paste and beat well to combine.
Whisk together the eggs and egg yolks until they are thoroughly combined and lighten in color somewhat. Add to cheese batter and beat well to combine. (This also incorporates some air into the batter.)
Scrape half of the cheesecake batter into the prepared, cooled pan over the crust. Drop cherry preserves into the batter by tablespoonsful, and swirl it around with a table knife. Then, scrape the rest of the batter into the pan and smooth the top so it is even. Place into the center rack of the 300 degree preheated oven and bake for one hour and fifteen minutes. (Bake for fifty minutes to an hour if you have a convection oven.)
Remove from oven when done–the cake will be set around the edges, and will be somewhat jiggly in the middle. Do not worry–as it cools on a wire rack on the counter, the residual heat of the cake will continue to bake the middle. By the time it is at room temperature, it will be completely set.
Allow to cool to room temperature, then cover tightly with foil, and still in the pan, refrigerate for at least ten hours or until completely cold. (This part of the baking I do the first evening, so that the cheesecake is perfectly cold when the ganache layer is poured on the top of it.)
While the cheesecake is baking, cook the cherry topping. Put 1 pound thawed sour cherries, sour cherry preserves, sour cherry concentrate, almond extract, and sugar into a saucepan, and bring to a boil, stirring, until the preserves melt and some juice is released by the cherries. Add the cornstarch and cold water mixture and stir until the liquid thickens. Remove from heat immediately, put the contents of the pan into a covered container and chill completely.
The next day, make the ganache. Finely grate the chocolate in the food processor or by hand and put it into a heat-proof bowl. Glass is great. Heat the cream to a boil, stirring constantly and remove from heat. Pour it over the chocolate and stir until the chocolate melts thoroughly and combines with the cream, forming a glossy, thick, delicious mixture.
Allow to cool for a few minutes. The ganache should still be pourable, but thick and not so hot that it will melt the top of the cheesecake.
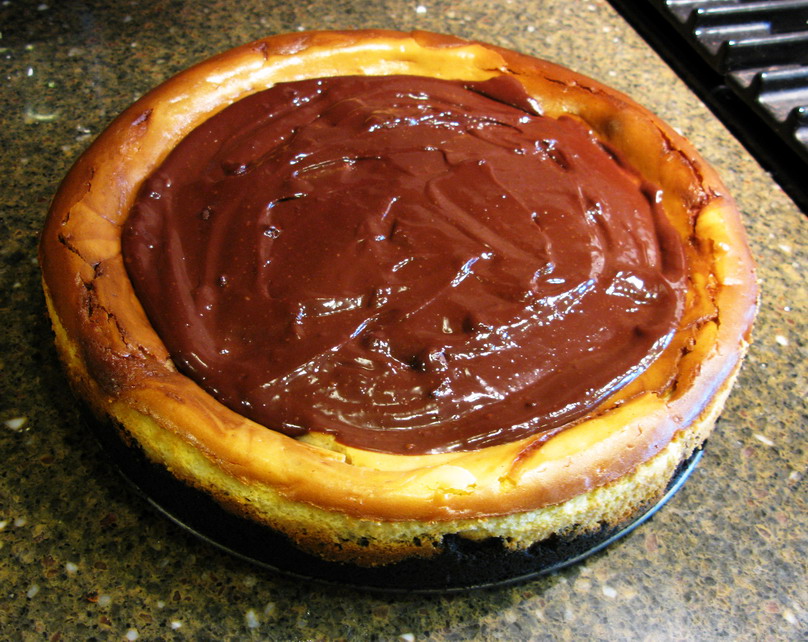
Remove the cheesecake from the refrigerator and note that the center of the cake has sunken slightly leaving a raised rim all the way around. Pour the ganache and smooth it into the center of the cake, leaving the rim plain. Put the cheesecake, covered, back into the refrigerator and leave it about a half an hour, or until the ganache is mostly set.
Take the cheesecake back out of the refrigerator one last time and spoon the cherries over the ganache covering it completely, and then sprinkle the toasted almond slices over the edge of the cherries, leaving the rim of the cheesecake bare.
Chill until serving time.
This will serve up to twenty people, depending on how much cheesecake they can eat!
Cooking From The Pantry
So, while I wasn’t writing posts for the past month, there were lots of other things I wasn’t doing.
I wasn’t cooking a lot at home.
I wasn’t eating a lot at home.
I wasn’t cleaning up a lot at home.
I wasn’t taking a lot of photographs.
I wasn’t sleeping very much.
There were also a lot of other things I was doing.
I was cooking a lot at work.
I was making up new recipes, but I was a goof and didn’t photograph them.
I was, as I said, working for the campaign.
I was cooking for the campaign volunteers, though, once again, I forgot to take pictures.
I was listening to a lot of NPR and reading a lot of news online.
I was reading a lot of books.
However, as gratifying as it was to work on a winning campaign, I have to say that the toll taken on our kitchen because of the not cleaning or cooking was very harsh.
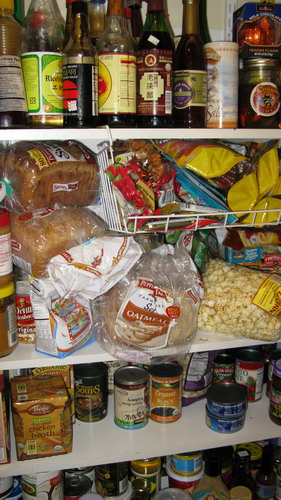
Our pantry closet had become a disaster area. I am certain that some of the food items that had fallen from the shelves onto the floor of the closet had started to fulminate into a spontaneously generated life form, and that once it had gained sufficient size and mass from eating dried pasta and sucking the life from forgotten onions, it was going to slither out from under the door and hunt our cats for sustenance.
So, this Sunday, in the interest of nipping such a horrific domestic emergency in the bud, I set out to clean out and re-organize the pantry.
Which I did, as you can see above.
Now Zak can find Kat’s dried fruit snacks, the bread and the pasta without fearing for his life while I am at work, and I have a remote chance of being able to find any given ingredient I might wish to employ in the cooking of dinner now that I am less stressed out and busy.
Once the pantry was cleaned, I noticed that the freezers looked a tad bit, uh, well, disastrous, so I cleaned those out today, took inventory and organized them.

And I sort of organized the spice cabinet. I say sort-of, because it was really a half-hearted attempt at organization. My in-laws alphabetize their cupboards, so I know what real organization is like and I know, that no matter how hard I try, I cannot be that OCD about my cabinets. So, I bow to their superior organization skills and get on with life.
But, you will notice, that for the benefit of Zak, I did take a marker and label the refrigerator shelves and drawers. I figure that if I change anything around, I can wipe the writing off with rubbing alcohol, and start over.
The refrigerators, of course, are next on the list of my organizational frenzy.
So why did I tell you all of that, you may wonder?
So, I could talk a little bit about cooking from the pantry, which I think is the best way to go about getting a quick, nutritive meal on the table with the least amount of bother and fuss. It is often very economical, because the point of having stuff in your pantry is that you can buy grains, meat, canned goods, condiments and spices when they are on sale in bulk, and then use them later if you have a decent sized pantry with a modicum of organization and a pretty good freezer.
And with the economy as buggered up as it is at the moment, saving money is a great idea for everyone.
What are some pantry staples that I keep around the house all the time that I can use to make a quick meal?

Rice, obviously., and several kinds at that. I keep the ones I use most frequently–basmati, jasmine and sushi rice, in the glass or plastic bins pictured here. I buy them in large bags which I store in a closet down the hall, from which I portion out enough for each bin. When a bin gets empty, I pour the rest of the bag in, and so on and so on.
Beans are a big one, both dried and canned. Canned are quicker than dried, but I like dried better, so I have some of each. And lentils–I have lots of dried lentils which cook faster than beans and taste just as good if not better. I have split peas, too.
Pasta in every shape, made from every grain and from everywhere in the world they make noodles.
Canned tomato products. Whole ones, diced ones, crushed ones, sauce, and paste, some or all of these are always around in my pantry, as well as a jar or so of salsa, either home-canned or from a local producer.
Olives, capers, anchovies, anchovy paste, dried mushrooms and fruits, olive oil and every sort of condiment you can imagine, including salsas, vinegars, oils and sauces. (I am not listing all of the Asian pantry items–those are covered in a previous post.)
Tortillas of every sort.
Root cellar staples such as onions, potatoes, garlic, winter squash, sweet potatoes and carrots. Although I grew up with my Grandparents’ root cellar, I have yet to convert part of our underground basement/garage into one, so all of these save the carrots are stored in the bottom of my pantry closet behind the rice in bins. The carrots go in the crisper drawer.
And in the freezer, I have all sorts of frozen vegetables, fruits, meats and fish, with a heavy emphasis on cheaper cuts of meat that are filled with flavor, like chuck or shoulder roasts, ground meats, sausages, farmed fish like tilapia and catfish, and bacon.
Yeah, I have a huge store of food. It all comes from being a farm kid raised by two sets of grandparents who lived through the Great Depression and WWII. You don’t have to be as much of a food hoarder as I am to still turn out really great, simple, quick pantry meals. You just have to pick some basic ingredients you really like and that are really versatile, like beans, rice, pasta, canned tomatoes, olives, capers, anchovies, onions and garlic, and have some basic spices, and you are good to go.
What kinds of stuff do I make with all of these things?
Well, tonight, after digging around in the freezers and doing inventory, I was kind of tired, but I knew that I could make a really quick, tasty dinner of tacos just out of what I had in the kitchen.
Yeah, even chefs cook tacos sometimes. (Last night I proudly served guests a dinner from the pantry: spaghetti puttanesca and wowed them.)
But we don’t use the little seasoning packets, so there. Nyah!
My ground meat tacos are easy, nutritious and tasty, and the leftovers can be put to many uses.
You can turn the leftovers into burrito, quesadilla or omelet filling. Or, you can add more tomato products, more chilies, and beans and turn it into chili. Or, you could make a pot of Spanish rice, grease up a casserole dish, put the rice in the bottom, the taco mixture on top, cover it with grated cheese and turn it into a casserole, which you can name after me, if you want. Or, you could make chipotle mashed potatoes, put the taco meat in the bottom of a casserole, the taters on top, sprinkle on some cheese and make Tex-Mex Cowboy Pie.
Or, you can do what I often do and bag up the leftovers, label and date it and put it in the freezer for a day when you just cannot even think about cooking.(Unless you put it in the freezer and forget about it, and then find it years later, freezer burned, tattered and sad and then decide to thaw it and give it to your dog for dinner.)
Anyway, here is my recipe for taco filling–which, if you are a vegetarian, you can adapt by using a pound of refried beans in place of the meat.

Easy Pantry Taco Filling
Ingredients:
3 tablespoons olive oil
1 cup thinly sliced onions
2 tablespoons minced frozen or fresh sweet bell pepper (I have bags of these in the freezer from the summer)
1 cup frozen corn kernels, thawed if you remember to, but well, if you forget, don’t sweat it
1 pound ground meat (I prefer grass fed beef, bison or venison here, but you can use chicken, pork or lamb if you want, or chorizo. Or, for vegetarians, use 1 pound refried beans–but if you use the beans, leave out the milk, and thin the mixture with water as needed.)
3 cloves garlic, minced
1/2 cup milk
1 tablespoon smoked paprika
1 tablespoon regular paprika
1 tablespoon ground cumin
2 teaspoons ground coriander
chili powder to taste
powdered chipotle chile to taste
black pepper and chili pepper flakes to taste
14 ounce can diced tomatoes (I like Muir Glen fire-roasted)
1 14 ounce can black beans, drained
1 tablespoon tomato paste (I use the stuff in the tube so I can only use little bits as I need it and not waste any)
1/2 cup salsa
salt to taste
water as needed
1/2 tablespoon flour mixed in 1 tablespoon cold water
fresh chopped cilantro
Heat olive oil in a heavy-bottomed pan over medium heat. Add onions and cook, stirring until they turn a medium translucent. Add sweet peppers and corn kernels and cook, stirring constantly until the onions turn medium golden brown and the corn is browned slightly.
Add the meat, break up and stir in the garlic. Add the milk all at once and cook, stirring. Add the spices, and continue cooking, stirring constantly until all the pink is gone from the meat and the milk simmers away. Add the tomatoes, beans, tomato paste and salsa, and water if necessary to keep the mixture from sticking to the bottom of the pan and to form a bit of a sauce. Cook, stirring until the sauce cooks down a bit and flavors the meat. Taste for salt, add it if necessary, and thicken the sauce with the flour and water mixture. (If your tomatoes didn’t color the taco meat as nicely as you would like, add more plain paprika at this point until it is the reddish-brown color you like.)
Stir in chopped cilantro, and scallions in any quantity you desire and use as a taco filling. I like to garnish it with lettuce, more cilantro, very sharp cheddar cheese, sour cream and really spicy salsa.
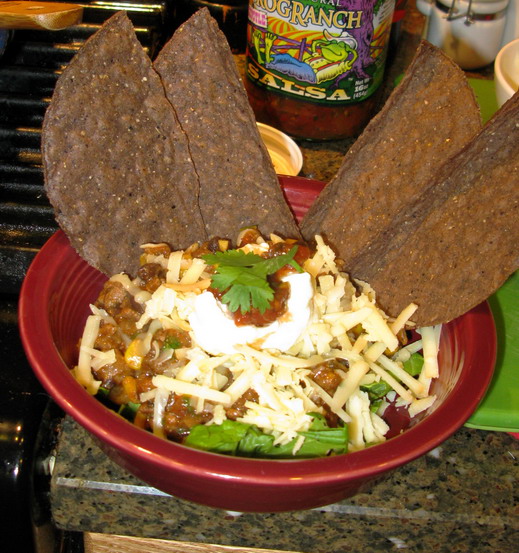
I like to eat my tacos “inside out” because I make too much of a mess of my clothes if I pick them up and eat them the way normal people do. As you can see, I break my warm taco shells in half and after putting the filling and toppings in a bowl, stick the tortillas upright in the bowl. It looks kind of neat, and I eat it by scooping up the goodies with the taco bits. I end up with more food in my mouth and less down my cleavage, which is a great deal.
Now, what can you add to this?
Well, fresh or frozen chilies come to mind. I tend to make mine tame because of Kat–she likes spicy foods, but she isn’t really a chili-demon yet. We’re still working on that.
Olives are nice in here–I like green ones better than black ones for this, though. With the olives, it tastes a little like Cuban picadillo.
More and different kinds of beans are always possible. Pintos would be great!
Posole would be good.
Fresh kale or collards, very thinly sliced and added near the end would be awesome. And since it is getting on to being greens weather, they would be perfect.
And that is one of the best things about having a pantry full of ingredients–you can always remake your leftovers into something new and different, or customize a recipe into something even better than it was before.
That’s because cooking from the pantry invites, nay, insists that the cook be creative. If you build up a stock of food and then vow to cook at least two or three meals a week from your pantry items, I guarantee you will come up with combinations you might never have thought of otherwise.
So, there you are.
Now, go digging around in your pantry and cook up something new and delicious–and as always–tell me about it!

Categories:
- Admin (rss) (55)
- Blogs and Blogging (rss) (81)
- Book Reviews: Cookbooks (rss) (43)
- Book Reviews: Non-Cookbook Food Books (rss) (38)
- Cats and Cat Blogging (rss) (47)
- Chinese Cooking Lessons (rss) (32)
- Culinary School Stories (rss) (18)
- Dairy Pruducts: Cultured and Barbaric (rss) (4)
- Documentary Filmmaking (rss) (1)
- Essays, Rants and Reflections (rss) (260)
- Fighting Hunger (rss) (12)
- Food and Kids (rss) (45)
- Food in the News (rss) (126)
- Food Media (rss) (98)
- Food Preservation (rss) (18)
- Food Safety (rss) (45)
- Gardening (rss) (30)
- Herbs and Herb Blogging (rss) (20)
- Holidays (rss) (50)
- Kat Blogging (rss) (22)
- Kitchen Science (rss) (36)
- Leftover Makeover (rss) (8)
- Life, the Universe and Everything (rss) (131)
- Local and Sustainable (rss) (227)
- Local Athens Food and Foodies (rss) (42)
- Meatless Mondays (rss) (32)
- Menu For Hope (rss) (5)
- Nutrition, Diet and Health (rss) (84)
- On The Farm (rss) (8)
- Recipes: Almost Vegetarian, Vegetarian and Vegan (rss) (294)
- Recipes: American Regional (rss) (37)
- Recipes: Appalachian Hillbilly (rss) (33)
- Recipes: Bread, Pasta, Grains (rss) (95)
- Recipes: Canning and Preserving (rss) (8)
- Recipes: Chinese (rss) (123)
- Recipes: Comfort Food (rss) (120)
- Recipes: Cookies (rss) (16)
- Recipes: Desserts (rss) (48)
- Recipes: French (rss) (25)
- Recipes: Fruits and Vegetables (rss) (302)
- Recipes: Greek, North African and Middle Eastern (rss) (31)
- Recipes: Indian (rss) (137)
- Recipes: Italian (rss) (42)
- Recipes: Japanese (rss) (7)
- Recipes: Jewish (rss) (4)
- Recipes: Korean (rss) (6)
- Recipes: Meat, Poultry and Fish (rss) (220)
- Recipes: Mexican/Native American/ Latin American/Caribb (rss) (27)
- Recipes: Original (rss) (108)
- Recipes: Thai (rss) (27)
- Recipes: Tofu (rss) (17)
- Recipes: US Regional (rss) (16)
- Recipes: Vietnamese (rss) (8)
- Restaurant Stories (rss) (28)
- Sewing, Quilting, Arts and Crafts (rss) (16)
- Simple Chinese Recipes (rss) (30)
- Slow Food and Heritage Foods (rss) (10)
- Spice Blogging (rss) (44)
- The Chinese Cookbook Project (rss) (14)
- The Chinese Pantry (rss) (39)
- The Documentary (rss) (2)
- The Kitchen Saga (rss) (17)
- The Locavore's Bookshelf (rss) (15)
- The Unsung Adventures of The Culinary Nerd (rss) (6)
- Tools and Toys (rss) (35)
- Uncategorized (rss) (10)
- With a Side of Politics (rss) (48)
Archives:
- August 2012 (9)
- July 2012 (12)
- September 2011 (3)
- August 2011 (7)
- July 2011 (8)
- June 2011 (16)
- May 2011 (17)
- April 2011 (11)
- December 2010 (9)
- November 2010 (5)
- February 2010 (1)
- December 2009 (5)
- November 2009 (7)
- October 2009 (10)
- September 2009 (16)
- August 2009 (14)
- July 2009 (14)
- June 2009 (7)
- May 2009 (17)
- April 2009 (10)
- March 2009 (25)
- February 2009 (13)
- January 2009 (10)
- December 2008 (5)
- November 2008 (5)
- October 2008 (6)
- September 2008 (13)
- August 2008 (8)
- July 2008 (11)
- June 2008 (18)
- May 2008 (13)
- April 2008 (14)
- March 2008 (16)
- February 2008 (17)
- January 2008 (19)
- December 2007 (25)
- November 2007 (18)
- October 2007 (24)
- September 2007 (16)
- August 2007 (15)
- July 2007 (15)
- June 2007 (10)
- May 2007 (14)
- April 2007 (16)
- March 2007 (17)
- February 2007 (20)
- January 2007 (13)
- November 2006 (1)
- October 2006 (8)
- September 2006 (14)
- August 2006 (25)
- July 2006 (30)
- June 2006 (28)
- May 2006 (34)
- April 2006 (29)
- March 2006 (24)
- February 2006 (30)
- January 2006 (38)
- December 2005 (40)
- November 2005 (37)
- October 2005 (32)
- September 2005 (25)
- August 2005 (30)
- July 2005 (28)
- June 2005 (21)
- May 2005 (8)
- April 2005 (22)
- March 2005 (17)
- February 2005 (29)
- January 2005 (10)
Search Site:
Links:
- Lily’s Wai Sek Hong
- 101 Cookbooks
- A cat in the kitchen
- A Veggie Venture
- Accidental Hedonist
- Cha Xiu Bao
- chez pim
- Chocolate & Zucchini
- Chopstick Cinema
- Chowhound.com
- Chubby Hubby
- Cook sister!
- Cooking with Amy
- da*xiang
- Eat Local Challenge
- Eating Liberally
- Ecocentric
- Eggbeater
- Epicurious
- Farmgirl Fare
- Fatfree Vegan
- Foodgoat
- ForkandBottle.com
- Green Olive Tree
- Hooked on Heat
- Jaden’s Steamy Kitchen
- Kalyn’s Kitchen
- Lucullian delights
- Mahanandi
- Matt Bites
- MeatHenge
- mmm-yoso!!!
- New York Times – Dining & Wine
- Pizza Goon
- Rasa Malaysia
- Ruhlman
- Sailu's Kitchen
- Serious Eats
- SF Gate: Food & Dining
- Simply Recipes
- Soul Fusion Kitchen
- Tastespotting
- The Amateur Gourmet
- The Cleaner Plate Club
- The Food Section
- The Grub Report
- thecookscottage
- U.S. Food Policy
- Wandering Chopsticks
- Washington Post Food and Dining
- Wasted Food
Meta:

Powered by WordPress. Graphics by Zak Kramer.
Design update by Daniel Trout.
Entries and comments feeds.