Cook Local, Eat Global
Will Curry Call Her Home One Day?

I suspect that I am quite lucky.
Kat, although she has started doing the toddler food-controlling games, still loves real honest to God food.
Here, you can see her using a regular sized spoon to feed herself homemade Cajun red beans and rice. Hardly a bland dish, my vegetarian version is filled with onions, garlic, and both sweet and hot peppers, Thyme, rosemary and celery seeds add fragrance, and Kat adores it.
She still loves curries, mattar paneer is a favorite, but she also likes various chicken curries. The other day at Casa, she was scooping up refried beans and guacamole with a regular teaspoon and feeding herself quite handily. She even scooped up pieces of quesadilla from Zak’s plate–he’d tear off bits of his pork, rice and refrieds quesadilla and she’d use her spoon to scoop them up, instead of picking them up in her fingers. She is very into using a spoon these days.
Blueberries are a favorite, as are potatoes in any form. Cheese is beloved–although she has the toddler peculiarity of thinking that all cheese must be orange to be cheese. I have to convince her to try white cheeses, even though she used to eat them gladly a few months ago.
Eggs scrambled with cheese and herbs is a great quick lunch or breakfast for her, and she always eats it. Whole wheat toast with butter and sometimes strawberry jam are also favorites–the one time she was given white bread at my parents’ home, she spit it out. Instead, she chose to eat the pumpernickel bread that her grandfather was eating–bland foods just do not impress her at all.
She likes beef, mushrooms, carrots, green beans, Thai basil–we know this because Zak plucked a leaf from our deck garden for her to taste and her eyes lit up and she insisted on another leaf immediately. She even liked my Thai Basil Chicken, even though it was very hot with the first Thai chilies from the garden.
And she still loves fresh tomatoes, and has been keeping an eye out for ripe ones on our huge tomato plants up on the deck. Spaghetti with tomato and basil sauce and lots of freshly grated cheese is another perennial favorite, especially if there are some cut up olives or some chili flakes in it.
We still feed her so-called “kid foods–” meaning that she snacks on cereals and crackers, and now and again, she has macaroni and cheese or ramen noodles from a package for lunch, but then, so do the rest of us. She eats ice cream when we do (chocolate is her favorite) and when we have tortilla chips with salsa, she is right there with us.

And sometimes, she has cereal for lunch, just because that is all she is interested in eating.
But all in all, she eats what eat quite happily and cheerfully. She is a little more wary of new foods and flavors these days, but is still much more adventurous than a lot of kids are. We don’t cook separate meals for her when we are eating–we just make sure that there will be something in our meal that she will like and eat.
And there almost always is. (Especially when we are having Singapore Rice Noodles, which combine her favorite foods–noodles and curry–a meal made in heaven for Kat!)
So, I guess I am lucky.
I cannot help but wonder what sort of tastes she will grow up with, eating these sorts of foods. What will her childhood memories of dinner be like, since she has eaten a combination of Appalachian farm food, Indian and Thai curries, Chinese and Thai stir-fries and Mexican foods, as well as traditional and improvised pasta dishes? And she is still getting exposed to pizza, a few french fries and the occasional hot dog, just like most kids.
What food memories will she carry with her as an adult? What scents, flavors and textures take her back to her childhood and give her a sense of comfort and “home?”
I think about that often, and I think that more parents should, too. What we feed our kids early in their lives is what they will want to eat for the rest of their lives. I was lucky in that I was fed mostly homemade foods, most of them fresh and locally grown, with convenience items at a minimum, and fast foods as a special treat. And to this day, a plate of sliced tomatoes, well-salted and peppered, next to a platter of grilled or freshly boiled corn on the cob and a big bowl of ice-cold coleslaw makes me miss my Grandma. The smell of roast lamb and cauliflower with cheese sauce brings to mind my Gram, and a certain combination of tomatoes and herbs make me think of my Aunt Nancy’s spaghetti sauce. And the smell of beef and lentils cooking into a thick soup makes me think of Mom and Dad.
Will the scent of Indian spices and Thai basil, of sesame oil and Shao Hsing wine, of toasting chilies and warm tortillas fresh from the griddle do the same for Kat? Will curry call her home in her mind long after I am gone? Will the flavor of Singapore Rice Noodles in a restaurant remind her of her mother’s kitchen?
It is just something I think about.
Moroccan Gazpacho
There is no traditional dish called Moroccan gazpacho.
I just want to be clear about that up front.
I made it up.
I wasn’t the first person to make it up, apparently, but rest assured that any version of this soup you run across is not authentically Moroccan.
It may be gazpacho, but it sure isn’t Moroccan.
Now that we have that out of the way, let’s just talk about how this recipe came to be.
We needed a lunch special at Salaam.
And there were large fresh local tomatoes, lots of basil, red onions, garlic, green and red peppers, cucumbers and lemons newly preserved with salt in the Moroccan style.
Oh, and we had stale pita bread, olive oil, harissa, red chili pepper, cumin and cinnamon.
I wondered what gazpacho would taste like if I made it with preserved lemons and Moroccan spices.
So, I decided to find out.
It turns out that preserved lemons, harissa, cumin and cinnamon take the ubiquitous chilled Spanish soup and make it taste fresh and new, which is, as Martha Stewart would say, “a good thing.”
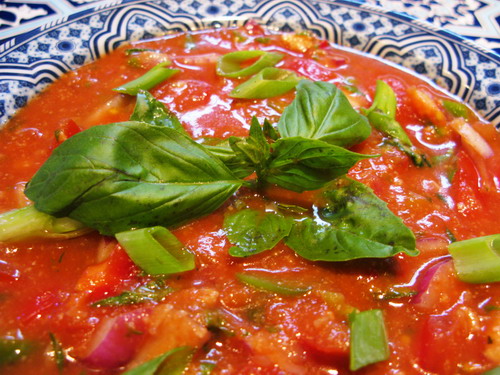
Generally speaking there are two general textures for gazpacho–blended smooth or chunky with diced ingredients.
I make mine so it is half blended and half chunky, which gives the best of both worlds. The liquid is thick and smooth, with finely diced vegetables throughout. To make the smooth liquid, I puree the bread with olive oil, a cucumber and garlic. (If you are gluten intolerant, leave out the bread, although your gazpacho will lack a certain body and creaminess that the bread imparts.) Most recipes at this point add water to thin out the liquid, but I always use V-8 juice, which coincidentally, we keep in Salaam’s pantry.
I find that using the vegetable juice blend gives a more complex flavor than just using water would do.
Then, I dice up tomatoes, onions, peppers and seeded cucumbers, add salt and pepper, and whatever herbs I have on hand, and voila–gazpacho.
For the ersatz-Moroccan version, I pureed a whole preserved lemon, a tablespoon or two of harissa sauce and a bunch of cilantro with the bread, olive oil, cucumber and garlic, and then added to the diced ingredients toasted, ground cumin, some cinnamon and a lot of fresh basil, roughly chopped.
It turned out beautifully, and nearly sold out at lunch, which is always a good sign.
I loved the complex fragrance, flavors, the textures and especially the summery bright calico colors of this soup and I will be making it again and again this summer.
Moroccan Gazpacho
Ingredients:
1 piece pita bread
1 cucumber, peeled and seeded
1 preserved lemon
1-2 tablespoons harissa sauce–to taste
1 bunch cilantro. stems removed
1/3 cup extra virgin olive oil
4 large cloves garlic, peeled and sliced
3 cups V-8 juice
5 tomatoes, cored and diced finely
1 large cucumber, peeled, seeded and diced finely
1 sweet red bell pepper, cored, seeded, finely diced
1 sweet green bell pepper, cored, seeded and finely diced
1 large red onion, peeled and finely diced
1 heaping teaspoon cumin seeds, toasted, cooled and finely ground
1/8 teaspoon ground cinnamon
salt and ground cayenne chili to taste
1 cup roughly chopped fresh basil leaves
whole basil leaves for garnish
Method:
Puree in a blender or food processor, the bread, cucumber, preserved lemon, harissa, cilantro, olive oil, and garlic. Put in serving bowl and whisk in the V-8. Stir in the remaining vegetables, and any of their juices from the cutting board. Add seasonings, and add salt and chili pepper to taste.
Garnish with whole basil leaves.
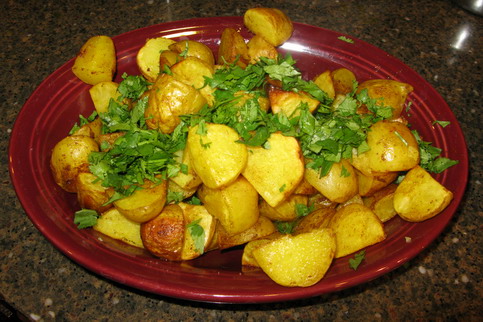
Garam Masala Roasted New Potatoes
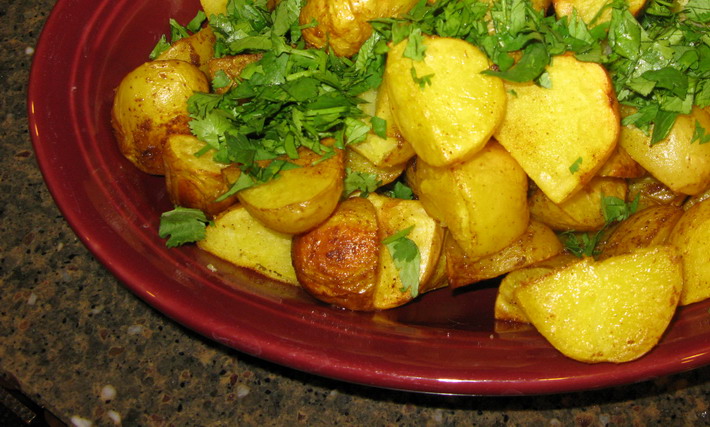
These potatoes are so simple to make, and they taste and look beautiful.
This recipe started out with baby Carola potatoes. Carola is a German heirloom variety with thin, golden skin and creamy yellow flesh that has a slightly sweet, earthy flavor. Of course, you could use any kind of baby potatoes to make this dish–fingerlings or tiny Red Bliss, or Yukon Gold would be just fine.
I made these potatoes to go with my traditional Fourth of July dinner, which consists of foods from elsewhere. In recognition that our country was founded by immigrants, and in support of my belief that what makes America strong and great the diversity of cultures which call this country home.
This year, we had Indian food. Other years, we have had Thai food, Mexican food and Italian food.
Next year, I have no idea what we will have to eat at our Fourth of July bash, but no doubt, it will be tasty, and I will likely do what I have always done–make a mix of traditional recipes and my own dishes inspired by the traditions of whatever cuisine we are cooking and eating at that time.
These roasted potatoes are not traditionally Indian. They are basically made the same way that potatoes are roasted in European traditions, but instead of drizzling them with olive oil, I used peanut oil, although melted ghee or canola oil would have worked. I also seasoned the oil with salt and my own house mixture of garam masala, which includes cloves, black peppercorns, cumin, cinnamon, black cardamom, dried cayenne chili and a bit of green cardamom. In order to boost the natural golden hue of the potatoes, I added about a quarter teaspoon of ground turmeric.
And, after the potatoes were done, I sprinkled freshly chopped parsley over them as a garnish. If I would have had some Aleppo pepper flakes left, I would have used those as well to add sparkles of rosy red to the dish. Mint would have worked just as well, but I had more cilantro than mint in the garden, so that is what I used.
These roasted potatoes would be great with roasted chicken or a leg of lamb. I also happen to think they would be great as part of a vegetarian Indian meal with mattar paneer, broccoli with panch phoron and bhindi masala.
Garam Masala Roasted Potatoes
Ingredients:
2 pounds baby potatoes, well scrubbed and thoroughly dried
1/3 cup peanut oil, ghee, or canola oil
1/2 teaspoon salt
1 teaspoon garam masala
1/4 teaspoon ground turmeric
1/2 cup roughly chopped cilantro, mint or scallions
2 teaspoons Aleppo pepper flakes (optional)
Method:
Preheat oven to 400 degrees F.
Cut the potatoes into halves or quarters depending upon their size–you want the pieces to be bite sized. (I cut mine into quarters.) Place potatoes on one or two baking sheets with rims, preferably. (I lined the baking sheets with silpats in order to make cleanup easier.)
Mix together the oil (melt the ghee first if you use it), salt, garam masala and turmeric, and drizzle over the potatoes. Toss potatoes gently to coat.
Bake in preheated oven for thirty minutes. Stir potatoes after thirty minutes and return to oven to bake until the outside of potatoes are crispy and the inside is tender.
Sprinkle with cilantro, mint or scallions and Aleppo pepper flakes for garnish and serve immediately, while still hot.
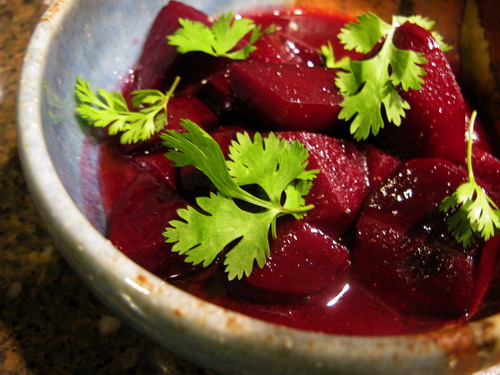
Baby Beets With Balsamic Honey Glaze and Garam Masala
When I was a little girl growing up on my grandparent’s farm, my least favorite vegetable was beets.
I loathed and despised them–I thought that they tasted like dirt.
Paradoxically, I used to love helping Grandma can and freeze the bounty of our gardens (every year we grew two one-acre plots–enough to feed the entire family) my favorite project was canning beets, even if I hated the way they tasted.
Why was this?
Because for whatever reason, I was intoxicated by the smell of cooked beets, and I found their brilliant rubine color to be be mesmerizing. The fact that packing slippery slices of these brilliantly colored roots tinted my hands pink was a fun bonus. I especially liked helping to make sweet and sour pickled beets–the fragrance of the hot carmine-colored vinegar-sugar pickling liquid was delicious, even if I didn’t like the way it tasted.
And when we were done, the jars, when they were lined up on tea towels on the kitchen counter, looked like jewels or stained glass when the late afternoon sun poured through the window, bathing the cooling beets in golden light.
It wasn’t until I was pregnant with Morganna that I finally decided I liked beets, and it was because of a craving for iron.
I was unable to take the iron supplements ordered by my doctor, because they made me very ill, so in order to avoid anemia–a problem that I have faced my entire life–I was told to eat more iron-rich foods. Spinach was simple, because I love it, and red meat was no problem as I was craving it. Liver should have been a problem for me to eat, as well as beets, for I hated them, but the truth was, my body needed iron so badly, I started craving them. I would smell chicken livers cooking, or liverwurst, and would start salivating. And when I smelled my then mother-in-law cooking sweet and sour beets, I nearly went mad with hunger and started eating them out of the pot before they were quite finished cooking!
They tasted divine–earthy and sweet, and the “dirt” flavor that so repelled me as a child was infinitely attractive when I was pregnant. And their sauce was buttery, sweet and sour at the same time. So delicious! I took to eating beets nearly every day, I loved them so much.
Too bad I had never heard of borscht at that time, or I would have been eating it all the time–beef, beef bones, sauerkraut and beets–I would have been in heaven!
Surprisingly, my love of beets stayed long after Morganna was born and I was finished nursing her. Over the years, I discovered various ways to make beets, ways that made them palatable to even the most vociferous of the anti-beet brigade. I particularly liked introducing baby roasted beets to beet haters presented in a salad with pears and chevre, dressed in a honey-balsamic vinaigrette.
Last night, I had a craving for beets, which was convenient, because I had a little bundle of baby beets in the fridge from Shade River Organic Farm I bought at the Farmer’s Market the week before.
But I didn’t have time to roast them, so I decided to peel them, cut them into quarters and boil them until they were just tender enough to pierce with a fork, but not so tender that they were mushy. Mushy beets, unless we are talking about pureed beets in borscht, just don’t do it for me.
I cooked them in as little salted water as possible, and after they were done, I added about a tablespoon of local wildflower honey, and a half tablespoon or so of balsamic vinegar.
A pinch of salt, and then about a quarter teaspoon of my house made toasted and ground garam masala and a teaspoon of butter finished the glaze for the beets, which I garnished with lacy fresh cilantro leaves.
So simple, and so very like the sweet and sour beets my Grandma made, and yet still, different. The balsamic vinegar added a floral note as did the honey, and the garam masala drew out the earthiness of the beets and embraced them with the warmth of sunny spices.
“Garam masala” means “hot spice mixture” and refers to the warming spices used in Indian foods. It doesn’t necessarily refer to chilies, however, and not every garam masala blend includes chilies. Each family or cook has their own blend of spices that they use, usually toasted and ground in small amounts in order to ensure that the spices are as strongly scented and flavored as possible.
My garam masala blend is made of one teaspoon black peppercorns, 3 cloves, 1/4″ stick of cinnamon, c1 tablespoon oriander and 1 teaspoon cumin seeds, and 2 green cardamom pods, all toasted in a skillet then cooled and ground to a powder. I keep it in an airtight jar on my counter, and use it at the end of cooking whenever I have a dish that needs a little extra something to make it sparkle. You can use your own recipe for garam masala or use whatever commercial blend you like. Penzey’s Garam Masala is pretty darned good if you don’t want to make your own.
These beets make a great side dish for any summer meal–whether you are making American, French or Indian food–they are delicious. They are just as good hot off the stove, at room temperature or lightly chilled, though if you are going to chill them, I suggest using olive oil instead of the butter.
This recipe is only enough to serve one or two people, but you can scale it up however you like in order to make more. Just be aware that the garam masala should be added to taste in larger quantities–spices never ever scale up perfectly by simple multiplication the way other ingredients do.
Baby Beets With Balsamic Honey Glaze and Garam Masala
Ingredients:
1/2 pound baby beets, tops and root ends trimmed, peeled and quartered
water as needed
pinch kosher salt
1/2 tablespoon balsamic vinegar
1 tablespoon wildflower or other honey
1 teaspoon butter
1/4 teaspoon garam masala–or to taste
1/8 cup cilantro leaves for garnish
Method:
Put beets in a small saucepan with only enough water to barely cover them. Bring to a boil over medium heat and cook at a brisk simmer until the beets are done to your liking. I like mine tender enough to be pierced by a fork, but still firm. but you cook your beets how you like them. I like to cook them quickly, though, so as little of the pretty red coloring, called betaine, comes out in the water as possible.
While the beets cook, allow the water to reduce naturally to about half of its original volume. If, by the time the beets are done to your liking, there is still too much water, just drain some of it out. Then stir in the other ingredients, except for the cilantro, and let it simmer for a minute or two more to allow the flavors to mingle and the sauce to thicken slightly.
Sprinkle with the cilantro leaves and serve either immediately or after allowing the beets to come to room temperature.
Seared Tuna a l’Indienne

First of all, this is not a traditional Indian fish dish. That is why it has a French name, not an Indian one.
It is an original recipe using traditional Indian elements such as dal, chutney and papad, put together by me in untraditional ways.
I have to admit that the idea for this dinner special was not mine.
Dennis, also known affectionately (at his own behest, I must add) as Brown Sugar, who is the day shift cook at Salaam, came to me with a photograph from a cooking magazine along with a recipe. “Could we do this?” he asked.
The photograph illustrated a recipe for a seared fish steak (I believe that it was swordfish, but I may be wrong) served on a bed of southwestern-style seasoned black beans, with a crackling covering of deep fried yucca sticks, and topped with a pat of cilantro lime butter.
I had to admit, it looked delectable–and I could almost smell the different spices–chiles, cumin, onions, garlic, cilantro and lime, all mingling into a fragrant melange.
However, the thematic range of Restaurant Salaam doesn’t really extend to the southwestern US. Our menu encompasses the regions from the Eastern Mediterranean to the Middle East, to North Africa, India, Thailand and farther east now and again, but doesn’t really go as far west as New Mexico.
So I thought about what made that dish so appealing, with an eye toward translating it and “Salaamifying” it.
I think that the one of the most interesting aspects of this recipe are the contrasting textures. The fish is firm-fleshed and seared crisp on the outside and tender and rare on the inside. The beans are soft, but not mushy, the butter is fragrant with a meltingly soft texture. And the yucca is crispy-fried and starchy, adding yet another layer of flavor and texture.
I decided that we could make a compound butter out of my cilantro chutney recipe by simply blending it with softened butter. The chutney is fairly wet, which meant that I would have to squeeze some of the juice from the butter once it was blended, in order to roll it into cylinders and wrap it in plastic wrap, but I was certain that the flavor would be amazing, especially since I knew that the green chutney by itself is amazing with fish.
Instead of beans, I decided to make a sauce out of masoor dal, which cooks into a pale yellow puree all on its own. This, I seasoned simply with a tarka of deeply browned onions and garlic, with whole mustard and cumin seeds. I also added frozen methi greens to the dal, along with some dried methi greens, to give a slightly bittersweet fragrance to the sauce, as well as giving it body and a hint of green coloring. You could use any masoor dal recipe you wanted for this though, like one that includes summer vegetables such as squash, tomatoes or spinach.
The tuna was simple–I just seasoned it with a rubbing of salt and finely ground pepper. I could have coated it with coarsely crushed spices–like making steak a poivre, but I decided against adding the spices, since the butter and dal were both highly flavored. Then, I seared it on both sides in a very hot skillet, with very little oil.
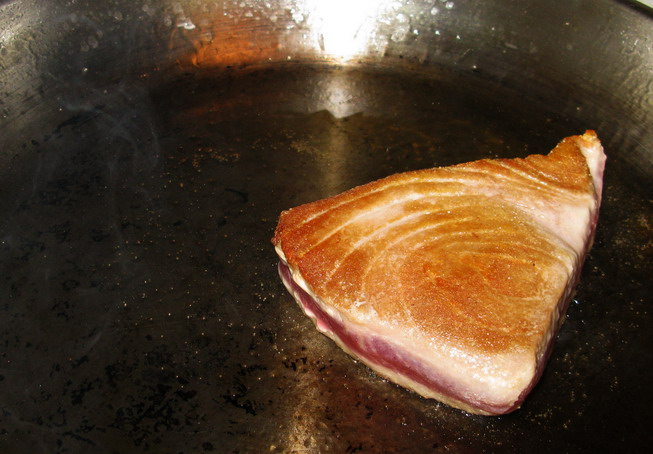
Searing fish steaks is quite simple, and goes quickly. All you have to do is use a cast iron skillet, heated to smoking on high heat. Add a tiny bit of oil that has a high smoking point, like peanut or canola oil–I like to use a spray bottle, but it isn’t necessary. You just want enough to keep the fish from sticking–you don’t want the oil to puddle into a pool in the pan. Remember–you aren’t frying!
Then put the fish into the pan and let it brown into a nice crust on one side. You will see some opacity creep up the sides of the steak as the bottom cooks. You will know the bottom is done when it releases completely from the pan when you slide a spatula under it. If it sticks a bit, leave it be–it needs to cook a little more. When it is done, flip it and you will see that the flesh has turned a pretty golden brown.
How long does this take–only a few minutes.
Then, let it cook on the second side until it is completely golden brown on that side. After a minute of searing on the second side, clap a lid over the fish–I like to use a clear glass one, so I can watch what is going on in the pan. It should take about another minute or so to finish cooking that side.
The lid keeps the heat concentrated and helps cook the interior of the flesh as well as the outside. Leaving the lid off for a minute allows the outer edge to crisp lightly.
After that, using tongs, hold the fish so that each outer edge is seared against the pan as well. This only takes about a minute per side.
At this point, check the internal temperature to determine if the fish is done to your liking. Using an instant read thermometer, put the probe all the way into the center of the steak.
For rare, which is my favorite for tuna (which I am still not eating because of the mercury issue), the temperature should be between 120-125. For medium-rare to medium, 130-135 is perfect. For medium well, 140-145. For well done tuna, which I philosophically disagree with, cut the tuna steak in half longitudinally so you can cook it all the way through without turning the outer bits of the fish into sawdust. I consider well done tuna to be overdone, but some people like it that way. It is well done when you stick a knife in, pry it lightly apart and see that there is no pink lingering in the center of the fish.
For rare, if the fish hasn’t come to temperature yet, just pop the lid back on and cook for another minute or a minute and a half. Check the temperature again. Be quick about it–don’t walk away and leave the fish with the lid on, or you may overcook it.
For medium rare, do the same.
For medium well to well, add a very small amount of water, wine or vegetable broth to the pan, and clap the lid back on. Only use between 1/4-1/2 cup of liquid, which produces steam. Steam is very hot and hastens the cooking of the interior of the fish, while adding moisture. This keeps it from drying out and becoming rubbery, which is a sinful waste of a beautiful piece of fish.
My final conundrum was how to add an element of crunch, which was provided in the original recipe by the deep fried yucca.
I ended up using bits of pappad–black pepper, cumin and coriander flavored lentil wafers that I shallow fried and broke apart beforehand. These can be cooked ahead by several hours and can be kept in an airtight container until they are needed. They are lightly crisp and delicious and the jolt from the lightly crushed spices in this particular variety made up for me not spicing the fish itself.
Pappad can be toasted over an open flame instead of fried and while I have heard that they can be microwaved into crispiness, I have had little luck with that cooking method. They never seem to cook evenly that way, and are not as crisp, so for this recipe, I would stick with frying.
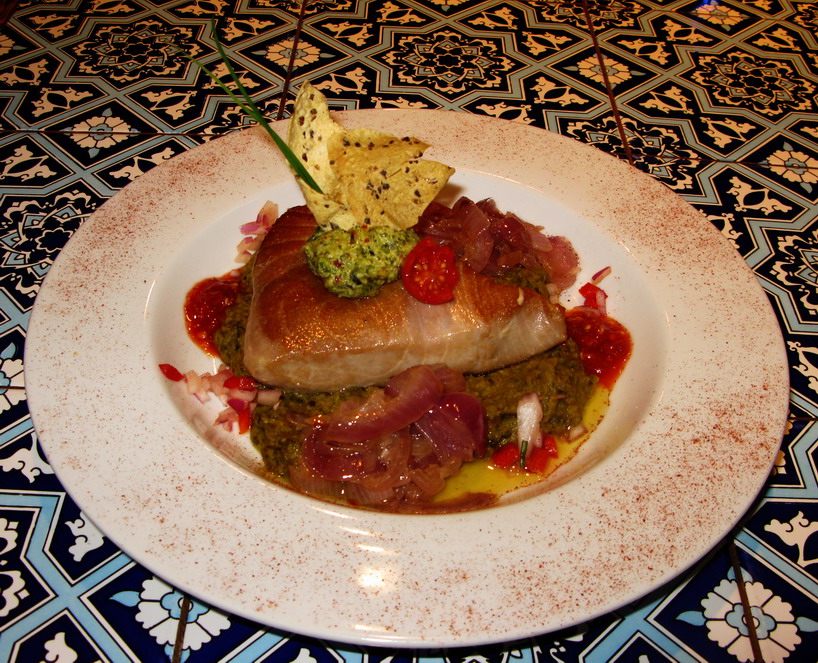
Finally, to garnish the dish, I chose to use some red onions sauteed in butter and some sriracha sauce, as well as a cherry tomato cut into the shape of a lotus blossom. Otherwise, the colors of the dish tended toward the green and yellow; the touches of red and violet balanced the plate perfectly, while adding still more layers of flavor.
Everyone who tried it whom I spoke with loved the balance of flavors and textures, and I was very fond of the way in which the relatively plain, high quality fish was enhanced by the addition of the Indian spiced dal and chutney butter, but was not overwhelmed. (I did take a taste of the one I cooked for the staff to try–one bite will certainly do no harm to either Kat or I–it was amazing.)
So, thank you ever so much, Dennis. Your idea was a great one, and you will see it come up as a special again.
I promise.
Here is a guide to making it, with links to recipes that you can use to make the chutney and the dal.
Seared Tuna a l’Indienne
Ingredients:
canola or peanut oil for shallow frying
1 package papad
1 recipe cilantro chutney (obviosely leave out the fish and rice–just make the chutney)
1/2 pound butter, softened
1 recipe masoor dal tarka–to perfectly replicate what you see in the photograph, replace the tomatoes with one cup frozen methi leaves, and add 2 tablespoons dried methi leaves to the lentils as they cook, and leave out the chilies and ginger from the tarka.
3 tablespoons butter
3 medium sized red onions, thinly sliced
1 teaspoon salt
sriracha sauce as needed for plating
canola or peanut oil for searing
salt and freshly ground pepper to taste
4 tuna steaks, 6-8 ounces each
Method:
Heat the first measure of oil for shallow frying over medium heat. When it is hot, add pappad, one at a time. They will sizzle and balloon up and outward immediately, and begin to darken in color slightly. They are done in seconds. I like to use tongs to put them in the oil, and then as I am lifting them out and they are still pliable, I crinkle them up into interesting shapes. Then, I set them down on layers of paper towels to cool and drain.
Be sure not to let them brown too much–they should be pale tan–a little darker than regular file folders. They will darken slightly even after they come out of the oil, so take them out sooner rather than later.
After they are cool and drained, crumble them into interesting random shapes and put them in an airtight container.
Put the chutney in the bowl of a food processor or electric mixer. Add the softened butter, and process or whip until the two are thoroughly combined.
Lay out 2 feet of plastic wrap on the counter. Take handsful of the chutney butter, and squeeze out excess liquid. Shape 1/3 of the butter roughly into a cylinder and place in the center of the sheet of plastic until the butter extends along the length of the plastic wrap, with three inches of wrap free on either side of the butter. Roll the wrap over the cylinder tightly, and then twist the free wrap at both ends like you are wrapping up a giant piece of candy. Roll the encased butter on the counter to make it as even and neat as possible. Lay it on a baking sheet and place it in your freezer until it is firm. Repeat with the remaining 2/3 of the butter. Before serving bring out onto the counter to soften it. (You can make this weeks in advance and keep it in your freezer until the day it is needed.) This makes more butter than you will need for this recipe, but I find that it is so tasty and useful to have in the freezer, I don’t mind. It is great on fish, grilled shrimp and chicken and tastes good melted into plain steamed basmati rice. It is good melted into dal as well, and will perk up a so-so curry as well. Just cut off a bit of it and dump it into whatever you want to taste better.
For service, bring the butter roll to room temperature, and cut 1″ chunks from it. Shape these into balls, and flatten them on the bottom by pressing on a clean cutting board or plate.
Make the masoor dal, and keep it warm until you need it.
Melt the butter in a heavy-bottomed skillet on medium high heat and add the onions. Sprinkle with the teaspoon of salt and cook, stirring, until the onions turn translucent and soften, but not until they brown. You want to retain as much color in them as possible. Remove from heat, and set aside until you are ready to plate the fish.
Heat a cast iron skillet over high heat until it begins to smoke slightly. Add a tiny bit of oil–spray is easiest–to just barely coat the bottom of the pan and make it shiny. Rub salt and pepper into the tuna steaks and one or two at a time, cook as directed above. Cook no more than two at a time as more will lower the heat of the pan too much and the fish will not cook properly. To keep the fish warm until it is ready to serve, either have an oven heated to 150 degrees, and set each steak upon it as it is done, or serve each person their entree as it is done and don’t worry about sending everything out at once.
It also helps to have warm plates to serve on–you can heat them in the oven if they are oven proof, or run them through your dishwasher timed such that they will be on the dry cycle and thus very hot right when dinner is to be served. A very hot plate with hot dal on the bottom will keep the fish sufficiently hot so you can cook and plate everyone’s entree for service at the same time.
To plate the dish, ladle or spoon a scant 1/2 cup of dal on the center of a plate or shallow bowl. Place the tuna steak in the center of the dal. On two opposite sides, put small piles of sauteed red onions, and on the other opposite sides, put two small dots of sriracha sauce. Put a chutney butter ball on top of each fish steak, then poke two to three interestingly shaped pieces of papad into the butter, standing upright. If you wish, add cherry tomato lotus blossoms, finely diced red bell pepper bits or long pieces of chive to the composition, and serve it forth.

Categories:
- Admin (rss) (55)
- Blogs and Blogging (rss) (81)
- Book Reviews: Cookbooks (rss) (43)
- Book Reviews: Non-Cookbook Food Books (rss) (38)
- Cats and Cat Blogging (rss) (47)
- Chinese Cooking Lessons (rss) (32)
- Culinary School Stories (rss) (18)
- Dairy Pruducts: Cultured and Barbaric (rss) (4)
- Documentary Filmmaking (rss) (1)
- Essays, Rants and Reflections (rss) (260)
- Fighting Hunger (rss) (12)
- Food and Kids (rss) (45)
- Food in the News (rss) (126)
- Food Media (rss) (98)
- Food Preservation (rss) (18)
- Food Safety (rss) (45)
- Gardening (rss) (30)
- Herbs and Herb Blogging (rss) (20)
- Holidays (rss) (50)
- Kat Blogging (rss) (22)
- Kitchen Science (rss) (36)
- Leftover Makeover (rss) (8)
- Life, the Universe and Everything (rss) (131)
- Local and Sustainable (rss) (227)
- Local Athens Food and Foodies (rss) (42)
- Meatless Mondays (rss) (32)
- Menu For Hope (rss) (5)
- Nutrition, Diet and Health (rss) (84)
- On The Farm (rss) (8)
- Recipes: Almost Vegetarian, Vegetarian and Vegan (rss) (294)
- Recipes: American Regional (rss) (37)
- Recipes: Appalachian Hillbilly (rss) (33)
- Recipes: Bread, Pasta, Grains (rss) (95)
- Recipes: Canning and Preserving (rss) (8)
- Recipes: Chinese (rss) (123)
- Recipes: Comfort Food (rss) (120)
- Recipes: Cookies (rss) (16)
- Recipes: Desserts (rss) (48)
- Recipes: French (rss) (25)
- Recipes: Fruits and Vegetables (rss) (302)
- Recipes: Greek, North African and Middle Eastern (rss) (31)
- Recipes: Indian (rss) (137)
- Recipes: Italian (rss) (42)
- Recipes: Japanese (rss) (7)
- Recipes: Jewish (rss) (4)
- Recipes: Korean (rss) (6)
- Recipes: Meat, Poultry and Fish (rss) (220)
- Recipes: Mexican/Native American/ Latin American/Caribb (rss) (27)
- Recipes: Original (rss) (108)
- Recipes: Thai (rss) (27)
- Recipes: Tofu (rss) (17)
- Recipes: US Regional (rss) (16)
- Recipes: Vietnamese (rss) (8)
- Restaurant Stories (rss) (28)
- Sewing, Quilting, Arts and Crafts (rss) (16)
- Simple Chinese Recipes (rss) (30)
- Slow Food and Heritage Foods (rss) (10)
- Spice Blogging (rss) (44)
- The Chinese Cookbook Project (rss) (14)
- The Chinese Pantry (rss) (39)
- The Documentary (rss) (2)
- The Kitchen Saga (rss) (17)
- The Locavore's Bookshelf (rss) (15)
- The Unsung Adventures of The Culinary Nerd (rss) (6)
- Tools and Toys (rss) (35)
- Uncategorized (rss) (10)
- With a Side of Politics (rss) (48)
Archives:
- August 2012 (9)
- July 2012 (12)
- September 2011 (3)
- August 2011 (7)
- July 2011 (8)
- June 2011 (16)
- May 2011 (17)
- April 2011 (11)
- December 2010 (9)
- November 2010 (5)
- February 2010 (1)
- December 2009 (5)
- November 2009 (7)
- October 2009 (10)
- September 2009 (16)
- August 2009 (14)
- July 2009 (14)
- June 2009 (7)
- May 2009 (17)
- April 2009 (10)
- March 2009 (25)
- February 2009 (13)
- January 2009 (10)
- December 2008 (5)
- November 2008 (5)
- October 2008 (6)
- September 2008 (13)
- August 2008 (8)
- July 2008 (11)
- June 2008 (18)
- May 2008 (13)
- April 2008 (14)
- March 2008 (16)
- February 2008 (17)
- January 2008 (19)
- December 2007 (25)
- November 2007 (18)
- October 2007 (24)
- September 2007 (16)
- August 2007 (15)
- July 2007 (15)
- June 2007 (10)
- May 2007 (14)
- April 2007 (16)
- March 2007 (17)
- February 2007 (20)
- January 2007 (13)
- November 2006 (1)
- October 2006 (8)
- September 2006 (14)
- August 2006 (25)
- July 2006 (30)
- June 2006 (28)
- May 2006 (34)
- April 2006 (29)
- March 2006 (24)
- February 2006 (30)
- January 2006 (38)
- December 2005 (40)
- November 2005 (37)
- October 2005 (32)
- September 2005 (25)
- August 2005 (30)
- July 2005 (28)
- June 2005 (21)
- May 2005 (8)
- April 2005 (22)
- March 2005 (17)
- February 2005 (29)
- January 2005 (10)
Search Site:
Links:
- Lily’s Wai Sek Hong
- 101 Cookbooks
- A cat in the kitchen
- A Veggie Venture
- Accidental Hedonist
- Cha Xiu Bao
- chez pim
- Chocolate & Zucchini
- Chopstick Cinema
- Chowhound.com
- Chubby Hubby
- Cook sister!
- Cooking with Amy
- da*xiang
- Eat Local Challenge
- Eating Liberally
- Ecocentric
- Eggbeater
- Epicurious
- Farmgirl Fare
- Fatfree Vegan
- Foodgoat
- ForkandBottle.com
- Green Olive Tree
- Hooked on Heat
- Jaden’s Steamy Kitchen
- Kalyn’s Kitchen
- Lucullian delights
- Mahanandi
- Matt Bites
- MeatHenge
- mmm-yoso!!!
- New York Times – Dining & Wine
- Pizza Goon
- Rasa Malaysia
- Ruhlman
- Sailu's Kitchen
- Serious Eats
- SF Gate: Food & Dining
- Simply Recipes
- Soul Fusion Kitchen
- Tastespotting
- The Amateur Gourmet
- The Cleaner Plate Club
- The Food Section
- The Grub Report
- thecookscottage
- U.S. Food Policy
- Wandering Chopsticks
- Washington Post Food and Dining
- Wasted Food
Meta:

Powered by WordPress. Graphics by Zak Kramer.
Design update by Daniel Trout.
Entries and comments feeds.