Cook Local, Eat Global
The Wallhanging Top Is Done!

Here is the completed top to the wallhanging I am making for Zak; you can see that I added the appliqué dragonfly two days ago. I drew a pattern on a used piece of printer paper, and cut it out. Then, I applied fusable webbing to the wrong side of two different fabrics–these are really cool–they are iridescent–one is pale ice blue and the other is silvery. Then while the paper for the webbing was still on the back of the fabric, I traced the pattern pieces and cut them out, then peeled off the paper, and placed the pieces on the wallhanging front.
Then, I carefully fused them onto that fabric with a moderately cool iron. Tomorrow, I will do a zigzag stitch around each piece to hold it and to give it a finished edge.
After that, I will cut the batting and the backing fabric–the fabric I am using for it is on the front of the quilt as well, but only in tiny pieces. It is the darkest blue batik with paler leaves and tendrils on it.
Then, I pin-baste the layers together using safety pins, and I start machine quilting. I’ll be using variegated purple and indigo thread in a geometric pattern that will follow the larger shapes of the fabric pieces on the top, which I put together in sections, starting with the center piece.
The centerpiece, with Buddha’s face, if I quilt it, will be done by hand, as soon as my lap quilting hoops arrive. I tried to work on another wallhanging that I had pieced together ages ago for my Mom in it, but because of the thickness of two layers of flannel and the batting, there was no chance that the embroidery hoops I had could work. They just couldn’t keep the tension tight enough for hand quilting. (Which is a skill I am just now learning–it is not hard, but it is not easy, either. I suspect it would be easier on something other than flannel, with a proper quilting hoop or frame. We shall see soon enough.)
And in weather news–it is snowing like mad. We’ve been in the midst of a winter storm here–it isn’t as bad as was predicted, which is not surprising, but still it is pretty bad. Lots of ice, sleet, freezing rain and snow. Which is just wonderful considering that our river in town, the Hocking, has just receeded down from flood stage a few days ago. Wait until all of this melts. It will come up above flood stage again, maybe two more more times this spring, mark my words.
Simple Punjabi Homestyle Comfort Food: Keema Mattar
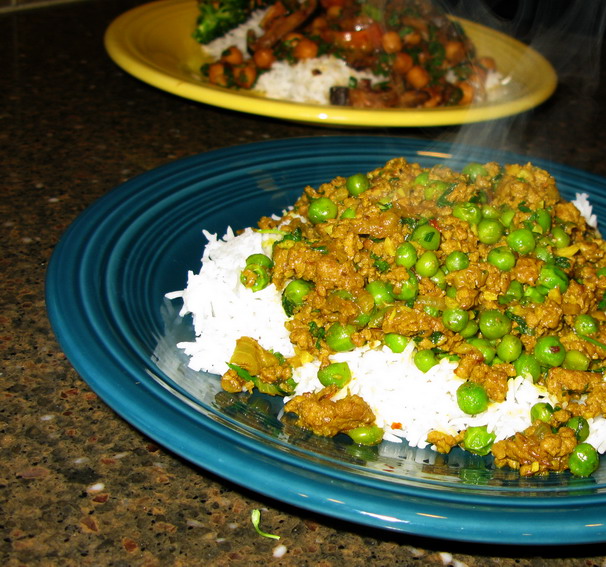
Keema mattar is one of the easiest north Indian dishes to prepare, and one of he most satisfying. It is nothing more than spiced minced meat, usually lamb, cooked with peas. The combination of the hearty meat and the sweetness of the peas is soul-stirring, and it is great served either with warm naan or steamed basmati rice or rice pillau. I like to have some kind of raita, preferably cucumber, or perhaps potato and carrot, and a green chutney and maybe some spicy lime pickles with keema mattar: because it is a dry curry, meaning there is no sauce, it is best accompanied by wet side dishes and relishes.
It is a perfect quick meal for busy families on nights when no one wants to cook anything elaborate or overly time-consuming.
Over the years, I have added baby potatoes, baby carrots or pearl onions to keema mattar, all to good effect, but I like it just as well in its simplest, most authentic variant of just lamb and peas.
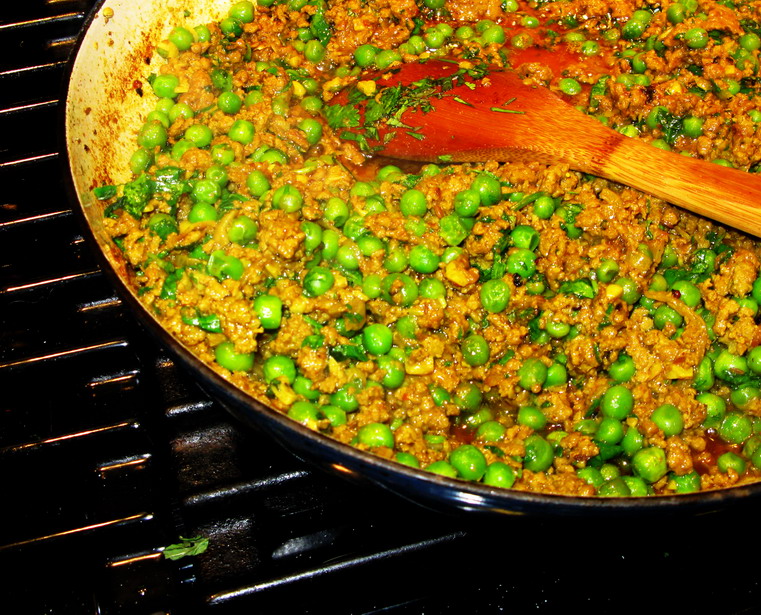
One addition I have made to the recipe technique over the years is browning the lamb in milk. I learned this trick from an Italian chef in culinary school: it is the method used in cooking ragu bolognaise, the classic sauce of mixed minced meats. Cooking the meat in milk results in a perfectly tender, silken ground meat with no clumps or clods of chewy, overcooked protein. After the meat is browned, you just continue cooking until the milk is cooked away. Then, in order to give the spices a chance to fully permeate the meat, a cup and a half of water is added and allowed to slowly simmer away. When the liquid is nearly gone, the frozen peas are added to the pan and stirred to combine. By the time they are cooked to tender, verdant perfection, the water has simmered away.
Then all that is left to do is to stir in a cup or two of fresh, roughly chopped herbs. I like a combination of cilantro and mint, though one could use all of one or the other, or add chives, garlic chives or scallion tops to the mixture.
And that is all–the only thing left to do is scoop some up on some bread, or ladle it over rice and dig in!
Keema Mattar
Ingredients:
1 1/2″ cube fresh ginger, peeled and sliced thinly
6 garlic cloves, peeled and sliced
1/4 teaspoon black peppercorns
4 whole green cardamoms
1 black cardamom
1 1/2 teaspoons coriander seed
1/2 teaspoon fennel seed
1/2 teaspoon cumin seeds
4 whole cloves
2 teaspoons turmeric
1 teaspoon sweet paprika
3 tablespoons canola or peanut oil
2 cups thinly sliced onions
1 teaspoon salt
1 pound ground lamb
1-1 1/2 cups milk
water as needed (about 1-2 cups)
12-16 ounces frozen peas
salt to taste
1 cup roughly chopped fresh cilantro and mint
Method:
Grind the ginger, garlic and spices together, then stir in the turmeric and paprika. Set spice paste aside.
Heat the oil in a heavy-bottomed, deep frying or braising pan, and add onions. Sprinkle salt over onions, and cook, stirring, until onions are deep golden brown. Add spice paste and continue cooking, stirring constantly, until the onions are a reddish, rich brown. Add meat, and break up clumps, then add milk. Continue breaking up clumps and stirring until all the pink is gone from the meat.
Cook until the milk has simmered away, then add a cup or so of water and turn heat down to low. After the meat has simmered for about twenty minutes, and most of the water has cooked away, add frozen peas, and cook, stirring, until the peas are cooked–just until they are tender, warmed up and brilliant green, and the liquid has evaporated.
Season to taste with salt and stir in the fresh herbs, then serve immediately with warm bread or steamed rice, raita, chutney and pickles.
Curried Chicken From the Oven: Masalewali Dum Murghi
Most people think of curries being cooked on the stove top, in a pot, where it simmers over a period of time, sometimes hours, sometimes minutes. But whether a curry takes an hour or more, most of the time, it helps to be in the kitchen in order to stir the sauce and keep it from burning. (Unless you are partially cooking it in the pressure cooker, but even so, at the end of the cooking time, you usually have stir the sauce while it reduces after the pressure is released.)
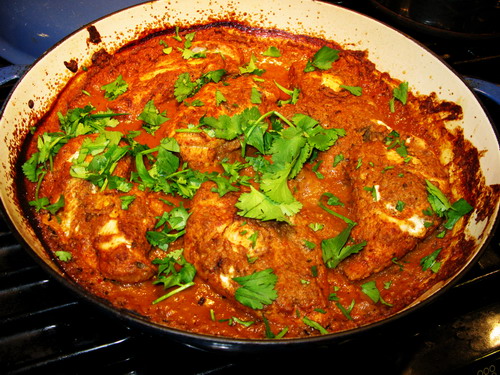
This curried chicken dish is unusual in that it is marinated in yogurt, browned onions and spices, then sealed tightly in a casserole dish and baked in the oven until the chicken is done. The marinade thickens into a delicious sauce while the chicken is cooked to tender perfection. The “dum” in the name of the dish refers to a cooking method that involves cooking food in a tightly sealed pot with very little added liquid, which results in a very tender, extremely well-flavored curry.
I got the idea for this dish from Smita Chandra’s cookbook, From Bengal to Punjab:The Cuisines of India. This cookbook is filled with every day recipes that you would find in Northern Indian home kitchens, not in restaurants or at banquets. These recipes use the same classical techniques that the more complex cookery styles of Northern India, but the recipes are simpler, meant to be made for meals for family and friends. And while the results are not always the prettiest of foods, they always taste delicious.
The marinade and sauce for this Masalewali Murghi is based on yogurt, browned onions, some unsweetened shredded coconut and spices. All that is necessary to put it together is to brown the onions, the coconut and spices in oil. Then this mixture is ground with tomatoes (I used the ones I canned this past summer, instead of the fresh ones called for in the recipe), and whisked into yogurt. This mixture is poured over chicken boneless skinless chicken breasts, and then is allowed to sit, covered for an hour to allow the yogurt to tenderize the meat and the spices to flavor it. Then the casserole is tightly sealed with foil under the lid, and is popped into an oven to bake for forty-five minutes.
When it comes out, the chicken is steamy and tender and the marinade has thickened into a sauce that is great to sop up with bread or serve over rice.
Everyone loved this dish, even if it wasn’t that pretty, and I was asked to make it over and over again. And considering how fast it came together, I see no reason not to comply.

Masalewali Dum Murghi
Ingredients:
2 pounds boneless skinless chicken breasts, trimmed and cut into halves
3 tablespoons canola oil
1 teaspoon cumin seeds
1 teaspoon coriander seeds
1/2 teaspoon fenugreek seeds
1/2 teaspoon black peppercorns
1 inch stick cinnamon
6 green cardamom pods
6 whole cloves
1 dried small red chili
2 tablespoons unsweetened flaked coconut
1 tablespoon sweet paprika
2 cups thinly sliced onions
1 inch piece fresh ginger, peeled and sliced
8 cloves fresh garlic, peeled and sliced
2 medium tomatoes or two cups canned tomatoes, juice drained
5 heaping tablespoons plain yogurt
salt to taste
roughly chopped cilantro for garnish
Method:
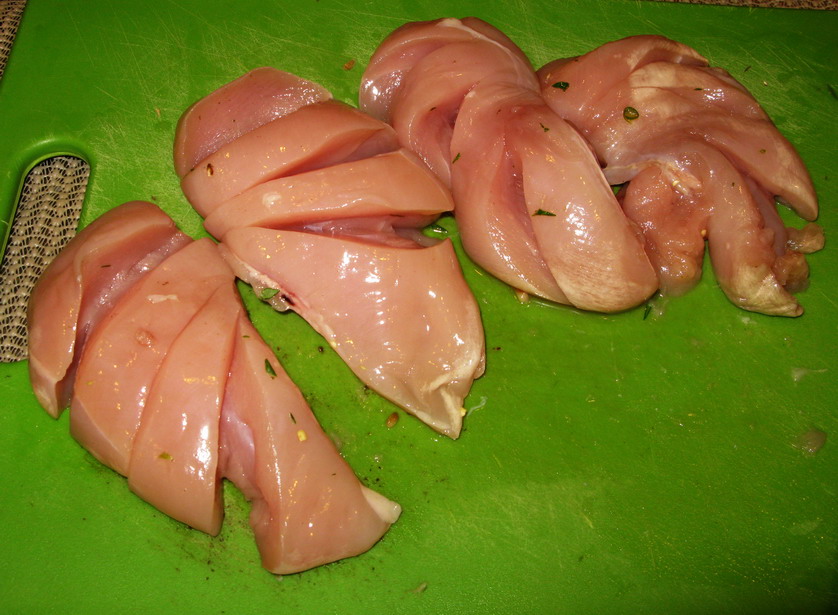
Make deep cuts in the top surface of the chicken breast halves, without cutting all the way through. Set the chicken breasts in a heavy-bottomed casserole with a tight-fitting lid.
Heat oil in heavy bottomed frying pan on medium heat. Add whole spices, and cook, stirring until they puff and darken.–this will take a few seconds. Add coconut immediately, and cook, stirring, until it browns lightly–this will take a few more seconds. Remove the spices with a slotted spoon to a spice grinder, and put the pan back on the heat. Add the paprika to the spices in the grinder, and grind them finely. Put them into a medium sized bowl.
Put the pan back on the heat, and cook the onions, stirring constantly until they turn deep golden. Add ginger and garlic, and cook, stirring, until the onions are a deep reddish brown, the garlic is golden and everything is quite fragrant. Remove onion mixture from the pan to the spice grinder and grind into a fine paste. Add to the spice mixture. Add the tomatoes to the spice grinder and puree, then add to the bowl with the spices and onion. Stir together.
Using a whisk, beat the yogurt into the spices, onions and tomatoes, and season to taste with salt. Pour over the chicken pieces, and put a piece of foil over the top of the casserole before fitting the lid tightly over it. Allow chicken to marinate for an hour.
While chicken is marinating, preheat the oven at 400 degrees F. After an hour, put the tightly covered casserole into the oven, and bake for 45 minutes.
When the timer goes off, remove the lid and scatter roughly chopped cilantro over the top, and serve with rice or bread, and several vegetable dishes.
Flaky Pan-Fried Indian Flatbread: Methi Paratha
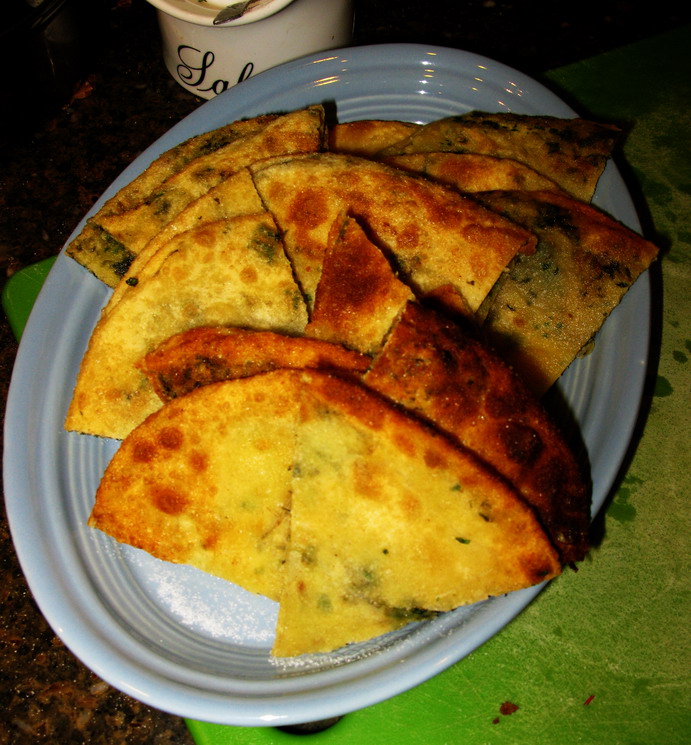
Paratha is a flaky sort of pan-fried round bread from India that is crispy on the outside and steamy-chewy on the inside. I was told by the father of one of my clients, who had been a civil servant in India and thus had to do much traveling around the country, that it is most popular in the northern states, but that it was eaten and made in many variations all over.
The first time I tasted it, I thought it was very much like Chinese scallion pancakes in both flavor and form, although I have since learned that the two breads are not always made the same way. While scallion pancakes are always rolled out flat, then rubbed with oil and sprinkled with scallions, then rolled up like a cigar, coiled into a cinnamon-bun shape, and then rolled back out flat again, many parathas are simply rolled out the one time, and then fried.
While I think that the simpler version is perfect for a quick evening meal, I have to admit that I like the flakiness that adding oil and then rolling up, coiling and then rolling out again produces. The oil separates the dough into tiny layers when treated this way, giving a different texture to the bread than it would otherwise have. And since I grew up eating lard pie crusts that were shatteringly flaky, you can imagine that I would like flaky, layered, fried bread!
Making paratha by this method isn’t as difficult as it seems, and the results are so tasty, I cannot imagine you would not think it was worth it, especially for a dinner for guests. You could also vary the filling–you could add cooked, curry-spiced gobi, or cauliflower, instead of the methi, or fenugreek greens. Or, you could just do cilantro. Or you could do garlic chives, scallions and cilantro. Any of these would be lovely additions.
Although I didn’t add them to this batch, I think that next time, I will use a few spices in my paratha dough. About 1/2 teaspoon of turmeric would give a pale golden color, while a teaspoon of whole, toasted cumin seeds would add crunch and a lovely, musky-sweet scent and flavor. (If you use spices, add them to the flour and salt before adding the water.) I have since found recipes that use yogurt instead of water to make the dough; I intend to try that out instead as well, because that seems like it would make an even more tender and flaky bread.
Oh, and one more thing–if you do not have chapati flour around, you could use half all purpose flour and half whole wheat flour for this recipe. It turns out quite good, and would save you from having to add yet another type of flour to your pantry!
Methi Paratha
Ingredients:
2 cups chapati flour (or 1 cup all purpose and one cup whole wheat flour)
1/2 teaspoon salt
3/4-1 cup water, as needed
1/2 cup dried fenugreek greens (methi), soaked in warm water until softened (or one cup fresh fenugreek, leaves picked off, stems discarded)
1/4 cup cilantro leaves, removed from stems
2 scallion tops, green part only, thinly sliced
Aleppo pepper flakes to taste (I used about 1/2 tablespoon)
1/8 teaspoon salt
2 tablespoons canola or peanut oil
canola or peanut oil as needed for shallow pan-frying the paratha
Method:
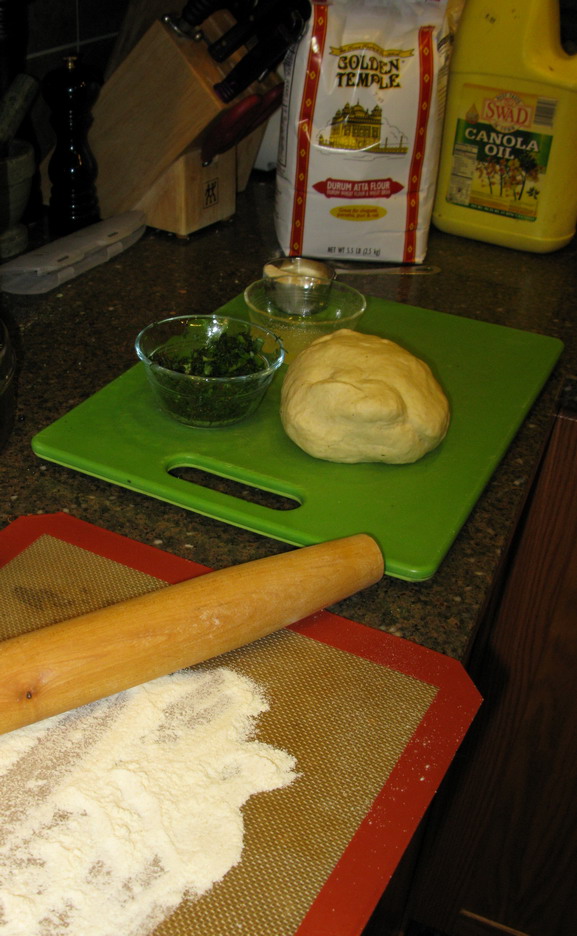
Mix together the flour and salt until well combined. Add water, starting with smaller amount, and adding more as needed to make a medium-soft dough. Knead by hand until smooth and somewhat elastic–about seven to eight minutes. Put in a bowl, cover with plastic wrap and allow to rest for thirty minutes.
Meanwhile, prepare the herb filling. After soaking the fenugreek greens until they are soft, remove them from water and squeeze the excess liquid out. Set on a cutting board with the cilantro and scallions, all put together in a pile. Mince these herbs together, until they are very fine. They will stick together somewhat because of the dampness of the methi, but eventually, they will stop clinging and become drier and more manageable. Mix them with the Aleppo pepper flakes and second measure of salt by hand. Put this mixture in a small bowl, and place it near wherever you plan on rolling out the dough and assembling the breads.
Pour the 2 tablespoons pf the canola or peanut oil into a small bowl and put it next to the methi mixture.
Roll the ball of dough out into a long rope and cut into six equal portions. Set aside all portions but the one you are working with at the time, and cover with plastic wrap.
Take each portion and roll into a ball with your hands. Sprinklle a bit of flour onto your rolling surface, and flatten ball into a disc. Roll out into a thin, round pancake shape.
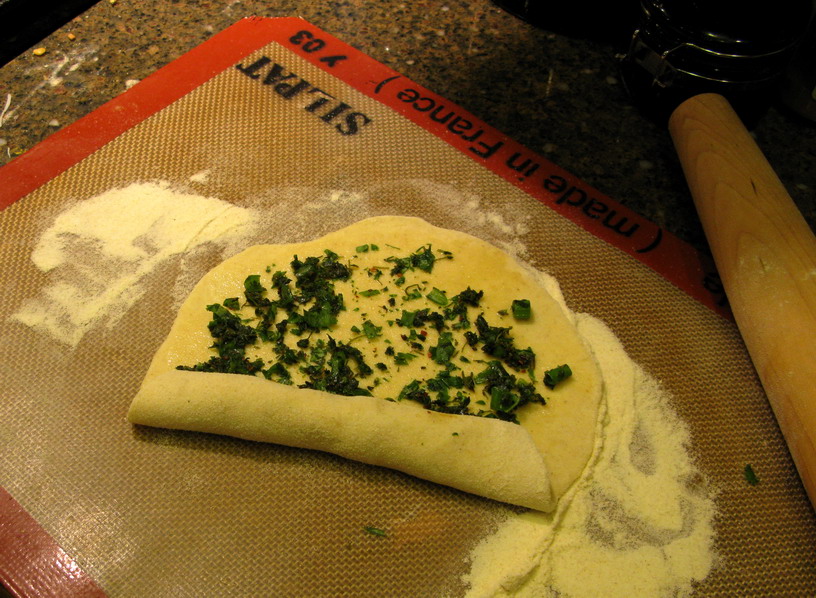
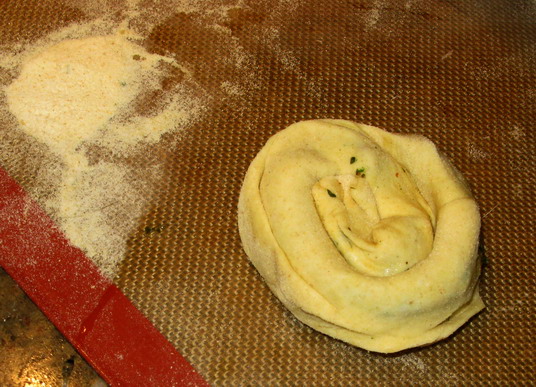
Taking up a bit of oil from the bowl with your fingertips, rub it completely over the surface of the pancake. Sprinkle enough of the methi mixture over the pancake to cover it in a scatter-shot fashion. Roll up like a cigar, and pinch the edges and ends closed with your fingers. Roll the cigar up tightly like a snail or cinnamon bun, and pinch the edges closed, as seen in the photograph above.
Making sure that there is a bit of flour on the rolling surface and some on the rolling pin, roll the pancake out again, and this time, set aside on wax paper and cover with another sheet of waxed paper.
Repeat with remaining five pieces.
Heat enough canoloa or peanut oil on medium high heat to cover the bottom of a pan large enough to fry the paratha.
Add paratha, one at a time to the pan, and allow to brown and puff on the bottom, before turning once. The oil should be hot enough to bubble and hiss immediately after the paratha is put in–if not, it is too cold. Remove the paratha and wait a while longer before frying–if you put it in while the oil heats up, it will absorb more oil and become leaden, soggy and greasy on the inside. You don’t want that.
After it is turned over allow it to cook for about another minute–it takes about a minute or so per side to cook. Remove with spatula and drain on paper towels, then cover to keep warm. Repeat with remaining breads.
Serve with raita, dal and pickles for a light supper or lunch.
A Little Food Porn to Brighten Your Monday
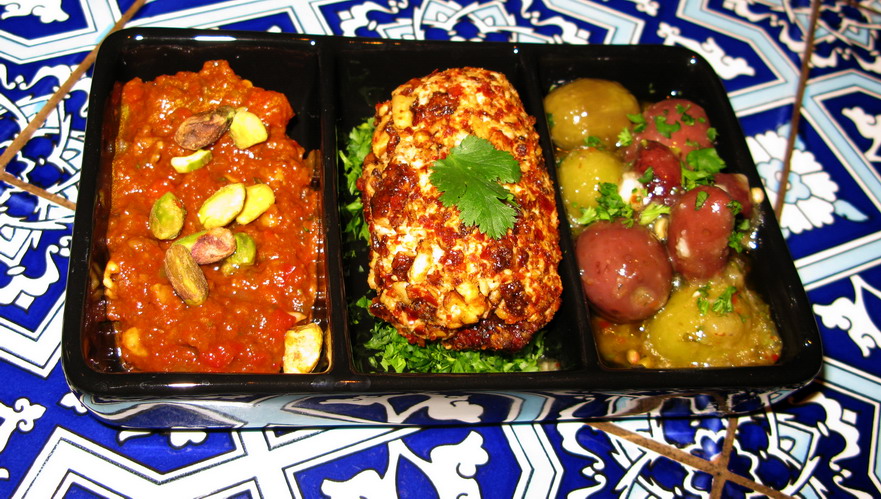
Even though I cannot share all the recipes from the food I make at Salaam, I wanted to share with my readers some descriptions and photographs of the kinds of dishes I’ve been doing there for the past few weekends, all of which have been madly busy.
So, here we are, starting out with our new Appetizer Trio: from the left to the right, muhammara, the sexiest dip in existence, made with sweet and hot peppers, walnuts, caramelized onions, garlic and pomegranate molasses, then topped with pistachios. Then we come to my newest innovation which I call Chevre a l’Aziz: a sweet, tart and spicy mixture of the finest tangy goat cheese, dates, spices and pomegranate molasses, rolled in spiced candied pecans and Aleppo Pepper. The final section of the plate contains a mixture of Greek and Italian olives marinated in garlic, preserved lemons, herbs, spices, lemon juice, and olive oil.
These beauties come with a basket of warm flatbread for dipping, spreading and sharing.
Hilarie was so excited to find those little plates at a restaurant supply house on sale, and I am glad that I could come up with a great use for them. They look like little jewels in a bento box if you just take a glance at the filled dishes.
And here is a really scrummy-looking photo of our featured dessert, made by yours truly: Chai-Spiced Creme Brulee.
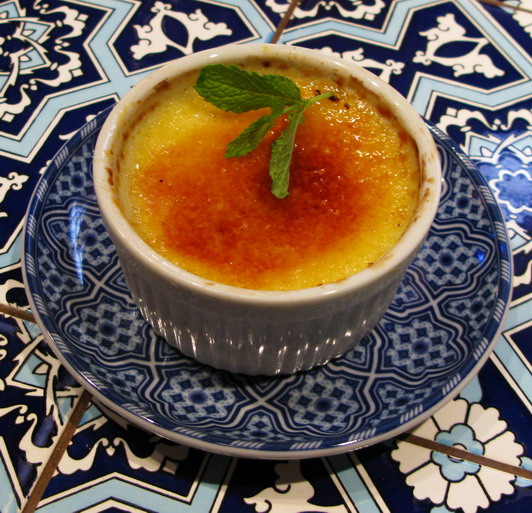
We’ve pretty much sold out of this dessert every weekend since it debuted on Valentine’s Day, which is a great thing. Everyone raves about it, and I have to admit it is pretty decadent: velvety smooth with a silky finish on the tongue. The chai spices are strong enough to taste, but not overpowering–and they blend amazingly with the vanilla bean.
Look for a post later this week or next week on how to make foolproof creme brulee, although, be advised that I am not giving away the secret of what chai spices I use and how I get them in there. Those are Salaam trade secrets–but I will still teach you how to get a great, silky baked custard and a shatteringly crisp caramel topping. Those are the two real necessities of creme brulee–the flavoring is just window dressing, in my opinion, secondary to the contrast in texture and temperature of the two main elements.

Categories:
- Admin (rss) (55)
- Blogs and Blogging (rss) (81)
- Book Reviews: Cookbooks (rss) (43)
- Book Reviews: Non-Cookbook Food Books (rss) (38)
- Cats and Cat Blogging (rss) (47)
- Chinese Cooking Lessons (rss) (32)
- Culinary School Stories (rss) (18)
- Dairy Pruducts: Cultured and Barbaric (rss) (4)
- Documentary Filmmaking (rss) (1)
- Essays, Rants and Reflections (rss) (260)
- Fighting Hunger (rss) (12)
- Food and Kids (rss) (45)
- Food in the News (rss) (126)
- Food Media (rss) (98)
- Food Preservation (rss) (18)
- Food Safety (rss) (45)
- Gardening (rss) (30)
- Herbs and Herb Blogging (rss) (20)
- Holidays (rss) (50)
- Kat Blogging (rss) (22)
- Kitchen Science (rss) (36)
- Leftover Makeover (rss) (8)
- Life, the Universe and Everything (rss) (131)
- Local and Sustainable (rss) (227)
- Local Athens Food and Foodies (rss) (42)
- Meatless Mondays (rss) (32)
- Menu For Hope (rss) (5)
- Nutrition, Diet and Health (rss) (84)
- On The Farm (rss) (8)
- Recipes: Almost Vegetarian, Vegetarian and Vegan (rss) (294)
- Recipes: American Regional (rss) (37)
- Recipes: Appalachian Hillbilly (rss) (33)
- Recipes: Bread, Pasta, Grains (rss) (95)
- Recipes: Canning and Preserving (rss) (8)
- Recipes: Chinese (rss) (123)
- Recipes: Comfort Food (rss) (120)
- Recipes: Cookies (rss) (16)
- Recipes: Desserts (rss) (48)
- Recipes: French (rss) (25)
- Recipes: Fruits and Vegetables (rss) (302)
- Recipes: Greek, North African and Middle Eastern (rss) (31)
- Recipes: Indian (rss) (137)
- Recipes: Italian (rss) (42)
- Recipes: Japanese (rss) (7)
- Recipes: Jewish (rss) (4)
- Recipes: Korean (rss) (6)
- Recipes: Meat, Poultry and Fish (rss) (220)
- Recipes: Mexican/Native American/ Latin American/Caribb (rss) (27)
- Recipes: Original (rss) (108)
- Recipes: Thai (rss) (27)
- Recipes: Tofu (rss) (17)
- Recipes: US Regional (rss) (16)
- Recipes: Vietnamese (rss) (8)
- Restaurant Stories (rss) (28)
- Sewing, Quilting, Arts and Crafts (rss) (16)
- Simple Chinese Recipes (rss) (30)
- Slow Food and Heritage Foods (rss) (10)
- Spice Blogging (rss) (44)
- The Chinese Cookbook Project (rss) (14)
- The Chinese Pantry (rss) (39)
- The Documentary (rss) (2)
- The Kitchen Saga (rss) (17)
- The Locavore's Bookshelf (rss) (15)
- The Unsung Adventures of The Culinary Nerd (rss) (6)
- Tools and Toys (rss) (35)
- Uncategorized (rss) (10)
- With a Side of Politics (rss) (48)
Archives:
- August 2012 (9)
- July 2012 (12)
- September 2011 (3)
- August 2011 (7)
- July 2011 (8)
- June 2011 (16)
- May 2011 (17)
- April 2011 (11)
- December 2010 (9)
- November 2010 (5)
- February 2010 (1)
- December 2009 (5)
- November 2009 (7)
- October 2009 (10)
- September 2009 (16)
- August 2009 (14)
- July 2009 (14)
- June 2009 (7)
- May 2009 (17)
- April 2009 (10)
- March 2009 (25)
- February 2009 (13)
- January 2009 (10)
- December 2008 (5)
- November 2008 (5)
- October 2008 (6)
- September 2008 (13)
- August 2008 (8)
- July 2008 (11)
- June 2008 (18)
- May 2008 (13)
- April 2008 (14)
- March 2008 (16)
- February 2008 (17)
- January 2008 (19)
- December 2007 (25)
- November 2007 (18)
- October 2007 (24)
- September 2007 (16)
- August 2007 (15)
- July 2007 (15)
- June 2007 (10)
- May 2007 (14)
- April 2007 (16)
- March 2007 (17)
- February 2007 (20)
- January 2007 (13)
- November 2006 (1)
- October 2006 (8)
- September 2006 (14)
- August 2006 (25)
- July 2006 (30)
- June 2006 (28)
- May 2006 (34)
- April 2006 (29)
- March 2006 (24)
- February 2006 (30)
- January 2006 (38)
- December 2005 (40)
- November 2005 (37)
- October 2005 (32)
- September 2005 (25)
- August 2005 (30)
- July 2005 (28)
- June 2005 (21)
- May 2005 (8)
- April 2005 (22)
- March 2005 (17)
- February 2005 (29)
- January 2005 (10)
Search Site:
Links:
- Lily’s Wai Sek Hong
- 101 Cookbooks
- A cat in the kitchen
- A Veggie Venture
- Accidental Hedonist
- Cha Xiu Bao
- chez pim
- Chocolate & Zucchini
- Chopstick Cinema
- Chowhound.com
- Chubby Hubby
- Cook sister!
- Cooking with Amy
- da*xiang
- Eat Local Challenge
- Eating Liberally
- Ecocentric
- Eggbeater
- Epicurious
- Farmgirl Fare
- Fatfree Vegan
- Foodgoat
- ForkandBottle.com
- Green Olive Tree
- Hooked on Heat
- Jaden’s Steamy Kitchen
- Kalyn’s Kitchen
- Lucullian delights
- Mahanandi
- Matt Bites
- MeatHenge
- mmm-yoso!!!
- New York Times – Dining & Wine
- Pizza Goon
- Rasa Malaysia
- Ruhlman
- Sailu's Kitchen
- Serious Eats
- SF Gate: Food & Dining
- Simply Recipes
- Soul Fusion Kitchen
- Tastespotting
- The Amateur Gourmet
- The Cleaner Plate Club
- The Food Section
- The Grub Report
- thecookscottage
- U.S. Food Policy
- Wandering Chopsticks
- Washington Post Food and Dining
- Wasted Food
Meta:

Powered by WordPress. Graphics by Zak Kramer.
Design update by Daniel Trout.
Entries and comments feeds.