Cook Local, Eat Global
Leftover Makeover: Got Extra Stir-Fry? Make Fried Rice

Leftover stir-fried dishes in my house usually don’t last long enough to be turned into anything else. Usually they go home with people–Morganna takes some back to her dorm room for lunch the next day, or I send some home with Dan or Amy for meals the next day. Or, if it is a chicken dish that Kat particularly likes, I leave some to go with rice for her lunch the next day or for dinner, or what have you.
But sometimes, I seriously mess up and make too much of something or another.
And then it is time to make Leftover Fried Rice.
Which is just what it sounds like it is–it is a vehicle to use not only leftover rice–which is what the Chinese invented the stuff to do–you make too much rice, which is the staff of life and is thus not to be wasted, so you let it get cold and dried out a bit and you fry it the next day with some aromatics, some vegetables and bits of tofu or meat or seafood and eggs and wham! You have a quick lunch or snack, and your rice goes to a far better place than the compost pile or the slop bucket for the pigs.
At my house, when I have too much stir-fry leftovers to use up within a few days, I plan on making fried rice. I save up rice in the fridge, and in the past, I have saved up tidbits from two and sometimes three different stir-fries. I always have eggs around, and there are always a sad handful of carrots, some dried or fresh mushrooms, maybe a half a bunch of broccoli or asparagus or a tiny handful of snow peas and one or two scallions, and these get cut up to go into the fried rice as well.
In the case of this batch of Leftover Fried Rice, henceforth to be known as LFR, I had about 2/3 of a quart container of Chicken with Bacon and Bok Choy, as well as the handful of carrots, some chopped cilantro that didn’t get used to garnish tacos earlier this week and some sliced scallion tops that didn’t make it into the quesadillas from Monday. I also had some frozen peas thawed out for Kat to eat and she didn’t eat many of them, so I used those, and a half a bunch of asparagus that didn’t get stir-fried on Saturday. With the four fresh shiitakes leftover from a pasta dish on Sunday and the last couple of eggs in the fridge, I had plenty of goodness to go into the fried rice.
Making LFR is ridiculously simple.
All you need to do is to cut up some aromatics–scallions or onions, some fresh ginger and garlic and maybe add some fermented black beans, and have them ready. Then, whatever vegetables you have, cut them up in about the same size and shape as the ones in the stir-fry that you are using up in the LFR. This keeps it all pretty.
Then, you gather the condiments you are going to use in your fried rice.
If you want your rice to be brown, you need to use either thick soy sauce or dark soy sauce mixed with a little bit of ground bean sauce. I am beginning to prefer doing the latter because it has more flavor–the thick soy sauce that comes in a jar is really sweet because of the molasses in it. The combination of dark soy sauce and ground bean sauce is much more tasty, I think, in large part because of the natural glutamates in both condiments, which gives that savory umami taste that everyone likes so well.
You can add some chili garlic sauce or paste or some sesame oil if you want for extra flavor.
Once everything is cut up, you need to put everything into the order it is going into the wok in your workspace. Aromatics go first, with onions or scallions first, then fermented black beans if you use them or ginger and garlic. Then, if you have any raw meats, they go in next, or mushrooms can go in here, or tofu. Then, your cold leftover stir fries go in, with uncooked vegetables next, going in the order of which one takes longer to cook. Carrots always win this contest, with green beans next, then broccoli, and so on. Then, the rice goes in, and the condiments, then the eggs and the garnishes and that is it.
There are a few tricks to it.
One–always start with cold, fairly dry rice, and always break it out of its clumps before you cook it. If you start with it hot, you will end up with mushy rice that sticks to your wok, and no one likes that, least of all your wok. If you don’t break up the clumps before it goes in the wok, you have to do it after it goes in the wok and that can get messy, what with rice flying out of the wok in all directions as you chop at it madly with your wok shovel. So, take my advice and just lightly oil your hands and squish up any clumps you have by hand, getting as many grains of rice separated as possible from each other.
Two–beat your eggs well. You want them to be a nice uniform yellow in color and lightly thickened.
Three–you have to use more oil in the cooking of fried rice than you do in any of my regular stir-fry recipes, but you don’t have to use as much as they do in restaurants–I usually use no more than a third of a cup of oil and usually, I can get by with four tablespoons. Use as little as you can at first, and later, when the rice goes into the wok, if it sticks, you can add a bit more.
Four–if you can, bring your leftover stir fried bits to room temperature before cooking them. It keeps you from over cooking them the second time around and it keeps you from cooking down the wok overmuch. Bring your rice to room temperature, too, if you can.
That is about it.
Oh, and you can use any kind of stir-fried stuff in here you want. I’ve used leftover stir-fried Thai dry curries before in LFR, and I have also used leftover Ma Po Tofu which isn’t even stir-fried–it is braised. I have also used leftover Red-Cooked Beef–which is also braised, and leftover Dry-Fried String Beans and Steamed Chinese Sausages–and they all went fine in :LFR.
And the truth is–I have sneaked leftover andouille sausage and ham and bits of vegetables from non-Asian dishes in LFR, and it all turned out pretty darned tasty.
So, go for it–be wild, be free, and use up the little bits of this and that you have in your fridge. Food is too precious and expensive to waste.
Oh–and one more thing. LFR is great cold, but you can also use it to stuff in vegetables before roasting them. If you do that, just be sure and roast the stuffing veggies halfway before you stuff them, and then drizzle the stuffing after it is inside the veggies with some broth to keep it moist. Cover them tightly with foil so there is no drying out and then serve when the vegetables are tender and steamy.
Very tasty way to serve larger zucchini, for example.

Leftover Fried Rice–A General Guideline
Ingredients–Everything Except the Rice, the Leftovers, Some Aromatics and the Eggs is Optional:
4 tablespoons to 1/3 cup canola or peanut oil
1 1/2 cups thinly sliced onions or 2 bunches of scallions, white and light green parts sliced thinly on the diagonal
2 tablespoons fermented black beans, optional
1/4 cup minced fresh ginger
5-8 cloves garlic, minced
2-4 cups leftover stir-fried stuff–or braised meats or tofu or whatever you think will taste good together with the rice and other stuff you have gleaned from your fridge
1-2 cups fresh, uncooked vegetables cut up so they are in pieces similar to your leftover stir fry bits, optional
4-6 cups cooked cold long-grain rice–clumps broken up
1 1/2 tablespoons thick soy sauce or 2 tablespoons dark soy sauce and 1 1/2 tablespoons ground bean sauce
2 eggs very well beaten
1 cup thinly sliced scallion tops, and/or chopped cilantro leaves, and/or thawed frozen peas–all are optional
1/2 teaspoon toasted sesame oil–you guessed it–optional
salt to taste–yes, this is optional, too–I bet you are surprised
Method:
First, clean out your refrigerator of anything that is edible and that will taste good in your LFR. Use your judgment here, but don’t be afraid to experiment. Leftover grilled corn on the cob, so long as you remove it from the cob before it goes into the wok -will- taste great in this–even if it isn’t anywhere near traditional. Remember, the point if this dish is not authenticity to any preconceived notion of what you think of as fried rice–the point is to use up leftovers in a tasty, non-wasteful fashion. So clean out your fridge, and cut and prep all of your ingredients. Lay them out in the order in which they will go into the wok, as outlined in the post above and in the ingredient list.
Heat your wok on high heat until a thin ribbon of smoke drifts up from it. Add the oil–add a smaller amount first–you can add the rest later. Heat one minute, until it shimmers and moves with convection currents in the wok.
Add the onions or scallions. Cook, stirring until they brown lightly and soften–this takes longer with the onions. If you are using fermented black beans, add them when the onions or scallions are halfway cooked.
Add the ginger and garlic and cook one more minute.
Add the leftover stir fry or cooked whatevers. Stir and cook for about a minute before you start adding raw vegetables, remembering to add the ones that take longer to cook, such as carrots or mushrooms, first. Use your common sense here. Big broccoli stalks will take longer to cook than skinny green beans or asparagus, though big stalks of asparagus will take longer, unless you cut them in thin diagonal slices or blanch them first. So, after the leftover bits cook for a minute to warm up, start adding the raw vegetables.
Cook until the raw veggies are just starting to look sort of done.
Add the rice. Stir, chop, stir, scrape, stir, chop, stir, scrape. Make sure you don’t need more oil. If you do, clear a spot in the center of the wok and add it there. Stir, scrape, chop. Add the thick soy sauce or the dark soy sauce and ground bean sauce. Stir, scrape, stir, toss–this requires strong forearms. Cook and stir until everything is mixed nicely together, everything smells nice, everything is brownish and there are no clumps of rice stuck together.
Scrape a bare spot in the center of the wok and pour in the egg. Stir until the egg is as done as you like it–I do mine until they are half way done, but most people cook them all the way, then scrape them into eggy bits and stir them in then. I do mine until they are half-cooked and then stir them in and let the heat of the rice finish cooking them–this way they dissolve into the rice and make it lightly sticky so that it is easier to eat with chopsticks and it gives it a rich, delicious flavor. The more traditional way of cooking them all the way and then stirring them in is good, too.
Remove wok from heat. Stir in whatever garnishes you have, if you have any.
Add sesame oil if you want, and stir well.
Serve it forth, eat heartily and happily and be of glad heart for your refrigerator is clean and you have wasted no food this day.
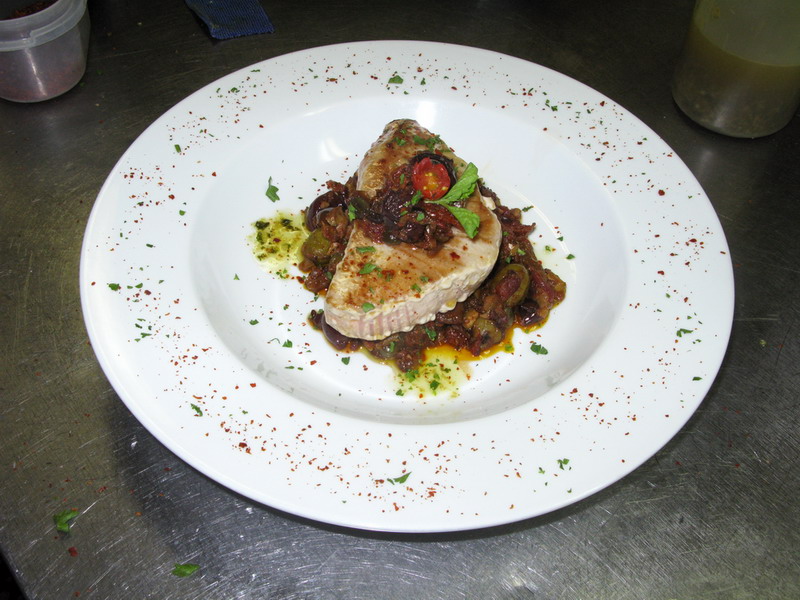
An Inspired Idea: Tonnato Puttanesca

I have already written about the delectably sensuous pasta sauce from Naples, puttanesca. This velvety concoction of tomatoes, olives, capers and anchovies which is known as “whore’s sauce” is one of my very favorite comfort foods. It makes for a quick supper from the pantry when I haven’t had a chance to think too long and hard about what to cook. but it never tastes like something thrown together thoughtlessly.
It tastes artful.
A good puttanesca is a balance of salty, sweet and savory flavors sparked with the fragrance of capers and garlic.The salty flavor obviously comes from all of the preserved ingredients: the olives and capers are brined, and the anchovy paste is also well-salted. Sweetness comes from the cooked canned and sundried tomatoes, as well as from my carefully caramelized onions and lightly browned garlic. The savory note comes from the umami punch carried by the anchovies or anchovy paste; I have tried to make purely vegetarian versions of puttanesca, and while they were all very good, they lacked the depth and smoky nuance that the anchovies bring.
But, you know, as much as I adore spaghetti puttanesca, and could probably eat it three times a week without being fatigued, I always wondered if there wasn’t something else I could do with that sauce.
When Hilarie at Restaurant Salaam asked me to come up with a new sauce for seared tuna, for whatever reason, puttanesca leaped into my consciousness and refused to be dislodged. And even though Hil is not herself fond of olives, she jumped on the idea and insisted that I give it a whirl.
So, I did.
And I am really glad I did, because this is a dish I would serve proudly to anyone, anywhere, anytime. (Provided, of course, that they were able and willing to eat fish and olives, of course. I would never, ever serve this to a vegan, for example, or a Jain, or to someone who just plain old didn’t like fish. That would not only be cruel to the diner, it would be a waste of a rare and delicious bit of fish.)
I like the combination of a very expensive cut of fish with what is essentially poor-folks food from the back-alleys of Naples. (And the irony of serving whore’s sauce on tuna steak appeals to my bawdy sense of humor as well.) But as appealing as the combination is intellectually, it is even more pleasing to the palate.
Rare or medium rare seared tuna, with its clean, rich ocean flavor really pairs amazingly well with the melange of salty, sweet and savory flavors and strong fragrances of puttanesca. They are just two great tastes that taste great together, to use the old advertising line from those old Reese’s Peanut Butter Cup commercials.
A note here on the issues of the overfishing of tuna–I am of the opinion that if we are going to eat tuna at all, it should be very sparingly. I think that everyone gives up a portion or two of sushi, sashimi, seared tuna and tuna fish sandwiches per week, that perhaps the resulting slump in demand for the fish would cause overfishing them to slow down, and perhaps stop altogether. Besides, with the amount of mercury found in the flesh of these large predatory fish, it is probably a good idea to treat tuna as “a sometimes food” as the modern, newly-ascetic Cookie Monster would say. (What is up with that, anyway? The whole reason that Cookie Monster is a monster is because of his immoderate love of cookies and his habitual gluttony regarding same. Or, at least, I got that message when I was a kid. Political correctness has gone too far.)
Be that as it may, tonnato puttanesca turned out to be a delicious entree, one that combines the richness of seared fish with the earthiness of whore’s sauce, and I am very pleased I had the idea to combine them.
Tonnato Puttanesca
Ingredients:
3-4 tablespoons olive oil
1 small onion, thinly sliced
4-5 cloves fresh garlic, minced
3 anchovy fillets, chopped finely or 1 1/2 teaspoons anchovy paste
1/2 pound pitted Kalamata olives, drained and chopped roughly
1/3 pound pitted green unstuffed olives, drained and chopped roughly
1/4 cup finely minced oil-packed sun-dried tomatoes
3 tablespoons capers, drained of brine and rinsed thoroughly, then drained again
1 teaspoon or to taste red chile flakes (optional)
1/4 cup dry red Italian wine
1 14 ounce can diced tomatoes with their juice (I use Muir Glen Fire Roasted Organic)
handful of fresh basil leaves, minced
1/4 cup extra virgin olive oil
1 clove garlic, minced and pounded into a paste
1 cup basil leaves, minced and pounded into a paste
2 teaspoons olive oil
4 tuna steaks
minced basil and basil sprigs for garnish.
Method:
First, make the puttanesca sauce. This recipe will make a sauce that is not very fluid. Instead, it will hold together like a salsa or relish on the plate, making a good platform for the tuna steak.
Heat the first measure of olive oil on medium heat in a heavy bottomed skillet or pan. Add onion and cook until softened and golden, stirring now and then. Add garlic and anchovy and continue cooking until garlic turns golden, the onions brown slighty and the anchovy fillets disintegrate. (If you are using anchovy paste, do not add at this point–add it after the olives and capers have cooked for about a minute.)
Add olives, sun-dried tomatoes, capers, and chile flakes, and continue cooking until very fragrant, about three minutes. Add wine and allow alcohol to boil off.Add tomatoes and their juice after the alcohol has boiled away and turn heat down slightly and allow to cook until it thickens up and most of the liquid is boiled away.
Remove from heat and stir in first measure of minced basil.
Next, make the garlic and basil infused olive oil.
Mix together the 1/4 cup extra virgin olive oil with the garlic and basil paste, and allow to steep for about an hour or so.
Just before serving, stear tuna steaks.
Heat two heavy-bottomed skillets (not nonstick–I like cast iron or heavy stainless steel) over medium high heat until they smoke slightly. Add one teaspoon of olive oil to each and tip pans back and forth to coat the bottom thoroughly. Add tuna steaks two per skillet. Allow to sear on the first side undisturbed for a few minutes, or until a nice brown crust is formed. Watch the sides of the fish; a line of white cooked flesh will come up from the bottom toward the top. At this point, turn the fish and press the second side down with the back of the spatula. Put a lid down on the pan, and allow to cook undisturbed for the same amount of time it took to sear the first side.
For rare tuna, sear both sides of the steak, then if you like, using tongs, lift and hold each edge of the tuna against the hot pan to sear them as well. This looks much prettier, and you still have a nice red interior.
For medium rare tuna, after you sear both sides and clap the lid over the fish, let it cook until the edges turn beige on their own. That should lead to a pinkish red interior that is warm all the way through.
For medium well tuna, meaning warm all the way through and barely pink on the inside, before you clap the lid on the pan, squirt about 1/4 cup of water into the pan, then slap the lid on it (the oil will make is splatter, so use the lid as a shield while you squirt in the water–I use a squeeze bottle as it is easier to get the water in without being burned since my hand can stay out of the way. Pouring the water in usually involves getting my hands spattered and burned by hot oil, which, while I am used to it, still sucks.
The steam from the water will help cook the tuna through without drying it out.
For well done tuna–open a can. Okay, okay, if you really want well done tuna, do yourself a favor and slice the steak in half so you have two thinner tuna steaks instead of one thick one. Then cook as per my instructions for medium-well tuna, except because the steak is thinner, it will steam through more quickly and lose less juice and flavor that way.
To plate this dish, take about a half cup of the sauce and drain any remaining liquid from it. Mound it in the center of the plate. Place a tuna steak on top of the mound, and then drizzle the basil garlic oil over the fish. Then place about a tablespoon of the puttanesca on top of the fish, and dot the edges of the puttanesca on the plate with basil garlic oil, then sprinkle with minced basil, mild chili flakes (;like Aleppo or Kirmizi pepper) and top the little mound of puttanesca with a basil sprig.
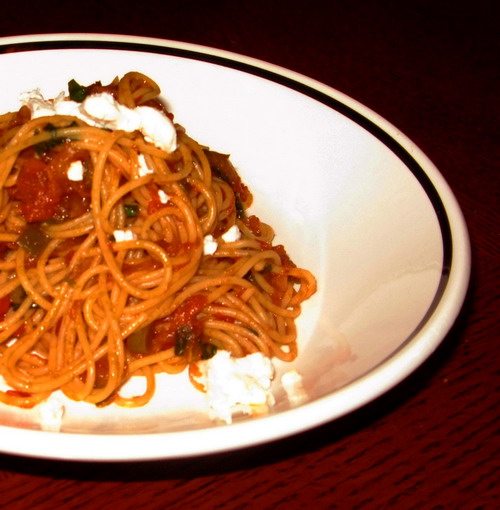
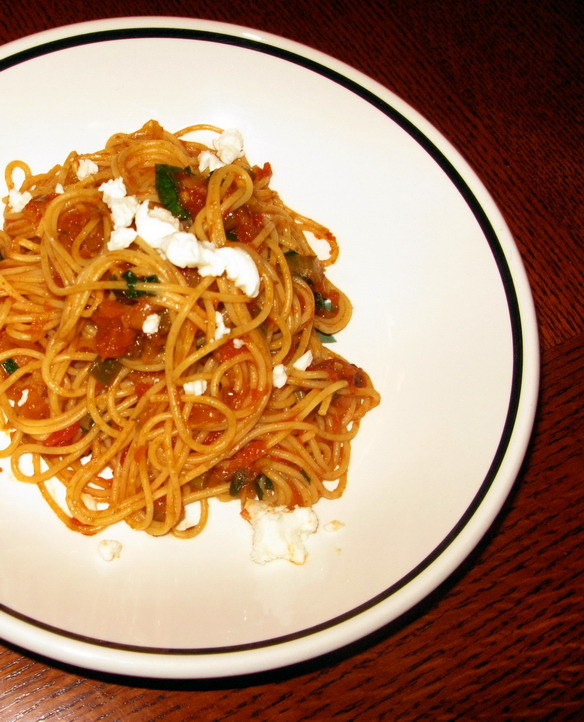
Kiss, Kiss, Bang, Bang: Spaghetti with Ramps, Green Garlic and Goat Feta
I bet you are wondering why I called this recipe “Kiss, Kiss, Bang Bang,” right?
Well, it has nothing to do with either James Bond, the movie with Robert Downey Jr. or the Torchwood episode of the same name.
It has to do with the nature of the recipe I am presenting.
This pasta sauce is such an explosion of strong flavors, that if you were to kiss someone after eating it, you would make a big bang of an impression upon them.
And probably not in a good way.
So, this title is a warning of sorts. If you are in a kissing mood after you eat this spaghetti, I suggest that you choose your target kissee wisely. The best strategy would be to feed your intended recipient of the kiss some of the pasta first, so that the two of you are equally armed when it comes to the strong flavors and aromas left in the mouth. The combination of caramelized onions, ramps, green garlic and goat feta is powerful–delicious, sensual and delightful, really, but you don’t really want to share it second hand. (Well, unless you know someone like me who thinks the aroma and flavor of garlic is just about the sexiest ever….) And the combination is strong enough, thanks to the ramps, that it will defeat the liberal application of Listerine, Altoids and Crest. (On the other hand, personally, I’d sooner kiss someone who has just eaten a raw garlic clove than someone who has washed his or her mouth out with Listerine. Listerine tastes like someone has been licking a hospital floor. Ick.)
So, the title is a warning, but it is also an advertisement for those who love big bangin’ flavors–if you love the sweetness of caramelized onions, the tang of garlic, the heady aroma of ramps, and the sword-sharp bite of goat feta, then this recipe is for you. Take all of those flavors, add the sweetness of tomatoes and the heat of a little bit of chilies, and you have a great, quick sauce for spaghetti that will not only chase the blues and blahs away, but will chase away anyone else you might want to be rid of as well.
The truth is–you can leave out the ramps if you must–especially if you have no way of getting them. Just add more green garlic or add some regular garlic to the sauce. Or just plain old leave it out. You can also forgo the butter in the recipe and just use olive oil instead, but I find that a bit of butter in addition to the olive oil softens the flavor of all of the alliums, and adds a certain richness to the sauce, making it cling deliciously to the spaghetti. You can also leave out the optional teaspoon of anchovy paste in order to make this dish vegetarian–the anchovy paste adds a great deal of umami flavor, but it isn’t necessary. I just think it perfectly rounds out the sauce and ties the different allium tastes together into a cohesive whole.
As for the goat feta, I was lucky enough to get some of the first batch of Chris Schmiel’s (of Integration Acres) home made feta from his goats. You may not be so lucky, so if you can’t get goat feta, use whatever feta you can get–the creamiest, tangiest, most sharp feta you can find.
One more thing–I used home-canned tomatoes and marinara sauce from last summer’s abundant tomato crop, but you can just as easily use store-bought canned tomatoes and jarred marinara. In fact, this would be a quick way to jazz up jarred sauce–just use the highest quality sauce you can buy, one without high fructose corn syrup, so that you get the truest, strongest tomato flavor possible.
Kiss Kiss Bang Bang Spaghetti
Ingredients:
2 tablespoons olive oil
1 tablespoon butter (optional–you could use another tablespoon of olive oil instead)
2 cups thinly sliced yellow onions
1 teaspoon salt
1/4 cup fresh green garlic, white and light green parts only, thinly sliced
1 teaspoon Aleppo pepper flakes
1 teaspoon anchovy paste (optional)
1 teaspoon or to taste chili garlic paste–I used my homemade paste (or use freshly chopped chilies or a few drops of hot sauce)
1/4 cup dry sherry or dry red wine
1 pint canned tomatoes
1 quart marinara sauce
1 cup thinly sliced green garlic–dark green tops only
1 cup thinly sliced ramp leaves
salt and freshly ground black pepper to taste
1 pound thin spaghetti, cooked al dente
1/4 cup crumbled feta cheese
Method:
Heat olive oil and butter in a heavy-bottomed skillet until the butter foams. Add the onions and sprinkle with the salt. Cook, stirring, until the onions turn a deep golden brown. Add the garlic and continue stirring and cooking until the garlic turns golden and the onions are a deep reddish brown. add the pepper flakes, anchovy paste, and chili garlic paste, and cook, stirring for another minute. Add the sherry or red wine, and cook, stirring, until the alcohol boils off.
Add the tomatoes, and cook, stirring, until the juice is boiled off and the tomatoes begin to break down. Chop at the tomatoes with a spoon until they break down, and add the marinara sauce and keep cooking until the sauce thickens slightly. Toss in the green garlic tops and ramp leaves, and season to taste with salt and pepper. Cook until the leaves wilt slightly, then add drained spaghetti to the pot and toss until the pasta is well coated.
Swirl pasta onto serving bowls and top with crumbled feta cheese and serve immediately. (Serves six as a main course with salad.)
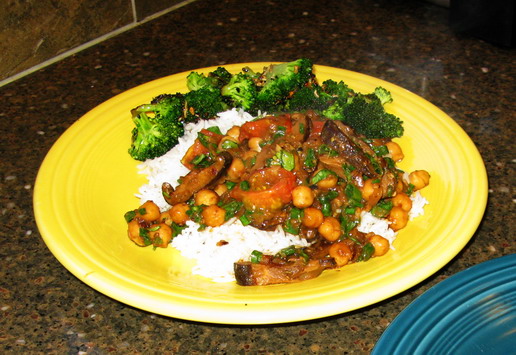
A Beautiful Vegan Curry: Kashmiri Dhingri Chole
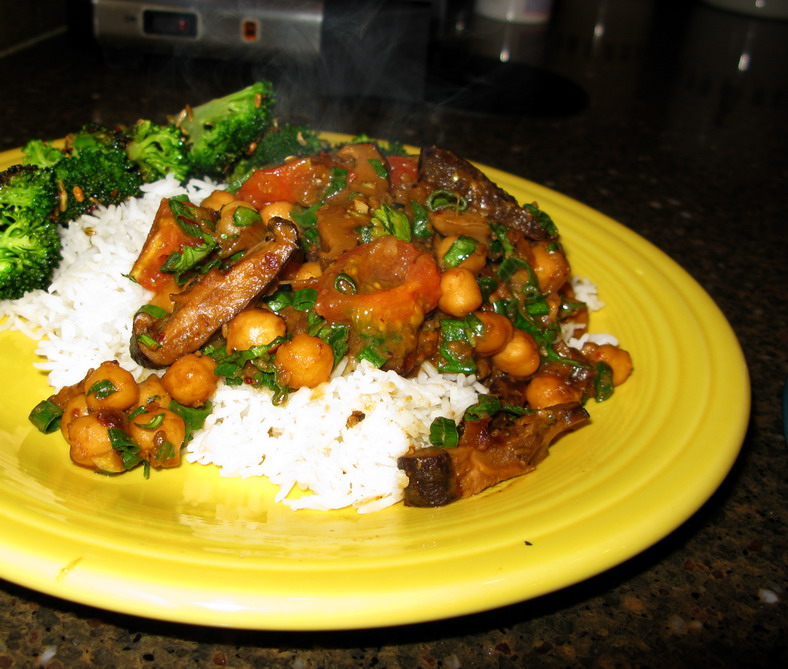
This is one of those recipes you want to make for your non-vegan friends in order to prove to them that vegan food can be delicious. Consider this curry to be an “ambassador recipe” to the world of non-vegetarians. I have quite a few such recipes, and they nearly always work. This one is great because it includes dried shiitake mushrooms, also called “Chinese black mushrooms,” which you can get at nearly any Asian grocery store. These umami-filled fungi have a wonderful earthy aroma, meaty texture and rich flavor which pair perfectly with chickpeas, also known as chole.
I came across this recipe in Geeta Samtani’s excellent cookbook, A Taste of Kashmir while I was gleaning ideas for lunch and dinner specials at Salaam. I like to do at least two or three vegetarian or vegan specials a week, and I really like to find unusual recipes that no one else in town would ever make.
As soon as I saw this one, I had to make it.
And we sold out of it. People loved it.
And, it is simple to make.

The one “tricky” part of the recipe is soaking and cooking the mushrooms. I have found that the best method is to boil water, and pour it over the mushrooms, and let them soak until you can stand to stick your fingers into the water. When they are cool enough to touch, they are completely rehydrated.
Just squeeze the excess water out, cut off the stem and discard it because it will be too tough, and slice the mushroom cap into thin pieces. Then let the pieces dry slightly on a paper towel before you saute them with the onions, garlic, ginger and spices–this removed the last of the excess water so that the mushrooms will get just a little bit crispy and absolutely delicious as they cook.
The other hint I have for making this recipe is that if you happen to have a bit of hummus in your fridge, instead of mashing some of the chickpeas to thicken the curry, you could add a heaping tablespoon of hummus. I have discovered that you cannot taste the tahini in a curry if you use it as a thickener and the lemon juice, garlic and cumin in it are already part of this recipe to begin with, so it all works out perfectly. This is just a little shortcut if you don’t want to take the time to mash chickpeas, although, in reality, that doesn’t take very long, either, even if you just use a manual potato masher.
Kashmiri Dhingri Chole–Mushroom and Chickpea Curry
Ingredients:
10-20 Chinese black mushrooms
boiling water as needed to rehydrate mushrooms
3 tablespoons canola or peanut oil
2 cups thinly sliced onions
1 teaspoon salt
1 1/2″ cube ginger, peeled and minced finely
1 teaspoon cumin seeds
1/4 teaspoon black peppercorns
1 teaspoon fennel seeds
1/2 teaspoon coriander seeds
1 cardamom pod, seeds removed and pod discarded
1 clove
1 pinch ground cinnamon
8 cloves garlic, peeled and minced finely
2 14 ounce cans of chickpeas, drained
handful fresh cherry tomatoes, quartered
lemon juice and salt to taste
1/2 cup scallion tops, thinly sliced
1 cup cilantro leaves, roughly chopped
Method:
Put mushrooms in a bowl, and cover with boiling water. Allow to sit while you prep the rest of the ingredients. When the water is cool enough to touch, squeeze out excess water, cut off the stems off, and slice the caps thinly. Sit slices on paper towels to drain while you prepare everything else. KEEP THE MUSHROOM SOAKING WATER!!!
Heat oil in a heavy-bottomed skillet, and add onions, Sprinkle with salt, and cook, stirring, until medium golden brown. Add ginger, and cook.
While ginger is cooking with the onions, grind spices to a powder, and add to the skillet. Add mushroom slices, and cook, stirring until onions are deep reddish brown, and the mushrooms are lightly crispy on the edges and brown. Add garlic, cook for one more minute, stirring, and add to the pot the chickpeas and all but the last tiny bit of the mushroom soaking water. (That last bit contains the little bits of grit that come off the mushrooms that is not tasty–throw that bit away.)
Turn down the heat and simmer for about twenty minutes. Take out about 1/4 of the chickpeas, and mash them to a near puree, and add them back to the pan. Add the tomatoes, and cook until they just begin to wilt. Add the lemon juice and salt to taste, and stir in scallion tops and cilantro leaves.
Serve over steamed basmati rice.
Taste vs. Flavor, Or, In Praise of Our Noses
I was reading somewhere on the net, a thread of conversation about food, foodies, and what makes a foodie a foodie. In the middle of this wide-ranging discussion, one commenter postulated that most foodies were supertasters who have tongues which can discriminate between the most subtle nuances of flavor between different foods.
Except, as another poster pointed out, supertasters, which are people who have a much higher than average number of taste buds on their tongues, don’t tend to like highly flavored foods, because what they taste is so intense that they are nauseated or disgusted by it.
It is more likely for a supertaster to become an extremely fussy or picky eater than it is for them to become a foodie.
Most food lovers probably only have an average number of tastebuds on their tongues. Which may make some folks sad, because everyone wants to be above-average in something, and having a very sensitive tongue–well, it sounds kind of sexy, doesn’t it?
But I don’t think what our tongues are up to in our mouths that make us food-lovers–it is what goes on in our noses that matters.
Why do I say this?
Because there are only five tastes which are registered on the tongue: sweet, sour, bitter, salty and umami--which is that meaty, savory taste that makes myriad foods such as mushrooms, meat and fermented soy products so darned, well, tasty. (Hot as in chile heat is not a taste–it is a sensation. It is the feeling of our mouths receiving a slight chemical burn–which doesn’t sound appetizing, but for myself and others like me, it is.)
If we could only discern those five tastes, then our food would only be made of a combination between those five tastes. And we would not have most spices, wine would either be bitter, sweet or sour, or some combination of the three, and our cuisines would be much more boring.
Instead, humans experience a myriad of flavors, all built from a combination of tastes and fragrances. We have hundreds, if not thousands of herbs and spices which build complex flavor patterns in our cuisines, and we talk about the “nose” of wine, or its “bouquet” in terms referring to its floral, fruity, woody or spicy qualities. We are thus able to proclaim not only the difference in flavor between a cherry and an apple, but also discern distinct differences in flavor between the hundreds of varieties of apples.
But the truth is–we do not only experience taste, we also experience flavor, and because of that, gastronomy is endlessly diverse, fascinating and fun.
What is the difference between taste and flavor?
Taste is discerned by the taste buds on the tongue.
Flavor is sensed in combination between our taste buds and our noses–with our noses, frankly, doing most of the work. It is the fragrance and aroma of food that make it most interesting, and I am firmly of the belief that most foodies boast sensitive noses, not sensitive tongues. (If you don’t believe me, think back to the last time you had a cold and had a nose so stopped up that you had to breathe through your mouth. Remember how weird food tasted–or rather, didn’t taste? That is because your blocked-up nose was unable to deliver its part of the sense of taste to your brain, and so every flavor was dulled down or erased completely.)
In my case, I have found over the years that I can smell the different individual spices of the melange used in an Indian dish, before I even taste it. Now, this ability to disentangle the rich spice mixtures of India by smell is not something I was born with; I learned to do it.
Well, not quite–I mean, I always had a good sense of smell. I could detect the difference of a single bay leaf between my Aunt Nancy’s lentil soup and my mother’s–otherwise, the recipe was exactly the same. But, to me–that bay leaf aroma was very present, and it made the two soups as different as night and day.
But sniffing out a bay leaf in a cauldron of soup at twenty paces is one thing; parsing out the identity of the spices dancing together in a curry is quite a different beastie altogether.
I had to train my nose, and my palate to do that.
How did I do this?
I will tell you. I used to, as I collected my Indian spices over time, take a small bit of each one and sniff it, then write down my impressions of it. Then, I would taste a bit of it on its own–and write down my further impressions. Finally, I would toast a bit of it in a dry skillet, and in a second skillet, would cook another bit of it in oil. Once again, I would write down what I thought of the flavor of the spice in cooked form.
When I taught Indian and Chinese cooking in Maryland, I used to put my students through their paces and urged them to keep a spice notebook to keep track of what all the spices, aromatics, herbs and condiments used in these cuisines tasted like, so they could refer back to their notes if they ever got stumped on the origin of a particular scent, flavor or taste. It seems that the act of writing down your impressions helps to burn the association of the flavor with the spice or herb in the mind; it essentially helps create what is called a “taste memory,” which is the ability to recall the specific flavor or taste of any given ingredient, mixture or dish.
Most chefs, myself included, have excellent taste memories. Some of them were born with an exquisitely sensitive palate, while others develop theirs through study and training over time. Most of us, I think, started out with good senses of taste and smell, and the ability to recall foods from memory, but then, this memory is strengthened by regular practice in using these senses critically and intentionally, by articulating what it is we are tasting.
The ability to recognize and parse out different tastes and flavors is a great skill for anyone to have, whether one is a chef, a serious home cook or just a serious eater, because not only does it allow us to understand and enjoy food to its fullest extent, it also allows a chef or cook to recreate dishes which we may have only tasted once, perhaps twice, without having to rely on a recipe.
Having a good nose and a memory for flavors is fun, I must say, because I enjoy being able to go out to most restaurants, eat something great and then be able to skip off home and after the passage of weeks or months, or sometimes, even years, hie myself into the kitchen to recreate the recipe on my own.
(I call that particular activity “food hacking,” and no, I do not do “Top Secret Restaurant Recipes.” I mean, why would anyone want to make a Big Mac at home? But, food hacking is a fun hobby.)
Just remember, that without our sense of smell, food would be much more boring than it is. We’d be lacking the very green, somewhat pine-resin flavor of rosemary, and the sweet, somewhat citrus, floral delight that is cardamom. We’d be bereft of the tingling warmth and spiny spark of black pepper and the delectable red burst of the first strawberry of the season.
Without our noses, our meals would be poorer indeed.
So what is the upshot of all of this blather?
It is this–if you want to be a better cook, a more discerning eater or just learn more about food, don’t worry about how many tastebuds are sitting on the surface of your tongue.
Instead, follow your nose.

Categories:
- Admin (rss) (55)
- Blogs and Blogging (rss) (81)
- Book Reviews: Cookbooks (rss) (43)
- Book Reviews: Non-Cookbook Food Books (rss) (38)
- Cats and Cat Blogging (rss) (47)
- Chinese Cooking Lessons (rss) (32)
- Culinary School Stories (rss) (18)
- Dairy Pruducts: Cultured and Barbaric (rss) (4)
- Documentary Filmmaking (rss) (1)
- Essays, Rants and Reflections (rss) (260)
- Fighting Hunger (rss) (12)
- Food and Kids (rss) (45)
- Food in the News (rss) (126)
- Food Media (rss) (98)
- Food Preservation (rss) (18)
- Food Safety (rss) (45)
- Gardening (rss) (30)
- Herbs and Herb Blogging (rss) (20)
- Holidays (rss) (50)
- Kat Blogging (rss) (22)
- Kitchen Science (rss) (36)
- Leftover Makeover (rss) (8)
- Life, the Universe and Everything (rss) (131)
- Local and Sustainable (rss) (227)
- Local Athens Food and Foodies (rss) (42)
- Meatless Mondays (rss) (32)
- Menu For Hope (rss) (5)
- Nutrition, Diet and Health (rss) (84)
- On The Farm (rss) (8)
- Recipes: Almost Vegetarian, Vegetarian and Vegan (rss) (294)
- Recipes: American Regional (rss) (37)
- Recipes: Appalachian Hillbilly (rss) (33)
- Recipes: Bread, Pasta, Grains (rss) (95)
- Recipes: Canning and Preserving (rss) (8)
- Recipes: Chinese (rss) (123)
- Recipes: Comfort Food (rss) (120)
- Recipes: Cookies (rss) (16)
- Recipes: Desserts (rss) (48)
- Recipes: French (rss) (25)
- Recipes: Fruits and Vegetables (rss) (302)
- Recipes: Greek, North African and Middle Eastern (rss) (31)
- Recipes: Indian (rss) (137)
- Recipes: Italian (rss) (42)
- Recipes: Japanese (rss) (7)
- Recipes: Jewish (rss) (4)
- Recipes: Korean (rss) (6)
- Recipes: Meat, Poultry and Fish (rss) (220)
- Recipes: Mexican/Native American/ Latin American/Caribb (rss) (27)
- Recipes: Original (rss) (108)
- Recipes: Thai (rss) (27)
- Recipes: Tofu (rss) (17)
- Recipes: US Regional (rss) (16)
- Recipes: Vietnamese (rss) (8)
- Restaurant Stories (rss) (28)
- Sewing, Quilting, Arts and Crafts (rss) (16)
- Simple Chinese Recipes (rss) (30)
- Slow Food and Heritage Foods (rss) (10)
- Spice Blogging (rss) (44)
- The Chinese Cookbook Project (rss) (14)
- The Chinese Pantry (rss) (39)
- The Documentary (rss) (2)
- The Kitchen Saga (rss) (17)
- The Locavore's Bookshelf (rss) (15)
- The Unsung Adventures of The Culinary Nerd (rss) (6)
- Tools and Toys (rss) (35)
- Uncategorized (rss) (10)
- With a Side of Politics (rss) (48)
Archives:
- August 2012 (9)
- July 2012 (12)
- September 2011 (3)
- August 2011 (7)
- July 2011 (8)
- June 2011 (16)
- May 2011 (17)
- April 2011 (11)
- December 2010 (9)
- November 2010 (5)
- February 2010 (1)
- December 2009 (5)
- November 2009 (7)
- October 2009 (10)
- September 2009 (16)
- August 2009 (14)
- July 2009 (14)
- June 2009 (7)
- May 2009 (17)
- April 2009 (10)
- March 2009 (25)
- February 2009 (13)
- January 2009 (10)
- December 2008 (5)
- November 2008 (5)
- October 2008 (6)
- September 2008 (13)
- August 2008 (8)
- July 2008 (11)
- June 2008 (18)
- May 2008 (13)
- April 2008 (14)
- March 2008 (16)
- February 2008 (17)
- January 2008 (19)
- December 2007 (25)
- November 2007 (18)
- October 2007 (24)
- September 2007 (16)
- August 2007 (15)
- July 2007 (15)
- June 2007 (10)
- May 2007 (14)
- April 2007 (16)
- March 2007 (17)
- February 2007 (20)
- January 2007 (13)
- November 2006 (1)
- October 2006 (8)
- September 2006 (14)
- August 2006 (25)
- July 2006 (30)
- June 2006 (28)
- May 2006 (34)
- April 2006 (29)
- March 2006 (24)
- February 2006 (30)
- January 2006 (38)
- December 2005 (40)
- November 2005 (37)
- October 2005 (32)
- September 2005 (25)
- August 2005 (30)
- July 2005 (28)
- June 2005 (21)
- May 2005 (8)
- April 2005 (22)
- March 2005 (17)
- February 2005 (29)
- January 2005 (10)
Search Site:
Links:
- Lily’s Wai Sek Hong
- 101 Cookbooks
- A cat in the kitchen
- A Veggie Venture
- Accidental Hedonist
- Cha Xiu Bao
- chez pim
- Chocolate & Zucchini
- Chopstick Cinema
- Chowhound.com
- Chubby Hubby
- Cook sister!
- Cooking with Amy
- da*xiang
- Eat Local Challenge
- Eating Liberally
- Ecocentric
- Eggbeater
- Epicurious
- Farmgirl Fare
- Fatfree Vegan
- Foodgoat
- ForkandBottle.com
- Green Olive Tree
- Hooked on Heat
- Jaden’s Steamy Kitchen
- Kalyn’s Kitchen
- Lucullian delights
- Mahanandi
- Matt Bites
- MeatHenge
- mmm-yoso!!!
- New York Times – Dining & Wine
- Pizza Goon
- Rasa Malaysia
- Ruhlman
- Sailu's Kitchen
- Serious Eats
- SF Gate: Food & Dining
- Simply Recipes
- Soul Fusion Kitchen
- Tastespotting
- The Amateur Gourmet
- The Cleaner Plate Club
- The Food Section
- The Grub Report
- thecookscottage
- U.S. Food Policy
- Wandering Chopsticks
- Washington Post Food and Dining
- Wasted Food
Meta:

Powered by WordPress. Graphics by Zak Kramer.
Design update by Daniel Trout.
Entries and comments feeds.