Cook Local, Eat Global
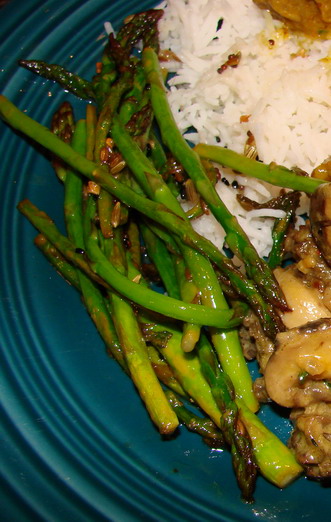
Asparagus with Panch Phoron
Asparagus is one of those seasonal vegetables that we make gluttons of ourselves with when it is in season, until the point that we are nearly tired of it when it is gone.
I say nearly tired, because I don’t think that I could get truly weary of asparagus. It is just so fresh and green and wonderful. After a long winter of eating darker greens, it is nice to eat something sweet, tender and new.
And it helps that each year, I come up with new ways to cook the little verdant spears. I guess if I just steamed it and dressed it with lemon and butter every day, it -would- get tiresome. But no, I like to roast it, grill it, put it in pasta sauces and stir fries.
Last week, I discovered that it is really good in Panang Beef Curry instead of string beans, and I came up with an utterly simple preparation using the Bengali spice mixture, panch phoron.
Made of equal parts of cumin, fenugreek, nigella, mustard and fennel seeds, panch phoron is a magical mixture. These seeds, when toasted in oil or butter, and tossed with a lightly cooked vegetable bring out the natural delicious nature of that vegetable, while adding a myriad of sweet, musky, oniony and hot flavors of their own.
You don’t even need a formal recipe to make this: it contains five ingredients.
Butter, panch phoron, asparagus, lemon juice, and a sprinkle of salt. That is it.
For one half pound of asparagus, I used two tablespoons of butter, a teaspoon and a half of panch phoron, the juice of one medium lemon and a pinch or two of salt.
All you have to do is prepare your asparagus for cooking by breaking off the tough ends, and cutting it into bite sized pieces or leaving the spears whole, as you prefer.
Then, you melt the butter in a heavy bottomed pan and toast the panch phoron in it until it is brown and fragrant. Then, toss in the asparagus and cook, tossing and stirring until the skin of it brightens slightly.
Then add half the lemon juice, and steam the asparagus in it until it is done, then add the rest of the lemon juice and salt and stir.
Voila! An amazingly flavorful side dish that is brainlessly simple to do, yet which tastes sophisticated and complex.
Kashmiri Wild Mushroom Curry
Wild mushrooms are a seasonal indulgence which are a universal pleasure.
Wherever edible wild mushrooms grow, people seek them out and create delectable dishes featuring their earthy flavors. This is true whether we are talking about the Appalachian highlands where folks gather meadow puffballs, shaggy inkcaps and the elusive morels, which they saute in butter or batter and fry to a crisp, rich finish, or the Himalayan foothills of Kashmir where wild mushrooms are cooked into gently-spiced, dairy-laced curries.
I am not much of a mushroom-hunter. I have never had much luck seeking morels in the wild; I just don’t have the eye for them I guess. However, I know them when I see them, and when I see them, I want them.
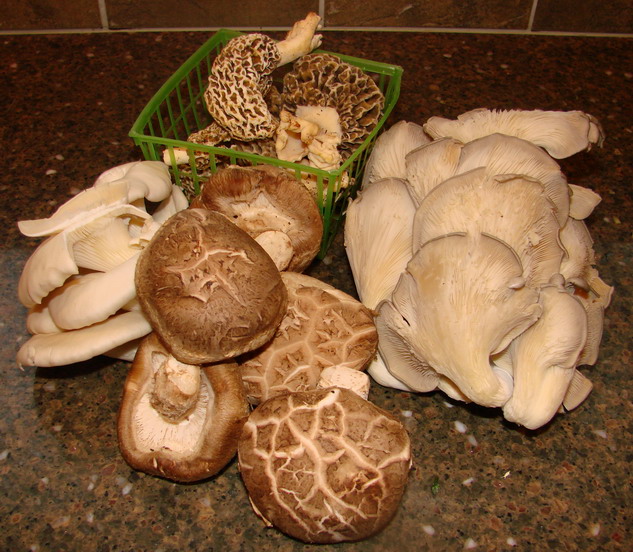
I was thrilled to find wild gathered morels at the farmer’s market last Saturday. I was there early, before the market was open for business, and happened to see that some of my favorite sellers, Art and Peggy Gish, had four boxes of morels for sale, so I stood at their table, and waited for the market to open.
Other customers milled about, and the sharp-eyed fungaphiles among them quickly gathered with me. We negotiated amongst ourselves, and the first four of us who lined up all agreed that we would each only buy one box, leaving enough for the others.
We had a great time, teasing back and forth with each other, talking about how we would cook them and joking that our little courteous agreement kept us from having to mug each other in the parking lot to steal the delicious fungi.
I also was lucky enough to find an enormous bunch of oyster mushrooms and fresh shiitake that were cultivated locally, so I bought them up as well, resolving to make something rich for Morganna and I to share. (Zak really dislikes mushrooms, so that means more for us.)
I was originally going to make a beef stroganoff with the mushrooms, but later, I changed my mind. I wanted to make something even more special than that, and I didn’t want the flavor of beef to overpower the delicate beauty of the spongy morels.
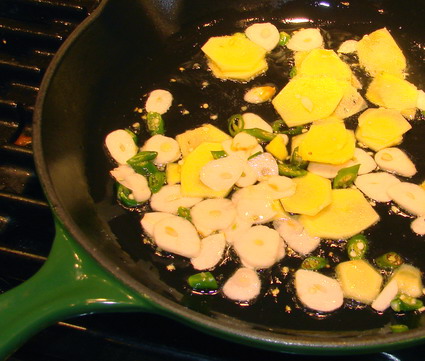
Remembering the passages I had read about the wild mushrooms of Kashmir in several books, I decided to make a curry with them. However, I saw no reason to make a very strongly spiced dish with them; I wanted the delicate woodland flavors of the mushrooms to be the centerpiece of the curry. So, I chose the typical Kashmiri spices of cardamom, fennel, coriander, cinnamon and cloves, an onion and some garlic to enhance the mushroom flavor.
Butter was my cooking fat of choice, and if there was yogurt in the fridge I would have used it. Instead, I used a bit of lamb stock and cream to create a minimal thick and unctuous sauce.
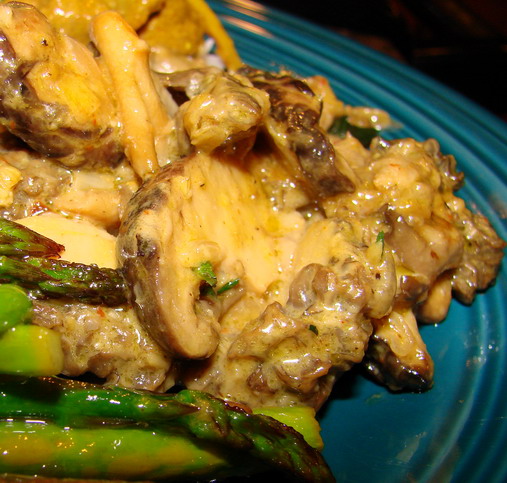
Finally, for a touch of color, I used a bit of turmeric and paprika and a sprinkling of fresh mint for a verdant sparkle of taste.
It turned out amazingly well. Served with plain steamed basmati rice, it was a revelation. The creamy, thick sauce was a dream of caramelized onion, sweet spices and garlic, and it perfectly complemented the earthy mushrooms. An alternative way to serve it would be as a filling for little puff pastry or phyllo tartletes. It would not be traditionally Kashmiri, but it would be a fantastic fusion of Indian and European traditions.
And next year, when the morels poke their little wrinkly caps above the leaf litter and pine needles of the forest floor, I will make this again.
Kashmiri Wild Mushroom Curry
Ingredients:
4 tablespoons butter, divided
1 large onion, peeled and thinly sliced (about 1 cup)
1/4 teaspoon salt
3 cloves garlic, peeled and thinly sliced
1/8 teaspoon fennel seeds
1/2 teaspoon coriander seeds
3 green cardamom seeds
1/8 teaspoon black peppercorns
pinch ground cinnamon
1 whole clove
1 pound of mixed wild mushrooms, cleaned and sliced thinly
1/2 cup lamb, chicken or vegetable broth
1/2 cup heavy cream
1/4 teaspoon ground turmeric
1/8 teaspoon paprika
2 tablespoons minced fresh mint leaves
Method:
Melt half the butter in a heavy-bottomed skillet. Add onions in a thin layer, and scatter salt over. Cook, stirring now and then until deep golden in color.
While the onions cook, grind the garlic, fennel, coriander, cardamom, peppercorns, cinnamon and cloves to a fine paste.
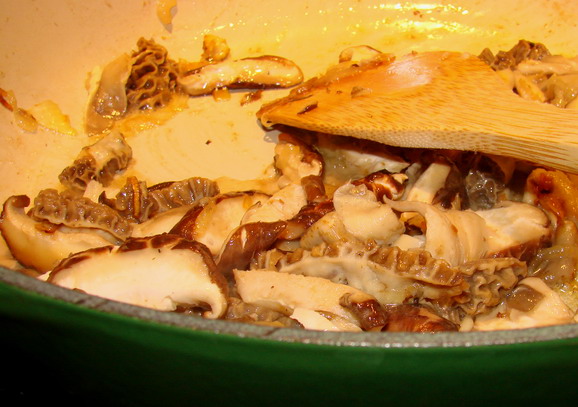
As soon as the onions turn light red, add the spice paste, and mushrooms, and cook, stirring, until the onions turn deep reddish brown, the spices are fragrant and the mushrooms wilt slightly. Add the rest of the butter, and keep cooking, stirring constantly, until the mushrooms are tender.
Add the broth, and cook until it mostly simmers away. Add the heavy cream, turmeric, and paprika and cook until it is mostly simmered away, and the liquid that is left forms a thick sauce that clings the mushrooms like a fragrant velvet.
Stir in the minced fresh mint and serve immediately. Or, if you cannot serve it immediately, leave out the mint, and remove from the heat. Cover and allow to sit for no more than an hour or so at room temperature. To reheat, add about a tablespoon of cream, and stir over medium heat until it is steamy hot again. Then, stir in the fresh mint and serve.
Creating Your Own Foolproof Chinese Stir-Fry–Step Two: The Aromatics

If you think of the main ingredients of your stir fry as the stars of your show, then the aromatics are akin to those character actors who bring a delightful amount of color, flavor and realism to a cast. Cast in supporting roles, aromatic ingredients are very much like skilled character actors in that if you, the chef/director, are not careful to reign them in, they can disrupt the show by overpowering your stars and taking over. On the other hand, you don’t want to be so timid that you do not allow the aromatics to shine, and do what they do best, which is bring a stir-fried dish to life with vibrant flavors.
What is an aromatic?
Generally speaking it is a very flavorful dried or fresh spice, herb, or preserved condiment which, when used in small amounts flavors an entire wokful of food. The most familiar fresh aromatics are those from the allium family: onions, garlic, scallions, leeks, shallots.garlic chives and chives. As far as I am concerned, there would be no cuisine without this family of aromatic vegetables/herbs; they are quite simply that indispensable to the kitchens of the entire world.
But there are other quite wonderful and necessary aromatics in the Chinese kitchen. Ginger, which is a rhizome, adds its fresh, tingling flavor to innumerable Chinese dishes. Chile peppers, though a relative newcomer to the shores of China, have become quite popular and are used fresh, dried, fermented, salted, and made into various condiments, such as chile-garlic sauce. Black pepper, star anise, Sichuan peppercorn, cinnamon, and five spice powder are all spices which are used to flavor Chinese foods, including stir fries. Salted dried shrimp, fermented black beans, and fermented vegetables can also play the role of aromatics in a Chinese stir fry.
It isn’t just the strong flavor of an aromatic that determines its role; it is when and how it is used in a stir fried dish that causes me to call it an aromatic, and not either a main ingredient or a condiment. To me, the main factors which determine whether or not an ingredient is an aromatic in a stir fry is that it is used in relatively small amounts,and it is among the first ingredients that are put into the wok, in order to infuse the rest of the ingredients with its flavor.
There is an exception to my rule, of course: some aromatic spices, such as Sichuan peppercorns or black pepper, can be sprinkled over the dish just at the end of cooking to add an extra fillup of flavor. However, in cases such as this, often the aromatic added at the end of the cooking process was also used at the beginning.
Some aromatic ingredients can be used in such quantity in a stir fry that they qualify as main ingredients. A classic example is garlic chives or chive blossoms, which are used as a vegetable in stir fries that contain a small amount of meat. I am personally fond of pork with garlic chives, and chicken with chive blossoms is very good as well.
How does a cook properly use and control these strong-flavored ingredients in order to keep them from taking over the main ingredients of a stir fried dish?
There are several ways. One, is to be aware of what aromatics enhance which main ingredients, and choose them accordingly.
Everything tastes good with tofu. There, I said it. That is part of why I like tofu so much–it is versatile. You can cook it spicy, you can cook it mild. and it is always good. Chicken is like tofu in that all of the aromatics, used judiciously, will enhance its natural savory flavor.
Ginger really enhances beef and freshens its strong flavor; it is also essential with fish and seafood. Garlic is also good with beef, but it really shines with pork and lamb. Scallions are one of the “Heroic Trio” of the Chinese kitchen, and is good with everything, but sometimes I really prefer deeply cooked onions instead. Fermented black beans, in greater or lesser amounts are good with everything, but I really like it with beef and chicken. Chilies are great in anything, as far as I am concerned.
It is also helpful to know that there are classic combinations of aromatic ingredients in Chinese cookery. I have already mentioned the ever-present “Heroic Trio” of scallion, garlic and ginger in a post of all its own, but there are other combinations that are just as tasty. Fermented black beans are good friends with garlic and either chiles or caramelized onions. Ginger, scallion and black pepper are great with seafood. Chile, garlic and fermented black beans are used with clams and I love it with tofu. Leeks, ginger and garlic are amazing with stir-fried lamb. (That is a northern Chinese specialty.)
Secondly, it helps to know how the way the aromatics are cut influences their flavor in a stir fry.
Ingredients which are cut smaller have more surface area. This allows the release of more of the essential oils which add flavor to the stir fry. So, for an intense flavor, minced or pureed aromatics fit the bill. For a strong, but not as overpowering a flavor, thin slices of matchstick stips will work. For subtle flavor, thicker slices are the way to go. The proper technique is to add the aromatics to the stir fry at the beginning of the process, just after
There is a problem, however, with using minced ingredients, especially garlic, in a stir fry. When you heat your wok enough to produce a browned crust on your main ingredients, the heat is intense enough to burn minced garlic on contact, which would cause a very bitter, biting flavor which can utterly ruin a dish.
The way I get around this is that I add the minced garlic on top of the main protein ingredient, whether it is meat of tofu. While the meat or tofu are browning and are left motionless in the wok for that one minute or so, I sprinkle the garlic over the upper surface of the meat or tofu.. The heat and oil simmering up between the pieces of protein cooks the garlic partway, and once the bottom is browned of the meat or tofu, and you start stirring again, the garlic infuses the entire dish with its flavor without burning.
Why choose three aromatics, rather than four or more?
It is easier to learn how the flavors work together in a stir fry if you only use three at a time. Once you become more experienced, then you can start adding one or two other flavors to a stir fry. If you start out with more aromatics, you run the risk of overloading your dishes with flavor and muddying them.
So for now, stick with Barbara’s Rule of Three, and after your stir fries get better, you can discard it like every other outgrown rule you have ever been given.
Up Close and Personal With Kimchi
Kimchi is considered the national dish of Korea. This broad category of lactic-acid fermented pickles is made of a wide variety of vegetables, fruits and sometimes seafoods, all brined in salt, flavored with herbs, garlic, ginger, and often, liberal amounts of red chili peppers. Some people find the array of types of kimchi intimidating; I find them fascinating.
However, I must confess that while I adore kimchi, and am not intimidated by the thought of making it, until last night, I have been far too lazy to do it myself.
Which is odd, because it isn’t as if I am unfamiliar with the mysteries of fermented vegetables.
I mean, I grew up helping to make huge batches of saurkraut, kimchi’s blander (but still tasty) European cousin every autumn.
Mom and I would go out to Grandma and Grandpa’s farm on a drizzling, cool October morning, and help harvest bushel after bushel of cabbages. Mom, Grandpa, and Grandma would range up and down the rows, wielding machetes, which they used to hack the heads of cabbage off just above the damp red clay soil. With quick, deft cuts, the tough outer leaves would be trimmed, flopping to the ground waiting for me to scurry along and gather them into a basket. When the basket was full, it was my job to ferry it out to the field and dump them over the fence for the patiently waiting cows, who gladly grazed upon the parts of the cabbage which we found inedible. They found them delicious.
Uncle John would ferry the heavy, full bushel baskets of cabbages to the ends of the rows, where Grandpa would pick them up with the tractor, and he’d carry them to the house. Down in the basement we’d go, to cut the heads into quarters, core them and wash them very carefully in the big sink. We’d fill the sink with water, and then dissolve salt in it, and put the quartered cabbages in it to purge them of any bugs, slugs or other creepy-crawlies. Grandma was adamant that she didn’t want any extra added protein in her kraut.
Then Grandpa would shred the cabbage with his own mandoline, which he made out of a sharpened piece of machete blade, cut and mounted in an oak box he constructed. I was never allowed near the “kraut cutter” as he called it, as it was frighteningly sharp and had no safety features, unlike modern mandolines. My job was to take the shredded cabbage, bowl by bowl, and sprinkle the pale green ribbons into the huge forty-gallon crock in even layers. After about an inch of cabbage ribbons went in, Grandma would sprinkle the kosher salt over it all, in a proportion that her hands knew better than her head, and Mom or Uncle John would take up the “tamper”–a huge turned flat bottomed cudgel made of oak, once again by Grandpa–and beat the cabbage down, smashing it and releasing the juices, packing it tightly into the crock, forcing out the air.
This went on all day, until two or three huge crocks were packed full of pounds and pounds of salted cabbage. Then, Grandma would put a layer of cheesecloth over the opening of the crock, cover that with a clean dinner plate she had sanitized with boiling water, and on top of the plate went a carefully wrapped cinderblock which acted as a press, weighing down the cabbage, helping to extract the juice and keeping excess air out.
And that was it. We left it for a few weeks to ferment in the cold basement, and then Grandma would pack it into sanitized jars and process it in a hot water bath, and we’d end up with many quarts of delicious, nutritious saurkraut to keep us healthy all winter long.Making kraut is easy, but long and tiring work, especially if you make a large amount of it.
Kimchi, because it requires more ingredients than just cabbage and salt, requires more work still, though none of it is particularly hard. I made it in culinary school and loved it, but then, that was an entire class of twenty students making it. Many hands make the work lighter, you know, and until recently, I could only count on my own pair in the kitchen.
So, what was it that shook me out of my laziness?
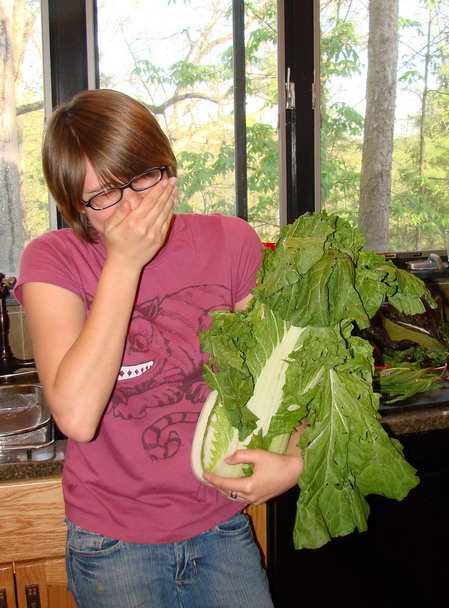
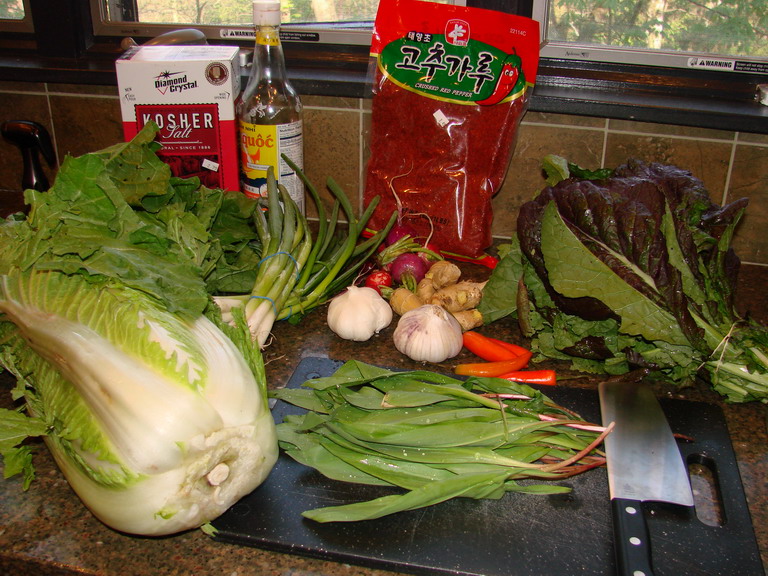
Well, I was minding my own business, wandering through the farmer’s market on Saturday, and I saw this just cut head of napa cabbage. And it was huge–larger than Kat. And I could smell its fresh verdant sweetness from across the table, and it just looked lonely there, the last one left, bereft of its fellow cabbages. And I looked at it and thought to myself, “What a lonely looking cabbage. I bet it would make some fine and tasty kimchi.”
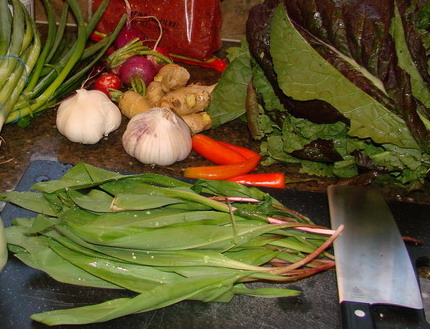
So, I bought the thing, which with the big, tough outer leaves weighed probably seven pounds, and lugged it home. Along the way, I also picked up some purple and pink radishes, some mustard greens, some tender new scallions, ome Japanese white globe turnips, some green garlic and some ramps (Appalachian wild garlic) to go in the kimchi. In fact, the only non-local ingredients that went into this kimchi were the fish sauce and chili peppers, the garlic and ginger and the kosher salt. In celebration of the fact that I was using mostly local Appalachian Ohio ingredients, including ramps (which, if they grew in Korea, would be used in kimchi–I just know it. They are so tasty, and so good that there is no Korean grandma who would turn her nose up at them. I am sure of it.), that I named this recipe, “Appalachian Springtime Kimchi.”

I figured that Morganna (also known as Chibichan) would help me make the kimchi, and since our kimchi jar was perilously low because I had been feeding it to her to fend off a cold, it seemed only fair.
As for a recipe, I will tell you the truth: I combined the recipe I found here, with one I read in the excellent cookbook, Eating Korean by Cecilia Hae-Jin Lee, and the method Chef Hector Lipa taught me at Johnson & Wales, added my locally grown and gathered ingredients and came up with my own concoction. Since I just made it last night, I won’t know for a few days how it is going to taste, but I will say it smells really, really good.
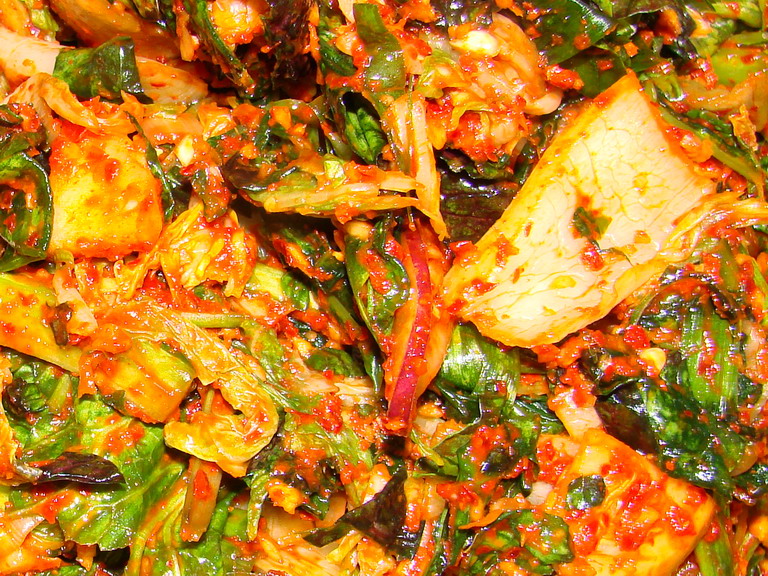
Kimchi, like saurkraut. is one of those foods which demands that you pay attention and get up close and personal with the ingredients. There is a lot of hand work involved in the making of kimchi, and because it is a fermented raw product, it pays to start out with very clean hands, utensils, counters and sink. So, scrub your hands well, clean under your fingernails and roll up your sleeves, then follow these step by step photographs chronicling our first batch of Appalachian Springtime Kimchi, a dish which I hope will become a seasonal specialty at our house. (Morganna wanted to name it “Redneck Kimchi” but I overruled that suggestion. To me, “Redneck Kimchi sounds like it was made from iceburg lettuce, Frank’s Red Hot Sauce, Vienna sausages and Blue Ribbon Beer. Ick.)
Appalachian Springtime Kimchi
Ingredients:
7 pounds Napa cabbage
1 cup plus 1 tablespoon kosher salt
2 heads garlic, peeled and sliced
4″ long chunk of fresh ginger 1″ thick, peeled and sliced
1 1/2 cups Korean ground red chiles
2 bunches scallions, trimmed, washed and sliced thinly (about a cup and a half)
1cup of ramp leaves, thinly sliced
3 fresh red chilies, stemmed and quartered
1 bunch of fresh mustard greens, washed and sliced into 1″ wide ribbons
1 bunch of radishes, washed, trimmed, cut in half and thinly sliced (about 1/2 cup)
3 medium sized Japanese globe turnips, peeled, trimmed, quartered and thinly sliced (about 1 cup)
1/4 cup fish sauce
1 teaspoon sugar
Method:
Gather your materials: you need a one-gallon jar, preferably glass, with a screw on lid or self-locking lid. Run it through the dishwasher and make certain to put it through the heat dry cycle. Or, wash it well by hand, then pour boiling water over it and the lid, then allow it to air dry. Also, you will need a very large bowl or basin and a large plastic bag. I used one of the giant Ziplock bags which are meant for storage of household items. It is tough enough to be rinsed out and used for later batches of kimchi.
You will also need latex or plastic gloves.
First, cut off the root end of the cabbage, and then strip away the tough outer leaves of the cabbage. Cut it in half longitudinally.
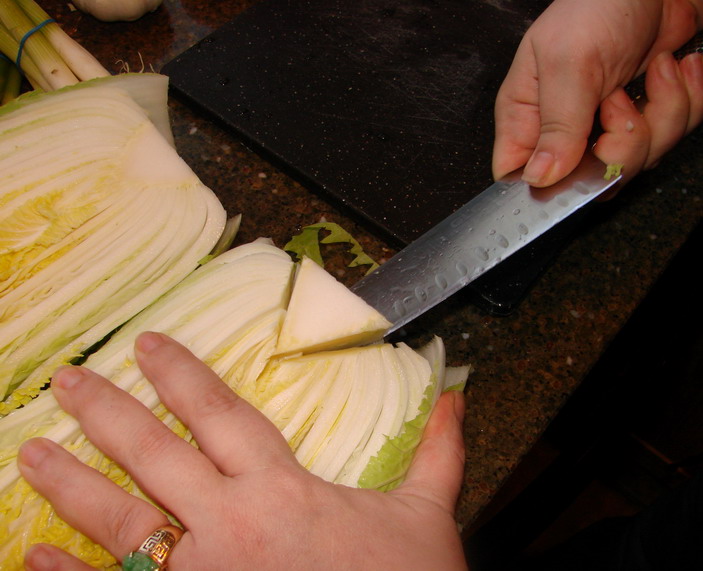
Then, making a v-shaped cut with your knife, cut the core of the cabbage, then pry it out with your fingers.
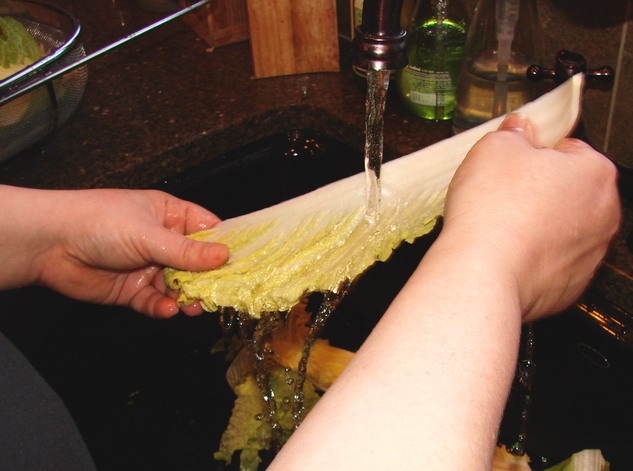
Separate all of the leaves of the cabbage, and carefully rinse each leaf individually, spraying away all of the little specks of dirt that like to hide out in the crinkly leaves. Pay special attention and watch out for ants, and especially slugs, which love to hide within the layers of the leaves and snack upon their sweetness. Slugs in kimchi are not my favorite thing.
Once the cabbage leaves are rinsed, cut them into about two-inch square pieces, and allow them to drain in a colander until all of the cabbage is cut. (Morganna would like me to mention at this point that all of this cutting, grinding and scrubbing goes well with music. She suggests that you listen to this. We did, and it had us dancing and bouncing as we chopped, shredded and ground our way around the kitchen.)

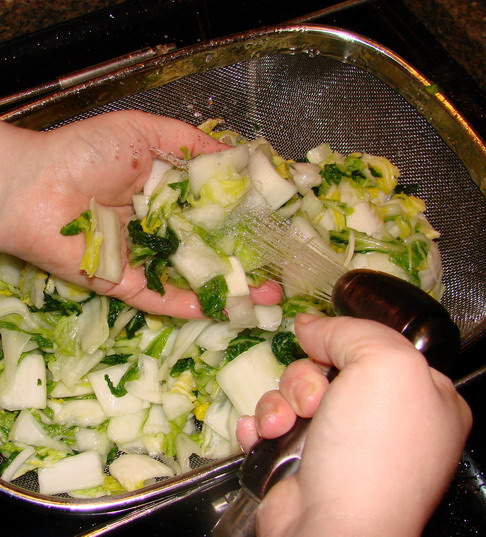
Then, you need to salt the cabbage. Open your plastic bag, and grab up some cabbage bits and sprinkle a thin layer into the bottom of the bag. Grab up a small amount of the one cup of salt, rub it between your palms, and then reach into the bag, and rub the salt into the cabbage leaves briskly. Repeat this process until you have used up all of the cabbage and salt, then squish the cabbage leaves, massaging the salt well into them.
Seal up the bag and set it aside for about three hours. Every now and then, check on the cabbage, swishing it around, and making certain that the cabbage juices that are being drawn out of it covers the leaves completely.
While the cabbage is brining, grind up your ginger and garlic with a food processor into a thick paste, and set them aside.
After the cabbage is brined, drain it in a colander, and squeeze as much of the juice out of the cabbage as possible. The texture should be similar to a dill pickle–soft but somewhat crisp.
Then, rinse the cabbage thoroughly with cold water, squeezing it and squishing it around, then allow it to drain again.
Put on your gloves, and mix together the remaining tablespoon salt, ginger, garlic, ramps, chili slices, and chili powder, fish sauce and sugar in the large bowl or basin. Get this mixed together well, then start massaging in the brined cabbage and mustard greens, in alternating handfuls. Please, please, please! Do not touch your nose, face, or any other part of your body with your gloved and chili infested hands. It is painful.

Mix thoroughly. Morganna and I found that putting the bowl into the sink kind of helps to keep the mess contained. We scrubbed the sink out well first so that if any bits escaped the bowl, we could just pick them up out of the sink and pop them back into the bowl.
After all the ingredients are squooshed into a big pile of kimchi goodness, it is time to start packing it into the jar.
Just scoop handfuls into the jar, and then gently pack them down in order to make sure there are no air bubbles. Don’t pack it tightly, it isn’t necessary.
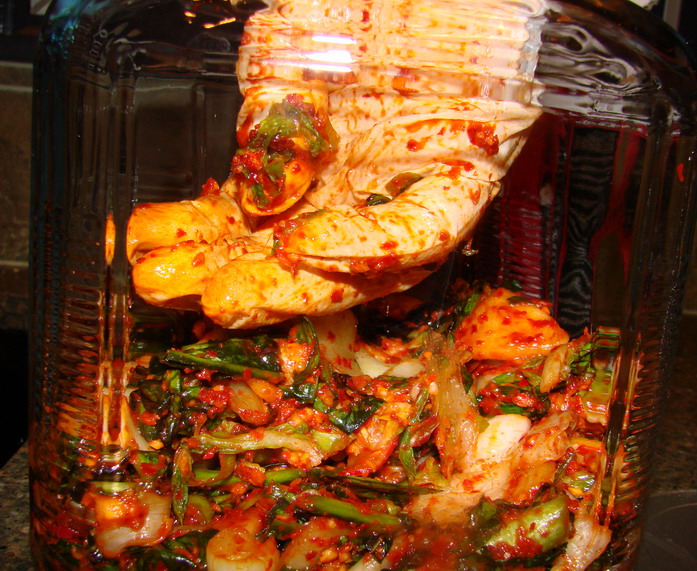
After all of the kimchi is put in the jar, screw the jar on loosely. Strip off your gloves, then wash your hands thoroughly with soap and cold water, to remove any lingering residue from the chilies. Then, set the jar in a cool place and leave it alone for three days. Check it every day; if the fermentation is going correctly, you will see small bubbles moving up through the layers of vegetables.
After that, open it up and taste it, then store it in the refrigerator. It will last for a month or so, though it will continue to ferment. Some people do not like it as much after it ferments for a long time. I do like it, but some folks will only use very fermented kimchi in cooking, and will not eat it raw.
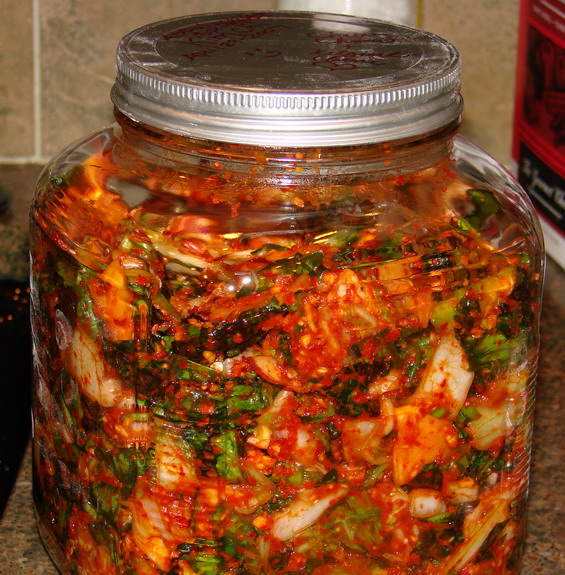
So, there it is. Appalachian Springtime Kimchi. Morganna and I are probably going to make a couple more batches of this while ramps are still in season, and give the jars away as gifts.
Stay tuned for more Korean recipes in the future, including some more kimchi varieties as the season progresses and other vegetables and fruits ripen.
Super Quick Injury Update: I’m Fine!
I wanted to let folks know that the pierced finger is pretty well healed. It hurt like crazy; the only reason I didn’t yelp when it happened was because I knew Kat had just gotten to sleep and I didn’t want to wake her up!
But, it is fine now–just two little pinprick holes–one through my nail and one on the other side of the finger. Thankfully, it went in diagonally and missed the bone entirely. It barely bled.
My head is fine. I hit my chin when I landed, and rattled myself nicely, but no lasting damage was done. That is the advantage of having a hard head, I guess.
Now–I was going to post on Thursday–I had the next bit in the series half written, when Morganna and I went to start cooking dinner.
But, while we were prepping, she said to me, “You know, I think I have just about gotten my knife skills back up to speed….”
Then, about five seconds later, she said, “Ouch! Oh, shit.”
She cut her finger, through her nail (the same finger on the same hand I pierced with the sewing machine needle….) and diagonally.
She ran to clean it out, and called out to me, “I think it will be okay.”
I looked at it, and sent her and Zak to the ER to get it stitched. They actually used surgical glue on it, but still…oy. It has been a bad week.
Yesterday, though, I went out and got a new sewing machine. Finally, I will be able to finish Kat’s baby quilt, and some other projects I have laying around, as well as start some new projects that I will be sharing here later.
Today, there was a wedding shower at our house for a friend, so this is the first time I have gotten to sit down and rest.
I’m going to go read the manual to my new pretty now!

Categories:
- Admin (rss) (55)
- Blogs and Blogging (rss) (81)
- Book Reviews: Cookbooks (rss) (43)
- Book Reviews: Non-Cookbook Food Books (rss) (38)
- Cats and Cat Blogging (rss) (47)
- Chinese Cooking Lessons (rss) (32)
- Culinary School Stories (rss) (18)
- Dairy Pruducts: Cultured and Barbaric (rss) (4)
- Documentary Filmmaking (rss) (1)
- Essays, Rants and Reflections (rss) (260)
- Fighting Hunger (rss) (12)
- Food and Kids (rss) (45)
- Food in the News (rss) (126)
- Food Media (rss) (98)
- Food Preservation (rss) (18)
- Food Safety (rss) (45)
- Gardening (rss) (30)
- Herbs and Herb Blogging (rss) (20)
- Holidays (rss) (50)
- Kat Blogging (rss) (22)
- Kitchen Science (rss) (36)
- Leftover Makeover (rss) (8)
- Life, the Universe and Everything (rss) (131)
- Local and Sustainable (rss) (227)
- Local Athens Food and Foodies (rss) (42)
- Meatless Mondays (rss) (32)
- Menu For Hope (rss) (5)
- Nutrition, Diet and Health (rss) (84)
- On The Farm (rss) (8)
- Recipes: Almost Vegetarian, Vegetarian and Vegan (rss) (294)
- Recipes: American Regional (rss) (37)
- Recipes: Appalachian Hillbilly (rss) (33)
- Recipes: Bread, Pasta, Grains (rss) (95)
- Recipes: Canning and Preserving (rss) (8)
- Recipes: Chinese (rss) (123)
- Recipes: Comfort Food (rss) (120)
- Recipes: Cookies (rss) (16)
- Recipes: Desserts (rss) (48)
- Recipes: French (rss) (25)
- Recipes: Fruits and Vegetables (rss) (302)
- Recipes: Greek, North African and Middle Eastern (rss) (31)
- Recipes: Indian (rss) (137)
- Recipes: Italian (rss) (42)
- Recipes: Japanese (rss) (7)
- Recipes: Jewish (rss) (4)
- Recipes: Korean (rss) (6)
- Recipes: Meat, Poultry and Fish (rss) (220)
- Recipes: Mexican/Native American/ Latin American/Caribb (rss) (27)
- Recipes: Original (rss) (108)
- Recipes: Thai (rss) (27)
- Recipes: Tofu (rss) (17)
- Recipes: US Regional (rss) (16)
- Recipes: Vietnamese (rss) (8)
- Restaurant Stories (rss) (28)
- Sewing, Quilting, Arts and Crafts (rss) (16)
- Simple Chinese Recipes (rss) (30)
- Slow Food and Heritage Foods (rss) (10)
- Spice Blogging (rss) (44)
- The Chinese Cookbook Project (rss) (14)
- The Chinese Pantry (rss) (39)
- The Documentary (rss) (2)
- The Kitchen Saga (rss) (17)
- The Locavore's Bookshelf (rss) (15)
- The Unsung Adventures of The Culinary Nerd (rss) (6)
- Tools and Toys (rss) (35)
- Uncategorized (rss) (10)
- With a Side of Politics (rss) (48)
Archives:
- August 2012 (9)
- July 2012 (12)
- September 2011 (3)
- August 2011 (7)
- July 2011 (8)
- June 2011 (16)
- May 2011 (17)
- April 2011 (11)
- December 2010 (9)
- November 2010 (5)
- February 2010 (1)
- December 2009 (5)
- November 2009 (7)
- October 2009 (10)
- September 2009 (16)
- August 2009 (14)
- July 2009 (14)
- June 2009 (7)
- May 2009 (17)
- April 2009 (10)
- March 2009 (25)
- February 2009 (13)
- January 2009 (10)
- December 2008 (5)
- November 2008 (5)
- October 2008 (6)
- September 2008 (13)
- August 2008 (8)
- July 2008 (11)
- June 2008 (18)
- May 2008 (13)
- April 2008 (14)
- March 2008 (16)
- February 2008 (17)
- January 2008 (19)
- December 2007 (25)
- November 2007 (18)
- October 2007 (24)
- September 2007 (16)
- August 2007 (15)
- July 2007 (15)
- June 2007 (10)
- May 2007 (14)
- April 2007 (16)
- March 2007 (17)
- February 2007 (20)
- January 2007 (13)
- November 2006 (1)
- October 2006 (8)
- September 2006 (14)
- August 2006 (25)
- July 2006 (30)
- June 2006 (28)
- May 2006 (34)
- April 2006 (29)
- March 2006 (24)
- February 2006 (30)
- January 2006 (38)
- December 2005 (40)
- November 2005 (37)
- October 2005 (32)
- September 2005 (25)
- August 2005 (30)
- July 2005 (28)
- June 2005 (21)
- May 2005 (8)
- April 2005 (22)
- March 2005 (17)
- February 2005 (29)
- January 2005 (10)
Search Site:
Links:
- Lily’s Wai Sek Hong
- 101 Cookbooks
- A cat in the kitchen
- A Veggie Venture
- Accidental Hedonist
- Cha Xiu Bao
- chez pim
- Chocolate & Zucchini
- Chopstick Cinema
- Chowhound.com
- Chubby Hubby
- Cook sister!
- Cooking with Amy
- da*xiang
- Eat Local Challenge
- Eating Liberally
- Ecocentric
- Eggbeater
- Epicurious
- Farmgirl Fare
- Fatfree Vegan
- Foodgoat
- ForkandBottle.com
- Green Olive Tree
- Hooked on Heat
- Jaden’s Steamy Kitchen
- Kalyn’s Kitchen
- Lucullian delights
- Mahanandi
- Matt Bites
- MeatHenge
- mmm-yoso!!!
- New York Times – Dining & Wine
- Pizza Goon
- Rasa Malaysia
- Ruhlman
- Sailu's Kitchen
- Serious Eats
- SF Gate: Food & Dining
- Simply Recipes
- Soul Fusion Kitchen
- Tastespotting
- The Amateur Gourmet
- The Cleaner Plate Club
- The Food Section
- The Grub Report
- thecookscottage
- U.S. Food Policy
- Wandering Chopsticks
- Washington Post Food and Dining
- Wasted Food
Meta:

Powered by WordPress. Graphics by Zak Kramer.
Design update by Daniel Trout.
Entries and comments feeds.