Cook Local, Eat Global
Celebrating Indian Independence At Mahanandi
Indira, the talented writer of the popular Indian food blog, Mahanandi, has a one time food blog event going on this August to celebrate the independence of India from British colonial rule. It’s called the Food Parade on Independence Day, and the idea is a great one meant to celebrate the wonderful variation of the regional cuisines of India.
Check out her post for the specific rules of the event, and get in that kitchen and start cooking up a celebration.
Also at Mahanandi, is a lovely photo essay of her trip to New Vrindaban, a holy site dedicated to Krishna located on 500 acres near Wheeling, West Virginia. The photographs of the temples and the swans and peacocks are lovely, as are her descriptions of the peaceful aura that the place possesses.
I have always meant to go there, and haven’t yet made it. I remember hearing about it as a child (it was decried from the pulpits of a few churches I attended as a place of heathenry–I remember getting very angry at one minister and standing up and renouncing him, telling him that God comes to all people, not just to Christians, and it doesn’t matter to God if he is called God or Krishna–my strongly stated opinion started a bit of a fracas), and always wanting to see it.
Someday, I think we will have to take a trip and go there.
More later!
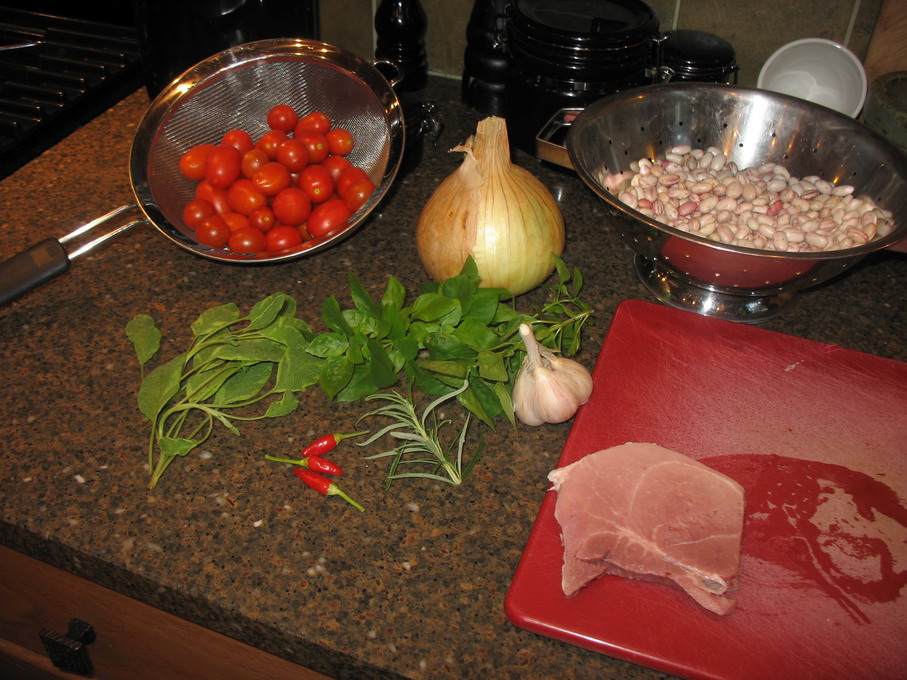
A Bean, By Any Other Name, Wouldst Taste As Sweet?
Beans are in my blood.
I grew up eating them, child of Appalachia that I am.
A cheap source of protein, dried beans were not only an easy meal, but they were a way of life, especially in the wintertime.
When the weather was cold and blustery, the remedy was to put on a pot of beans.
And a “pot of beans” meant beans seasoned with some sort of pork, whether it was a hamhock, fatback, jowl bacon or even just a dab of bacon grease. An onion, a bay leaf and maybe some garlic might go in the pot, but they were all optional.
The necessary item for a good pot of beans was some sort of pork product, preferably smoke cured. That is what added depth and a sweet smokiness to the beans, and made the broth, known in some families as “pot likker,” a heavenly brew. I was notorious for craving the bean juice as much as the beans themselves, and would drink it like soup from a mug if I was allowed.
But it wasn’t just dried beans I grew up with. Oh, no–my grandparents grew several different kinds of beans on their farm, too. Most noteably bush and pole green beans, and lima beans.
The bush beans we ate young, as green beans, and we’d can them young, too. Sometimes, Grandma would pickle some, too.
The pole beans, we’d eat young, but Grandma would wait until they matured farther, and we’d make “shelly beans” with them, and then she’d can them that way.
“Shelly beans” are green beans that are old enough that the pods are tougher, and you string them, open them up and scrape out the beans. You still eat the pods–they still go in the pot, but with the beans removed, they don’t take as long to cook and get tender. And if any of the beans in the batch are younger, you just string and snap those like normal so what goes in the pot is a mixture of snapped beans, open and emptied bean pods and shelled beans. This was all cooked up with onions, pork and sometimes potatoes, and was very good, though I tended to like the tenderer young pods best.
Lima beans–those were eaten green. We didn’t leave them on the vine to ripen and dry to make dried beans. Grandpa planted both baby limas–those tiny-podded wonders that had beans in them that were barely larger than a kernel of field corn (corn that is meant to feed livestock), and sweeter than candy, and regular large limas, that were starchier and plumped up when you cooked them until they burst out of their skins.
Lima beans tasted good, and Grandma used to can them until she switched over to freezing them. But whether they are canned or frozen, processing them meant we had to spend long, long hours shelling them out of their pods, and there is nothing tougher than a lima bean pod. I hated the work, because shelling lima beans took strong hands, and it would make your thumbs ache. And it took lots of us to shell them out to freeze, too–six sets of hands at the least. When we had enough folks, when I was younger, I used to get the job of picking the beans from the vines and putting them in the baskets of the cousins, aunts, uncles and other relatives, who sat in comfortable lawn chairs and rockers under the locust tree next to the barn, where they could shell beans in the comfort of the shadiest, breeziest spot on the farm. But when there were fewer of us, and after I got older, I always had to shell them, and I would go home with thumbs aching from having to string pods that were so tough they seemed to be made of kevlar, or at least chiten.
But, much as I disliked the thumb-wracking work of shelling limas, I still miss gathering in the shade, in rocking chairs, and listening to the folks gossip and tell stories on each other, tales punctuated by the metallic ping of beans striking the metal colanders we all held in our laps to recieve the shelled beans. The pods went with the uprooted vines, onto a tarp in the middle of our circle. After we were done, the vines and pods would be divided up among the pigs, chickens and cows, all of whom loved the flavor of the greens, and who relished cleaning up what we could not ourselves eat.
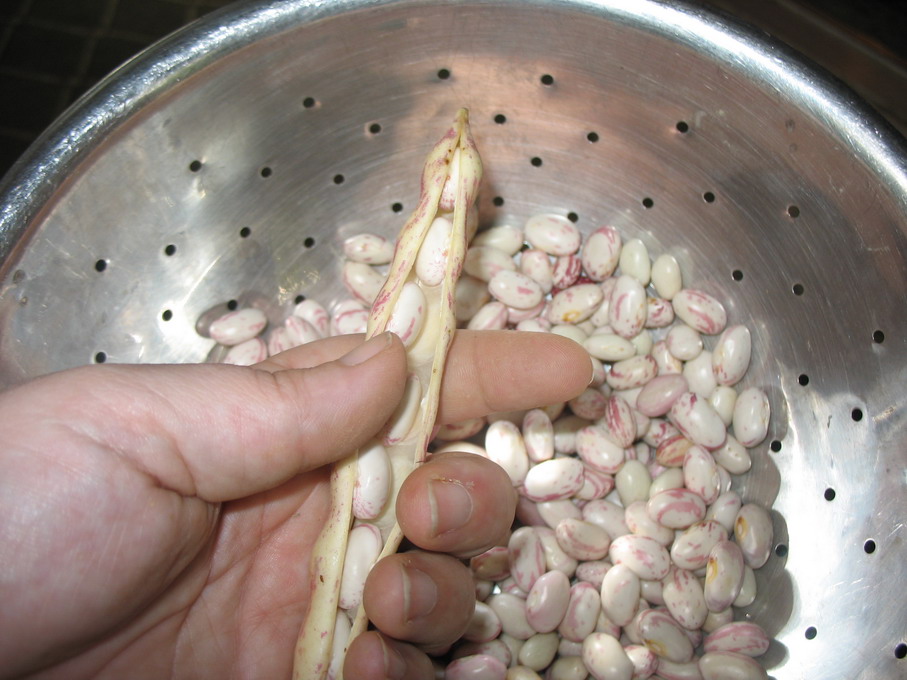
I felt all of that coming back to me today as I shelled these beans I picked up at the farmer’s market on Saturday.
I saw them, practically being ignored in a stall filled mostly with more conventional green beans and onions, a stall run by an older lady who reminds me of my Grandma’s best friend, Becky, a lady, who like Grandma, has long gone to that great garden patch in the sky. No one else seemed to be paying any attention to these unusual looking knobby-podded beans, but they caught and held my eye.
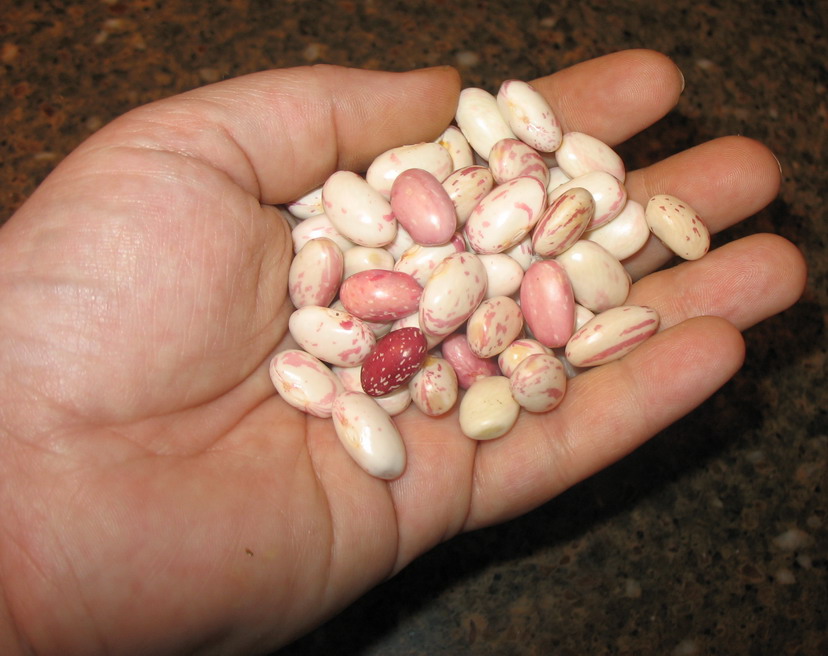
Because they looked like a bean I had read about in Marcella Hazan’s and Paula Wolfert’s books: Italian cranberry beans.
They were long and knobby, with plump pods, some of which were pale green, but most of them were ivory to creamy-buff in color. All of them were streaked with brushstrokes of cerise; they looked as if a pixie with a paintbrush had been at them.
I couldn’t resist. I stepped up to the nice lady and asked her what those beans were.
She smiled brightly–obviously she liked these beans.
“Those is horticultural beans,” she said, nodding. “Not many grows ’em.”
“They are for shelling, aren’t they?”
She beamed, and nodded. “Uh, huh. Cook em with pork–I know you’ll love ’em if you try ’em.”
I nodded and smiled. “I’ll take a box of them.” (Which looked to be about two quarts of pods, which I figured would give me about a pound of beans. My estimation was correct.; once shelled, they made about a pound of beans.)
She grinned with delight and dumped the box into a bag and we exchanged cash and she smiled. “Let me know what you think of em when you come back next week.”
As we stepped away, Zak said, “What kind of beans are those?”
“Cranberry beans–in Italy, they are known as cranberry beans and they are eaten in Tuscany, in particular. Marcella Hazan says that they are best fresh like this, and bemoans the fact that you can mostly only get them dried in the US, if you can even find them at all. They are supposed to be creamy and sweet.”
“So, what you are saying is you found a treasure, huh?”
“Yep.”
So, the beans, whether you want to call them horticultural, French horticultural or cranberry beans, came home with us.

And I got the pleasure of sitting my sunporch and shelling them. Though, it isn’t the same without the gossip and my Grandma’s laughter, I did have the rocking chair, a cat (Grimalkin) tumbling at my feet, and I could sit and watch the fawns and their mother cavort in our backyard, as well as the birds go about their business. It was almost as good as sitting under the locust tree beside the barn and looking down the slope over the field at the pond and the woods below. It was better, actually, in one way, as it was inside and thus the mosquitos couldn’t get me.
And, these many-named beans didn’t make my thumbs hurt.
How did I cook them?
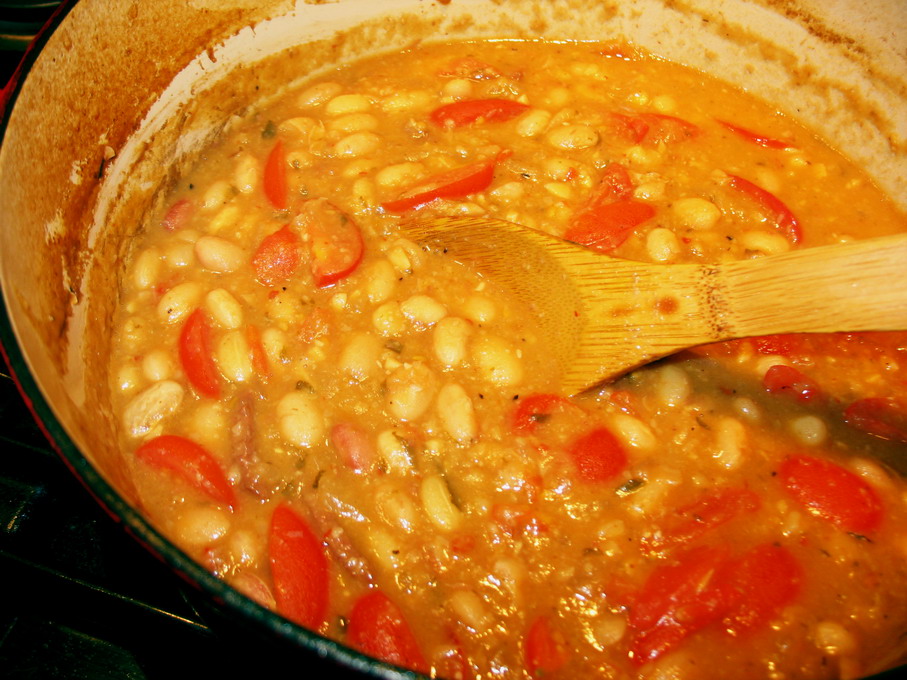
Well, in an improvised fusion between Appalachian Hillbilly cookin’ and Tuscan Country Folk cuisine: I made a pasta fagiole dish that included locally raised and cured ham from Harmony Hollow Farms, a caramelized sweet onion from the lady who grew the beans, garlic from yet another farmer, and herbs, chiles and minature plum tomatoes from my own garden. Everything in the dish was local except the Parmesan cheese, the pasta, the wine and the chicken broth.
It turned out very, very well, too. The beans were delicious, just as creamy and nutty-flavored as Hazan and Wolfert promised. The only improvement I could make in the dish would be to add a rind from a piece of Parmesan to the bean pot, and to use a smaller shape and size of pasta–I think that small shells would be great, because they could cup and hold the beans perfectly.
I believe that we will be visiting that nice lady again on Saturday and picking up another bag of these delicious whateveryouwanttocallem beans, for they were awfully tasty.
Besides, that gives me an excuse to sit in a rocker on my sunporch and spend a nice hour shelling beans, and watching the deer.
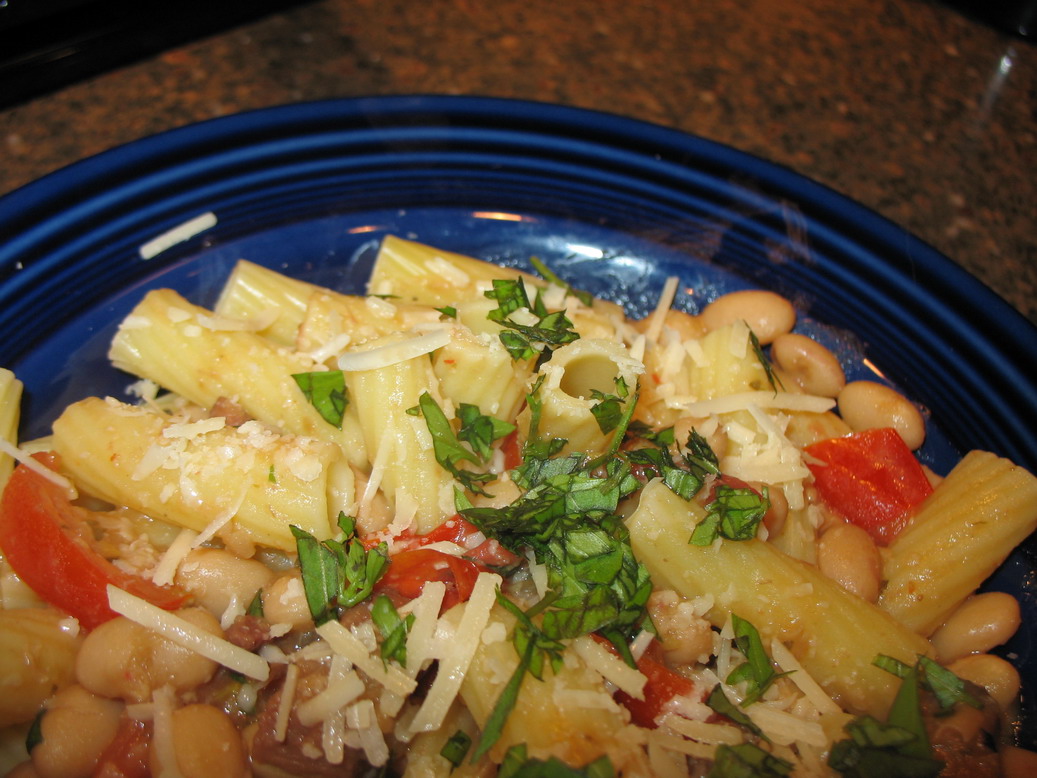
Appalachian-Tuscan Fusion Pasta Fagiole
Ingredients:
3 tablespoons olive oil
1 tablespoon bacon grease (optional)
1 large onion, thinly sliced
1 teaspoon salt
2 ounces boneless ham, cut into small dice
1-2 fresh chiles–to taste–minced
black pepper to taste (I used Aleppo pepper flakes instead–about a teaspoon of them)
3 large cloves garlic, minced
2 tablespoons minced fresh sage
1 tablespoon minced fresh rosemary
1/2 cup dry white wine, sherry or marsala
1 quart chicken or vegetable broth
1 pound shelled fresh horticultural/French horticultural/cranberry beans
1/2 pound fresh plum tomatoes, chopped
1/4 cup minced fresh basil
1 pound pasta of your choice, cooked al dente
freshly shredded Parmesan cheese, for serving
Method:
In a heavy-bottomed pot or Dutch oven, bring olive oil and bacon grease, if you are using it to heat on medium. When bacon fat is melted, add onion and sprinkle with salt. Cook, stirring, until onion is dark golden colored and smells sweet. Add ham, chiles, pepper, garlic sage, and rosemary, and continue cooking, stirring, until the ham browns slightly, the garlic is golden and the onions are brown.
Add wine, and stir to deglaze pan, and allow alcohol to cook off.
Add whichever broth you are using, and the beans. Allow beans to come to a simmer, turn heat down, and partially cover pot. Cook until beans are just softened, and the skins are starting to crack–about an hour. Remove lid, turn heat up to high and carefully allow broth to cook down until it is barely covering beans. Add tomatoes.
Using an immersion blender, puree about 1/4 of the beans, to make a thick gravy. Allow tomatoes to soften and begin to break down. Stir in half the basil.
Dump drained pasta into bean pot and toss to combine.
Put into heated bowls to serve, and top with a sprinkling of cheese and some more basil.
What is This Vegetable?
One of the most beautiful things about getting a CSA box is the excitement of not knowing what will be in it, until you open it up.
It is little bit like Christmas, every weekend.
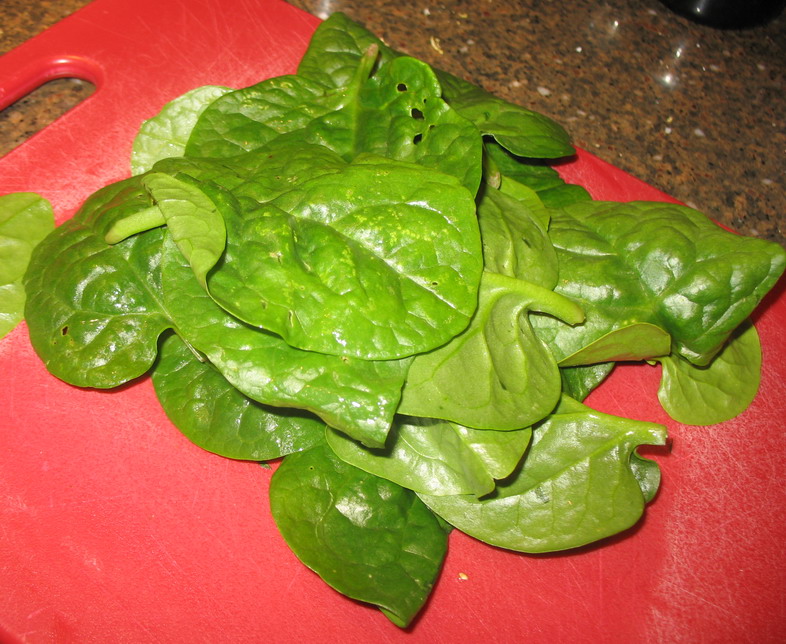
For the past two weeks, we have had a mysterious green in our box.
You can see it in the picture up there: it is a sturdy-leafed thing, with an earthy scent, rather akin to chard or beet greens. But leaves, which are glossy and emerald-colored, are very fleshy and stiff. When you break them open or cut into them, they are filled with a thick, viscous fluid that is reminiscent of the slithery juice of okra, but is not so slimy. In my eyes, it is more akin to aloe vera juice, but a little more runny, and with little flavor.
The flavor when it is raw is unusual; many people, because of the juice, don’t much care for it raw, but I didn’t think it was unpleasant. Though, I have to admit, thinking of an entire salad bowl of the fleshy, somewhat spongey-textured leaves didn’t make me want to grab the vinagrette. Most people prefer it cooked–and when I look at it and think rationally–I can see why.
What is it I am talking about?
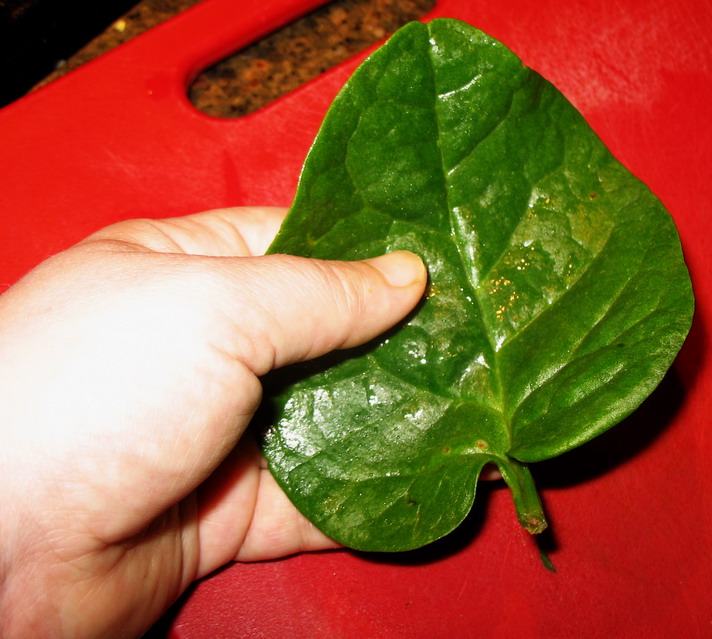
Basella rubra, otherwise known in English as Malabar spinach.
It is not a true spinach, but it has been grown in warm areas of the US and Europe as a spinach substitute for years, because it is untroubled by the heat. Spinach will “bolt” in the heat of summer, which means that once it gets too warm for its comfort, the plant will rush to put out flowers and seeds, and then die. Spinach is a true cool-weather plant, and as such, can be a big problem crop in places in the US, like the South, where heat in the summer is a fact of life.
But, Malabar spinach is a tropical vine, originating in India, and as such, when the sun is broiling down and there are temperatures upwards of ninety degrees like we have been having recently here in Athens, it is perfectly at home, and will just keep growing, and growing, and putting out lovely verdant heart-shaped leaves like crazy.
And for those of us who like cooked spinach–it is a godsend.
The one drawback to the plants is that they do not like drought, so if one is growing it and the weather causes a dry spell, like the one that came with our heat wave, it appreciates extra watering attention. Dry areas do well with irrigating the plants, I am told.
Nutritionally speaking, this green is a powerhouse. Low in calories and carbohydrates, it is high in protein, calcium, iron and vitamin A, and has a moderate amount of vitamin C. One hundred grams of cooked Malabar spinach gives 5% the RDA of protein (that is a lot for a green vegetable) and 23% the RDA of vitamin A. It also gives 12% of the RDA of calcium–which is very good for a vegetable.
But, what is it like cooked?
It is virtually indistinguishable in flavor from spinach, though I can tell the difference by the texture. Spinach leaves are never as thick as Malabar spinach is. It stands up to heat better than spinach, which wilts as soon as flame touches the pan it is in; Malabar spinach also doesn’t shrink as much in volume as spinach does. (There is nothing more disheartening than to spend nearly an hour cleaning and picking tough stems from ten pounds of spinach only to watch it shrink down to virtually nothing when it is cooked. Trust me.)
The color of it cooked also gives it away to a careful observer. It is more of a brilliant green when cooked than spinach, which darkens considerably. Malabar spinach keeps its vibrant grass-green color for much longer in the pan.
I have read caveats online that caution against overcooking this green, as it can apparently go slimy. I am not sure what constitutes overcooking, however, so all I can say is when I cooked it tonight, it turned out very well, with no tendency towards sliminess in evidence.
How is it best cooked?
Well, having only used it as spinach in a sauteed pasta sauce, and cooked the way I cooked it tonight, I cannot say. But, I have to admit to liking the way I made it tonight better: I read online that it was cooked by the Bengalis with onion, chile and a little bit of mustard oil, so I improvised a recipe based around that very vague description. I have no idea if it really does taste like the way they cook it in the state of Bengal, but, it tasted good, and I will be cooking it this way again. Tonight it was a side dish beside my homemade baked macaroni and cheese. It was perfect, especially with a dollup of my Fresh Tomato Chutney Salad completing the meal. Look for that recipe tomorrow–it is a salady, chutney-like dish I used to make for my Pakistani personal chef clients that they really, really enjoyed.
Bengali Style Malabar Spinach
Ingredients:
1 pound Malabar spinach, washed, dried, with thick stems and veins removed
1 tablespoon butter or ghee
1 medium sized yellow onion, sliced thinly
2 Thai bird chiles, sliced thinly
1/2 teaspoon salt
1 large garlic clove, minced
1/2 teaspoon cumin seeds
1/2 teaspoon mustard seeds
1 tablespoon mustard oil
Salt to taste
Method:
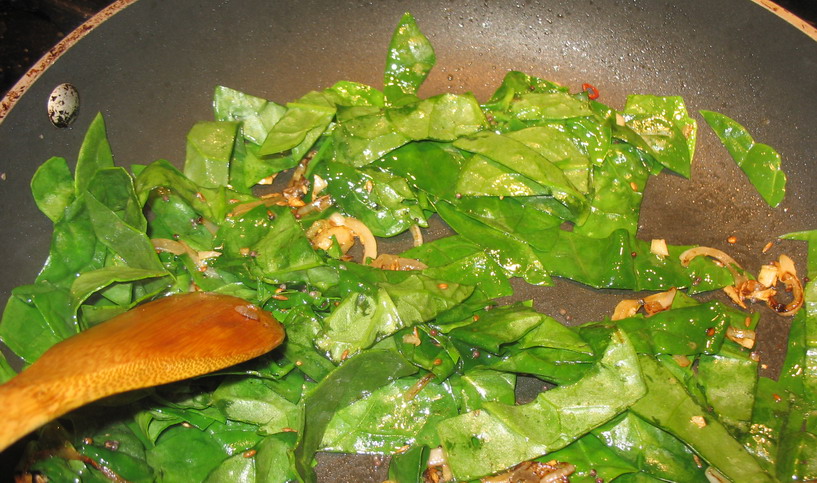
After the stems are removed from the greens, stack them up together in piles about 1/2″ thick, and cut crosswise into 1/2″ thick ribbons. Set aside.
Heat butter in a saute pan, and add onions and chiles, sprinkling well with salt. Cook, stirring, until the onions darken to a medium golden brown. Add garlic, and keep cooking until the garlic becomes golden and the onions are reddish.
Add cumin and musard seeds, and stir until mustard seeds start to pop. Add mustard oil, and the Malabar spinach, and cook, stirring, and shaking pan, until the leaves brighten in color and wilt. Sprinkle with a bit of water if the onions take on too much color or begin to scorch, and keep cooking until the onions are dark reddish brown, the cumin is deep colored and fragrant, and the greens are well-wilted and darkened somewhat.
Then, it is ready to serve. It goes well with mac n cheese, though I suspect it would also be nice with a full Indian meal, particularly one that included channa masala and maybe a nice raita, too.
Reminder: The Spice is Right V: “Fresh and Local”
This is just a quick reminder that the deadline for the fifth edition of “The Spice is Right” blogging event where we share recipes that include spices in some way, shape or form, is on August 15th.
This time around, our theme is going to be “Fresh and Local,” where we try and use a spice that is locally grown and pair it with the freshest local produce we can find to create a truly seasonal dish that is filled with the flavors of our home.
Now, if you absolutely cannot get a locally grown spice, fear not–I will not disqualify you if you use a locally grown herb instead. But, do try and see what you can come up with–that is the fun of these challenges–trying to be as creative as possible within the limitations imposed by the theme.
One of the reasons I chose this particular theme for August is because I think that with the supermarketification of our world, where unseasonal produce is flown and shipped from all over the world, we have forgotten what it is like to eat with the seasons. Many of us have forgotten what the unique flavors of our home terroir are. “Terroir” is a French word that speaks of the special flavor of food grown in a particular place, and is related to the type of soil, the rainfall, the amount of sun, and whether the air is from the mountains or the sea.
I like to think that with this silly little blog challenge, I am helping us reconnect with our terroir–our home soil, and the fruits that come from it.
If you would like to participate, the complete rules (such as they are) are listed here, along with a full explanation of the this month’s theme. I have already received a few really interesting entries, and I look forward to quite a few more as the month progresses. As always, if you have questions, you can post them here, or just email me. I’ll be happy to help in any way.
Until then, happy hunting at the farmer’s markets, happy gardening and harvesting, happy shopping and happy cooking!
Garden Update: I’ve Got ‘Maters!
With the heat wave we have been experiencing here in Athens (heat indeces of around 106 degrees F daily–woohoo!) and no rain in sight, I have noticed that my tomatoes have started going into overdrive.

(The heat wave did finally break last night, with a spectacular series of thunderstorms that included mult-colored lightning, cracks and rolls of thunder and torrential rain. Now it is only in the upper eighties. This, I can live with.)
The “Jellybean” cherry tomatoes and the “Juliette” miniature plum tomatoes are just pouring out ripe tomatoes like there will be no tomorrow. ‘Maters like heat, and the long dry spell also intensifies their flavor a good bit–(the flavor of my basil plants and other herb plants have also intensified in the heat–less water=more essential oils=more flavor) such that these little ovoid and round red fruits are bursting with tomatoey goodness. (And, no, none of them smell like feet or pond water. They smell like tomatoes. Duh.)
The “Mr. Stripey” heirloom tomatoes are getting big, but are still green. I suspect I will not harvest them until September. Which is fine–between now and then, I suspect we will have plenty of tomatoes from our own plants and from the CSA shares to contend with.
Every day, I have been able to go out on the deck and pick a big double handful of fruits that get gathered in my skirt–that is what you see in the photo above–a typical afternoon’s harvest, and they last on my counter for about three or four days–if they make it that long before being eaten out of hand, made into a salad, or our new favorite way of eating them: in the ever-evolving summer pasta saute.
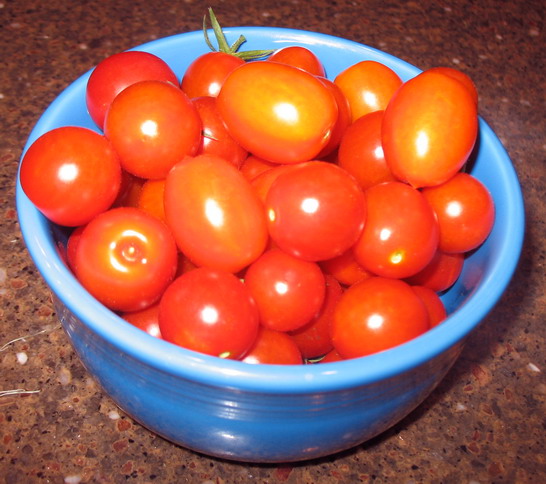
The bowl you see on the counter there holds about two days worth of tomatoes–that is enough for a batch of pasta every other night.
The first variation on the summer pasta is written up here, with a recipe. This second variant is similar, but different enough that it has a flavor that is unique, even if it does share many of the same ingredients as the first. The variant I will make tonight will be a further refinement, with the addition of some ingredients, the subtraction of others. So far, the tally of who likes which pasta is thus: Zak likes the lemony tang and light refreshing quality of the first version, while Morganna and Donny both prefer this new version, with its creamy, unctuous quality from the ripened cow cheese, and the nutty flavor that comes from a large splash or two of sherry. I am thinking that I like them both, but in different ways and for different reasons: like the lemony version because it is lighter, but I really like the creamy cheesy version, because it involves creamy ripened cow cheese.
You will notice that neither version contains meat protein.
There is a story behind that.
In addition to the fact that I have lots of tomatos and other vegetables to use, I am having problems, as I slowly slide into my third trimester, eating meat again.
For whatever reason, I absolutely cannot stomach it. I don’t like the smell of it, and more than a bite or two of anything other than chicken or seafood seems to make me nauseous. I am also having reflux problems from the utererous pressing on the espophagus, and making it difficult to eat anything heavy that takes a very long time to digest.
So…I am pretty well back to eating mostly vegetables and grains, with some chicken and seafood. Most of my protein these days comes from dairy products and eggs, both of which have remained edible to me. Quiche from the local bakery, in fact, has been a godsend–they use whole wheat pastry flour in the crust, so it has a wonderful nutty flavor in addition to the flaky texture, and they use great cheeses and local eggs (local butter and milk, too) and a variety of delicious vegetable fillings that are just right. A wedge of that is perfect in the morning, as I have discovered that fried or scrambled eggs are not wanting to stay down as easily as they had been in the past.
So, there we are. My garden is still growing like mad–the “Jellybean” tomato vines are probably twelve feet tall at this point, but I have no real idea, since they have grown up to eight feet, then drooped down and I have tied them back down along the stakes, to the deck railing, where they are snaking along in great, twining tendrils. I don’t think they will stop growing and making blossoms until frost. What is scary, is that I have not fed them since I mixed the organic fertilizer into their planter boxes before setting the 6″ tall baby plants in there. (Yes, just a few short months ago, they were that tiny. It is hard to believe.)
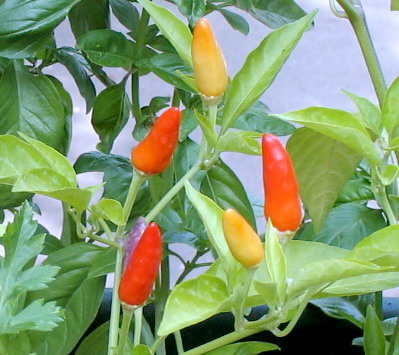
The basils are also exploding in fecundity, and I can pick a big bouquet or two a week to use in cooking and still have plenty of basil grow up for next week. The other herbs are not quite as fertile, but I have plenty of them to use every week as well. The chiles are giving me a handful of pods every other week, so I am happily harvesting them as we go and adding them to the pasta dishes with abandon.
So now, here is another variation on my summer pasta–this one including Sweetgrass Dairy’s Green Hill ripened cow’s milk cheese:
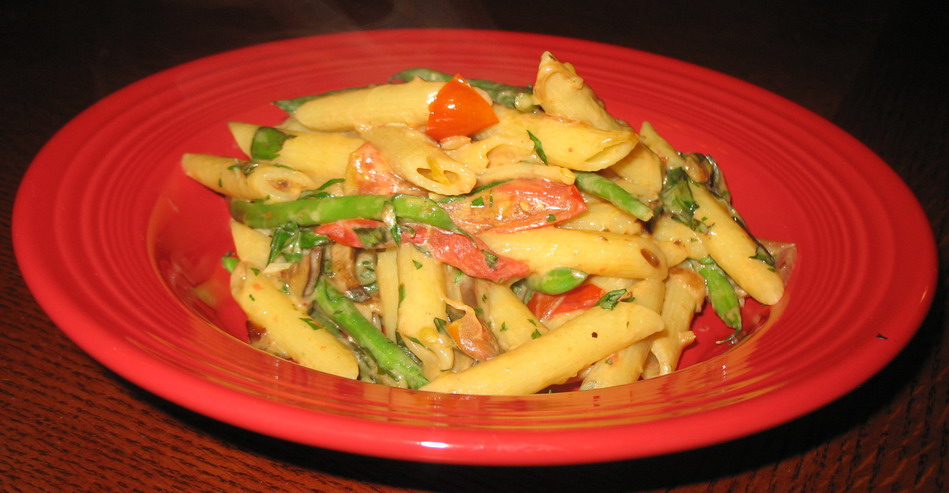
Green Hill Summer Pasta
Ingredients:
3 tablespoons olive oil
2 small or 1 medium yellow onions, cut in half, peeled and thinly sliced
generous pinch salt
big pinch of Aleppo pepper flakes or a good grinding of black pepper for those of you can use it–lucky beasties that you are!
zest of 1 lemon, minced
3-4 small, very hot chile peppers, such as Thai bird chiles, minced (or, to taste)
3 large chantarelle mushrooms, cleaned and thinly sliced
1/2 cup dry sherry, divided into two halves
4 cloves garlic, peeled and minced
1/2 pint haricot vert, topped, but with the tails left on, rinsed and thoroughly dried
11/2 cup2 small plum, pear or cherry tomatoes, cut into thin quarters or sixths
1/8-1/4 cup chicken broth or vegetable broth
3/4 pound penne pasta, cooked al dente and drained
1 Sweetgrass Dairy Green Hill cheese, rind removed (removing the rind is optional–except for folks like me who are allergic to it)
1/2 cup minced fresh basil and flat leaf parsley
Method:
Heat olive oil in a wide, deep skillet on medium flame. Add onions, and sprinkle with salt and Aleppo or black pepper, and cook, stirring until they go medium brown and limp. Add lemon zest, chile, mushrooms and garlic, and keep cooking, stirring, until the lemon zest and garlic brown slightly, and the mushrooms are golden.
Add half of the sherry, and cook, stirring, until the alcohol evaporates.
Add haricot vert, and cook, stirring, until they deepen in color slightly. Add tomatoes, broth and second half of sherry, and cook, stirring until tomatoes just begin to break down.
Add penne and the cheese. Cook, stirring, to incorporate the pasta and melt the cheese into sauce thoroughly. At this time the haricot should be tender-crisp, the onions should be dark brown and fully caramelized, the tomatoes melty and good, the cheese should be turning everything into an unctuous, creamy sauce. When this happens, taste for salt, correct seasoning if necessary, stir in the herbs and turn into a warmed serving bowl.
Notes:
In order to remove the rind from a ripened cheese, put it in the fridge to firm it up a bit. Take it out and cut the top off of it carefully with a sharp knife. Let it come to near room temperature, and then, using a spoon, scoop out the cheesy goodness, and put it into a bowl. The riper the cheese, the easier this is to accomplish.
If you cannot get Green Hill or don’t want to try, use any ripened cow’s milk cheese for this. You can use Camembert, or Mt. Tam from Cowgirl Creamery. You can use Creme de Brie if you don’t want to play with removing the rind, though it won’t taste as good. Or, you can leave the rind, and just cut it into pieces. The rind will never melt all the way into the dish, though, and that might disturb some diners who think rind is ucky. In that case, you can pick that out before you serve it.
Either way works, so long as you are not allergic to mold, in which case, my methods work better!

Categories:
- Admin (rss) (55)
- Blogs and Blogging (rss) (81)
- Book Reviews: Cookbooks (rss) (43)
- Book Reviews: Non-Cookbook Food Books (rss) (38)
- Cats and Cat Blogging (rss) (47)
- Chinese Cooking Lessons (rss) (32)
- Culinary School Stories (rss) (18)
- Dairy Pruducts: Cultured and Barbaric (rss) (4)
- Documentary Filmmaking (rss) (1)
- Essays, Rants and Reflections (rss) (260)
- Fighting Hunger (rss) (12)
- Food and Kids (rss) (45)
- Food in the News (rss) (126)
- Food Media (rss) (98)
- Food Preservation (rss) (18)
- Food Safety (rss) (45)
- Gardening (rss) (30)
- Herbs and Herb Blogging (rss) (20)
- Holidays (rss) (50)
- Kat Blogging (rss) (22)
- Kitchen Science (rss) (36)
- Leftover Makeover (rss) (8)
- Life, the Universe and Everything (rss) (131)
- Local and Sustainable (rss) (227)
- Local Athens Food and Foodies (rss) (42)
- Meatless Mondays (rss) (32)
- Menu For Hope (rss) (5)
- Nutrition, Diet and Health (rss) (84)
- On The Farm (rss) (8)
- Recipes: Almost Vegetarian, Vegetarian and Vegan (rss) (294)
- Recipes: American Regional (rss) (37)
- Recipes: Appalachian Hillbilly (rss) (33)
- Recipes: Bread, Pasta, Grains (rss) (95)
- Recipes: Canning and Preserving (rss) (8)
- Recipes: Chinese (rss) (123)
- Recipes: Comfort Food (rss) (120)
- Recipes: Cookies (rss) (16)
- Recipes: Desserts (rss) (48)
- Recipes: French (rss) (25)
- Recipes: Fruits and Vegetables (rss) (302)
- Recipes: Greek, North African and Middle Eastern (rss) (31)
- Recipes: Indian (rss) (137)
- Recipes: Italian (rss) (42)
- Recipes: Japanese (rss) (7)
- Recipes: Jewish (rss) (4)
- Recipes: Korean (rss) (6)
- Recipes: Meat, Poultry and Fish (rss) (220)
- Recipes: Mexican/Native American/ Latin American/Caribb (rss) (27)
- Recipes: Original (rss) (108)
- Recipes: Thai (rss) (27)
- Recipes: Tofu (rss) (17)
- Recipes: US Regional (rss) (16)
- Recipes: Vietnamese (rss) (8)
- Restaurant Stories (rss) (28)
- Sewing, Quilting, Arts and Crafts (rss) (16)
- Simple Chinese Recipes (rss) (30)
- Slow Food and Heritage Foods (rss) (10)
- Spice Blogging (rss) (44)
- The Chinese Cookbook Project (rss) (14)
- The Chinese Pantry (rss) (39)
- The Documentary (rss) (2)
- The Kitchen Saga (rss) (17)
- The Locavore's Bookshelf (rss) (15)
- The Unsung Adventures of The Culinary Nerd (rss) (6)
- Tools and Toys (rss) (35)
- Uncategorized (rss) (10)
- With a Side of Politics (rss) (48)
Archives:
- August 2012 (9)
- July 2012 (12)
- September 2011 (3)
- August 2011 (7)
- July 2011 (8)
- June 2011 (16)
- May 2011 (17)
- April 2011 (11)
- December 2010 (9)
- November 2010 (5)
- February 2010 (1)
- December 2009 (5)
- November 2009 (7)
- October 2009 (10)
- September 2009 (16)
- August 2009 (14)
- July 2009 (14)
- June 2009 (7)
- May 2009 (17)
- April 2009 (10)
- March 2009 (25)
- February 2009 (13)
- January 2009 (10)
- December 2008 (5)
- November 2008 (5)
- October 2008 (6)
- September 2008 (13)
- August 2008 (8)
- July 2008 (11)
- June 2008 (18)
- May 2008 (13)
- April 2008 (14)
- March 2008 (16)
- February 2008 (17)
- January 2008 (19)
- December 2007 (25)
- November 2007 (18)
- October 2007 (24)
- September 2007 (16)
- August 2007 (15)
- July 2007 (15)
- June 2007 (10)
- May 2007 (14)
- April 2007 (16)
- March 2007 (17)
- February 2007 (20)
- January 2007 (13)
- November 2006 (1)
- October 2006 (8)
- September 2006 (14)
- August 2006 (25)
- July 2006 (30)
- June 2006 (28)
- May 2006 (34)
- April 2006 (29)
- March 2006 (24)
- February 2006 (30)
- January 2006 (38)
- December 2005 (40)
- November 2005 (37)
- October 2005 (32)
- September 2005 (25)
- August 2005 (30)
- July 2005 (28)
- June 2005 (21)
- May 2005 (8)
- April 2005 (22)
- March 2005 (17)
- February 2005 (29)
- January 2005 (10)
Search Site:
Links:
- Lily’s Wai Sek Hong
- 101 Cookbooks
- A cat in the kitchen
- A Veggie Venture
- Accidental Hedonist
- Cha Xiu Bao
- chez pim
- Chocolate & Zucchini
- Chopstick Cinema
- Chowhound.com
- Chubby Hubby
- Cook sister!
- Cooking with Amy
- da*xiang
- Eat Local Challenge
- Eating Liberally
- Ecocentric
- Eggbeater
- Epicurious
- Farmgirl Fare
- Fatfree Vegan
- Foodgoat
- ForkandBottle.com
- Green Olive Tree
- Hooked on Heat
- Jaden’s Steamy Kitchen
- Kalyn’s Kitchen
- Lucullian delights
- Mahanandi
- Matt Bites
- MeatHenge
- mmm-yoso!!!
- New York Times – Dining & Wine
- Pizza Goon
- Rasa Malaysia
- Ruhlman
- Sailu's Kitchen
- Serious Eats
- SF Gate: Food & Dining
- Simply Recipes
- Soul Fusion Kitchen
- Tastespotting
- The Amateur Gourmet
- The Cleaner Plate Club
- The Food Section
- The Grub Report
- thecookscottage
- U.S. Food Policy
- Wandering Chopsticks
- Washington Post Food and Dining
- Wasted Food
Meta:

Powered by WordPress. Graphics by Zak Kramer.
Design update by Daniel Trout.
Entries and comments feeds.