Cook Local, Eat Global
Meatless Monday: South Indian Style Aloo Mattar
Recently, I have been delving more deeply into the cuisines of the southern states of India. I had eaten in a couple of South Indian style restaurants once or twice, but I was not impressed with the food. However, after following the blogs of so many talented Indian cooks, and reading Cooking With Pedatha, I have become convinced that the restaurants were not very good, and have become inspired to learn more about the beautiful foods from the southern regions of India.
I mean, really, I already like vindaloo, which is from Goa, which is in the south. And I cook a mean vindaloo myself–filled with the delicious combination of garlic, onions, mustard seed and chilies–and when I realized that, I began to rethink my whole avoidance of South Indian recipes. I thought about the flavors prevalent in these cuisines and realized that I was being completely silly, because I -liked- all of those flavors already!
One of the favorite spices of the region is mustard seed, and I have found in my cooking, that nothing beats mustard seeds fried in ghee or oil for giving a dish a nutty flavor and a satisfying “pop” when the cooked seeds are crunched under the teeth. And chilies–I am not afraid of chilies–on the contrary, I crave them. And while I am still somewhat sensitive to black pepper, I can eat it in judicious amounts, and black pepper is used commonly in the south. And coconut–coconut has been one of my favorite foods since childhood!
And then there are the curry leaves.
Oh, the curry leaves.
I have loved them since the first time I bought them in a lovely little Indian market in Columbia, Maryland. I had picked them up from the produce case and sniffed them curiously and a dear little grandmother in a gorgeous green and amber-colored sari stepped up to me and asked if I knew what they were. I did know–but I had never used them, though I was finding myself intrigued by their musky, seductive scent. She smiled, and told me all about how to use them, so of course, I put them in my basket.
The little lady (who had the most amazing hair–a long, thick braid of shimmering white down her back all the way to her waist) was very pleased, and waved goodbye to me as I paid for my purchases and left. I never saw her again, but I rather think of her as the Fairy Godmother of Curry Leaves, because she introduced them to me so graciously, that I feel as if she must of come from heaven to put on the path to more delicious Indian food.
I generally had confined my curry leaf use to dal, however, because Zak was not partial to the flavor and fragrance they imparted to any dish I cooked them in. Since he doesn’t like dal (I know, how can that be?), I would use them with profligate abandon in my dal and eat it to my heart’s content, until my very skin smelled like curry leaves.
However, with my new explorations of South Indian curry, I have been using curry leaves in many dishes–including the one I am going to give to you here. And guess what–Zak has decided that he loves them, too! Everyone who tastes these dishes loves them–and cannot get enough of them–so, in my house, South Indian cooking is here to stay, and I will likely always have a supply of fresh or frozen curry leaves on hand from now on.
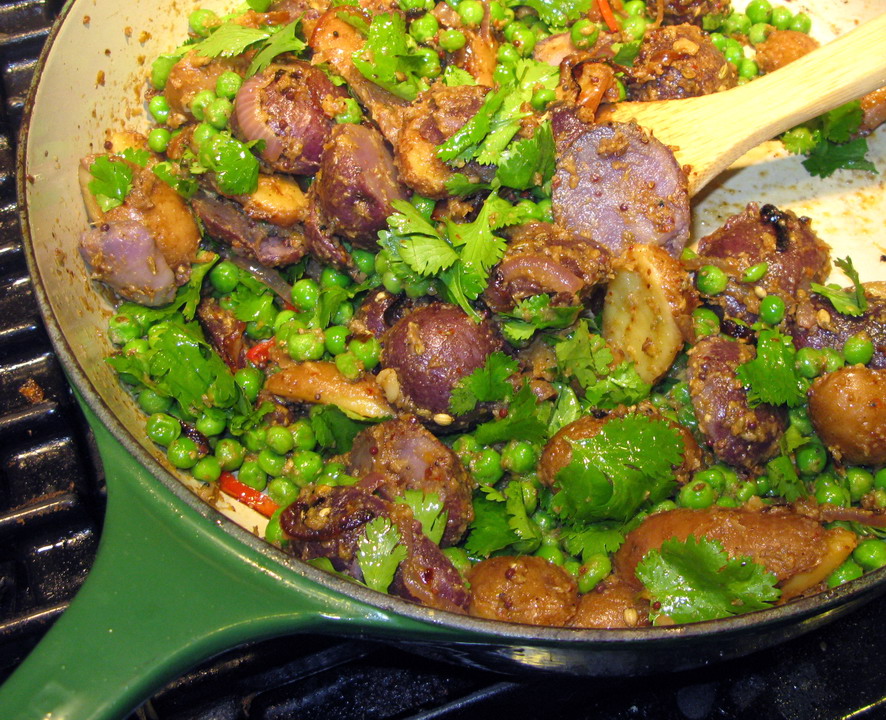
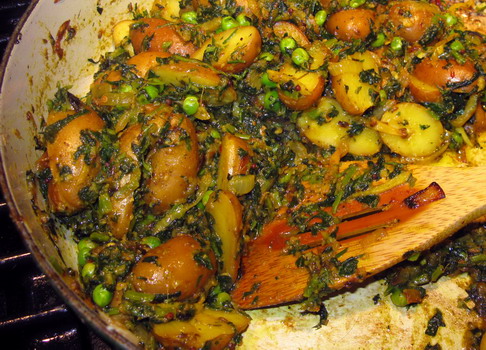
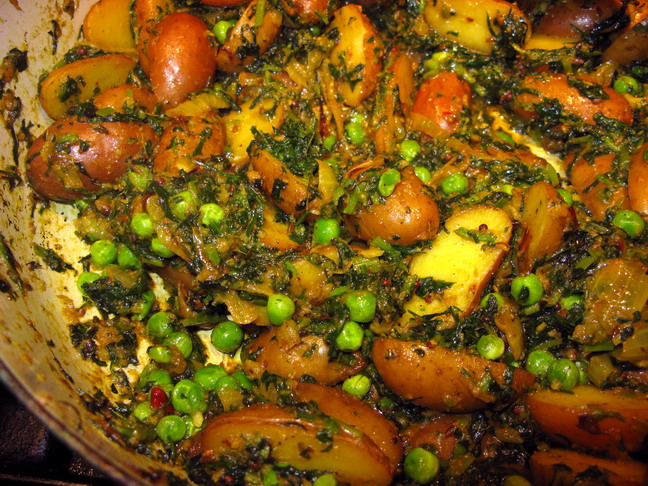
So, now, let me tell you about this very picturesque dish, which is a combination of two of my favorite vegetables: potatoes and peas. (Yes, I have finally decided that peas are one of my favorite vegetables. I can hear both of my dearly departed Grandmothers up in the aether somewhere, laughing with delight, as I refused to eat them through most of my childhood, much to their mutual dismay.)
Specifically, tiny fingerling potatoes–including little blue ones–and frozen peas, as they are a really delicious and nutritious vegetable to eat all winter long. Not to mention their emerald green color looks stunning paired with the burgundy red skin and creamy white flesh of fingerling potatoes and makes pretty blue potatoes look even bluer.
This is a very simple dish, really, and no, you don’t have to use blue potatoes in it at all if you cannot get them. They just look so very pretty, and I love the colors of Indian foods so much–they remind me of the vivid colors of silk and cotton saris and the exuberant polychromatic style in which many popular depictions of Hindu gods are painted.
But what you do need to do to make this dish taste great is this–you need to use curry leaves, you need to be certain that you cook your mustard seeds in the oil or ghee until they sputter and pop, and you need to brown your onions very well. (If you do not fully cook your mustard seeds until they sputter and pop, they will be underdone, and instead of popping under the teeth in a way reminiscent of caviar, they will have an unpleasant gritty texture, and worse than that, underdone mustard is very bitter with an acrid feeling on the tongue.)
I also suggest you use ghee in this dish, but if you are a vegan and you want to use canola or another vegetable oil, I do understand. But the ghee adds a voluptuous flavor and mouthfeel to the dish that I think is very appealing.
At any rate–here is a vegetarian dish that my non-vegetarian friends and family adore, which means that most omnivores would like it.
South Indian Style Aloo Mattar
Ingredients
1 pound mixed fingerling potatoes, including some blue ones if you can get them
3 tablespoons ghee or canola oil
2 cups thinly sliced red onions
1 teaspoon salt
1-3 fresh red chilies (I used serrano), thinly sliced on the diagonal
5-8 curry leaves
1 teaspoon mustard seeds
1 1/2 teaspoon cumin seeds
4 large cloves garlic
1/2 teaspoon fennel seed
1/4 teaspoon fenugreek seed
1/2 teaspoon cumin seed
1 tablespoon coriander seed
1/4-1/2 teaspoon black peppercorns
1/2″ piece of cinnamon stick
2 cloves
water as needed
1 pound frozen peas, thawed if you wish
salt to taste
1/4 cup chopped mint for garnish
1/4 cup whole cilantro leaves for garnish
Method:
Scrub the potatoes well, and put them in a pot of cold water. Cook until tender, drain and allow to cool. Cut them in half longitudinally once they are cool enough to handle.
Heat the ghee or oil in a heavy-bottomed, deep skillet and add onions, then sprinkle with the salt. Cook, stirring, until the onions are a nice medium golden brown. Add the chilies, and curry leaves, and cook until the onions are a deeper golden color, then add the mustard and cumin seeds. Cook until the mustard seeds sputter and pop, stirring constantly.
Add the potatoes to the pan, and cook, stirring, until the cut sides of the potatoes brown lightly.
While the onions cook, grind the garlic and the remaining spices into a thick dryish paste. Add the spice paste to the pan, and cook, stirring, until the spices brown and begin sticking to the bottom of the pan. Deglaze the pan with as little water as possible–start with 1/3 cup and work up from there, being certain to scrape up all the browned bits.
Add the peas, and cook, stirring, until most of the liquid is boiled away and the spices cling to the vegetables. Add salt to taste.
Stir in the mint and cilantro just before serving.
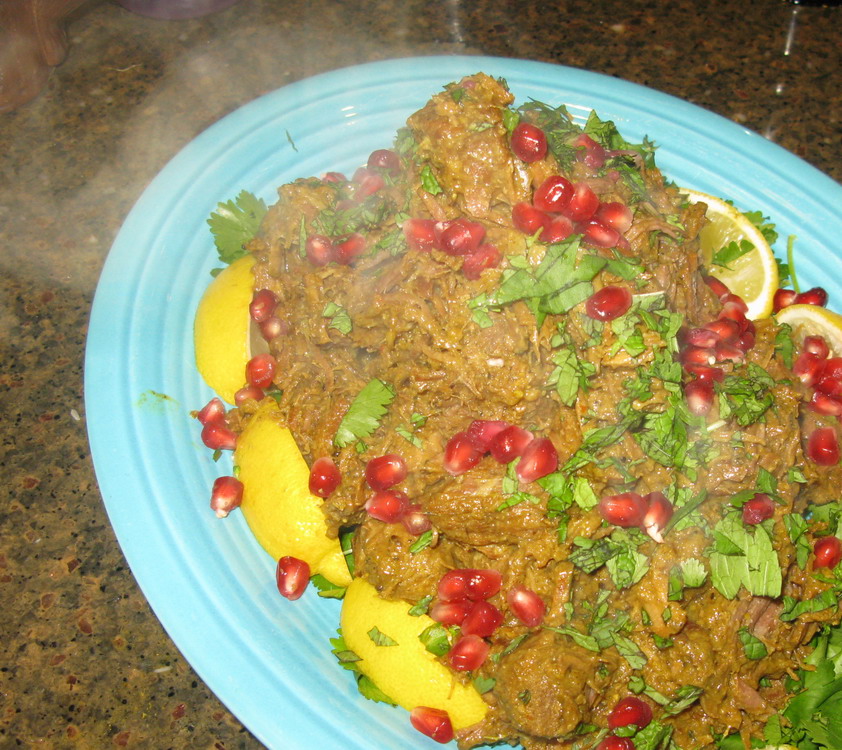
Bohti Gosht: Delicious Cubes of Meat

This is one of my favorite meat dishes from India to make in the late fall and winter.
Why?
Because my very favorite garnish for it is pomegranate seeds. Don’t they look lovely, like sparkling garnets sprinkled over that steaming pile of meat cubes coated in a tingly spice paste? And they add crunch and flavor, too, a tangy sweetness that is a perfect counterpoint to the spices and the musky fresh green cilantro. And, of course, lemon juice–as little or as much as each diner wishes–gives the perfect acidic bite, a top note that makes your mouth want to dance and sing and shout with joy all at once.
I learned this recipe from Madhur Jaffrey’s wonderful book, Quick and Easy Indian Cooking, which was one of the books I used to teach myself how to cook Indian, way, way, WAY back in the day. The recipes in this book are simple and very tasty, and it gave the first instructions I ever had on how to use a pressure cooker to make Indian food. And learning how to use a pressure cooker revolutionized my cookery immensely–and I ended up making curries on a much more regular basis than before, because I learned that even if I had to come home from work and cook dinner in an hour or two, with a pressure cooker, I cook beautiful dals, curries and stews, beans and soups that all tasted like they had simmered for hours and hours.
I liked that.
In fact, bohti gosht is the very first Indian recipe I ever made in my very first pressure cooker.
Bohti Gosht is an interesting dish, because it is not what most Americans would think of as a curry. It has no sauce–the meat is cooked in a minimum of water in the pressure cooker, and when the meat is done and the pressure is normalized, the cooker is opened, and the fire is raised to high again and the remaining water is boiled away, leaving the masala paste clinging to the braised cubes of meat.
Because it is dry, you really should serve bohti gosht with wetter dishes. A raita is lovely, as is a nice liquidy dal or a creamy vegetable curry like mattar paneer. You can also serve a wet chutney with bohti gosht–I love green cilantro and mint chutney with it myself.
Over the years, I have adapted the recipe to the point that my ingredient list looks nothing like Madhur Jaffrey’s. For one thing, hers contains curry leaves, which when I first started making this dish, I could not find anywhere. And now that they are available, my family is so used to the way I make bohti gosht, I believe they would rebel if I messed with the recipe and added curry leaves! I also use more spices than she suggests in her recipe–she calls only for commercially made garam masala, turmeric and some ground cumin, along with fresh ginger and garlic, but I never made it that way. I never liked commercial garam masala (though that changed after I discovered Penzey’s–BUT I still tend to grind my own garam masala for every day use), so I used cumin, coriander, cloves, peppercorns, cinnamon stick, green cardamom, a tiny bit of fenugreek seeds and a single black cardamom pod. I also use more garlic and ginger than she calls for, and much more than the single fresh green chili in Madhur’s recipe. I use both fresh and dried chilies, because I like the different flavors they each bring to the dish.
I like to make bohti gosht for every big Indian feast I create, because it is so different from the saucy curries that most Americans think of when they are told that they will be eating Indian food. I like to tweak with guests’ expectations, and beguile their palates with new textures, flavors and aromas. I want them to come away from my table not only with sated bellies, but with minds alight with curiosity and wonder–I want to inspire them to try ever more new and interesting foods, not only at my house, but out in restaurants and especially, at their own tables.
What sort of meat should be made into bohti gosht?
Madhur’s original recipe calls for boneless shoulder of lamb or pork, cut into 1″ cubes, but I have only made it with beef or lamb. I would dearly love to make it some time with venison, but I haven’t had a chance to try it that way. I suspect it would be divine, especially if I devised a blackberry sauce or chutney to go with it.
At any rate, here is my recipe for bohti gosht, an absolutely delicious dish that never lets me down.
Maybe someday I will try making it with curry leaves and see what happens….
Bohti Gosht
Ingredients:
4 tablespoons ghee or canola oil
2 pounds boneless stewing or braising meat, cut into 1″ cubes I prefer beef chuck or lamb shoulder
2″ cube fresh ginger, peeled and cut into chunks
6 cloves garlic, chopped roughly
1-3 green chilies–to taste, depending on how hot you like your food
2-3 dried red Indian chilies–once again, to taste
1/2 teaspoon peppercorns
1 1/2 teaspoons cumin seed
2 teaspoons coriander seed
4 whole cloves
1″ stick cinnamon
6 green cardamom pods
1 black cardamom pod
1/2 teaspoon ground turmeric
water as needed (this depends on what the smallest amount of water your pressure cooker can handle)
salt to taste
pomegranate seeds, roughly chopped cilantro leaves and lemon or lime wedges for garnish
Method:
Heat the oil in a heavy-bottomed skillet, or in your pressure cooker over medium high heat.
Add the meat, and begin browning, stirring as needed.
Grind together all of the rest of the ingredients into a fine paste except the water, salt and garnish.
When the meat is nearly completely brown, add the spice paste and cook, stirring, until the paste just begins to stick to the bottom of the pan or pressure cooker and the meat is fully browned. Deglaze the pan or pressure cooker with the smallest amount of water your cooker needs to operate. (Some models take up to three cups of water to work, while others can work with as little as a 1/2 cup of water. Mine takes 1 1/2 cups to operate properly.)
If you are browning in a pan, scrape the meat, water and spices into the pressure cooker. Bring to a boil over high heat, and close the lid on the cooker, lock it and bring it to full pressure.
Turn the heat down to low and cook for forty to forty-five minutes on high pressure for beef or venison. For lamb, cook for fifteen minutes, for pork, cook for thirty minutes.
Allow pressure to release naturally by taking the cooker gently off the heat and allow the temperature to drop on its own. When the pressure normalizes, which takes from 15-20 minutes, open the cooker, and put it back on high heat.
Bring to a boil, and cook, stirring gently, to remove the remaining water from the dish. Stir gently to avoid breaking up the meat cubes into shreds. (Though this will happen to some extent, anyway.)
When the water is boiled away, remove from heat and add salt to taste. Transfer to a heated serving platter and garnish with plenty of pomegranate seeds, cilantro and lemon or lime wedges. (I also pass bowls of the three garnishes, so diners can add as much as they like to their own portions.)
Eat with plenty of lemon juice squeezed over it, basmati rice and a saucier, wetter curry.
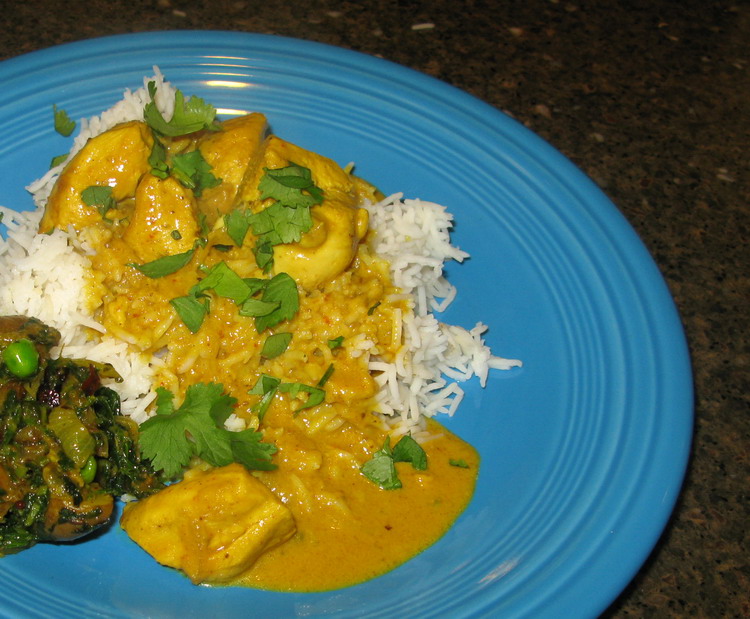
A Fragrant Chicken and Coconut Curry from Mangalore
I don’t make coconut or coconut milk based Indian curries as often as I make the ones based on yogurt or tomatoes. It wasn’t until recently that I began experimenting with coconut curries, in large part, because my gallbladder seems to tolerate the fat in coconut milk more than it does the fat in dairy products.
And what is strange is this: I adore coconut. When I was a child, a couple of times a year, I would talk my Mom into buying fresh coconuts for me when we saw them in the store so we could crack them open and I could drink the water from inside them and eat the delicious, nut-like meat. I loved any sweet with coconut in it, and when I first tasted Thai food in a good restaurant, it was the coconut curries that beguiled me and drew me into appreciation for the cuisine.
So, why have I basically ignored Indian coconut curries for so long?
Habit, I guess. That is sad to say, but I think it is true.
But, no more. Having discovered I can basically eat coconut milk with relative impunity (my gallbladder has become quite annoying as I wait to have my surgery–it was scheduled for tomorrow, but has been pushed back to next week because my surgeon in the hospital this week), I believe I will be returning to it as a curry sauce base for years to come.
This curry is an adaptation of one I found in Camillia Panjabi’s excellent and beautifully illustrated book, 50 Great Curries of India. The original recipe for Kori Gashi, which is from the port city of Mangalore, which is in the state of Karnataka in the south of India on the western coast, called for freshly made coconut milk, but I substituted Mae Ploy brand canned coconut milk, and I used different types of chili peppers since I have not gotten my hands on any genuine, brilliant red Kashmiri chilies. (To make up for a lack in red coloring, I added a bit of paprika to the curry, purely for its dusty scarlet hue.)
I also used tamarind concentrate instead of the actual fruit as the souring agent in the curry because it is what I had.
But the rest of the curry–the spicing and most of the techniques for putting it together are the same. I did use a few more curry leaves than were called for in Panjabi’s version, because I really love the flavor and aroma they impart, particularly in coconut-based curries. And instead of chicken pieces on the bone, I used boneless skinless breasts cut into chunks, because they are lower in fat and they were what I had in the freezer.
While I am certain that the original recipe as written was even tastier than the version I made, I have to say that this was one of the most fragrant, intensely flavored chicken curries I have had in a long time. I loved the spice mixture and the strong chili flavor was amazing, though balanced by the tang of the tamarind and the musky, pervasive scent of the curry leaves. It also makes a great deal of sauce which is very good poured over rice–in fact, I had some of the curry sauce, sans chicken, draped gracefully over a bowl of basmati rice for lunch this afternoon, and it was very satisfying. Not too filling, but definitely delicious, with a complex bouquet of flavors.
Fragrant Coconut Chicken Curry From Mangalore
Ingredients:
5-15 whole dried red chilies, depending on the heat you want (I used my home grown and dried Thai chilies)
4 heaping teaspoons coriander seeds
1/4 teaspoon mustard seeds
1/2 teaspoon fenugreek seeds
1 inch cinnamon stick
1 teaspoon cumin seeds
8 peppercorns
4 cloves
2 teaspoons Aleppo pepper flakes
1 cup chopped onion
1 1/2 inch cube fresh ginger, peeled and chopped
6 large cloves garlic, peeled and cut into slices
1/2 teaspoon turmeric
1 1/2 teaspoons bright red paprika
2 heaping tablespoons coconut oil or canola oil
1 1/2 cups thinly sliced yellow or red onions
1 teaspoon salt
1 1/2 cans Mae Ploy coconut milk, shaken before use
1 1/2 tablespoons tamarind concentrate
2 pounds boneless, skinless chicken, (breasts or thighs or a combination) cut into bite sized pieces
15 curry leaves (fresh or frozen)
salt to taste
1 cup roughly chopped cilantro leaves for garnish
Method:
In a small, dry skillet, toast the chilies, stirring constantly for about three minutes. Add the whole spices and the turmeric, and continue stirring and toasting for about another two minutes. Dump the spices on a plate to cool. When they are cool, put them into a spice grinder, blender or mixie, along with the Aleppo pepper flakes, chopped onions, ginger, garlic, turmeric and paprika, and blend to a smooth paste.
Heat the coconut or canola oil in a heavy-bottomed wide skillet, and add the 1 1/2 cups sliced onions. Spread out the onions, sprinkle with salt and cook, stirring constantly until the onions turn a deep golden brown. Add the spice paste and stir well, then add the chicken pieces, and cook, stirring until the pieces begin to brown a bit and spice paste sticks to the pan, browning.
Stir in the coconut milk (reserve the extra half can in case you want more sauce or you want to dilute it a bit–when you are done, however, you can keep it in a closed container in the fridge for a week, or in the freezer for several months), scraping up the browned bits on the bottom of the pan, making sure to get it all up and mixed in–this is what makes the curry taste so very good.
Add the curry leaves and stir them in well, cover the pot loosely (let a bit of steam escape, in other words), turn heat down to low and simmer until chicken is tender.
Salt to taste and stir in or sprinkle the cilantro over the top for garnish.
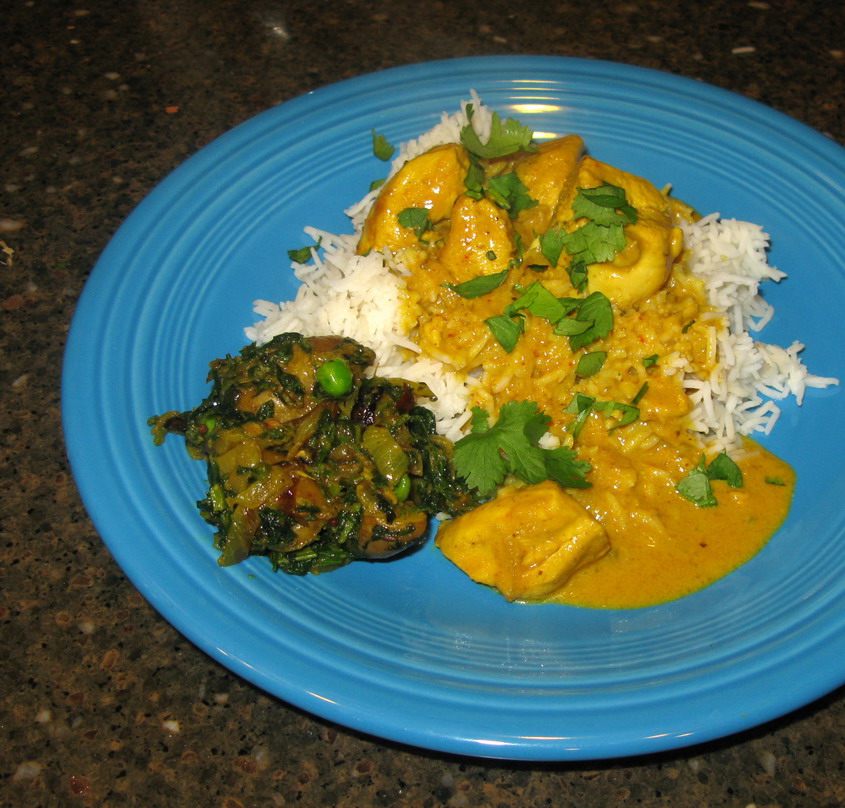
A Delicious Vegetarian Curry: Aloo Methi Mattar
Aloo methi is one of my favorite Indian vegetarian dishes. Potatoes are parboiled, then fried in ghee or oil with browned onions, fresh ginger, garlic, chilies, spices and fresh, dried or frozen fenugreek greens. I love aloo methi the way that the earth loves the sky. And I am continually coming up with variations of it, from adding fenugreek greens to my usual saag aloo (potatoes cooked with greens) to aloo methi tamatar, which has tomatoes added.
I think that this version is my favorite so far, and I am very pleased to share it with you. In this recipe, I use tiny fingerling potatoes, parboiled and cut in half with their skins still on, and both fresh (or frozen) fenugreek and dried kasouri methi, and then, at the end, I add a small amount of frozen peas to the pan, so that they just cook to tender-crisp.
The peas pop in your mouth when you chew, sending little shivers of sweetness amidst the spicy potatoes cooked to creamy perfection and the slightly bitter, musky methi greens. And–the color is fantastic–the potatoes are stained yellow with turmeric, there are red flecks of chilies, the methi is deep green, and then, there are the peas–round morsels of brilliant grass green. It is so very, very pretty, and filled with delicious spices and flavors.
As usual, aloo methi mattar is better after a night spent in the refrigerator where the spices can mingle with each other and make great partnerships. It is just that the peas don’t look as pretty after they are heated up, so my feeling is this: if you make it ahead to heat up the next day, add thawed frozen peas right before heating it up. Then, everything will look and taste perfect.
This is great rolled up into fresh chapati, and I bet it would be good wrapped in naan. It is also good paired with a very saucy curry, as it is a fairly dry preparation, sans sauce. I am of the opinion that it would go beautifully with any fairly soupy dal as well.
Aloo Methi Mattar
Ingredients:
5 cloves garlic, peeled
1″ cube fresh ginger, peeled and roughly chopped
3 teaspoons coriander seed
1/4 teaspoon fennel seeds
1/8 teaspoon fenugreek seed
2 teaspoons Aleppo pepper flakes
3 tablespoons ghee or canola oil
2 cups thinly sliced yellow or red onions
1 teaspoon salt
1″ cube fresh ginger, peeled and sliced into thin julienne strips
2-4 fresh red thai chilies, cut into thin slices
1 teaspoon mustard seeds
1 teaspoon cumin seeds
2 pounds fingerling potatoes, skins scrubbed, boiled until tender, drained and cooled and cut in half longitudinally
2 tablespoons dried methi (kasouri methi), soaked in 1/4 cup hot water until soft, then drained and excess water squeezed out
1 teaspoon turmeric
1-1 1/2 cups water, as needed
2 cups fresh or frozen methi greens, chopped (If frozen, thaw and squeeze out excess water)
1/2-3/4 cup frozen peas, thawed
salt to taste
Method:
Put the first 6 ingredients in the jar of a blender, spice grinder or mixie, and blend to a spice paste, using a bit of water if necessary to make it smooth. Set aside.
In a wide, heavy-bottomed pan or skillet, heat the ghee or oil over medium high heat and add onions. Stir the onions well, then sprinkle the salt evenly over them, and cook, stirring constantly, until the onions turn golden. Add the julienned ginger and the chili slices and cook for another three minutes until it is the ginger is quite fragrant. Add the mustard seeds and cumin seeds and cook, stirring, until the mustard seeds sputter and pop, and then add the spice paste, potatoes, dried methi and turmeric, and cook, stirring, until the spices start to stick to the bottom of the pan and brown.
Deglaze pan with as little water as possible, (a cup is ideal, but you may need a little more, which is why I have the measure of water being a bit vague) being certain to scrape up all of the browned bits on the bottom of the pan. Add the fresh or frozen methi, and cook, stirring, until the water is boiled away. Add the peas, and cook for a minute or two, stirring constantly, until the peas are heated through and everything is mixed together well.
Salt to taste, and serve.
A Sacred Sweet: Kheer
Kheer is the most common name for the many different puddings concocted from condensed milk, sugar and various other ingredients in India, but it is also known by many regional names such as phirni, payasa and kushmanda.
By any name, however, kheer is not only delicious, but is considered to be sacred by many Hindus, not only because it is made of milk–which is a staple food for Indian vegetarians, but because it is also used as an offering in temples, most particularly, in temples devoted to Krishna. One of Krishna’s epithets is Govinda, meaning “one who cares for the cows,” and he is often depicted as a cowherder, playing flute to soothe his charges, and to beguile the Gopis, his female devotees who also tended the cows of their village, Vrindavan.
Since cows are so central to the sacred stories of Krishna, it is unsurprising that offerings to Him made in temples and homes tend to be dairy-based foods, such as kheer. These offerings, after they have been set upon the altar, are later distributed to the worshipers at the temple, or among family members in the home, in essence, sharing the sacred food with each other and God.
I myself am not a practicing Hindu, but I have the utmost respect for the beliefs and practices of Hindus, and I have to admit that every time I taste well-made kheer I can completely understand why it is considered to be sacred.
What is kheer?
Simply said, it is an Indian sweet, rather like a pudding, that is made from milk that has been condensed by the process of reduction. Milk is brought to a frothing boil while being stirred constantly, then the heat is turned down so that the milk boils rapidly, but does not climb the edges of the pot. Stirring all the while, much of the water is evaporated away, until the milk is thickened enough to at least coat as spoon, though in some types of kheer, the milk is condensed further so that it truly is thick and textured much like what we Americans think of as a pudding. In general when making kheer, the volume of milk is reduced to 1/4 of the original measure.
Depending on the recipe, other ingredients are added–sugar is always added, though not as much as one might think, considering the finished flavor of the dessert. Uncooked basmati rice or seviya–a very fine vermicelli noodle–are often added and cooked with the milk. These starchy ingredients do not only add thickness to the finished sweet, they add flavor and texture. Dried fruits such as golden raisins or currants are often added, as well as lightly crushed or thoroughly ground nuts like almonds or pistachios. Cardamom pods are a common flavoring for kheer, as is rosewater and kewra essence.
(Right here, I want to say that kheer, while it is commonly described as being “like an Indian version of rice pudding”, it is nothing like the rice puddings I was served as a child growing up in West Virginia. Those puddings, flavored only with a weak drizzle of vanilla extract and thickened with cornstarch and full of lumpy, sticky rice and black raisins, haunt me to this day. I hated rice pudding as a child; it invariably made me gag for some reason, but I adore kheer. As a rice pudding hater, I am here to say to other rice-pudding haters out there in the world that kheer is not the same thing as your nemesis. It is really amazingly delicious. I promise.)
The kheer that you find in typical Indian restaurants in the United States varies widely in quality and flavor. Most often served cold, though sometimes served warm, I think the most common versions I have had are made with rice, maybe some raisins and sometimes some almonds, flavored only with cardamom pods. Very few restaurants seem to spend the time to reduce the milk very much; many a kheer I have eaten that is more like a milky rice soup than a pudding. This is sad, because while the reduction is primarily done for texture, it also is important for flavor–when milk is reduced properly, it has a very rich, somewhat naturally sweet flavor that is very pleasant and which is totally lacking in milk that is still in its near-native thin state.
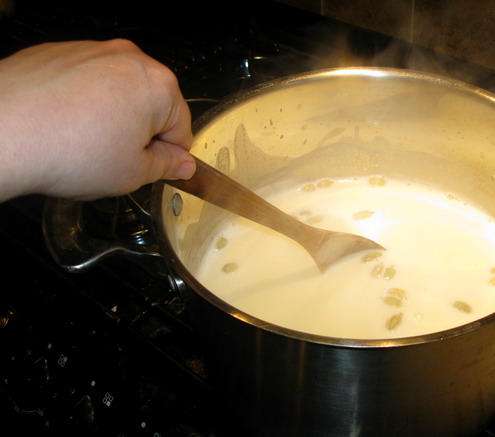
The recipe I am presenting here is very similar to the one I watched the mother and aunt of my Pakistani personal chef clients make. I had been invited to an Eid feast, and came over early to help cook, and ended up tending two large pots of milk, once the ladies realized I could be trusted to stand over the steamy milk and stir continually, without my concentration wavering.
This meant that they could work on other dishes while I stirred two pots at once–a long wooden spoon in each hand. It was slow, hot work, but rewarding, because I learned how to make fantastic kheer that is better than what I have ever eaten in a restaurant! (I also got to listen to the ladies sing together, which was also great fun; I did not understand the words, but I could hum along.)
Making kheer, just as making any other Indian sweet, required dedication, patience and a good strong arm. You don’t quite stir the entire time the kheer cooks, but close to it. And you really should pay pretty good attention to the milk–while I can manage to pull up a stool and sit and stir while reading a book in the other hand, you must be careful and not lose track of what the milk is doing. One of the keys to good kheer is being a good observer of what is going on in the pot and when it is time to turn the heat down or add the next ingredient, and when to stir like the dickens and when to stir more languidly.
I want to give a few general tips and warnings before I give the recipe.
First, use the best quality, freshest milk you can afford for kheer. I use only Snowville Creamery milk at home anyway, but even if I didn’t, I’d get it just for this recipe just on principle. When milk is the main ingredient, and is the main flavoring agent, you want it to be really good.
Also, don’t bother using skim milk to make this. I’d hesitate to even bother with two-percent milk. Just go out and buy whole milk to make kheer, and don’t worry about the fat. The end result will be worth it, and frankly, you know that it isn’t going to be a health food in the first place–I mean, it is a dessert, after all–so don’t fret over the fat.
Raw (turbinado) sugar is very good in this recipe, but if you don’t have it around, white sugar is fine. Brown sugar and sugars like jaggery are not good choices because they can sometimes make the milk curdle when they are added. Not only that, but the darker sugars darken the color of the dessert and it should be a pale cream color when it is done.
Also, count the cardamom pods as they go into the pot and remember how many you put in. While it is not necessary to remove them before serving the kheer, I like to take them out, just so my guests don’t have to worry about biting into them. And if you know how many went in the pot, you know how many need to come out, and you won’t spend twenty minutes digging around in the finished kheer with chopsticks, trying to dig out a nonexistent last cardamom pod. (Do you get the idea that I have made this mistake in the past?)
Finally, you need to have a really large pot to make kheer–one that can hold three times as much milk as you start out with. So, drag out your stock pot or the pot you cook pasta in, but only if they have very heavy bottoms on them. Why does the pot need to be big? Well, it needs to be tall, because when you bring your milk to a frothy boil, the bubbles will climb right up the sides of your pot and try to overflow onto the stove and make a big, nasty, stinky mess all over the burners and everything. If your pot is tall, you have plenty of time to see the crisis coming on, and thus, you can turn the heat down fast. This makes the foam instantly collapse upon itself and slide back down into the bottom of the pot where it belongs. Then, you can adjust the temperature so that the milk is boiling rapidly, but not frothing.
Why does the pot need to have a heavy bottom? Because if you don’t have a good, heavy bottom on your pot, you are going to end up scorching your milk, which will not only stick to the bottom of your pot and be the devil itself to clean, it will ruin the flavor of the entire batch of kheer. And who wants to stand over a huge pot of boiling milk, stirring the whole time , only to have it burned not because you were remiss in your stirring duties, but because your pot is too thin and burned the milk up anyway.
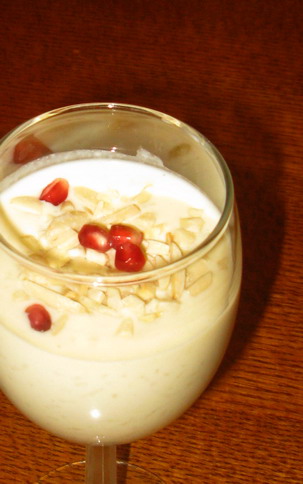
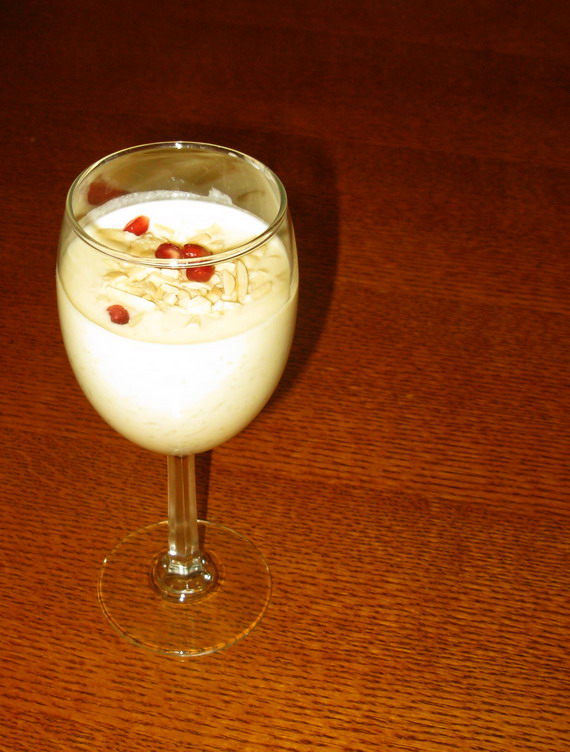
This version of kheer has rice, cardamom, rosewater, golden raisins and almonds in it in addition to milk and raw sugar. In the spring or summer, I would garnish it with fresh or crystallized rose petals, but in the fall and winter, I like to use fresh pomegranate seeds. Their brilliant ruby-red color sparkles on the creamy-white kheer, making a lovely contrast. Lightly crushed pistachios would also make a lovely garnish for this dessert.
Most Indian restaurants and households serve kheer in small, shallow bowls, but I like how it looks presented in wine glasses.
It just looks rather elegant when presented in stemware. But, you can serve it however you like–just keep in mind that it is rich and so a little goes a very long way.
Kheer
Ingredients:
2 quarts whole milk
1 cup half and half or light cream
1/4 cup basmati rice
16-20 whole green cardamom pods
1/2 cup raw sugar
1/4 cup golden raisins
1/4-1 1/2 teaspoons rosewater (this depends on the strength of your rosewater–I use 1 teaspoon of Cortas in my kheer)
1/2 cup slivered raw almonds lightly toasted, then lightly crushed
fresh pomegranate seeds, rose petals or crushed pistachios as garnish
Method:
In a large, heavy-bottomed pot, stir the milk, half-and-half or cream, rice and cardamom pods over high heat. Stirring constantly, bring to a frothing boil, then immediately turn down the heat until the milk boils rapidly, but no longer foams or tries to climb up the sides of the pot and overflow onto the stove top. (This process takes between fifteen and twenty minutes of constant stirring and fairly steady attention. As I said, I pull up a stool in front of the stove and stir with one hand while reading a book in the other, but I always keep one eye on the pot to keep tabs on the progress of the milk mixture.)
Boil the milk, stirring fairly constantly (this means you can stop for a few seconds to turn a page, grab a drink of water or get your kid a cup of juice, but don’t go running off to the bathroom or anything), until it reduces to about half its original volume.
Stir in the sugar and raisins, and turn the heat down so that milk simmers instead of boils, and stir very attentively so as to avoid scorching the milk and ruining the flavor of the kheer. Keep simmering until the milk has reduced to one quarter of its original volume. At this point the rice will be cooked, the raisins will have softened and plumped and the kheer should be fragrant and well-flavored with the cardamom. It should also be easily thick enough to coat a spoon very well–when your draw your finger down the back of the coated spoon, it should leave a clean streak that does not fill itself back in from the rest of the kheer on the spoon.
Remove from the heat and stir to cool the kheer to near room temperature. Then, cover and chill for at least three hours before serving. The kheer will continue to thicken as it chills–when you serve it, this will be a thick, rich, creamy confection.
Just before serving, you can use a pair of chopsticks to pick out the cardamom pods (I leave them in while the kheer cools so that their flavor can continue to be absorbed into the kheer), or you can leave them in. Stir in the rosewater, starting with the smallest amount first, gradually adding more until you have the flavor you want. I don’t like my kheer to be overtly rose-flavored, but I do want a subtle floral fragrance to wend its way over the palate to dance with the sweet citrus scent of the cardamom.
Spoon into whatever serving vessels you desire, and sprinkle each serving with a generous portion of the almonds and whatever other garnishes you choose.
This recipe serves about eight people, more or less.

Categories:
- Admin (rss) (55)
- Blogs and Blogging (rss) (81)
- Book Reviews: Cookbooks (rss) (43)
- Book Reviews: Non-Cookbook Food Books (rss) (38)
- Cats and Cat Blogging (rss) (47)
- Chinese Cooking Lessons (rss) (32)
- Culinary School Stories (rss) (18)
- Dairy Pruducts: Cultured and Barbaric (rss) (4)
- Documentary Filmmaking (rss) (1)
- Essays, Rants and Reflections (rss) (260)
- Fighting Hunger (rss) (12)
- Food and Kids (rss) (45)
- Food in the News (rss) (126)
- Food Media (rss) (98)
- Food Preservation (rss) (18)
- Food Safety (rss) (45)
- Gardening (rss) (30)
- Herbs and Herb Blogging (rss) (20)
- Holidays (rss) (50)
- Kat Blogging (rss) (22)
- Kitchen Science (rss) (36)
- Leftover Makeover (rss) (8)
- Life, the Universe and Everything (rss) (131)
- Local and Sustainable (rss) (227)
- Local Athens Food and Foodies (rss) (42)
- Meatless Mondays (rss) (32)
- Menu For Hope (rss) (5)
- Nutrition, Diet and Health (rss) (84)
- On The Farm (rss) (8)
- Recipes: Almost Vegetarian, Vegetarian and Vegan (rss) (294)
- Recipes: American Regional (rss) (37)
- Recipes: Appalachian Hillbilly (rss) (33)
- Recipes: Bread, Pasta, Grains (rss) (95)
- Recipes: Canning and Preserving (rss) (8)
- Recipes: Chinese (rss) (123)
- Recipes: Comfort Food (rss) (120)
- Recipes: Cookies (rss) (16)
- Recipes: Desserts (rss) (48)
- Recipes: French (rss) (25)
- Recipes: Fruits and Vegetables (rss) (302)
- Recipes: Greek, North African and Middle Eastern (rss) (31)
- Recipes: Indian (rss) (137)
- Recipes: Italian (rss) (42)
- Recipes: Japanese (rss) (7)
- Recipes: Jewish (rss) (4)
- Recipes: Korean (rss) (6)
- Recipes: Meat, Poultry and Fish (rss) (220)
- Recipes: Mexican/Native American/ Latin American/Caribb (rss) (27)
- Recipes: Original (rss) (108)
- Recipes: Thai (rss) (27)
- Recipes: Tofu (rss) (17)
- Recipes: US Regional (rss) (16)
- Recipes: Vietnamese (rss) (8)
- Restaurant Stories (rss) (28)
- Sewing, Quilting, Arts and Crafts (rss) (16)
- Simple Chinese Recipes (rss) (30)
- Slow Food and Heritage Foods (rss) (10)
- Spice Blogging (rss) (44)
- The Chinese Cookbook Project (rss) (14)
- The Chinese Pantry (rss) (39)
- The Documentary (rss) (2)
- The Kitchen Saga (rss) (17)
- The Locavore's Bookshelf (rss) (15)
- The Unsung Adventures of The Culinary Nerd (rss) (6)
- Tools and Toys (rss) (35)
- Uncategorized (rss) (10)
- With a Side of Politics (rss) (48)
Archives:
- August 2012 (9)
- July 2012 (12)
- September 2011 (3)
- August 2011 (7)
- July 2011 (8)
- June 2011 (16)
- May 2011 (17)
- April 2011 (11)
- December 2010 (9)
- November 2010 (5)
- February 2010 (1)
- December 2009 (5)
- November 2009 (7)
- October 2009 (10)
- September 2009 (16)
- August 2009 (14)
- July 2009 (14)
- June 2009 (7)
- May 2009 (17)
- April 2009 (10)
- March 2009 (25)
- February 2009 (13)
- January 2009 (10)
- December 2008 (5)
- November 2008 (5)
- October 2008 (6)
- September 2008 (13)
- August 2008 (8)
- July 2008 (11)
- June 2008 (18)
- May 2008 (13)
- April 2008 (14)
- March 2008 (16)
- February 2008 (17)
- January 2008 (19)
- December 2007 (25)
- November 2007 (18)
- October 2007 (24)
- September 2007 (16)
- August 2007 (15)
- July 2007 (15)
- June 2007 (10)
- May 2007 (14)
- April 2007 (16)
- March 2007 (17)
- February 2007 (20)
- January 2007 (13)
- November 2006 (1)
- October 2006 (8)
- September 2006 (14)
- August 2006 (25)
- July 2006 (30)
- June 2006 (28)
- May 2006 (34)
- April 2006 (29)
- March 2006 (24)
- February 2006 (30)
- January 2006 (38)
- December 2005 (40)
- November 2005 (37)
- October 2005 (32)
- September 2005 (25)
- August 2005 (30)
- July 2005 (28)
- June 2005 (21)
- May 2005 (8)
- April 2005 (22)
- March 2005 (17)
- February 2005 (29)
- January 2005 (10)
Search Site:
Links:
- Lily’s Wai Sek Hong
- 101 Cookbooks
- A cat in the kitchen
- A Veggie Venture
- Accidental Hedonist
- Cha Xiu Bao
- chez pim
- Chocolate & Zucchini
- Chopstick Cinema
- Chowhound.com
- Chubby Hubby
- Cook sister!
- Cooking with Amy
- da*xiang
- Eat Local Challenge
- Eating Liberally
- Ecocentric
- Eggbeater
- Epicurious
- Farmgirl Fare
- Fatfree Vegan
- Foodgoat
- ForkandBottle.com
- Green Olive Tree
- Hooked on Heat
- Jaden’s Steamy Kitchen
- Kalyn’s Kitchen
- Lucullian delights
- Mahanandi
- Matt Bites
- MeatHenge
- mmm-yoso!!!
- New York Times – Dining & Wine
- Pizza Goon
- Rasa Malaysia
- Ruhlman
- Sailu's Kitchen
- Serious Eats
- SF Gate: Food & Dining
- Simply Recipes
- Soul Fusion Kitchen
- Tastespotting
- The Amateur Gourmet
- The Cleaner Plate Club
- The Food Section
- The Grub Report
- thecookscottage
- U.S. Food Policy
- Wandering Chopsticks
- Washington Post Food and Dining
- Wasted Food
Meta:

Powered by WordPress. Graphics by Zak Kramer.
Design update by Daniel Trout.
Entries and comments feeds.