Cook Local, Eat Global
Talking Turkey: Please Don’t Kill The Bird Twice
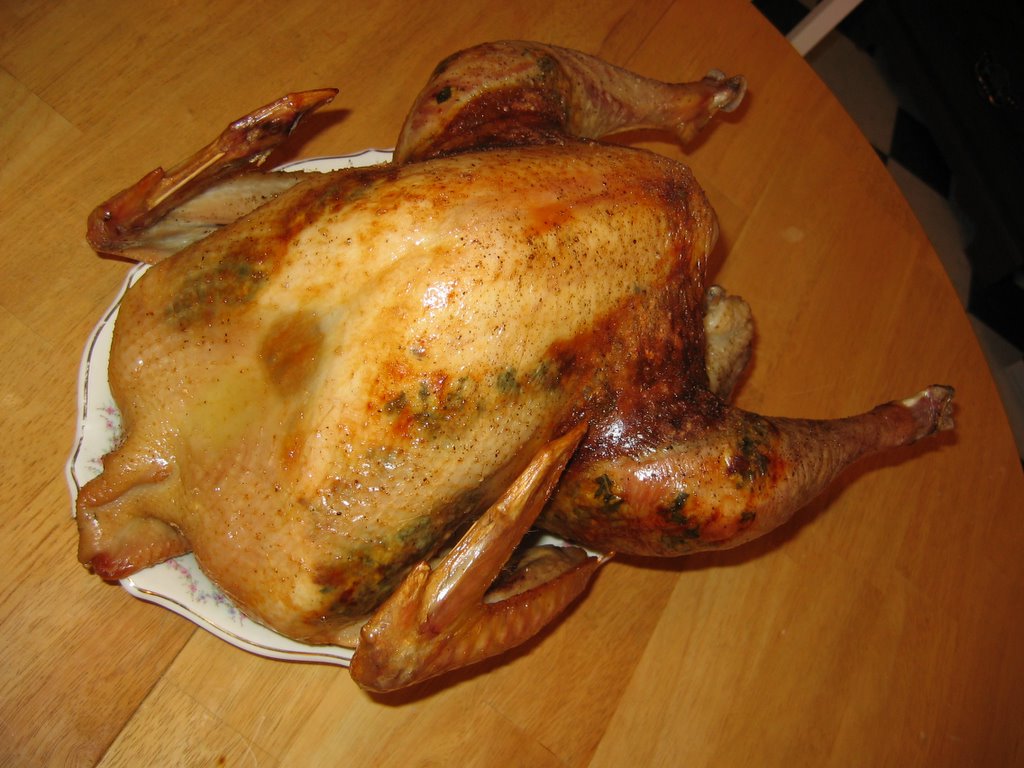
Cooking turkey intimidates a lot of people.
I used to be the same way, and then I went to culinary school, and got over my fears of the giant bird.
I got over my fears not only because I learned a lot of useful stuff when it comes to successfully roasting large fowl, but also because I realized that there are much more difficult things to cook than turkeys and I should just stop being scared and get on with my bad self and cook the birds, and cook them well.
Over the years, I have managed to create a method, cobbled together from various sources: chefs, cookbooks, magazines, and my own personal innovations, which result in flavorful, moist turkey meat every time.
But you don’t need to do it all the way I do.
I don’t care if you brine your bird, or salt it, or just take it out of the package, rinse it and roast it. I don’t care if you butter the skin, shove butter under the skin, inject it with butter or eschew butter altogether. I really don’t care if you baste it or ignore it. I don’t care if you cook it breast down or breast up or in a bag or under a tent of foil.
I even don’t care if you try to set your house on fire by deep frying it on your enclosed back porch.
What I do care most about turkey is this: that you not force the bird to die a second death by cooking it nigh onto oblivion.
So, in the name of happy tastebuds on Thanksgiving, I am asking that you please don’t overcook your bird. If you don’t overcook your turkey, you will be guaranteed to have tasty, juicy bird for dinner.
Now, I am not saying I want you to eat your turkey rare. I am not that freaky.
The fact is, fowl is one of the few meats I cannot stomach rare to raw.
I know that the USDA tells you to cook it until your internal temperature reaches 165 degrees F.
Salmonella is killed at 160 degrees F.
The problem is that if you take your bird out of the oven when it registers an internal temperature of 165 degrees, and then let it rest on the counter for twenty minutes before you carve it, which you are supposed to do in order to allow the juices to sink to the center of the meat, the temperature will continue to rise, about ten or fifteen more degrees. The turkey’s own heat will continue cooking the meat–this is called “carry over cooking,” and is manipulated by chefs and skillful home cooks to get meats that are cooked to perfection on the table without stress every time.
But if you follow the USDA’s advice, you will end up eating meat that is cooked to 175-180 degrees F., which is going to be dry and sawdusty and godawful.
So, here is the deal–take your turkey out when it registers between 150 and 155 on the thermometer. As it rests before you carve it, it will rise in temperature to 160-165–which will kill salmonella without killing the flavor and texture of the bird.
That is my Thanksgiving homily for 2007. Don’t overcook your bird.
Treat it with the respect and love due to a critter who has died so that you may eat and enjoy its flesh.
There is no need to make it die another death by excessive application of heat.
For a more detailed explanation on how I cook turkeys, here is a post from two years ago where I report on my experiences of cooking a heritage breed turkey. It also outlines my usual method for cooking any turkey, as well as giving advice on how to cook a leaner, less breast-heavy turkey.
For recipes for my favorite turkey dressing, look at Four Directions Dressing,
And for a great traditional southern Thanksgiving pie, here is my version of Sweet Potato Pie, spiked with Irish Cream liquor.
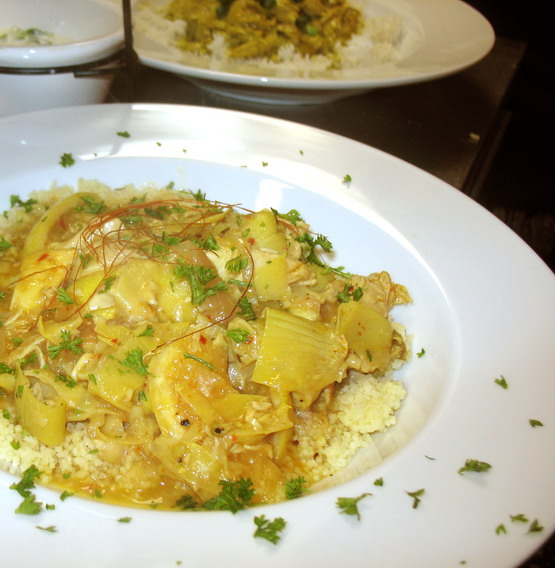
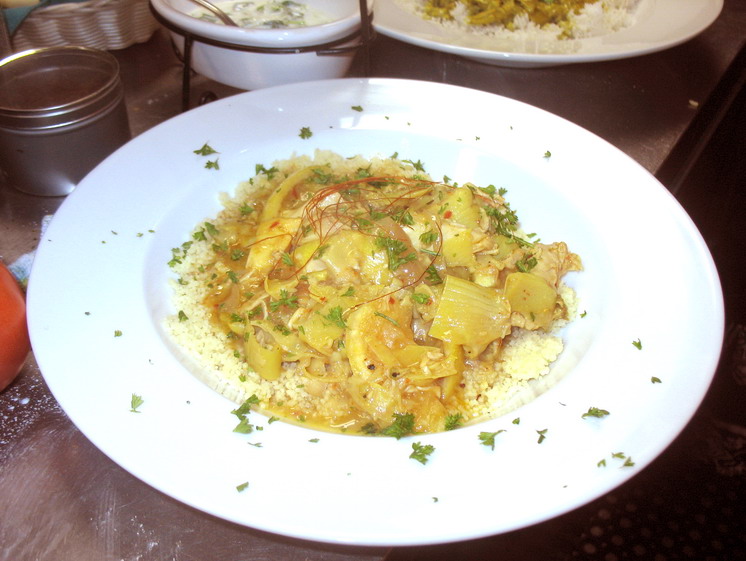
Moroccan Style Chicken with Lemons, Olives and Artichoke Hearts
I enjoy everything about my job–I don’t even mind the cleaning–but the best part is coming up with the specials. It’s like a game, coming up with new ways to combine pantry items we already have, with a minimum of ingredients especially purchased for the week, into delectable dishes that fit the theme of the restaurant and the tastes of the our guests.
Every week, I try to type up a list of specials, with detailed descriptions of the dishes, a list of the pantry items they utilize (this is called cross-utilization) and a shopping list for the special items we will need to make them. This is the most sensible way I can think of to keep the process organized, and to keep a record of what specials we ran and later, I go back into the file and add notes on how well they sold. This way I can keep track of which recipes I should repeat in a few weeks or a month, which might need some more work before being presented to the public again, or which ones should just fade into the mists of forgotten foods.
The process of coming up with specials also means I get an excuse to investigate the foods of the Middle East, Greece and North Africa, regions whose cuisines I admire, but do not know a lot about. And as everyone knows, there is nothing that a nerd, culinary or otherwise, likes better than learning new stuff.
This recipe is an adaptation of a Moroccan chicken tagine, which is a long-cooked stew, served over couscous. (Couscous is tiny seed-like bits of pasta which serve the same purpose as rice or bulgar wheat–it is a grain-based staple starch.) I adapted it to the unique cooking capabilities of our kitchen, and to the pantry items we have on hand, which means it is not what anyone could call authentic.
However, it was good.
Each flavor was distinct, but still blended into a harmonious whole. The sauce was tangy and tart without being overwhelmingly lemony or bitter, while the salty olives balance the lemon. The artichokes add a verdant note, while the chicken is rich and meltingly tender.
My first adaptation was to not use whole chickens cut up–I used chicken breast meat. Because of this, I didn’t need to cook the stew as long as I would normally. My second adaptation was to use fresh lemons rather than preserved ones, because the jar of preserved lemons I had made at work needed to cure another three weeks before they were ready to use. I changed around the spices a bit, and the herbs, but really, I think that I kept the spirit of the original recipe intact.
The amounts for this recipe are for a regular family meal–about four to six servings. I am not giving you the amounts I used for the special–most folks don’t need recipes to feed around twenty people or so!
One more thing–about the garnish–those are chile threads. They are finely cut bits of chile that have been dried. They are lovely and add a tiny bit of heat, but mostly look really cool as a garnish. You can mail order them from Savory Spice Shop.
Moroccan Chicken Stew With Lemons, Olives and Artichoke Hearts
Ingredients:
4 tablespoons olive oil
2 cups thinly sliced red onions
1 teaspoon salt
6 cloves garlic, minced
1 teaspoon freshly ground cumin seeds
1 1/2 tablespoon Aleppo pepper flakes
1/4 teaspoon cinnamon
1 1/2 cups crushed, pitted and lightly chopped green olives
1 pound thawed frozen or canned artichoke hearts, cut in half, chokes removed (if you use canned, drain and rinse well)
1 teaspoon ground turmeric
juice and zest of three lemons
1 quarts chicken stock or broth
1 teaspoon brown sugar
1 1/2 pounds chicken breast, boned and skinned
2 fresh or preserved lemons, cut into wedges (about six or eight wedges each)
4 tablespoons flour mixed into four tablespoons cold water (or 4 tablespoons roux blanc)
salt to taste
1 cup freshly chopped flat leaf parsley
1/2 cup freshly chopped cilantro leaves
chile threads for garnish
Method:
Heat olive oil in a deep, heavy bottomed pot–an enameled cast iron Dutch oven would be great. When it is hot, add the onions, and sprinkle the salt over them. Cook, stirring until they begin to turn slightly golden. Add garlic, spices and olives, and keep cooking. Cook for another few minutes. Add artichoke hearts and cook until they are lightly browned.
Add turmeric, lemon juice and zest, broth and sugar, and bring it to a boil, turn heat down until the liquid just simmers. Add chicken, and simmer until chicken is cooked. Remove chicken, and allow to cool until you can handle it. Shred into bite sized bits, and return to the stew, then add lemons. Simmer to allow lemon flavor to permeate the chicken–about five minutes.
Thicken broth slightly with either a slurry of flour and water or roux, then salt to taste.
Add parsley leaves and cilantro leaves, and serve over couscous.
Garnish with chile threads if you can get them–if not use some more Aleppo pepper flakes.
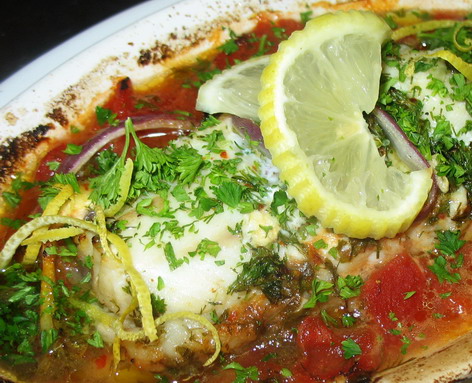
Delicious Greek Fish: Psari Plaki
Fish was always a treasured and favored food when I was a little girl.
We didn’t eat it often, and it wasn’t until I was much older that I actually got to taste really good saltwater fish (other than fried cod, mind you–that was always available and eaten with great glee when I was a kid), but what I loved was freshwater fish. Trout was my absolute all-time favorite, and when my Dad and uncles would go fishing in the mountains and bring back a haul of rainbow and brook trout, I would stuff myself with the fillets. Gram would dredge them in lightly seasoned flour, then fry them in oil to which she had added a tiny bit of butter for flavor. Then, she would add a tiny squeeze of lemon after they were hot from the skillet, and on a plate they would go.
I was taught to eat fish in tiny bites in order to carefully feel for bones with my tongue, as their fine, nearly invisible sharp spines could evade even the most experienced fish-cleaner’s knife. Being forced to eat in tiny bites meant that I also had to eat fish slowly, so I learned to savor its sweetness. To me, freshwater fishes seem even sweeter than saltwater fish–they tend to have a more delicate flavor born of cold, clear water.
I also loved lake perch and walleye from the deep waters of Lake Erie, once industry had stopped dumping pollutants into the water. My Dad and Uncle Jerry would go out and fish and bring back hundreds of pounds of the silvery little fish, and clean them and then Aunt Sis would fry them in a batter made with soda water, seasonings and flour, and they would come out with a crispy, light crust enrobing tender, pearly flakes inside. I remember one evening, eating about ten fillets of lake perch myself after one of those fishing trips. (Mom says I was in a growth spurt at the time, and could eat enormous amounts of food wthout ending up fat. Must have been nice!)
And of course, at my Grandma and Grandpa’s farm, we had a pond stocked with bass, bluegill and catfish, all of which I loved to catch and eat. I even learned to clean my own fish, so that by the end of the summer I was ten or so, I could expertly skin and fillet fish without leaving many bones behind in the flesh at all. Surprisingly, the job didn’t bother me at all–I never thought that fish smelled bad in any way, because we were always working with them fresh from the water. They never had a chance to sit around and develop a “fishy” smell.
So, from this background, I grew interested in the ways in which other people in the world cooked fish. So, while I read cookbooks obsessively as a kid, I found that the Greeks had lots of really interesting sounding ways with fish–which makes sense since they are a nation pretty much surrounded with ocean, with many tiny islands scattered around the mainland.
I desperately wanted to try making one dish in particular, which was called “Psari Plaki.” It wasn’t fried, you see–and most of what I had eaten my entire life had been fried fish. Either battered and deep fried, or dredged and pan fried–but fried was definately the way in which my family knew how to cook fish.
But this recipe–it was baked. And the fish wasn’t plain–it was surrounded by delicious sounding flavors. There were onions, garlic, lemons, tomatoes, fresh herbs and olive oil. It sounded so fragrant, so fresh–so different.
But, I didn’t get a chance to make it for years and years.
It wasn’t until I was in college and living in my first apartment, the place where I had my very first kitchen, that I got a chance to make psari plaki.
It was for my mother, who had been recently told by her doctor, that in order to lower her cholesterol levels, she must forgo red meats and only eat chicken and fish, with fish being preferred. But, of course, it could not be fried. No, that would not do. It must be broiled, baked, boiled or steamed.
She told me this, with a slight shudder, which I didn’t understand, so especially for her, I decided to make psari plaki. I thought that the many flavors, colors and textures of the dish would tickle her fancy and she would see that baked fish need not be plain and boring.
So, I made it, using really fresh turbot fillets I bought especially for the purpose.
And–she hated it.
Absolutely hated it.
I tasted it–and it tasted just as divine as I thought it would–the fruity olive oil and tomatoes combined with the tart, citrus tang of the lemon, the heady scent of the garlic and onions and the fresh verdant bite of the herbs to make an explosion of flavors in the mouth, flavors that combined very well with the sweet, lightly flavored white fleshed fish it was meant to enhance.
My Dad ended up eating it and saying it was perfect–exactly like the fish he had eaten in Greece back when he was in the Navy.
So, Mom ate salad that day, and rice pilaf, while Dad and I dined gleefully not only on our portions of psari plaki, but hers as well.
I felt bad for her, but I still loved the fish.
Years later, I remembered that incident when I saw cod loins in our freezer at work. We had all the other ingredients on hand, so I decided to haul off and make psari plaki again as a dinner special.
We sold out of all but one portion of it. People loved it.
I guess that my Mom’s reaction was just an anomaly.
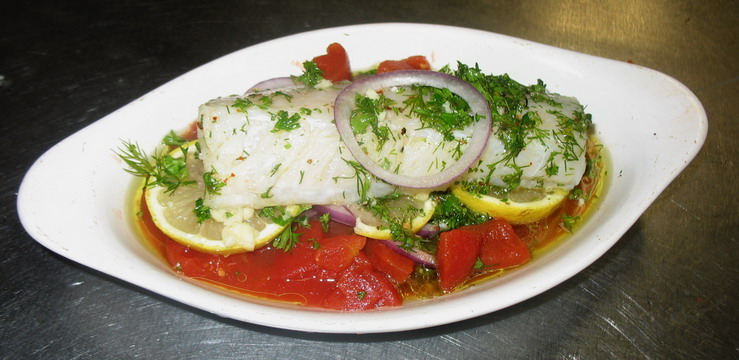
Anyway, this is a perfectly simple way to cook any white fleshed fish, whether it came from fresh or salt water. At Salaam, I prepared each serving in its own stoneware oval gratin, but at home, you can bake all of your fish in the same casserole dish. It will work quite well that way, have no fear.
If it is not fresh tomato season, used good quality canned diced tomatoes. Trust me on this. The pallid fresh tomatoes you get at the grocery store will do nothing more than water down the flavors of the other ingredients, and leave the fish swimming in a soupy pinkish mess. Just use the canned tomatoes, drained of their juices, layered on the bottom of your casserole, and the flavor, color and texture will be much better.
The fresh herbs you use are up to you. I used a combination of parsley and dill this time around, but you could add to that some fresh thyme, which is quite Greek. Or, you could add a tiny bit of rosemary as well–but have a care, as it is very strong in flavor and could overpower all the other components of the dish. Tarragon is not Greek, but its licorice sweetness would go wonderfully with the fish and other seasonings, so if you have it, use it.
Use as good an olive oil as you can find–the fruity, lightly peppery Greek oils are the best, of course, though some Italian ones work well also. We have Greek oil at work, so that is what I used.
As for the onions–you can use white or yellow ones of course, but the red ones look prettiest–their purple coloring deepens in the dry heat of the oven, which looks wonderful with the yellow lemons, red tomatoes and green herbs.
Psari Plaki
Ingredients:
6 4-6 ounce portions of a good white-fleshed fish
2 lemons, zested, then juiced
1/4 cup plus one tablespoon good olive oil, divided
1 clove fresh garlic, peeled and minced
1/4 cup finely minced fresh herbs
1/4 teaspoon salt
freshly ground black pepper to taste
1 14 ounce can of diced tomatoes, drained
3-4 lemons, sliced thinly
1 medium red onion, peeled and thinly sliced, the slices broken into rings
4 cloves fresh garlic, peeled and minced
1/2 cup fresh herbs, minced, divided
sliced lemons for garnish
Method:
Set aside the lemon zest in a covered bowl to be used as garnish.
Lay fish portions into a shallow container where they can sit in one layer. Whisk together the lemon juice, 1/4 cup of olive oil (leave aside the 1 tablespoon olive oil), the garlic, the first measure of herbs, salt and pepper until combined. Pour over the fish, cover the container tightly and leave in the refrigerator to marinate for around an hour.
Heat oven to 350 degrees F.
Once the marination time is over, use the one tablespoon of olive oil to lightly grease the sides and bottom of a shallow casserole that is big enough to hold the fish in a single layer. Or, grease the sides and bottom of 6 individual oval gratin dishes.
Put the tomatoes into a single layer over the bottom of the baking pan or pans. Cover the tomatoes with a single layer of lemon slices. Sprinkle red onion rings over the lemons, taking care to leave at least six rings aside to put atop the fish.
Then, layer the fish into the pan, reserving any marinade that does not cling to the fish.
Layer the remaining onion rings over the fish, with at least one ring per portion, two or three depending on the size of the fish pieces. Sprinkle with 1/4 cup of the remaining herbs, and the minced garlic. Drizzle with reserved marinade, and bake for around fifteen minutes, depending on how thick or thin your fish is cut. Thicker portions take longer to cook, while thinner ones cook quite quickly and can overcook in an instant so keep an eye on the progress of the fish.
When the fish is done remove from the oven and sprinkle with the remaining 1/4 cup of herbs and garnish with the lemon zest and lemon slices.
Athens Local Foodies and Food: Peggy and the Puffballs
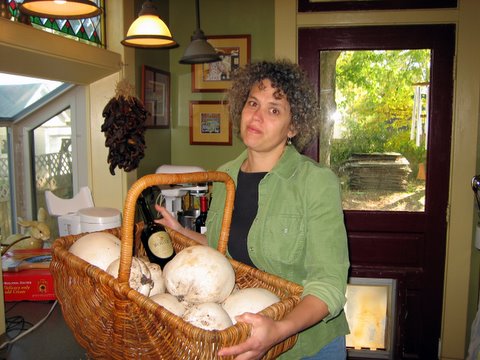
Peggy and the Puffballs sounds like a sixties pop group name, doesn’t it?
In celebration of local Athens food, food producers and food lovers, I have decided to do a Saturday feature, maybe not every Saturday, but close to it. It will be a photo of a local foodie and some of their favorite food, and a little story about them both.
I am proud to have Peggy as my first foodie–but I cannot take credit for this photograph. It was sent to me by Hillarie, the owner of Restaurant Salaam, and it shows Peggy with her wild mushroom harvest right after she got back from picking them.
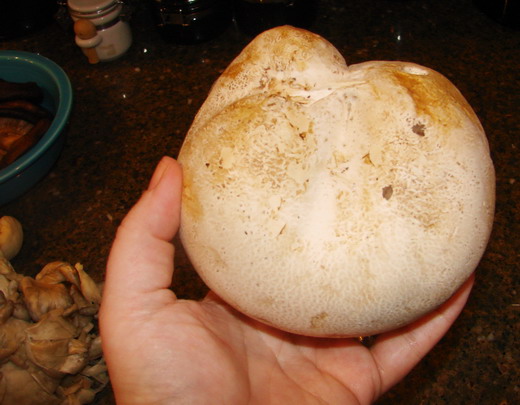
Look at the incredible size of these giant puffballs! The one I photographed was among the smaller ones–some of these are easily the size of adult human skulls. Amazing. They really look like something from a fairytale, don’t they? One would almost expect to see little woodland gnomes frolicking amongst them, or a little pixie piper perching atop one, playing a sprightly tune.
As I noted previously, these mushrooms cook up to be meltingly soft, fluffy: almost like clouds. They absorb the flavors of whatever they are cooked with, and they contrast perfectly with a stronger-flavored and chewier textured mushroom such as fresh or dried shiitake.
Here’s a big thank-you to Peggy for gifting me with the incredible experience of cooking and eating these delectable children of the meadow.
A Very Moreish Moroccan Salad
As might be expected, I have been researching Arabic, Persian, North African, Sephardic and Mizrahi Jewish, Eastern Mediterranean, Indian, Tibetan and Nepalese foods, in my quest for the colors, aromas and flavors of the Silk Road. As I experiment in my kitchen, cooking and tasting, with an eye toward making dinner and lunch specials for Restaurant Salaam which beguile the senses, I have found my imagination to be fired by the scent of myriad spices fruits and condiments, some familiar and some entirely new.
Olives, for example, are an old friend. I apparently, from the day when I could first chew, took to olives as if I had grown up playing under the gnarled branches of ancient olive groves. But for the longest time, the only olives I knew were the standard pimento stuffed cocktail olives common to all of the US, or the very bland, somewhat tinny-tasting and characterless black olives of California.
It wasn’t until I started eating and cooking Greek foods that I discovered the beauty of the deep violet-black Kalamatas–rich, fruity, with a dank bitterness layered over an intense salty-sweet taste that made me break out in a lustful sweat from my first bite. Until I tasted my first Kalamata, I only had Paula Wolfert’s word that a diversity of olives existed in the world, each variety delightful in its own way.
Paula Wolfert is the cookbook author who introduced me to the true cooking of both the Western and Eastern Mediterranean regions when I was in high school and early college. I devoured her recipes, reading them over and over, until, when I finally could get ingredients and cook them, I pretty much knew them by heart and didn’t have to consult the cookbook. Her descriptions of the dishes were so eloquent and accurately written that I knew exactly what each dish was supposed to taste like, such that I always knew if I was right on the money with my cooking, or heading towards disaster. I may have now and then headed toward the “Cliffs of Despair” with one or two of Wolfert’s recipes, but thanks to her clear writing, I never went over–I always was pulled back from the edge by her firm authorial voice, and I always managed to cook myself out of any corner thanks to her guidance.
Anyway, now that I am thoroughly introduced to olives, I cannot help but try as many of them as I can get my hands on, and tend to have several different sorts of them in my refrigerator at any given moment. One of the easiest ways to get me interested in a new dish is to tell me that there are olives and garlic in it. Then, I cannot help but take notice.
I am also fond of lemons, but I am sad to say that until I started on my journey of discovery along the path of the cuisines of the Silk Road, I had not felt the need to really encounter preserved lemons.
They are a common enough ingredient in Moroccan cuisine–so common in fact, that most people make them up in large jars at home. Plenty of bloggers have written about making preserved lemons–the only ingredients are lemons, salt, lemon juice, a jar and time. They are simple, really.
But, I had avoided them–for whatever reason–I am not sure why. It makes no real sense, honestly–I had a jar of two of them I had bought at World Market years ago and had carried about from kitchen to kitchen for years. But I never opened them.
Until I decided to make this salad, inspired by the writings of Claudia Roden, another best-beloved cookbook author.
I had found the recipe that sparked this one in her newest cookbook, Arabesque, which highlights the foods of Turkey, Morocco and Lebanon. It was for a dish of spinach sauteed with olive oil, garlic, olives and preserved lemon rind, which is then served cold.
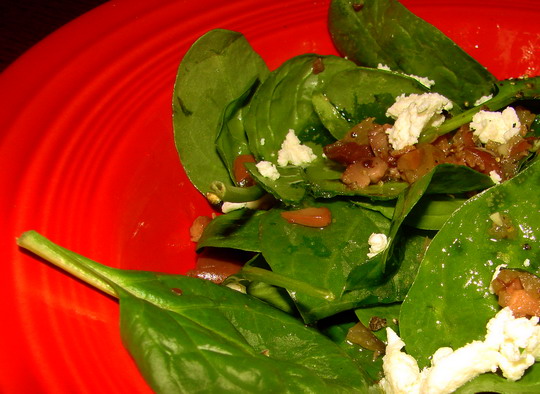
But since Zak doesn’t care for cooked spinach in most cases, I got the idea to use fresh raw spinach, and then chop together the olives, garlic and lemon rind, then dress the whole carefully with olive oil and a squeeze of lemon juice. I finished it off with dots of very fresh, very tangy local goat cheese, and a sprinkle of toasted pine nuts.
It was not exactly what Roden was writing about, mind you, and was not authentic in the least, but the flavors were blossoming with fragrance and power–it was a salad that made you want more with every bite. That is why I call it Moreish–the combination of flavors from the preserved lemons, olives and garlic is just classic, but the addition of the goat cheese sends it way over the top. And serving this delectable combination over velvety raw spinach is a great contrast in color, flavor and texture, as the spinach retains its both soft and crisp nature, while the chopped up preserved lemon, olives and goat cheese are all differing degrees of softness.
It was just damned good, is what it was.
So, now I need to make myself a jar of preserved lemons. I made a big jar of them for work today, but I need some at home, too, because I sense that they are going to become great friends of mine in the kitchen, alongside my faithful, companionable olives.
Moreish Moroccan Salad with Olives, Preserved Lemon and Goat Cheese
Ingredients:
2 preserved lemons, rinds removed, flesh set aside for another purpose or discarded
1/2 cup good black olives–Moroccan oil cured are best, but Kalamatas or other high quality black olives will do–rinsed if necessary
1 small clove fresh garlic, peeled
1 tablespoon minced fresh mint leaves
1/8 cup fresh soft, tangy goat cheese, crumbled
1/2 pound fresh baby spinach, washed and dried
1/4 cup extra virgin olive oil–choose a very fruity or peppery one
juice of 1/2 lemon
1/4 cup freshly toasted pine nuts–toast in a dry skillet over medium heat, shaking nuts until they brown evenly and become fragrant
Method:
Chop the preserved lemon rinds and olives together roughly until pieces are about the size of your pinky fingernail or half that size. Mince the garlic clove together with the mint leaves, and toss with the lemon rinds and olives. Allow to sit at room temperature for about an hour to allow flavors to mingle.
Lay the spinach leaves together in a serving bowl, and scatter the preserved lemon rind and olive mixture over them. Drop the pieces of goat cheese evenly over the top, and drizzle with the olive oil and lemon juice.
Sprinkle with the pine nuts, then, just before serving, toss gently with salad spoons to evenly distribute the lemon olive mixture, along with the olive oil and lemon juice.
Serves four.

Categories:
- Admin (rss) (55)
- Blogs and Blogging (rss) (81)
- Book Reviews: Cookbooks (rss) (43)
- Book Reviews: Non-Cookbook Food Books (rss) (38)
- Cats and Cat Blogging (rss) (47)
- Chinese Cooking Lessons (rss) (32)
- Culinary School Stories (rss) (18)
- Dairy Pruducts: Cultured and Barbaric (rss) (4)
- Documentary Filmmaking (rss) (1)
- Essays, Rants and Reflections (rss) (260)
- Fighting Hunger (rss) (12)
- Food and Kids (rss) (45)
- Food in the News (rss) (126)
- Food Media (rss) (98)
- Food Preservation (rss) (18)
- Food Safety (rss) (45)
- Gardening (rss) (30)
- Herbs and Herb Blogging (rss) (20)
- Holidays (rss) (50)
- Kat Blogging (rss) (22)
- Kitchen Science (rss) (36)
- Leftover Makeover (rss) (8)
- Life, the Universe and Everything (rss) (131)
- Local and Sustainable (rss) (227)
- Local Athens Food and Foodies (rss) (42)
- Meatless Mondays (rss) (32)
- Menu For Hope (rss) (5)
- Nutrition, Diet and Health (rss) (84)
- On The Farm (rss) (8)
- Recipes: Almost Vegetarian, Vegetarian and Vegan (rss) (294)
- Recipes: American Regional (rss) (37)
- Recipes: Appalachian Hillbilly (rss) (33)
- Recipes: Bread, Pasta, Grains (rss) (95)
- Recipes: Canning and Preserving (rss) (8)
- Recipes: Chinese (rss) (123)
- Recipes: Comfort Food (rss) (120)
- Recipes: Cookies (rss) (16)
- Recipes: Desserts (rss) (48)
- Recipes: French (rss) (25)
- Recipes: Fruits and Vegetables (rss) (302)
- Recipes: Greek, North African and Middle Eastern (rss) (31)
- Recipes: Indian (rss) (137)
- Recipes: Italian (rss) (42)
- Recipes: Japanese (rss) (7)
- Recipes: Jewish (rss) (4)
- Recipes: Korean (rss) (6)
- Recipes: Meat, Poultry and Fish (rss) (220)
- Recipes: Mexican/Native American/ Latin American/Caribb (rss) (27)
- Recipes: Original (rss) (108)
- Recipes: Thai (rss) (27)
- Recipes: Tofu (rss) (17)
- Recipes: US Regional (rss) (16)
- Recipes: Vietnamese (rss) (8)
- Restaurant Stories (rss) (28)
- Sewing, Quilting, Arts and Crafts (rss) (16)
- Simple Chinese Recipes (rss) (30)
- Slow Food and Heritage Foods (rss) (10)
- Spice Blogging (rss) (44)
- The Chinese Cookbook Project (rss) (14)
- The Chinese Pantry (rss) (39)
- The Documentary (rss) (2)
- The Kitchen Saga (rss) (17)
- The Locavore's Bookshelf (rss) (15)
- The Unsung Adventures of The Culinary Nerd (rss) (6)
- Tools and Toys (rss) (35)
- Uncategorized (rss) (10)
- With a Side of Politics (rss) (48)
Archives:
- August 2012 (9)
- July 2012 (12)
- September 2011 (3)
- August 2011 (7)
- July 2011 (8)
- June 2011 (16)
- May 2011 (17)
- April 2011 (11)
- December 2010 (9)
- November 2010 (5)
- February 2010 (1)
- December 2009 (5)
- November 2009 (7)
- October 2009 (10)
- September 2009 (16)
- August 2009 (14)
- July 2009 (14)
- June 2009 (7)
- May 2009 (17)
- April 2009 (10)
- March 2009 (25)
- February 2009 (13)
- January 2009 (10)
- December 2008 (5)
- November 2008 (5)
- October 2008 (6)
- September 2008 (13)
- August 2008 (8)
- July 2008 (11)
- June 2008 (18)
- May 2008 (13)
- April 2008 (14)
- March 2008 (16)
- February 2008 (17)
- January 2008 (19)
- December 2007 (25)
- November 2007 (18)
- October 2007 (24)
- September 2007 (16)
- August 2007 (15)
- July 2007 (15)
- June 2007 (10)
- May 2007 (14)
- April 2007 (16)
- March 2007 (17)
- February 2007 (20)
- January 2007 (13)
- November 2006 (1)
- October 2006 (8)
- September 2006 (14)
- August 2006 (25)
- July 2006 (30)
- June 2006 (28)
- May 2006 (34)
- April 2006 (29)
- March 2006 (24)
- February 2006 (30)
- January 2006 (38)
- December 2005 (40)
- November 2005 (37)
- October 2005 (32)
- September 2005 (25)
- August 2005 (30)
- July 2005 (28)
- June 2005 (21)
- May 2005 (8)
- April 2005 (22)
- March 2005 (17)
- February 2005 (29)
- January 2005 (10)
Search Site:
Links:
- Lily’s Wai Sek Hong
- 101 Cookbooks
- A cat in the kitchen
- A Veggie Venture
- Accidental Hedonist
- Cha Xiu Bao
- chez pim
- Chocolate & Zucchini
- Chopstick Cinema
- Chowhound.com
- Chubby Hubby
- Cook sister!
- Cooking with Amy
- da*xiang
- Eat Local Challenge
- Eating Liberally
- Ecocentric
- Eggbeater
- Epicurious
- Farmgirl Fare
- Fatfree Vegan
- Foodgoat
- ForkandBottle.com
- Green Olive Tree
- Hooked on Heat
- Jaden’s Steamy Kitchen
- Kalyn’s Kitchen
- Lucullian delights
- Mahanandi
- Matt Bites
- MeatHenge
- mmm-yoso!!!
- New York Times – Dining & Wine
- Pizza Goon
- Rasa Malaysia
- Ruhlman
- Sailu's Kitchen
- Serious Eats
- SF Gate: Food & Dining
- Simply Recipes
- Soul Fusion Kitchen
- Tastespotting
- The Amateur Gourmet
- The Cleaner Plate Club
- The Food Section
- The Grub Report
- thecookscottage
- U.S. Food Policy
- Wandering Chopsticks
- Washington Post Food and Dining
- Wasted Food
Meta:

Powered by WordPress. Graphics by Zak Kramer.
Design update by Daniel Trout.
Entries and comments feeds.