Cook Local, Eat Global
Preserving the Local Harvest: A General Introduction to Pressure Canning
This year’s Eat Local Challenge revolves around preserving the harvest, and like eating locally, this is something I do just as a natural course of events. When I told Morganna what the theme of this year’s challenge was, she said, “But what is the big deal–everyone knows about canning and freezing, don’t they?”
Well, in West Virginia, where we both grew up, yeah, a lot of folks know all about preserving food. That is because agriculture and self-sufficiency are still extent parts of Appalachian culture; what Morganna didn’t understand was that not everyone grew up like we did. So, she said I should write about what it is like to can salsa or something, just to give readers a glimpse of home canning on a small scale.
If you have been following my blog for a while, you know that I have written about making fresh marinara and pesto and freezing them along with freezing fresh chiles, I have made kimchi, and Hunan salted chilies.
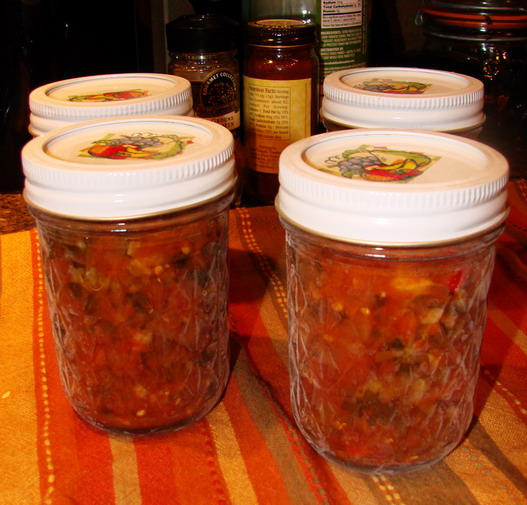
This year, since I bought a ten quart pressure cooker to replace my old and worn out seven quart one, I realized that it was large enough that I could do some small batch canning in it. Very small batch, in that it can only process four half pint jars at a time, but that is something. Enough to tide me over until I can get a real pressure canner for my birthday in October, at least.
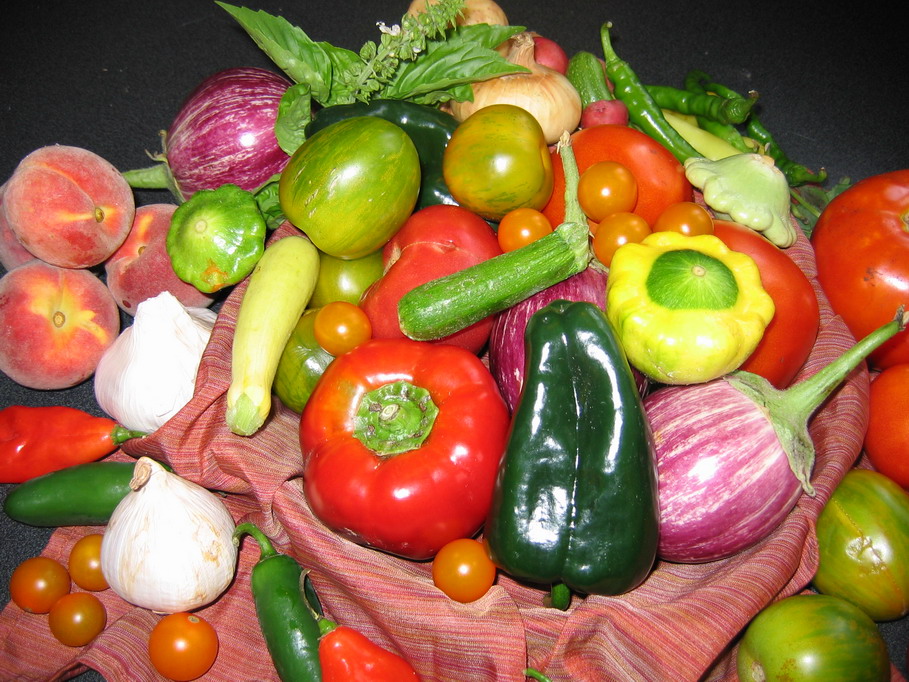
So, I bought about four pounds of plump, juicy heirloom tomatoes at the farmers market (Mr. Stripey, Green Zebra, Brandywine and Black Krim were the varieties, if you are curious) and made a batch of my Calico Salsa with them along with some beautiful sweet and hot peppers in shades of yellow, orange, red, green and purple, along with local purple onions, elephant garlic and cilantro, and set about preparing to can it. (The only non local ingredients in this batch of salsa, by the way, are the limes and the salt.)

I grew up helping my grandmother freeze, can and ferment her harvest, and I know what a lot of work it can be. Long hours I spent in the garden, the kitchen and the basement (she had a stove and sink down there, and we often canned there because being underground–it was cooler down there.) Sometimes, however, we’d run upstairs to the regular kitchen and downstairs to the basement kitchen, because we had different batches of stuff processing in each kitchen. Preserving the harvest can give you a really good aerobic workout–especially if you are putting up huge batches like we used to–a hundred quarts of tomatoes at a time, for example, or thirty pints of strawberry jam.
But when you can only work with four pints of anything at a time, one is forced to work in small batches, and that is a bit less worrisome. But, you still need a few special tools to use your pressure cooker to can and the photograph above illustrates some of them.
That odd set of tongs is a jar lifter–you use that to take the sterilized jars out of boiling water, and the sealed jars out of the canner. These guys are going to be your best friends when it comes to canning–so get a pair and don’t even try to use a set of tongs or silicone potholders or something equally silly. Pressure canners push water up to 240 degrees F.–and you DON’T want to touch glass that has been bathing in that. The burn you would get is beyond nasty. Just get a jar lifter and avoid the pain.
There is also a strange looking little blue plastic wand thing–that has a magnet on the end, and is used to pick up the flat sealing lids out of the sterilizing water. I remember back in the day when they didn’t have those magnet thingies yet, trying to get those lids out of the water. It was a right pain in the butt, so be grateful for the magnetic revolution and get your magic wand and use it, too. That clear stick thing next to the wand is a tool used to remove trapped air bubbles in your food product before putting on the lid. Trapped air interferes with the seal on the lid, and that is super bad juju for canning. You want a really, really good seal, otherwise you are courting foodborne illness.
You can also see the widemouthed funnel–get one of those, too. It keeps you from slopping hot food product all over the clean jars, your counter, yourself, the floor, your foot–you get the picture. Get one. They are cheap. Heck, they are so inexpensive, Grandma had three of them. Which helped if we were canning two different things at once, or we just had a huge batch to pack in jars–that let three of us pack at the same time.
Oh, and you need a pressure cooker or canner to do pressure canning. To pressure can in a pressure cooker, you need it to have at least a ten quart capacity. Mine is a ten quart cooker by Fagor, You will also need a canning rack to fit in your cooker to basically keep your jars off the bottom of the pot and from banging against each other. Fagor markets a canning kit for its ten quart cooker that includes all of the tools mentioned above in one box, along with a special instructional manual for canning in your pressure cooker.

Once you have all of your tools at the ready, washed in hot soapy water and rinsed well, you need to look into getting some canning jars.
And when I say canning jars, I mean jars made specifically for canning. Don’t think you can be clever and recycle mustard and mayonnaise jars. I mean, you -can- do it–but it isn’t a good idea to do it, even if you can get sealing canning lids to fit those jars, and here is why.
Canning jars are tempered very specifically to be used over and over again. They are made to be strong, and not to crack, chip or break easily. They are made to withstand the high temperatures and pressures of a pressure cooker or canner over and over again.
Recycled commercial condiment jars are made to withstand high heat and pressure ONCE. After that, they may put up with being reused in a pressure canner a few times, but you never know when one will crack, chip or bloody well burst in your cooker, and believe me, you don’t want to clean that up. So, just plain old don’t go there. Beg, borrow or buy real live canning jars.
Ball makes most of the canning jars sold in the US–okay, well, no it doesn’t really. Not anymore. But why do all the canning jars in the stores say “Ball” on them? Because the home canning jar business was sold off from Ball, but instead of changing the name, the new company kept it, because of the years of tradition and consumer trust built up behind Ball products. But anyway, most of the canning jars in the US are going to say “Ball” on them, and they are usually pretty inexpensive, and quite well made. My Grandma’s Ball (and Kerr) canning jars are still going strong after being used and reused for about, oh, in some cases, seventy years or so. That is pretty impressive. So, go out and get yourself some canning jars. If you are going to do a lot of canning and preserving, they are well worth the investment.
That said, there are other brands out there. Kerr makes good jars, (they should be–they are made by the same company that makes Ball jars now–Jardin Corporation) and you can also find pretty European styled canning jars like Leifheit in some stores and through online retailers. The really pretty ones would make containers for home-made goody gifts, if you want to share the bounty after you have successfully canned your first batches of produce.

Before you use your jars, you need to take them out of their packaging and undo the rings and flat lids. The rings are reusable multiple times–they are good until they rust and corrode, which depending on how well they are treated can take years. The flat lids which are what seals your food up and keeps it preserved, can only be used once. Don’t get some bizarre idea in your head that you can use them again, because I will have to come crawling through this Internet connection and whump you upside your silly head. That is the path to bacteria, botulism and death, right there. Don’t go there. Buy new lids every time. Heck, if you hauled off and tried to use lids twice, the spirit of my Grandma might just have to come and haunt you for the rest of your life–she lectured me so many times on the safety aspects of canning, which she took seriously. VERY seriously. And you should, too.
After you have taken them apart, run your fingertips over the rim of your jars. They should be absolutely smooth and perfect, free of chips, cracks and rough spots. If there are any defects in the rim, DO NOT USE THE JAR. Why? Because if there is a defect with the rim, the lid won’t seal and if the lid won’t seal, you will surely perish. It is as simple as that. A nick in the rim of a canning jar=death. Keep that in mind. Make sure that the rest of the body of the jar is free of cracks as well.
{I realize that I have probably horrified my readers into never trying to can. Please stick with me, and give it a shot sometime–it is a serious business, canning, but it is also well worth it. And trust me–anyone can do it, if they just have the right equipment and tools, treated properly, fresh ingredients, and attention to detail blended with patience.)
After you have inspected the jars wash them, the lids and rings in hot soapy water and rinse very well with cool water. You don’t want to leave any detergent residue in your jars or lids–that might make your food taste a bit weird. We wouldn’t want that.
After they are washed, just set them on the counter on clean dishcloths to dry.
At this point you need to prepare your food item for processing. Please use approved recipes for pressure canning and follow the instructions exactly. There are lots of really good books out that have recipes suitable for canning, (some of which I will be reviewing soon) and usually your pressure cooker or canner will include a booklet of recipes to start out with. You can change a few things about the recipes–like you can add more garlic and less olive oil for example, but remember, do not reduce acidic components, as they are part of the preservation process. In fact, it is just best to follow recipes until you really have a lot of experience with canning and understand why recipes are formulated the way they are.
For hot packing your food, it has to have been brought to a boil, and then taken down to a simmer before packing the jars.
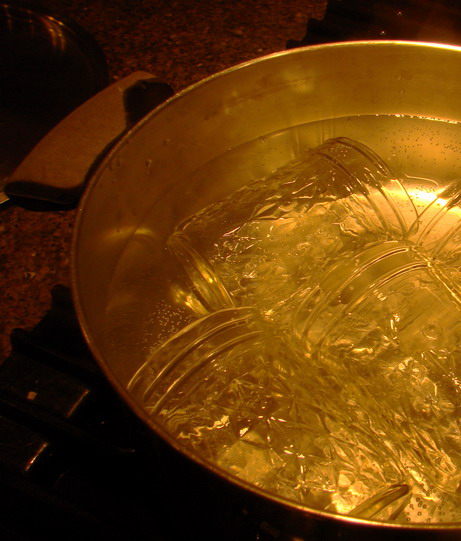
While the food is cooking, bring two pots of water, along with am extra pot or kettle of water, to the boil. One pot must be big enough to hold your jars, and the other one is meant to hold your flat lids (you don’t need to sterilize the rings by boiling them–in fact it is easier to deal with them at room temperature.) Bring the water to a boil in the pot for the lids, and then turn down the heat to a simmer. Add the lids, and allow them to simmer for at least five minutes. Do not let them boil–the heat from boiling water can mess up the sealing compound on the edge of the lids. The larger pot for the jars–that one can boil. I tend to let it heat to just below a simmer, and then put the jars in, making certain that they are completely covered with water. Once the jars are in the pot, bring the water to a boil.
Once the jars and lids are sterilized and the food is prepared and hot, you are ready to start filling the jars. Take a clean ladle (my Grandma used to sterilize her ladle and wide-mouth funnels, too, btw–whether you do or not is up to you–some books say to, some do not) and the funnel and have them ready. Take your jar lifter, and pick a jar up out of the water, tipping it to the side to empty it of the boiling water. Be careful and don’t splash yourself with boiling water. That hurts. Nah–I don’t know about that from experience or anything….

Set the steaming hot jar down on a folded clean dishtowel. If you put it on your cool or cold counter top, you risk the temperature difference putting a crack in the glass, especially if you are using a jar that has been used over and over and over for years. (Glass, no matter how well tempered, eventually gets tired after years of hard work–just like people.) I saw my Mom put a hot jar on a ceramic counter once, and yep, broke in half. Fortunately, the ladle of boiling tomatoes she was about to ladle into it hadn’t gone in yet, or she would have had some nasty burns on her bare feet. (Grandma always tried to tell her to wear shoes in the kitchen, but Mom seldom wears shoes for any reason–yep–she is a hillbilly–and proud of it!)
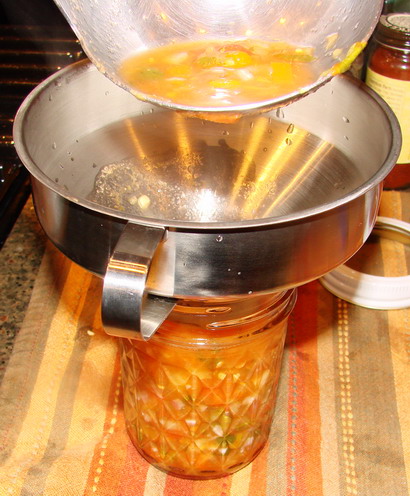
Pop your wide mouthed funnel in the top of the jar and ladle your food into it. Be sure and leave the specified amount of headroom at the of the jar. It will be specified in the recipe, but in general, jams and jellies need 1/4 inch of space at the top, acidic foods need about a 1/2 inch and non-acidic foods take a full inch. Run the little plastic air-bubble removal tool around the edge of the food from the top to the bottom, all the way around. Remove the funnel and wipe off the rim of the jar with a damp clean cloth, then pick up a lid from the simmering water with the magnetic wand and dry it with the clean cloth. Set it on top of the jar, center it well and then carefully screw on the ring. Do not tighten it overmuch–air needs to escape during the sealing process while the jar is in the canner. On the other hand, the ring shouldn’t be so loose that it doesn’t hold the lid in place on the jar–then water can enter the jar and mess up the food. So–you tighten the ring enough to hold the lid into place but not so much that you’d have to work hard to open it back up.
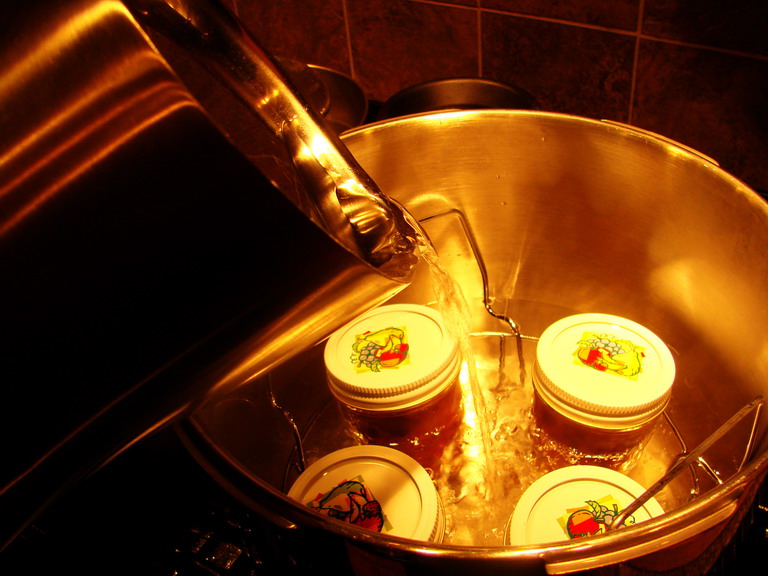
Then, take your kettle full of boiling water, and pour it into the pressure cooker or canner which already has the jar rack in place. Using the jar lifter, set the jars on the rack. Bring the heat up to high under the cooker/canner, and then, if you need to, add more boiling water so that the jars are covered by one inch of water. Be sure to aim the water so that you are pouring in the center of the pot, not directly on the jars, thus avoiding shocking the glass. Again, if you are using older jars which have been used over and over, you can potentially have one crack or break by having boiling water poured directly on it. This is one of those times when the new electric kettles that boil water super fast is quite useful–I mean they are already great for making fast pots of tea or French press coffee, but they are also super for adding boiling water to a canner. But you can use whatever you have to boil water–just be sure and have some ready to top off your pot.
Then, you make certain that the water in the canner/cooker is on a full rolling boil. When it is, put the lid on, lock it into place, and set the pressure to high. Once the pressure indicator shows that it is sealed and pressure is at full, turn the heat down to medium or low–whichever will keep the pressure up, and set the timer for the amount indicated by the recipe. (For my salsa, it was a full thirty-five minutes at full pressure.)
Then, you can leave the pot alone, and just check back on it now and again as needed.
When the timer goes off, turn the heat off under the pressure cooker/canner and allow the pressure to reduce naturally. Do not either use the cold water method of bringing the pressure down quickly or open the steam valve to hasten the process. This is a sure way to crack or break the jars. Just let the pressure come down naturally–which takes about twenty minutes with most pressure cookers.
After the pressure indicator shows that the pressure has normalized, unlock and open the lid. Look inside at your jars and see if anything has gone obviously awry. It probably hasn’t, so don’t fear–but it never hurts to check anyway. Then, let the jars sit in the still hot water for about fifteen minutes while the water cools. After that, you can take them out with the jar lifter and set them once more on a clean folded dishtowel. Leave them for about eighteen hours undisturbed.
After that, you need to check the seal on the jars. The jar lids should be slightly concave (sunken toward the inside of the jar) and there should be no give or movement up and down on them when you press them. Open the rings and check the seal on the edges–there should be no gaps, leaking or food seepage along the edges. Then put the rings on and tighten them well, and label and date your jars.
For safety’s sake, it is best to use home canned foods within a year. We ate Grandma’s stuff that was up to five years old, but she had been canning literally tons of food her entire life–she was the child of farmers who married a farmer, and she lived through the Depression and the second World War, so she really was an expert.
For a really great online source of information on canning, check out Jardin’s website, Fresh Preserving. If you need more direct help, please call your county extension office; the agents who work there are experts in all matters regarding food preservation safety. They are there to help you and will be able to answer your most urgent questions quickly and easily.
I hope this introduction hasn’t scared anyone off from trying to can at least a few jars of salsa or tomatoes for the winter. This month is the time for it, and I think that even if you just do small batches in a pressure cooker like I did, you are still taking more of a step toward food independence and who knows–maybe next year, you will jump into canning on a larger scale and really make yourself some food which is fresh, local and kept edible and safe for consumption months later!
Besides, it always gives a great sense of accomplishment to look at rows of home canned foods which you know are tasty and good for you, because you know exactly what went into them.
What is Up With the Cupcake Thing?

Sometimes human beings confuse me.
Okay, I will amend that. Not all humans confuse me–just most of them.
And it isn’t sometimes–it’s most of the time.
So, let’s just start this over, shall we?
Most of the time, I find the behavior of most human beings to be quite confusing.
Take the case of the cupcake.
Cupcakes have become suddenly trendy, (okay, in truth, this trend is not that new–it has been going on for a couple of years now, but I have resisted talking about it thus far, so let’s call it sudden) trendy to the point that there exists an entire blog written about nothing but cupcakes. Actually, the truth is, there was one blog written about cupcakes, but now there are lots of them. Everywhere you look someone somewhere is baking, eating, talking about, writing about and obsessing over cupcakes. There are highly successful bakeshops dedicated completely to the cupcake in major metropolitan areas
across the country.
You can even order cupcakes online to be shipped to you, you know, just in case you don’t live near one of those cupcake bakeries. (And the bakeries near you don’t make good cupcakes, and you are either too lazy or too baking-challenged to make your own.)
I don’t know why, but there you have it. Cupcakes are the “It” dessert of the twenty-first century.
They are a cultural phenomenon.
But I haven’t written about this trend, which has been going strong for about two years now, because, well, I just don’t get it. And I didn’t really want to be the curmudgeonly one to pop a pin in the balloon and take all the fun away.
I mean, I’m far from a cupcake hater–so before people get all het up over this little essay, let it be known now and henceforth that while I don’t see what it is about cupcakes that could possibly cause all of this cultural phenomenon stuff, I am not anti-cupcake. I just don’t bloody well get it.
I mean cupcakes are nice–I won’t turn one down. They taste good, well–I mean, if they are made from good ingredients, they taste good. And they can be very pretty and all, but really–I don’t get why someone would want to spend three dollars or more on one. Or write about them all the time–or make a wedding cake out of a mountain of them. (I especially don’t get that, because they can go stale so easily–and I don’t like thinking about decorating each one, then transporting them to the location of reception, and then assembling them without horrible accidents happening along the way. I mean, wedding cakes are scary enough to transport and assemble without death and destruction–can you imagine three hundred cupcakes? It gives me hives, I tell you, hives.)
But I have stayed out of the cupcake thing because I don’t want people to think I don’t take their passions seriously. I write about Asian food, local food and why it is important to recognize that meat comes from animals, and that if you can’t deal with it, you shouldn’t eat it. If other folks want to write about cupcakes all the time or make them all the time or even eat them all the time-who am I to say “Talk to the hand?” Nobody, that’s who, so I just stayed a silent supporter of the cupcake fans of the world, while being quietly bemused by all of the fuss.
But as of today, my silence on the issue of cupcakes is officially broken. Why?
Because I read this New York Times piece on how parents are getting up in arms over some school systems decreeing that elementary school kids cannot bring in cupcakes for birthday parties.
That was the crumb that broke this cupcake-neutral writer’s back.
It was too much. I had to say something.
In “Don’t Even Think of Touching That Cupcake,” author Sarah Kershaw relates that now that boards of education are cracking down on junk food sold in schools, cupcakes are in dire straits. They have been banned from some classrooms, even if they are brought in by a child to share on his or her birthday.
Wha?
Look, I am all about getting the soda and candy machines out of the hallways and the trans fats and fast food out of the lunchrooms. I understand the limitation on sending candy goodie bags for Halloween and Valentine’s Day. I understand why some schools are banning kids from bringing peanut butter sandwiches from home–some other kids might be so allergic to peanuts they’d just haul off and die from accidentally getting a tiny smudge of it on their own lunches. I get that.
I even get the wisdom of cutting down on the number of sugar-laden bake sales and candy sales used to support the school choir and band, though I am not sure how to make up those funds. In fact, I am not too sure how school systems should make up the funds lacking from those candy and soda machines, but, well, that isn’t what I am talking about.
I am talking about cupcakes. Brought from home. By a kid. To share. On his or her. Birthday. Dammit.
And a cupcake every now and then has never hurt anyone.

Now, don’t start in with me about the obesity crisis in the US. I am well aware of it. I know, I know, that we are seeing more incidences of Type II diabetes in kids than we have ever seen it before. I know. I know. And lots of kids eat too much fast food and drink too much soda and don’t have any gym classes, so they are on the less than slender side. I know.
But, look. The fat and sugar police are going too damned far here. Or at least, I think they might be. I might be wrong. But, back when I was in school, we had plenty of kids bring cupcakes on their birthday, and we ate them, and were happy, and very few of us were fat. We weren’t! In fact, we sometimes had treats donated by the local ice cream place, and we ate those. Ice cream. In school.
But then, those were -treats-. They were an every-now-and-then sort of thing. We didn’t eat sugary stuff every day in school. And our school lunches were not too bad–especially not in grade school. Back then, the lunch ladies actually did some cooking, and their rolls, chili, pizza and chicken soup were something to be excited about. And the mashed potatoes started out from potatoes, not from boxes–they were really tasty.
And most of us drank milk–not soda every day. Soda was a treat, too, for most of us.
Oh, and the other difference–is we had recess and gym every day. EVERY DAY. Until high school. And then we could only get out of it in our senior year, and only if we took some egghead classes like Chemistry II or Anatomy and Physiology. Like, if you wanted to get out of gym, you had better be ready to either cut apart a fetal pig and play with its innards, or huddle over a Bunsen burner doing qualitative analysis for months on end. (Needless to say, I took the egghead route: dead pigs and reagents were much more interesting than one more game of dodgeball or one more attempt to break my neck on the balance beam. I didn’t just get called The Culinary Nerd for no reason, you know.)
I don’t know. I just feel like yeah, we need to get the junk food out of the schools, but can’t we also get the kids moving again? Get them into some physical activities–and not just afterschool sports, but stuff in school, too. That way, it won’t just be the jocks who use their bodies and burn calories, but the nerds and everyone else, too. That way, there will be some balance, right?
That way, if a kid does bring some cupcakes to share with the class on her or his birthday–it won’t be such a big deal. It will be a treat–not an every day event.
But maybe I am wrong. Maybe there should be a zero tolerance policy for sugary foods in our schools.
I think that being that hard line about it smacks of nutritional fundamentalism, and frankly, I think it stinks just as much as political or religious fundamentalism and is just as dangerous.
Why?
Because whatever we make sinful, and take away from our kids will become that much more attractive to them.
You watch.
We will be raising generations of kids who worship cupcakes in a way that will make the current faddish devotion to them seem quaint by comparison.
But I am not worried–too many parents are getting their panties in a wad over the proposed cupcake bans to the point that pro-cupcake language has to be added to rules disallowing sugary snacks that go before various PTAs for votes. Otherwise, they wouldn’t pass.
I find that heartening, but also somewhat surreal.
And I come back to where this essay started–I find most people confusing most of the time.
All of this hullabaloo over a simple cupcake….
Early Autumn Soups for Baby and Everyone Else

Now that Kat is a year old, she is eating less and less “baby food,” and pretty much eats either a ground up or minced or chopped up version of what we are eating, particularly for dinner. Her breakfast is still oatmeal with fruit and yogurt, and for lunch she tends to have some of what I am eating, if I remember to eat or else, she has some of the following: egg yolk blended with a bit of mayonnaise, some whole cooked peas, some goat cheese, some noodles with either Chinese seasonings or a dab of marinara sauce or some chopped up cherry tomatoes. These foods she can feed to herself, and she does so with great glee and gusto.
But at dinner time, she has resisted eating “baby foods,” and instead insists upon eating whatever it is we are eating, whether it is a fiery curry or Sichuan stir fry, that is what she wants. She has an amazing capacity to eat spicy and highly flavored foods, and will cry if we do not give her whatever it is we are eating.
But, still, I want to make certain that she gets enough fats in her diet, and most of the stir fries I cook are very low in fat.

Babies and all growing children, for that matter, need much more fat than adults do. Not only is it used in the formation of healthy skin, hair and connective tissues, it is also necessary for good brain growth. Many people are not aware that brain cells are made up of fats, but it is true, so it is imperative not to restrict the fat intake of children while their brains are forming. Especially “good” fats such as those found in wild caught salmon, avocados, coconuts, egg yolks from pasture-raised poultry, and dairy products from grass-raised goats and cows.
Since Kat refuses to drink milk if it doesn’t come from Mamma, I have been sneaking dairy foods to her in different ways, usually by adding yogurt, cream, or cheese to various foods or by giving her bits of cheese to eat while I am cooking and she is watching from her perch in the highchair. Cheese is a favorite food of hers, and her absolute favorites are the freshly made local chevre that we can get at the farmer’s market and imported Parmesan grated into tiny flakes.
Two recipes I have come up with specifically for Kat, but which the rest of us have decided to eat as well are two soups which have dairy products sneaked into them in the form of cream or butter, and which feature the flavors of India. Kat loves them, and they are great for adult palates as well, and best of all, they are absolutely simple to make.
Cream of Curried Carrot Soup is a simple mixture carrots, potatoes, onions and garlic cooked in vegetable broth, then seasoned with curry powder and garam masala and a bit of salt. It is a variant on the myriad versions of pureed vegetable soups popular throughout France which I learned to make in culinary school. The only real deviation from the French method is the use of Indian spices as the seasoning. Cream is added at the end, after the vegetables are pureed, along with a tiny knob of butter, which gives the lovely russet orange soup a smooth texture and lush flavor which neither Kat nor any of the rest of us can resist.

As the autumn progresses, I suspect I will make many other creamy soups for Kat, including butternut or acorn squash, sweet potato and parsnip soup, celeriac and spinach and creamy borscht. The possibilities for main ingredients and flavorings are limited only by local availability of ingredients and the imagination of the cook–I recommend these as a way to eat more vegetables and love them at the same time. The amounts of cream or butter are negotiable–you don’t need to use much to get the benefit of them, but you can also use less if you worry about your waistline, though I am of the opinion that a bit of creamy soup is fine once and a while. You can also vary the flavor by using yogurt, sour cream or creme fraiche instead of cream and butter–borscht, in fact, should be made with sour cream.
Everything in moderation.
The second soup is nothing more than a vegetable broth-thinned red lentil and mung bean dal spiced with a tarka of butter, onions, sweet bell peppers, garlic, asafoetida and panch phoron. For a fresh flavor, I added fresh Green Zebra tomatoes cut into a tiny dice and minced cilantro at the end, making this spicy concoction a hymn to the early autumn bounty of southern Applachia, even though the methods, flavors and main ingredients are classically Indian. It can be left thick and served with rice, or thinned and used as a soup; either way it is utterly delicious, and is a favorite of both Kat and Morganna. I think that the next time I make it, I will add some grilled corn cut from the cob for extra texture and sweetness. (Every time I grill corn for dinner, I make extra and cut it from the cob to be used in various recipes, or I pack the kernels into ziplocks and chuck them into the freezer. Then I have them all winter long to add smoky sweetness to whatever I want.
Other autumn vegetables which could be added to the dal/soup would include minced kale, collards or mustard greens, finely diced turnips, carrots or parsnips, fresh mushrooms, and cross-ways sliced half-runner green beans or whole fresh baby lima beans.
Both of these soups cook quickly–in about thirty-five to forty-five minutes, usually, and the preparation time is minimal, about fifteen minutes. Whatever is not used right away can either be kept in the refrigerator for about four days or it can be frozen for several months. They are a wonderful way to use the bounty of late summer and early fall, while creating easy recipes beloved of both the toothless toddlers and the discriminating teens among us.

Early Autumn Red Lentil Dal with Panch Phoron
Ingredients:
2 cups red lentils
1 cup split skinned mung beans
1 tablespoon dried ground turmeric
1 1/4 quarts vegetable broth or chicken stock
3 1/2 tablespoons butter or butter ghee
3/4 cup finely diced onions
1/2 cup finely diced red sweet pepper
1 1/2 tablespoons panch phoron
2 tablespoons finely minced garlic
1 pinch asafoetida
salt to taste
water or vegetable broth as needed for thinning the dal–optional
fresh tomato cut into a small dice
1/2 cup minced fresh cilantro
yogurt for serving–optional
Method:
Pick over lentils and beans, removing any dirt clods, tiny rocks, sticks or other bits of debris. Rinse lentils and mung beans thoroughly, and drain in a colander. Add to a pot, along with turmeric and broth. Bring to a boil over high heat, turn down the heat and simmer uncovered until the lentils and beans have cooked into a slightly lumpy puree.
Melt butter in a skillet over hight heat. Add onions and sweet peppers and cook, stirring until the onions are medium gold in color. Add the panch phoron and keep cooking for about thirty seconds. Add the garlic and asafoetida and cook until the spices brown and become very fragrant, the onions have turned a reddish brown and the mustard seeds in the panch phoron begin to pop.
Pour this tarka into the lentils and beans and stir to combine. Add salt to taste. If you want a thinner soup, add some broth to thin it out at this time.
Just before serving, mix in the tomato and cilantro and then serve with yogurt to be added on top if diners wish.

Cream of Curried Carrot Soup
Ingredients:
2 pounds carrots, peeled and cut into small slices
1/2 pound potatoes, peeled and cut into small dice
1/2 pound onions, peeled and roughly chopped
2 tablespoons garlic, minced
1 teaspoon ground dried turmeric
1 1/2 quarts vegetable broth or chicken stock
salt to taste
freshly ground white or black pepper to taste
curry powder to taste (I like Penzey’s Sweet Curry Powder)
garam masala to taste (I used my own fresh house blend, but Penzey’s Punjabi Style is good, too)
1/4 cup heavy cream
1 tablespoon butter–optional
minced cilantro for garnish–optional
squeeze lemon or lime juice–optional
Method:
Put carrots, potatoes, onions, garlic, turmeric and broth into a pot and bring to a boil. Turn heat down to medium and allow to simmer uncovered until the vegetables are fork tender. Make sure you can insert and remove a fork easily from the vegetables.
Using an immersion blender or a regular blender, puree the soup smoothly, leaving no lumps. Immersion blenders make this simple, because you can just take the pot off the heat and blend right in the pot. No need to make a mess trying to get hot vegetables and broth into a blender jar.
Add salt and pepper to taste, then flavor soup to your taste with the curry powder and garam masala. I like mine heavy on the spices, but you may not–so do as you like with it. Blend in the cream and butter, and correct seasoning if needed.
Stir in cilantro before serving, and if you like add a sqeeze of lemon or lime juice to the soup just before serving or serve with lemon or lime wedges on the side for diners to add as they like.
From the New York Times: More on Why Local Food is Important (and other good news…..)
Alice Waters On Choosing Produce and the Local Food Revolution
Alice Waters has been at the forefront of a revolution in American food for the past thirty-six years. After she returned from her time in France, inspired by the fresh foods and simple ways of preparing them to which she had become accustomed, she opened Chez Panisse, her Berkley restaurant which emphasizes fresh, exquisite foods. Unsatisfied by the fresh produce then available, she began working with local farmers and even had a garden planted specifically to provide fresh lettuces, herbs and other vegetables to her restaurant. From there, she went on to other projects, including her groundbreaking Edible Schoolyard where elementary school kids grow their own lunches, and science and social studies projects take place in the garden.
Many other chefs, once critical of Waters’ philosophy, saying it was more about shopping than cooking, have come around, and among food professionals, there is a growing respect for the freshest ingredients, chosen at the peak of flavor and nutritional value.
In “Lunch With Alice Waters”, NY Times food writer Kim Severson invites Waters to take her shopping at the Union Square Greenmarket and then return to her apartment to cook a lunch of fresh, local ingredients together.
Waters used recipes from her forthcoming book, The Art of Simple Food: Notes, Lessons and Recipes From a Delicious Revolution (due out this October), which Severson says is both beautiful and maddening. Waters prefers doing a lot of hand work with a mortar and pestle instead of using electric appliances like blenders and food processors; this stymied Severson. The results of the recipes, however, were delicious, so Severson allows as to how Waters may have a point.
The article is an interesting look at the philosophy and personality of one of America’s leading proponents of the nascent local food revolution, and is well worth the five minutes it takes to read. Waters has the uncompromising integrity of a revolutionary, and so she sometimes comes across as a food fundamentalist; however, hers is the sort of fundamentalism I can get behind.
Editorial: Antibiotic Runuff
This editorial from the Times points out yet another problem with industrial meat production through confined animal feeding operations–the fact that the overuse of antibiotics in animal feed has started to create bacteria which are resistant to broad-spectrum antibiotics such as tetracycline.
I remember when I was back in college as a journalism student, reading a report buried in the back pages of the newspaper that a medical doctor had raised questions about the then fairly new practice of pumping healthy animals full of antibiotics in order to keep them from getting sick. The residues from these antibiotics would be in the meat, the doctor postulated, and could result in bacteria which would be resistant to these antibiotics, thus creating human health dangers. I used this article as an example of the sort of topic I wanted to cover in an investigative piece for my final project, but it was rejected by my old school professor, who said there was “no story there.”
I wish he had been right, and I had been wrong.
The issue covered in this editorial is about the fact that manure runoff from hog CAFOs contaminated with antibiotic residue has entered our groundwater, creating a perfect breeding ground for tetracycline-resistant bacteria. This poses a significant environmental health risk, to say the least, and is yet another reason why I refuse to buy meat from CAFO operations.
Good News From the NY Times
This is good news for bloggers, researchers and newshounds everywhere: as of today, the NY Times is abolishing their internet subscription service known as Times Select. Now all opinion columns and archives from 1987 to the present day are available without having to pay subscription fees.
That is cool. I can go back to reading Bob Herbert and Paul Krugman again.
Kimchi Noodle Soup
The theme of this year’s Eat Local Challenge is “Preserving The Harvest,” and I thought that I could use this opportunity to not only make up a few more batches of kimchi and Hunan salted chilies, but also highlight a few recipes using these delicious lactic-acid fermented vegetables.
Lactic acid fermentation is an ancient method of preserving vegetables for the winter in both the East and the West. In China, this method, which involves salting vegetables, with or without the addition of ginger, garlic and chile peppers, and then leaving them in covered crocks to allow the naturally occurring lactobacillis bacteria to begin fermentation, is used to make all sorts of pickled and preserved vegetables, from mustard greens to giant radishes. Koreans use this method to make all different sorts of kimchi, and in France, Germany and Austria, cabbage, both green and red, is fermented into saurkraut.
All of these fermented vegetables are important in the diets of people who live in cold climates, not only because they provide vitamins (especially vitamins C and A) and vegetable roughage in the winter months when the world is covered with ice and snow, but because these deliciously tart, salty pickles are filled with beneficial bacteria which help ward off viral infections. In the times before central heating and flu shots, viral illnesses killed millions, so naturally health-giving foods like kimchi were very important to people’s diets. And frankly, these foods are still important, because really, I would rather eat kimchi than get a flu shot.
Kimchi I trust. Flu shots–eh, not so much.
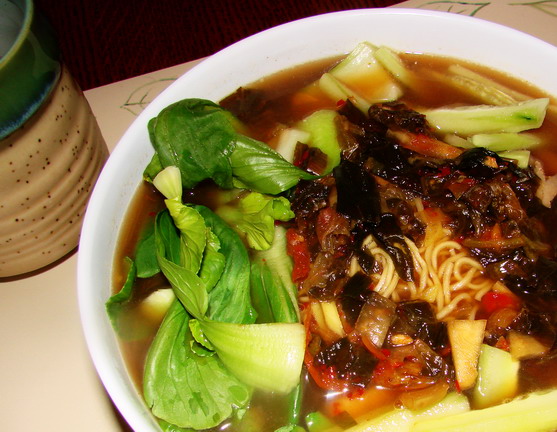
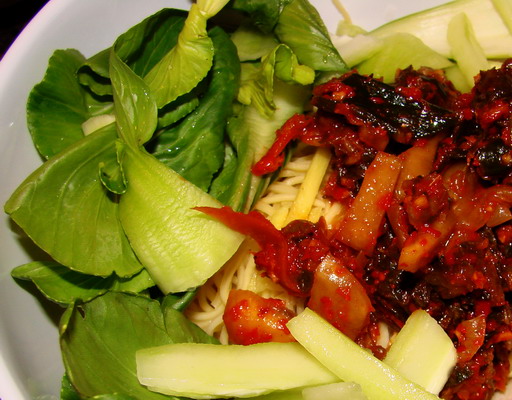
Back to the topic at hand–a recipe using kimchi, which I admit is neither wholly Korean, nor Chinese, but is an amalgam of the two. It is a noodle soup which is similar in flavor and style to a traditional Chinese noodle shop favorite, shredded pork and fermented mustard greens soup, but which uses shredded kimchi instead of the traditional Chinese pickled mustard greens. I also used some bits of roast pork instead of stir frying fresh pork with the greens along with some onions, ginger and garlic, and for a broth, I used my Chinese chicken and pork stock. I added fresh baby bok choy and some thinly cut sticks of seeded cucumber for crunch and a fresh sweetness that contrasted beautifully with the kimchi. The noodles I used were some fresh egg noodles that took all of about forty five seconds to cook in boiling water.
It went together simply into a quick local dinner, in large part because I had the big jar of kimchi in the fridge, a batch of roast pork I had already cooked and packed up in portions for the freezer, and the stock already made and frozen in quart-sized containers. I am a big believer in cooking ahead and either stocking the freezer or pantry with staples like stocks, sauces, preserved vegetables and pre-cooked meats so that I can make my very own fast foods in no time. All I had to do tonight was shred up the cucumber, wash and core the bok choy, and bring the stock to a boil, then cook the noodles. After that, it is nothing but assembly.
How did it taste?
Quite good, actually–I think I will add it to my arsenal of winter cold fighting soups. It was quite spicy, and the broth was rich with a deep meaty flavor. The sweetness of the Chinese roast pork went well with the salty kimchi and the greens were fresh and bittersweet. My favorite part, though was the cucumber; I loved the slightly cooked texture–it is smooth and cool as jade, but still lightly crisp, with a rich velvety quality. Even better is the fact that I cannot imagine a sore throat or cold being able to stand up to the ginger, chile, garlic and friendly bacteria in the kimchi, nor the sinuses being able to resist the drainage potential of rich chickeny broth fragrant with pungent aromatics. It will be a knockout healing potion, I bet.
One of the best parts about this dinner was how local it was; the main components of it–the vegetables in the kimchi, as well as the fresh vegetables, all came from Athens county, while the chickens and pork came from both here and from near Columbus. Only the Chinese condiments used to flavor the pork, kimchi and soup stock, came from elsewhere.
Oh, and one more note–Kat really liked this soup broth, even though it was very spicy. She would point at my bowl and say, “Ma1” quite emphatically, which is her way of saying, “Mom–give me some of that.” So, I put a tiny bit of the broth in my soup spoon, blew on it and then held it for her to sip. Which she did.
Then, much to our and her Uncle Dan’s amusement, her eyes opened wide, and she held her mouth open, sucking air. Her eyes bugged half out of her face, and her skin turned red around them, and her nose started to run. I gave her a sip of water, which she guzzled, and then, I figured she would either start to cry or just avoid the broth from then on.
No way. Instead, she set her sippy cup down on her high chair, pointed at the bowl again, and gasped out, “Ma!” Then, with a very determined and overly emphatic point, she repeated, loudly, “Ma1 Ma!”
I gave her another sip and she slugged it down, and the eye-popping and mouth dropping routine repeated, much to our amusement. Then, she had a sip of water and grinned at me like a maniac, and started pointing at the bowl again, proclaiming, “Ma! Ma! Ma!!!!”
The endorphine rush had hit.
A chili-head is born.
Stay tuned for more on Chinese noodles, preserving the harvest and other culinary adventures.
Kimchi Noodle Soup
Ingredients:
2 quarts Chinese chicken and pork stock, seasoned for soup (or, you could use 2 quarts chicken or vegetable broth, seasoned to taste with soy sauce, Shao Hsing wine or sherry and sugar)
1/2 pound fresh or dried Chinese egg noodles, cooked as described here
1/4 pound Chinese roast pork (char siu), thinly sliced (or, you could use extra firm tofu and/or dried rehydrated black mushrooms…mmm…)
4 baby bok choy, cored and rinsed
1/2 cup well-fermented kimchi, shredded or chopped roughly
1 small cucumber, peeled and seeded, then cut into thin strips
1 teaspoon sesame oil
Method:
Set out two or three noodle bowls.
Bring soup stock to a boil.
Divide cooked noodles evenly between the bowls, and top with the pork, bok choy, kimchi and cucumber. Drizzle with the sesame oil.
Pour boiling soup stock over the noodles and garnishes to cover them, and allow the fresh greens to wilt slightly as you carry them to the table.
Serve with strong fermented tea like pu er or smoked tea like lapsang souchong.

Categories:
- Admin (rss) (55)
- Blogs and Blogging (rss) (81)
- Book Reviews: Cookbooks (rss) (43)
- Book Reviews: Non-Cookbook Food Books (rss) (38)
- Cats and Cat Blogging (rss) (47)
- Chinese Cooking Lessons (rss) (32)
- Culinary School Stories (rss) (18)
- Dairy Pruducts: Cultured and Barbaric (rss) (4)
- Documentary Filmmaking (rss) (1)
- Essays, Rants and Reflections (rss) (260)
- Fighting Hunger (rss) (12)
- Food and Kids (rss) (45)
- Food in the News (rss) (126)
- Food Media (rss) (98)
- Food Preservation (rss) (18)
- Food Safety (rss) (45)
- Gardening (rss) (30)
- Herbs and Herb Blogging (rss) (20)
- Holidays (rss) (50)
- Kat Blogging (rss) (22)
- Kitchen Science (rss) (36)
- Leftover Makeover (rss) (8)
- Life, the Universe and Everything (rss) (131)
- Local and Sustainable (rss) (227)
- Local Athens Food and Foodies (rss) (42)
- Meatless Mondays (rss) (32)
- Menu For Hope (rss) (5)
- Nutrition, Diet and Health (rss) (84)
- On The Farm (rss) (8)
- Recipes: Almost Vegetarian, Vegetarian and Vegan (rss) (294)
- Recipes: American Regional (rss) (37)
- Recipes: Appalachian Hillbilly (rss) (33)
- Recipes: Bread, Pasta, Grains (rss) (95)
- Recipes: Canning and Preserving (rss) (8)
- Recipes: Chinese (rss) (123)
- Recipes: Comfort Food (rss) (120)
- Recipes: Cookies (rss) (16)
- Recipes: Desserts (rss) (48)
- Recipes: French (rss) (25)
- Recipes: Fruits and Vegetables (rss) (302)
- Recipes: Greek, North African and Middle Eastern (rss) (31)
- Recipes: Indian (rss) (137)
- Recipes: Italian (rss) (42)
- Recipes: Japanese (rss) (7)
- Recipes: Jewish (rss) (4)
- Recipes: Korean (rss) (6)
- Recipes: Meat, Poultry and Fish (rss) (220)
- Recipes: Mexican/Native American/ Latin American/Caribb (rss) (27)
- Recipes: Original (rss) (108)
- Recipes: Thai (rss) (27)
- Recipes: Tofu (rss) (17)
- Recipes: US Regional (rss) (16)
- Recipes: Vietnamese (rss) (8)
- Restaurant Stories (rss) (28)
- Sewing, Quilting, Arts and Crafts (rss) (16)
- Simple Chinese Recipes (rss) (30)
- Slow Food and Heritage Foods (rss) (10)
- Spice Blogging (rss) (44)
- The Chinese Cookbook Project (rss) (14)
- The Chinese Pantry (rss) (39)
- The Documentary (rss) (2)
- The Kitchen Saga (rss) (17)
- The Locavore's Bookshelf (rss) (15)
- The Unsung Adventures of The Culinary Nerd (rss) (6)
- Tools and Toys (rss) (35)
- Uncategorized (rss) (10)
- With a Side of Politics (rss) (48)
Archives:
- August 2012 (9)
- July 2012 (12)
- September 2011 (3)
- August 2011 (7)
- July 2011 (8)
- June 2011 (16)
- May 2011 (17)
- April 2011 (11)
- December 2010 (9)
- November 2010 (5)
- February 2010 (1)
- December 2009 (5)
- November 2009 (7)
- October 2009 (10)
- September 2009 (16)
- August 2009 (14)
- July 2009 (14)
- June 2009 (7)
- May 2009 (17)
- April 2009 (10)
- March 2009 (25)
- February 2009 (13)
- January 2009 (10)
- December 2008 (5)
- November 2008 (5)
- October 2008 (6)
- September 2008 (13)
- August 2008 (8)
- July 2008 (11)
- June 2008 (18)
- May 2008 (13)
- April 2008 (14)
- March 2008 (16)
- February 2008 (17)
- January 2008 (19)
- December 2007 (25)
- November 2007 (18)
- October 2007 (24)
- September 2007 (16)
- August 2007 (15)
- July 2007 (15)
- June 2007 (10)
- May 2007 (14)
- April 2007 (16)
- March 2007 (17)
- February 2007 (20)
- January 2007 (13)
- November 2006 (1)
- October 2006 (8)
- September 2006 (14)
- August 2006 (25)
- July 2006 (30)
- June 2006 (28)
- May 2006 (34)
- April 2006 (29)
- March 2006 (24)
- February 2006 (30)
- January 2006 (38)
- December 2005 (40)
- November 2005 (37)
- October 2005 (32)
- September 2005 (25)
- August 2005 (30)
- July 2005 (28)
- June 2005 (21)
- May 2005 (8)
- April 2005 (22)
- March 2005 (17)
- February 2005 (29)
- January 2005 (10)
Search Site:
Links:
- Lily’s Wai Sek Hong
- 101 Cookbooks
- A cat in the kitchen
- A Veggie Venture
- Accidental Hedonist
- Cha Xiu Bao
- chez pim
- Chocolate & Zucchini
- Chopstick Cinema
- Chowhound.com
- Chubby Hubby
- Cook sister!
- Cooking with Amy
- da*xiang
- Eat Local Challenge
- Eating Liberally
- Ecocentric
- Eggbeater
- Epicurious
- Farmgirl Fare
- Fatfree Vegan
- Foodgoat
- ForkandBottle.com
- Green Olive Tree
- Hooked on Heat
- Jaden’s Steamy Kitchen
- Kalyn’s Kitchen
- Lucullian delights
- Mahanandi
- Matt Bites
- MeatHenge
- mmm-yoso!!!
- New York Times – Dining & Wine
- Pizza Goon
- Rasa Malaysia
- Ruhlman
- Sailu's Kitchen
- Serious Eats
- SF Gate: Food & Dining
- Simply Recipes
- Soul Fusion Kitchen
- Tastespotting
- The Amateur Gourmet
- The Cleaner Plate Club
- The Food Section
- The Grub Report
- thecookscottage
- U.S. Food Policy
- Wandering Chopsticks
- Washington Post Food and Dining
- Wasted Food
Meta:

Powered by WordPress. Graphics by Zak Kramer.
Design update by Daniel Trout.
Entries and comments feeds.