Cook Local, Eat Global
Indian Stuffed Vegetables
One of the most beautiful things about the CSA box is that it is like Christmas once a week.
You never know what will be in it, and opening it up is like peeking into a vegetal treasure chest.
For the past several weeks, we have been getting delicious baby squashes, but last week, included in the box was a trio of lovely medium-sized yellow summer squash.
And down a couple of stalls, at the Shade River Organic Farm stall where I get my lovely tomatoes, there were the first small eggplants of the season.
I knew exactly what I would have to make: Indian style stuffed vegetables.
I used to make these for my Pakistani and Bangladeshi personal chef clients all the time, and they -loved- them.
You can use the filling mixture for absolutely -any vegetable; I have used squash, eggplant, sweet bell peppers, large chile peppers, and tomatoes in the past. I am sure that folks could come up with other vegetables to use this treatment on–just about any veggie that can be hollowed out and stuffed would work.
I use lamb in this recipe, but it is not necessary. You can leave it out entirely, and just use a little more vegetables: what I would do is roughly chop up a squash or two to take the place of the meat, and maybe at the end of the sauteing process, add some fresh or frozen green peas.
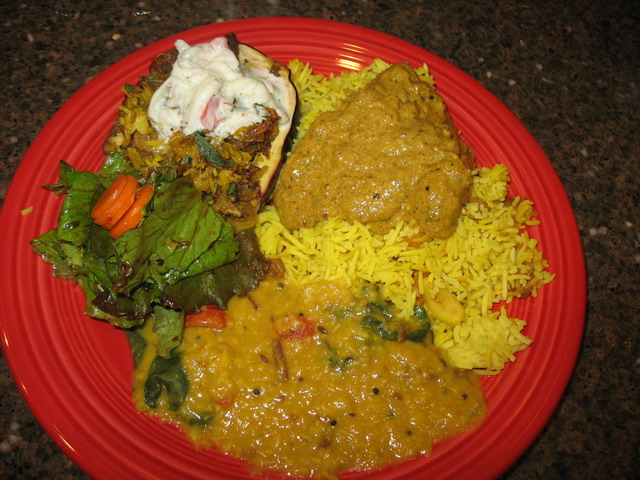
I always serve these stuffed veggies with a moist dish to go on top: my two favorites are cucumber-tomato raita with mint, cumin, salt and sometimes cilantro, and an uncooked mango chutney with chiles, sweet red peppers, cumin, red onion, garlic and cilantro. This time around, as you will be able to see in the photograph below, I made the raita, taking advantage of the fresh cucumbers and tomatoes at the market. (But, now that I think of it–I bet green chutney, otherwise known around here simply as “Green,” would be really wonderful, too.)
While my mother’s favorite version of this dish is sweet red or yellow bell peppers stuffed with this mixture (I chopped up a squash to go in the stuffing as the peppers have no edible innards to go in the stuffing) with mango chutney, I prefer the squash and eggplant variation showcased here, with the raita. I think that the flavors are more subtle and savory than the very sweet peppers with the sweet, hot and sour chutney.
In order to make this recipe, you need to make some of my keema sookh (leaving out the potatoes and green beans); however, if you are only doing one eggplant and one squash, you only need to use about 1/3 of a pound of meat mixture in it. This means several things–you can either scale down the keema sookh recipe, or use the stuffed vegetables idea as a way to use up leftover keema sookh and turmeric-tinted basmati rice.
I usually take the latter course, which is how I came up with this dish in the first place for my clients. It was a way to use up leftovers they had in their fridge to make a completely new and tastier dish–and they loved it.
Anyway, here is the recipe–I hope you will try it out, or something like it, to take advantage of all the beautiful produce that is coming out in the farmer’s markets this summer.
Indian Stuffed Vegetables
Ingredients:
1/3 of a recipe of keema sookh, minus the potatoes and green beans
1 cup basmati rice, rinsed thoroughly
1 1/2 cups water
1 tablespoon turmeric
1 squash–zucchini or yellow summer squash
1 medium eggplant
3 tablespoons canola or peanut oil or butter
1 medium onion, sliced thinly
2 cloves garlic, peeled and minced
1 teaspoon garam masala
salt to taste
handful of fresh mint leaves, minced
Method:
If the keema sookh is freshly made, set it aside to cool.
In a rice cooker, mix together rice, water and turmeric, and following manufacturer’s directions, cook the rice. When it is done, open rice cooker, fluff rice, and turn off warmer. Allow it to cool to room temperature.
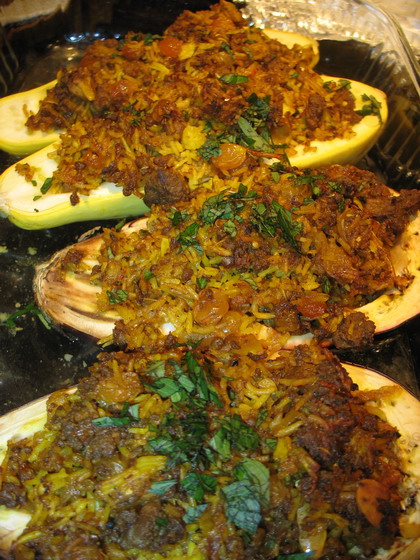
Slice vegetables in half lengthwise. To get vegetables to sit flat, before hollowing them out, cut a thin slice off the bottoms of the halves. Using a melon baller, a spoon or a lemon zester, scoop out the interior of both vegetables, leaving a shell about 1/4″ thick all around. Save the interior bits, and then when all the halves are hollowed, roughly chop the vegetable innards.
Preheat oven to 375 degrees.
Heat oil or butter in a saute pan on the stove on medium heat. Fry onions, stirring, until they are medium reddish brown. Add garlic and vegetable bits, and stir, cooking, until the squash and eggplant wilt and become transleuscent and wilt. Add the keema sookh and the rice, and stir and fry until all is well combined and fragrant. Season with garam masala and salt to taste.
Place hollowed out vegetable “boats” in a baking pan that will accommodate them all easily. Pour about 1/4″ of water in the bottom of the pan–do not let it come up to the opening of the “boats”–but you do want the bottom of the pan fully covered with water. Spoon filling carefully into the veggies, mounding decoratively and packing it lightly. Do not worry if you lose little dabs of filling into the water in the pan–it won’t burn or anything.
Cover tightly with foil and place in oven. Allow to bake for about 35-40 minutes, or until vegetables are tender and steamed through.
Garnish with a sprinkling of chopped mint leaves, and serve with raita or mango chutney to go over. Serves four as a main course, or eight if it is served with a lot of other Indian dishes, as shown here.
My New Favorite Cheese Sandwich

Don’t I know that writing about cheese sandwiches is boring, and no one wants to read about them?
Yeah, well, I guess that I don’t.
Especially since I am writing about my new favorite cheese sandwich in order to tell you about my new favorite cheese.
You see, I adore cheese. Before I ever tasted real Chinese, Thai or Indian food, there was cheese, and I loved it. I loved all kinds of it, and to this day, when it is comfort food I want and need, and I don’t reach for tom kha gai, it is most likely cheese that I will nab from the fridge, bring to room temperature, and nosh upon.
Okay, sometimes I don’t bother with the “bring to room temperature” part of the equation.
And sometimes, I use the cheese to make that most pedestrian of repasts–a cheese sandwich.
Cheese sandwiches -are- pedestrian, that is, unless you are a pregnant woman who is not also a vegan.
When one is a dairy-inhaling pregnant woman, cheese sandwiches are not boring: they are a blessed invention. They are manna from heaven. They are, especially when made with fresh, delicious, wholesome ingredients (that means, not Wonder Bread and Velveeta or–ick–Kraft Singles, folks) a quick, simple snack or hot lunch that a busy pregnant woman who is too tired to remember her name can put together in a flash, then eat, all the while secure in the knowledge that she is getting much needed calcium into her system.
So, you see my new favorite up there, don’t you? What is it made of? Well, locally grown organic tomatoes from Shade River farm, for one. Fresh lemon basil from Green Edge Gardens/Athens Hills CSA for another. The bread is the pain de campagne from our beloved local Big Chimney Bakery. And then, as you can see, delightfully melty, oozing, seductive semi-ripened raw cow’s milk cheese that I bought at the Village Bakery’s “Undercover Market,” a small but well-stocked little shop down the hill from our house that sells locally produced foods, fair trade foods and raw milk cheeses produced primarily in Ohio, though I am happy to report, they also carry raw milk cheeses from dairies as far afield as Georgia.

Like my new favorite cheese–Sweetgrass Dairy’s “Green Hill” semi-ripened, soft, raw cow milk cheese. The cheese is buttery-smooth and rich, owing to the nature of the milk given by pasture raised, purely grass-fed Jersey cows. (Milk from cows raised on grass is filled with an astonishing array of nutrients, including beta carotene, CLA (conjugated linoleic acid–a potent cancer fighting fat), omega-3 fatty acids, and vitamins A and E. Jersey cows give the richest, creamiest milk of any breed of cow.)
The cheese is amazingly delicious. A double-cream, it is similar in flavor and texture to brie, but to my taste, a little less “funky.” (Don’t get me wrong–brie put the “fun” into “funky,” and I love it, but it does tend to have a strong odor that some people find objectionable–Green Hill lacks that odor.) The cheese is great on its own, but when I first decided to pair it with the pan de campagne, lemon basil and tomatoes, I discovered that while it is milder than brie, it very easily stands up to the strong flavors of the bread, herb and tomato. Putting the open faced sandwich under the broiler at half power for three to five minutes renders the bread chewy-crisp, the cheese buttery and oozy, the basil fragrant as a citrus orchard and the tomato melty and soft. The broiling ties everything together into a cohesive whole, into a sandwich that is more than the sum of its parts.
So there we are. My new favorite sandwich made from my new favorite cheese. Take it from this pregnant woman, Green Hill cheese is a great American artisan cheese that comes from a dairy that not only makes cheese to be proud of, but they raise their cows and goats in a way that is good for the animals, good for the environment, and good for us lucky folks who get to eat their wonderful cheeses.
If you are curious and want to taste some of their cheeses for yourself, you can order them individually online here, or you can choose gift box assortments here.
I’m happy that I can just skip down the hill and pick great cheese up at the Village Bakery any time I want!
On Chiles
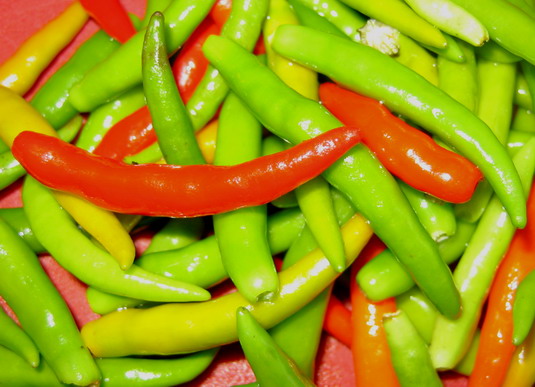
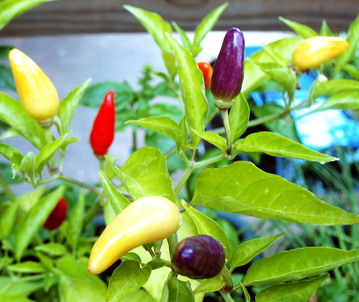
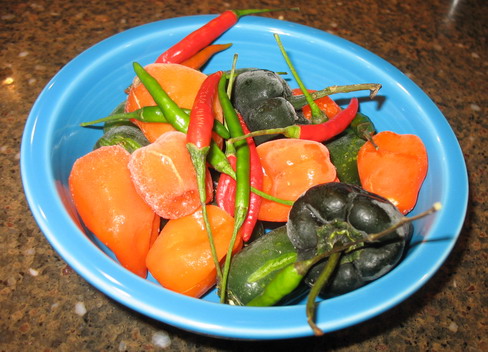
Chiles, whether fresh, frozen, roasted, dried, pickled, jellied, crushed, ground, or whole, are among my favorite flavorings in the kitchen.
I have no idea how many different chiles live in my kitchen at any given moment, nor do I know in how many different forms they are stoerd there, but I do know that I am so enamored of the flavor and flavor-enhancing qualities of the chile pepper, that I am apt to use them to flavor almost any dish, even ones that most people think should never have a spicy kick.
You know, things like brownies.
I am not sure when or why I started becoming enamored of chile heat. I do know that when I was eighteen and in college is when I first tasted real Sichuanese and Hunanese foods at the China Garden Restaurant in Huntington, West Virginia, and that is when I really started liking what the searing heat of chiles did for other foods. My passion grew from there, to the point where now, more often than not, if one eats at my house, they are going to be eating from a cuisine where chiles are used liberally and with abandon. From Thai to Indian to Chinese to Mexican to Southwestern US to Louisiania Bayou cooking–I love and crave the cookery that utilizes chiles to the fullest extent possible.
What I want to make clear is, it isn’t all just about the heat. I don’t like macho food that is just as searingly hot as possible without any sensible rhyme or reason. I don’t like spicy foods that are -just- spicy–that is boring. I love chiles that are used judiciously in combination with other strong flavors, all of the spices, herbs and seasonings working together to create a vibrant symphony on the tongue.
For example, I like the synergy that happens between chiles and garlic. The garlic enhances the natural sweetness of chiles, and the chiles catch and boost the sparkling heat of the garlic. Chiles and lime are another great pairing–the acid of the lime juice tames the heat and brings out the fruity quality of the chile, while the chile kisses the bitter edge that lime juice has and sweetens it just enough to make both flavors sing in harmony. Fish sauce and chile is a blessed union of two disparate ingredients that make the palate dance with glee–the salt and oceanic complexity of the fish sauce brings out the fruit flavors in the chile, while the chile seems to erase any lingering fishiness of the fish sauce and just makes the golden-amber fluid taste luxurious as mermaid’s treacherous kiss.
When the cook goes beyond pairings and begins to make a culinary menage a trois with chiles, the fun really begins. Add ginger to chiles and garlic and a holy trinity is born. The ginger’s floral scent and clean, brisk heat tempers the wild garlic passion and the chile’s incendiary nature. The three flavors, I am convinced, could bring the dead to life, not to mention kill the common cold. Chile, lime and Thai basil is another sacred marriage; the basil, filled with verdant sensuality, adds depth to the almost simplistic acidity of the lime juice and further enhances the fruity qualities of the chile. And when fish sauce, chile and sugar are wed, the sweetness offsets both the salt and the heat, and unifies the three flavors into an epic trilogy of mythic proportions.
So, when it comes time to present recipes for this month’s The Spice is Right event, I am hoping to see adventurous cooks mixing chiles with a variety of strong flavors, and in a myriad of culinary contexts. I hope to see appetizers, sauces, entrees, salads, drinks and desserts in this batch of entries, and if what I have seen of the entries so far is any indicator, I think that we will have a lot of fun creating new favorite flavor combinations to go with chiles.
So, remember, even though I named this month’s theme, “It’s Too Darned Hot!” it isn’t all about the heat.
It is all about the flavor.
The Shiksa Does Blintzes

The shiksa–that’s me. I call myself that because I am a goyim married to a Jewish fellow; however, I am told by all of Zak’s relatives that I most definately -am not- a shiksa.
You see, “shiksa” is a derogatory term for a non-Jewish woman or girl. I don’t take it as a derogatory when I refer to myself that way, though. I just like the way the word sounds. “Shiksa.” Rolls right off the tongue, with the soft “shhh” sound and the hard “ks.” It is one of those words you can draw out forever and give a thousand intonations to–like this: “Shiiiiiksaaa.” Or, it can be short and sweet, like it is spelled–“shiksa.” It just has an appealing sound to me for some unknown reason. (But then, I like the sound of a lot of Yiddish words, so who knows?”
So, while Zak’s family most certainly do -not- consider me a shiksa, I sstill call myself that for fun, just ‘cuz.
And every now and then, I have to haul off and try out a recipe from Zak’s Eastern European Jewish heritage, just because, well heck–a lot of that food is damned fine and tasty. (Although, strangely enough, a lot of the traditional fare, Zak hates, but I like. Like sweet and sour red cabbage, chopped chicken liver and gefilte fish. He won’t touch any of them, whereas I think they are splendid. Go figure. Who knows, maybe I really was someone’s bubbe in a past life or something.) I have already written about my take on matzoh ball soup, which I renamed “Shiksa Ball Soup” just because it sounds funny, and then I can say things like, “I bet you didn’t know shiksas had balls.”
Last night, I decided it was high time this shiksa took on the challenge of making blintzes from scratch.
What are blintzes, you goyim are probably wondering?
Well, they are like French crepes, but better. Let me tell you all about my first experience with cheese-filled blintzes way back in my college years around 1984 or so, back when there was a Jewish delicatessen in Huntington West Virginia named “Victors.” I think that little story will explain blintzes better than a clinical description could.
Back in the day, I was standing in line at Victors along with a group of friends who had all decided to go out for a corned beef sandwich and some matzoh ball soup. Mind you, we were all goyim. I wasn’t really in the mood for a corned beef on rye, so I was looking on the menu board, and I saw something called “cheese blintzes–served with your choice, sour cream or applesauce.” So, I said aloud, hoping one of my friends knew from blintzes, “What are blintzes? What kind of cheese is in them?”
A voice from behind me says, “Oy, listen to the little goy girl, wanting to know from blintzes.” I turned around and there was a stereotypical Jewish grandmother standing behind me, all round and smiling. “You want to know about blintzes?” she asked, and before I could answer, she continued, “They are only the best thing on this earth God never made.”
I raised an eyebrow. “So God didn’t invent the blintz?”
She smiled, eyes twinkling and winked. “Oh, no, honey, God didn’t invent them. A Jewish bubbe invented them, bless her for her foresight and ingenuity.”
I found myself smiling and said, “What are they?”
She patted my shoulder and said, “Oh, they are paper-thin pancakes, like crepes, only better than the French do, and filled with sweetened cottage cheese and fried in butter.”
“How can that be bad?” I said, and grinned as she nodded. “I’ll order them. Thank you.”
She smiled broadly and squeezed my shoulder again. “You’re too thin, honey, you need those blintzes–oh, and when they ask sour cream or applesauce, get both so you can figure out which you like better.”
Which is what I did.
And I was glad I did it, though I found I liked the sour cream slightly better, because, frankly, the bubbe was speaking truth–I was too thin. The blintzes would have been the first and only thing I ate that day, as I was an anorexic at the time.
So, those are blintzes–only the the best thing on this earth that God didn’t invent.
So, let’s bow our head and thank the bubbes who have been making blintzes forever and ever and start talking about making them.
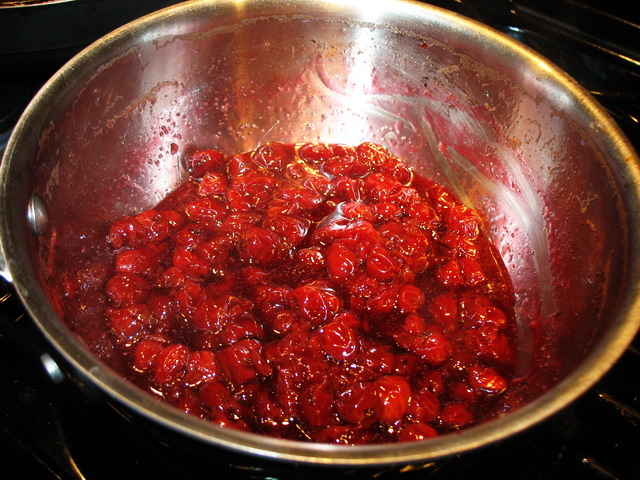
The version of blintzes I decided I wanted to make is somewhat untraditional. I wanted to fill them with sweetened cheese, of course, but I also wanted to top them with a sauce made from the fresh sour cherries which were sitting in the fridge all lonely and sad. As I did a bit of research on the net and found out that blintzes probably originated somewhere in Poland where sometimes they are filled with sour cherries, I was happy to know that my instinct wasn’t that far off from tradition.

What recipe did I use? Well, I consulted with The Molly Goldberg Jewish Cookbook, a venerable tome by radio, stage and television actress Gertrude Berg and cookbook writer Myra Waldo first published back in 1955 when the TV show “The Goldbergs” was popular. Normally, I don’t purchase cookbooks that are tied into a television or radio show, but when I bought it, it looked like a neat bit of history, and I was right.
The blintz recipe from the book also worked quite well, so I cannot complain that the recipes are not good, either. The thin pancakes came out just as Ms. Waldo and Ms. Berg promised they would, though I did add a pinch of cardamom and didn’t use butter to cook the pancakes themselves in, but instead used a tiny spritz of canola oil in my small Le Creuset frying pan just as if I was making crepes. (I still fried the filled blintzes in butter, so do not start scolding me–they turned out really well, in fact.)
The filling recipe was also accurate, though, of course, I did change it around a little. It called for two egg yolks, but considering how large my pastured eggs were and how rich the yolks are, I only used one. I also sweetened it primarily with honey and used the zest of one lemon in it, just to you, know, add my own little shiksa touch.
With the sour cherry sauce, I was on my own, so I improvised. It was simple, really, and the results were spectacular. I think you could use this sauce in place of any recipe that called for canned cherry pie filling, and the results would be far superior to the original version.

The next day, with four leftover crepes and some leftover filling, I made blueberry cheese blintzes by adding a few fresh blueberries to the filling, wrapping them up and frying them. Served with a sprinkle of powdered sugar and a scattering of blueberries, they looked lovely and tasted quite divine.
Cheese Blintzes with Sour Cherry Sauce
Ingredients for Pancakes
2 eggs
2 tablespoons canola oil
1 cup milk
3/4 cup all purpose flour
1/4 teaspoon salt
pinch cardamom
canola oil spray for cooking
Method:
Beat the eggs until well combined. Beat in oil and milk until smoothly combined. In a separate bowl, mix together flour, salt and cardamom, then whisk together until very smooth. Cover and chill for thirty minutes. The batter should come out the texture of heavy cream–if it is thicker, thin it out to the proper consistency with a bit of milk.
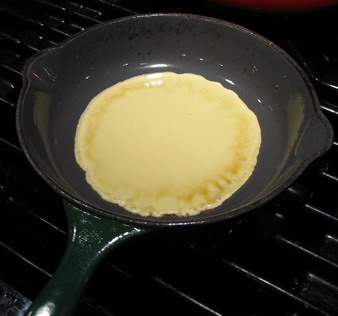
Spray a seven inch skillet (cast iron works great) with a tiny bit of canola oil. Heat it on medium heat and pour about 2 1/2 tablespoons of batter into the pan. Lift pan and turn and tip it back and forth quickly to get the batter to cover the bottom of the pan. Set back on the heat and cook until lightly browned on the bottom and fully set on the top. (There should be no liquidy bits of batter.)
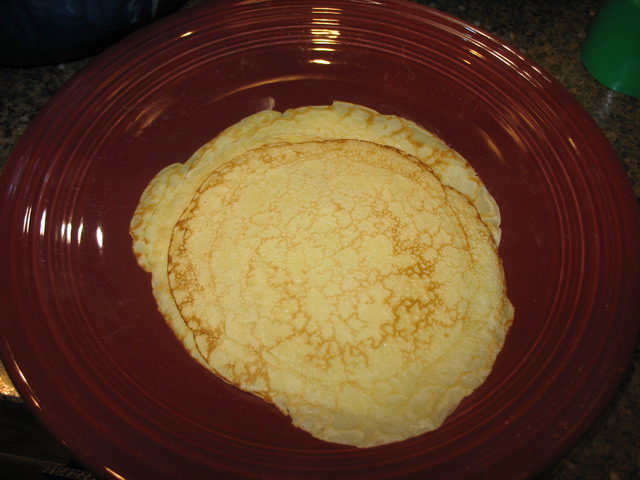
Using the tip of table knife, loosen pancake, then shake it back and forth and invert pan over a waiting plate. Smooth a stick of butter over the top of the pancake, to moisten it, and then repeat steps to cook the next pancake, and so on, and so on, until all of your batter is done. Stack them browned side up, buttering lightly between each pancake.
Method to Fill and Fry Blintzes:
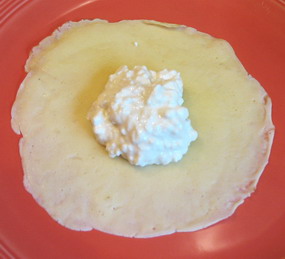
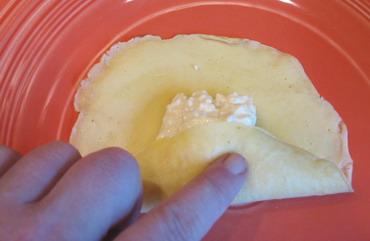
When all pancakes are done, place 1-2 tablespoons of the cheese filling on each blintz, with the browned side down to the plate and the pale side up to the filling. Turn the two opposite sides of the pancake in a bit, then roll up from the bottom to make a little roll or pillow. They should stick together to hold the blintz closed.
When all are filled, heat about three tablespoons of butter in a heavy-bottomed skillet over medium heat and fry the blintzes until lightly browned on both sides, turning them gently with a spatula.
Place on serving plate, sprinkle with powdered sugar (optional), and top with some sour cherry sauce. Serve sour cream on top or on the side.

Cheese Filling
Ingredients:
1/4 pound cream cheese, softened
1/4 pound cottage cheese
1 egg yolk
1 1/2 tablespoons honey
1/2 tablespoon sugar
1 teaspoon vanilla extract
zest of 1 lemon
Method:
Beat together all ingredients until smooth. Use as directed in recipe above.
Sour Cherry Sauce
Ingredients:
1 quart fresh or frozen sour cherries
4 tablespoons raw sugar
1 tablespoon kirsh, cherry brandy or almond extract
1/4 cup cherry juice from concentrate, reconstituted as per directions
juice 1/2 lemon
1 tablespoon cornstarch
2 tablespoons cold water
Method:
Rinse cherries well and pit. Place pitted cherries in a bowl, and sprinkle with sugar. Allow to sit and macerate in the sugar for an hour. Pour contents of bowl, kirsh, cherry brandy or almond extract (I used the extract) , cherry and lemon juices into a saucepan and cook over medium heat until liquid has reduced by 2/3, and the cherries have begun to cook down and start to lose their shape.
Dissolve cornstach in water and pour into simmering cherries. Stir until juice thickens and remove immediately from heat. Keep warm.
Note:
I liked the cherry sauce version better, but Zak liked the version with the blueberries mixed in the cheese filling and sprinkled on top better. You should try both and see which one -you like better and let me know whether Zak or I are right!
Reminder: The Spice is Right IV: It’s Too Darned Hot!
This is just a super-quickie reminder that the deadline for the next edition of The Spice is Right is coming up at midnight July 15th.
The theme this time around is “It’s Too Darned Hot!” and centers around chiles.
Lots of cuisines around the world make use of chile peppers in one form or another. Show us your favorite chile recipe, one that you make over and over, or one that everyone associates with you, or one that you just particularly like. Post it on your blog, put a link back to the rules for the event on my site (so if any of your readers want to come play, they can) by midnight July 15th, and send me an email with a link to the post, a link to your site and your name. Full rules and all that can be found here.
In the meantime, get cookin’ on something hot and sassy, and look for a couple of posts by me in the near future about chiles!

Categories:
- Admin (rss) (55)
- Blogs and Blogging (rss) (81)
- Book Reviews: Cookbooks (rss) (43)
- Book Reviews: Non-Cookbook Food Books (rss) (38)
- Cats and Cat Blogging (rss) (47)
- Chinese Cooking Lessons (rss) (32)
- Culinary School Stories (rss) (18)
- Dairy Pruducts: Cultured and Barbaric (rss) (4)
- Documentary Filmmaking (rss) (1)
- Essays, Rants and Reflections (rss) (260)
- Fighting Hunger (rss) (12)
- Food and Kids (rss) (45)
- Food in the News (rss) (126)
- Food Media (rss) (98)
- Food Preservation (rss) (18)
- Food Safety (rss) (45)
- Gardening (rss) (30)
- Herbs and Herb Blogging (rss) (20)
- Holidays (rss) (50)
- Kat Blogging (rss) (22)
- Kitchen Science (rss) (36)
- Leftover Makeover (rss) (8)
- Life, the Universe and Everything (rss) (131)
- Local and Sustainable (rss) (227)
- Local Athens Food and Foodies (rss) (42)
- Meatless Mondays (rss) (32)
- Menu For Hope (rss) (5)
- Nutrition, Diet and Health (rss) (84)
- On The Farm (rss) (8)
- Recipes: Almost Vegetarian, Vegetarian and Vegan (rss) (294)
- Recipes: American Regional (rss) (37)
- Recipes: Appalachian Hillbilly (rss) (33)
- Recipes: Bread, Pasta, Grains (rss) (95)
- Recipes: Canning and Preserving (rss) (8)
- Recipes: Chinese (rss) (123)
- Recipes: Comfort Food (rss) (120)
- Recipes: Cookies (rss) (16)
- Recipes: Desserts (rss) (48)
- Recipes: French (rss) (25)
- Recipes: Fruits and Vegetables (rss) (302)
- Recipes: Greek, North African and Middle Eastern (rss) (31)
- Recipes: Indian (rss) (137)
- Recipes: Italian (rss) (42)
- Recipes: Japanese (rss) (7)
- Recipes: Jewish (rss) (4)
- Recipes: Korean (rss) (6)
- Recipes: Meat, Poultry and Fish (rss) (220)
- Recipes: Mexican/Native American/ Latin American/Caribb (rss) (27)
- Recipes: Original (rss) (108)
- Recipes: Thai (rss) (27)
- Recipes: Tofu (rss) (17)
- Recipes: US Regional (rss) (16)
- Recipes: Vietnamese (rss) (8)
- Restaurant Stories (rss) (28)
- Sewing, Quilting, Arts and Crafts (rss) (16)
- Simple Chinese Recipes (rss) (30)
- Slow Food and Heritage Foods (rss) (10)
- Spice Blogging (rss) (44)
- The Chinese Cookbook Project (rss) (14)
- The Chinese Pantry (rss) (39)
- The Documentary (rss) (2)
- The Kitchen Saga (rss) (17)
- The Locavore's Bookshelf (rss) (15)
- The Unsung Adventures of The Culinary Nerd (rss) (6)
- Tools and Toys (rss) (35)
- Uncategorized (rss) (10)
- With a Side of Politics (rss) (48)
Archives:
- August 2012 (9)
- July 2012 (12)
- September 2011 (3)
- August 2011 (7)
- July 2011 (8)
- June 2011 (16)
- May 2011 (17)
- April 2011 (11)
- December 2010 (9)
- November 2010 (5)
- February 2010 (1)
- December 2009 (5)
- November 2009 (7)
- October 2009 (10)
- September 2009 (16)
- August 2009 (14)
- July 2009 (14)
- June 2009 (7)
- May 2009 (17)
- April 2009 (10)
- March 2009 (25)
- February 2009 (13)
- January 2009 (10)
- December 2008 (5)
- November 2008 (5)
- October 2008 (6)
- September 2008 (13)
- August 2008 (8)
- July 2008 (11)
- June 2008 (18)
- May 2008 (13)
- April 2008 (14)
- March 2008 (16)
- February 2008 (17)
- January 2008 (19)
- December 2007 (25)
- November 2007 (18)
- October 2007 (24)
- September 2007 (16)
- August 2007 (15)
- July 2007 (15)
- June 2007 (10)
- May 2007 (14)
- April 2007 (16)
- March 2007 (17)
- February 2007 (20)
- January 2007 (13)
- November 2006 (1)
- October 2006 (8)
- September 2006 (14)
- August 2006 (25)
- July 2006 (30)
- June 2006 (28)
- May 2006 (34)
- April 2006 (29)
- March 2006 (24)
- February 2006 (30)
- January 2006 (38)
- December 2005 (40)
- November 2005 (37)
- October 2005 (32)
- September 2005 (25)
- August 2005 (30)
- July 2005 (28)
- June 2005 (21)
- May 2005 (8)
- April 2005 (22)
- March 2005 (17)
- February 2005 (29)
- January 2005 (10)
Search Site:
Links:
- Lily’s Wai Sek Hong
- 101 Cookbooks
- A cat in the kitchen
- A Veggie Venture
- Accidental Hedonist
- Cha Xiu Bao
- chez pim
- Chocolate & Zucchini
- Chopstick Cinema
- Chowhound.com
- Chubby Hubby
- Cook sister!
- Cooking with Amy
- da*xiang
- Eat Local Challenge
- Eating Liberally
- Ecocentric
- Eggbeater
- Epicurious
- Farmgirl Fare
- Fatfree Vegan
- Foodgoat
- ForkandBottle.com
- Green Olive Tree
- Hooked on Heat
- Jaden’s Steamy Kitchen
- Kalyn’s Kitchen
- Lucullian delights
- Mahanandi
- Matt Bites
- MeatHenge
- mmm-yoso!!!
- New York Times – Dining & Wine
- Pizza Goon
- Rasa Malaysia
- Ruhlman
- Sailu's Kitchen
- Serious Eats
- SF Gate: Food & Dining
- Simply Recipes
- Soul Fusion Kitchen
- Tastespotting
- The Amateur Gourmet
- The Cleaner Plate Club
- The Food Section
- The Grub Report
- thecookscottage
- U.S. Food Policy
- Wandering Chopsticks
- Washington Post Food and Dining
- Wasted Food
Meta:

Powered by WordPress. Graphics by Zak Kramer.
Design update by Daniel Trout.
Entries and comments feeds.